prometheus介绍与安装
文章目录
- prometheus介绍与安装
- 一、Prometheus 简介
- 1.Prometheus 优势
- 2.Prometheus 基础架构
- 二、Prometheus 安装
- 1.后端存储配置
- 三、使用 Prometheus 实现系统监控
- 四、使用 Prometheus + Grafana 实现可视化界面
- 四.zabbix+grafana
安装部署参考http://t.csdn.cn/AcIht
一、Prometheus 简介
Prometheus(普罗米修斯)是一套开源的监控&报警&时间序列数据库的组合,由 SoundCloud 公司开发。

Prometheus 基本原理是通过 HTTP 协议周期性抓取被监控组件的状态,这样做的好处是任意组件只要提供 HTTP 接口就可以接入监控系统,不需要任何 SDK 或者其他的集成过程。这样做非常适合虚拟化环境比如 VM 或者 Docker 。

Prometheus 应该是为数不多的适合 Docker、Mesos、Kubernetes 环境的监控系统之一。
1.Prometheus 优势
易于管理:

Prometheus核心部分只有一个单独的二进制文件,不存在任何的第三方依赖(数据库,缓存等等);
唯一需要的就是本地磁盘,因此不会有潜在级联故障的风险。
强大的查询语言 PromQL:

Prometheus 内置一个强大的数据查询语言 PromQL,通过 PromQL 可以实现对监控数据的查询、聚合。
同时 PromQL 也被应用于数据可视化(如 Grafana)以及告警中。
高效:

对于监控系统而言,大量的监控任务必然导致有大量的数据产生。而 Prometheus 可以高效的处理这些数据。
可扩展:

Prometheus 支持联邦集群,可以让多个 Prometheus 实例产生一个逻辑集群;
当单实例 Prometheus 处理的任务量过大时,通过使用功能分区(sharding)+ 联邦集群(federation)可以对其进行扩展。
易于集成:

目前官网提供了多种语言的客户端 SDK,基于这些 SDK 可以快速让应用程序纳入到监控系统中,同时还支持与其它的监控系统集成。
可视化:

Prometheus Server 自带一个 UI,通过这个 UI 可以方便对数据进行查询和图形化展示;
同时还可以对接 Grafana 可视化工具展示精美监控指标。
2.Prometheus 基础架构
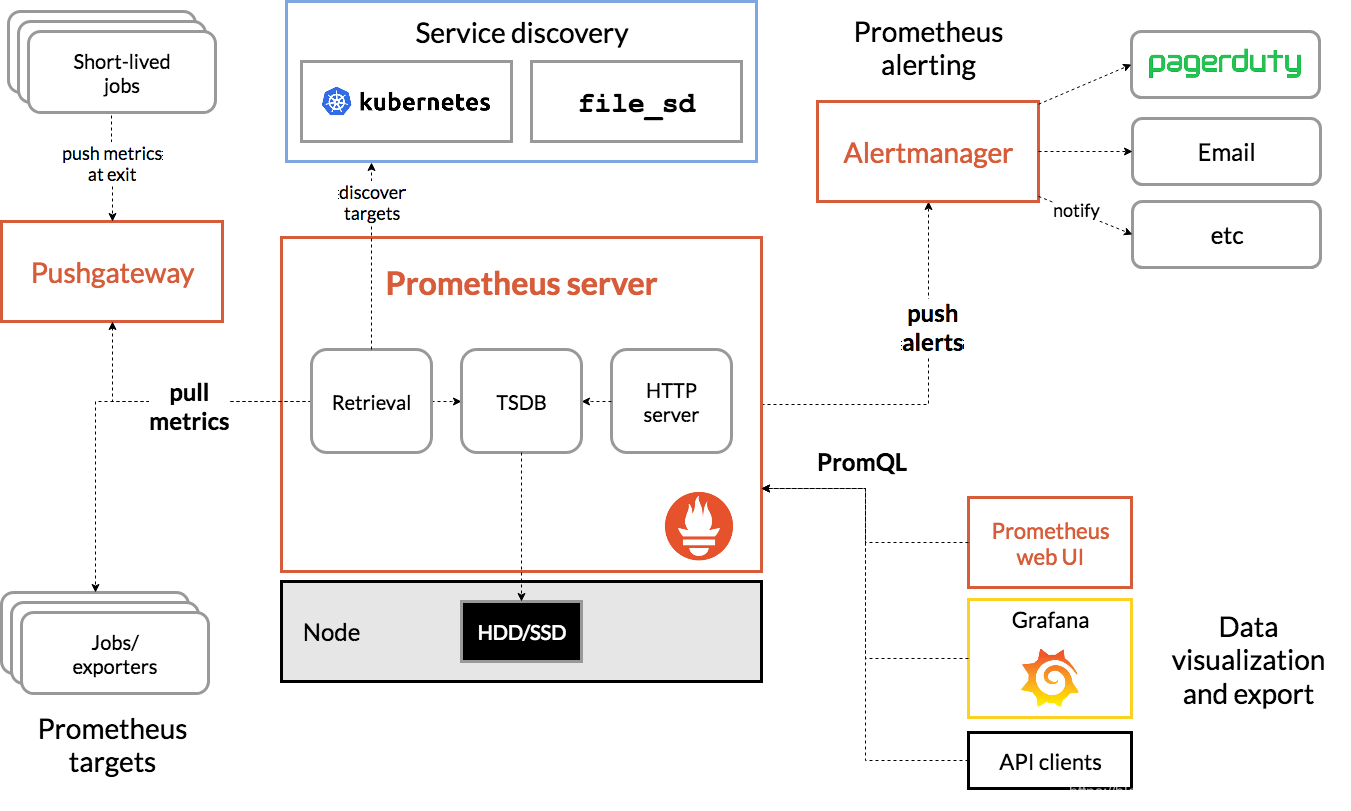
如上图,Prometheus 主要由以下部分组成:
- Prometheus:主要是负责存储、抓取、聚合、查询方面。
- Alertemanager:主要是负责实现报警功能。
- Pushgateway:主要是实现接收有 Client-push 过来的指标数据,在指定的时间间隔,有主程序来抓取。
- exporter:主要是负责采集物理机、中间件的信息。
二、Prometheus 安装
| 主机名 | 操作系统 | IP |
|---|---|---|
| prometheus | centos7 | 192.168.0.102 |
| clinent | centos7 | 192.168.0.103 |
| granfana | centos7 | 192.168.0.104 |
- 注意:在所有节点上安装 ntpdate 工具,并进行时间同步(因为 Prometheus 对时间要求非常严格)防火墙、selinux要关闭
[root@prometheus ~]# yum -y install ntpdate
[root@prometheus ~]# /usr/sbin/ntpdate ntp1.aliyun.com
 6 Jun 03:23:05 ntpdate[17368]: no server suitable for synchronization found
[root@granfana ~]# yum -y install ntpdate
[root@granfana ~]# /usr/sbin/ntpdate ntp1.aliyun.com
 6 Jun 03:23:10 ntpdate[10779]: no server suitable for synchronization found
 [root@granfana ~]# yum -y install ntpdate
[root@granfana ~]# /usr/sbin/ntpdate ntp1.aliyun.com
 6 Jun 03:23:10 ntpdate[10779]: no server suitable for synchronization found
prometheus下载地址:https://github.com/prometheus/prometheus/releases/download/v2.16.0/prometheus-2.16.0.linux-amd64.tar.gz
[root@prometheus ~]# cd /usr/src/
[root@prometheus src]# ls
[root@prometheus src]# ls
debug  influxdb-1.7.8.x86_64 .rpm  kernels  prometheus-2.37.8.linux-arm64.tar.gz
[root@prometheus ~]# cd /usr/src/
[root@prometheus src]# tar -xf  -C prometheus-2.16.0.linux-amd64.tar.gz /usr/local/
[root@prometheus src]# cd /usr/local/
[root@prometheus local]# mv prometheus-2.16.0.linux-amd64 prometheus
[root@prometheus ~]# useradd -s /sbin/nologin prometheus
[root@prometheus local]# chown -R prometheus:prometheus /usr/local/prometheus/

[root@prometheus local]# ls
bin  etc  games  include  lib  lib64  libexec  prometheus  sbin  share  src
[root@prometheus local]# cd /usr/lib/systemd/system
[root@prometheus system]# cp sshd.service promethues.service
[root@prometheus system]# vi promethues.service
[root@prometheus system]# cat promethues.service
[Unit]
Description=promethues
After=network.target

[Service]
User=prometheus
Group=prometheus
WorkingDirectory=/usr/local/prometheus
ExecStart=/usr/local/prometheus/prometheus

[Install]
[root@prometheus local]# chown -R prometheus.prometheus /usr/local/prometheus/
[root@prometheus local]# systemctl daemon-reload
[root@prometheus local]# systemctl start prometheus
[root@prometheus local]# systemctl status prometheus.service
● prometheus.service - prometheus
   Loaded: loaded (/usr/lib/systemd/system/prometheus.service; enabled; vendor preset: disabled)
   Active: active (running) since Tue 2023-06-06 05:29:58 EDT; 7s ago
 Main PID: 17511 (prometheus)
   CGroup: /system.slice/prometheus.service
           └─17511 /usr/local/prometheus/prometheus

Jun 06 05:29:58 prometheus prometheus[17511]: level=info ts=2023-06-06T09:29:58.909Z caller=main.go:335 vm_limits="(soft=unlimited, h...mited)"
Jun 06 05:29:58 prometheus prometheus[17511]: level=info ts=2023-06-06T09:29:58.910Z caller=main.go:661 msg="Starting TSDB ..."
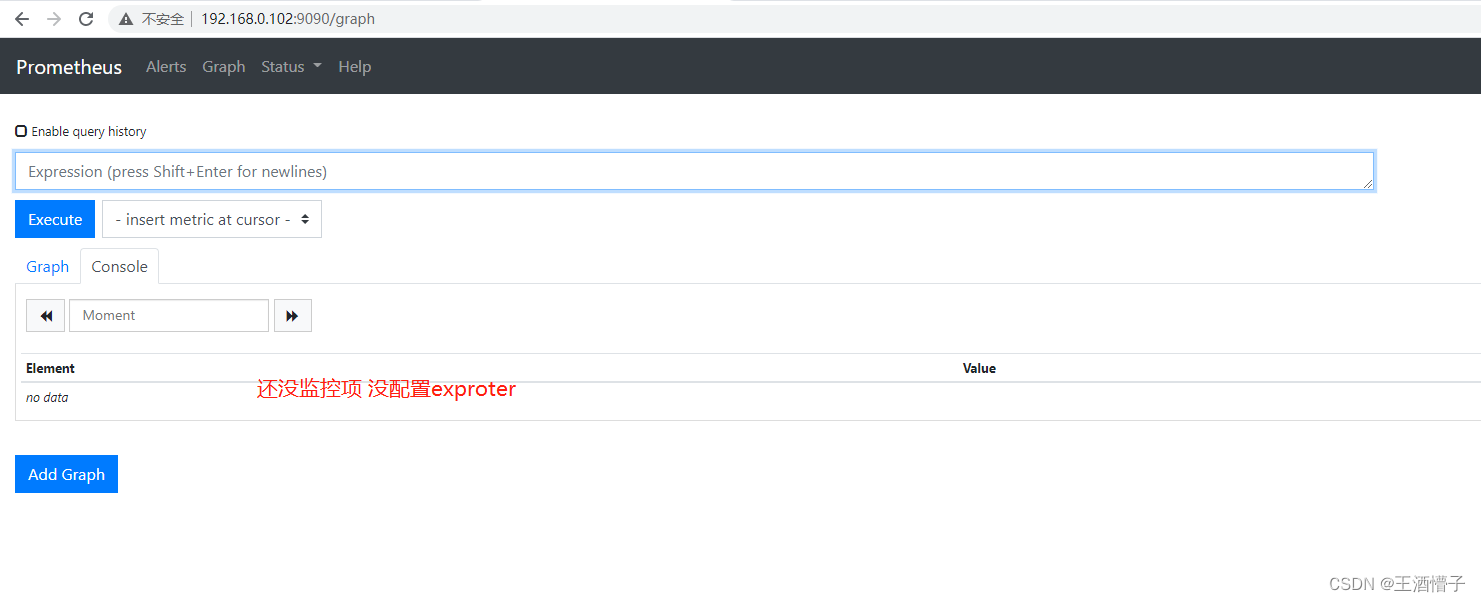
当启动 Prometheus 后,便可以通过 9090 端口来访问 Prometheus 自带的 UI 界面
1.后端存储配置
- 默认情况下 Prometheus 会将采集的数据存储到本机的
/usr/local/prometheus/data 目录,存储数据的大小受限和扩展不便; - 所以这里使用 influxdb 作为后端的数据库来存储数据。
- 下载地址:https://dl.influxdata.com/influxdb/releases/influxdb-1.7.8.x86_64.rpm
[root@prometheus src]# yum -y install influxdb-1.7.8.x86_64\ .rpm
[root@prometheus src]# cp  /etc/influxdb/influxdb.conf /etc/influxdb/influxdb.conf.bak //进行备份
[root@prometheus src]# systemctl enable --now influxdb
[root@prometheus src]# systemctl status influxdb
● influxdb.service - InfluxDB is an open-source, distributed, time series database
   Loaded: loaded (/usr/lib/systemd/system/influxdb.service; enabled; vendor preset: disabled)
   Active: active (running) since Tue 2023-06-06 21:26:49 EDT; 13s ago
     Docs: https://docs.influxdata.com/influxdb/
 Main PID: 18040 (influxd)
   CGroup: /system.slice/influxdb.service
           └─18040 /usr/bin/influxd -config /etc/influxdb/influxdb.conf
[root@prometheus ~]# inf
influx          influx_inspect  influx_tsm      infocmp         infotocap
influxd         influx_stress   info            infokey
[root@prometheus ~]# influx
Connected to http://localhost:8086 version 1.7.8
InfluxDB shell version: 1.7.8
> create database prometheus;
> show databases;
name: databases
name
----
_internal
prometheus
> exit
//配置 Prometheus 集成 infuxdb
[root@prometheus ~]# vi /usr/local/prometheus/prometheus.yml //在最后添加
remote_write:
  - url: "http://localhost:8086/api/v1/prom/write?db=prometheus"
remote_read:
  - url: "http://localhost:8086/api/v1/prom/read?db=prometheus"
[root@prometheus ~]# systemctl restart prometheus //进行重启
三、使用 Prometheus 实现系统监控
- 因为 Prometheus 并不能直接监控服务,其主要任务负责数据的收集,存储并对外提供数据查询支持;
- 因此,为了能够监控到某些东西,如:主机的 CPU 使用率,我们需要使用到 Exporter。
下载地址:https://github.com/prometheus/node_exporter/releases/download/v0.18.1/node_exporter-0.18.1.linux-amd64.tar.gz
//安装 Node_Exporter
[root@clinent ~]# cd /usr/src/
[root@clinent src]# tar -xf node_exporter-1.5.0.linux-amd64.tar.gz -C /usr/local/
[root@clinent src]# cd /usr/local/
[root@clinent local]# mv node_exporter-1.5.0.linux-amd64 exporter
[root@clinent local]# ls
bin  etc  exporter  games  include  lib  lib64  libexec  sbin  share  src
[root@clinent local]# vi /usr/lib/systemd/system/node_exporter.service
[root@clinent local]# useradd -s /sbin/nologin prometheus

[root@clinent local]# systemctl daemon-reload
[root@clinent local]#  systemctl enable --now node_exporter
Created symlink from /etc/systemd/system/multi-user.target.wants/node_exporter.service to /usr/lib/systemd/system/node_exporter.service.
[root@clinent local]# systemctl status node_exporter
● node_exporter.service - node_exporter
   Loaded: loaded (/usr/lib/systemd/system/node_exporter.service; enabled; vendor preset: disabled)
   Active: active (running) since Tue 2023-06-06 21:46:17 EDT; 12s ago
 Main PID: 11151 (node_exporter)
   CGroup: /system.slice/node_exporter.service
           └─11151 /usr/local/exporter/node_exporter --web.listen-address=:20001 --collector.systemd --collector.systemd.unit-whitelist=(ssh...
当启动 node_exporter 服务后,便可以通过 20001 端口来访问 Client 的监控指标。

//修改 Promehtues 配置文件
[root@prometheus ~]# vi /usr/local/prometheus/prometheus.yml //修改为下面配置
- job_name: "client"
  static_configs:
  - targets:
    - "192.168.0.103:20001"
[root@prometheus ~]# systemctl restart prometheus
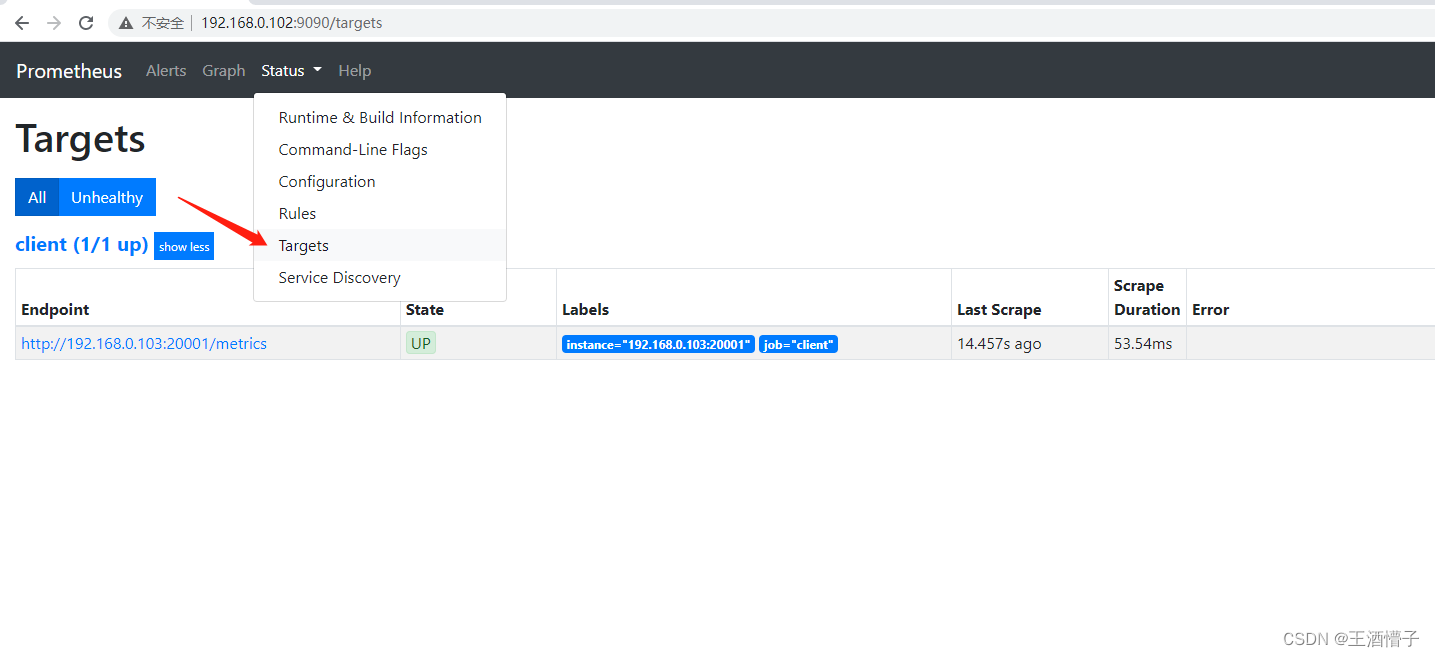
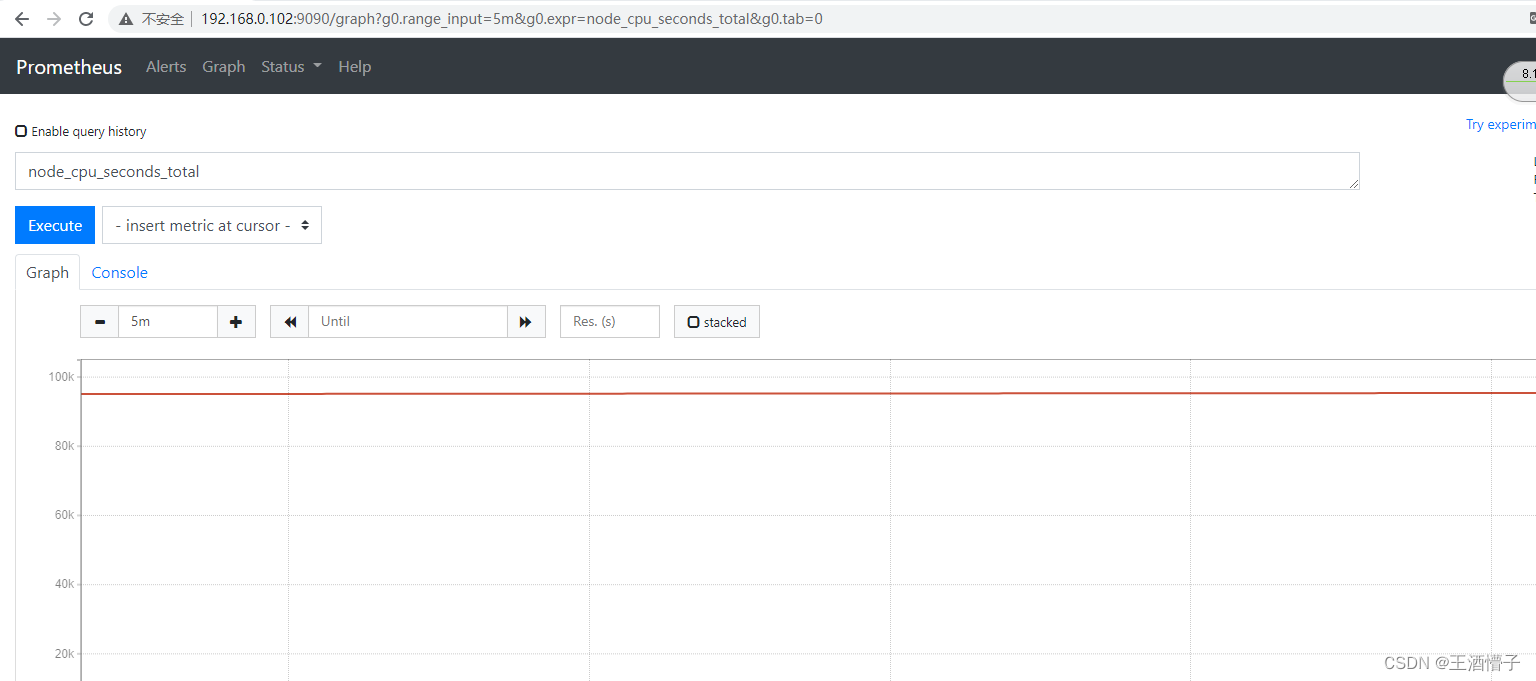
验证
四、使用 Prometheus + Grafana 实现可视化界面
- 在 Prometheus 中,我们可以使用 Web 界面进行数据的查询和展示,但是展示效果不是很好;
- 所以我们这里使用 Grafana 来配合 Prometheus 使用。
下载地址:https://dl.grafana.com/oss/release/grafana-enterprise-9.5.0-1.x86_64.rpm
//安装 Grafana
[root@granfana src]# yum -y install grafana-enterprise-9.5.0-1.x86_64.rpm
[root@granfana src]# systemctl enable --now grafana-server
Created symlink from /etc/systemd/system/multi-user.target.wants/grafana-server.service to /usr/lib/systemd/system/grafana-server.service.
[root@granfana src]# systemctl status grafana-server
● grafana-server.service - Grafana instance
   Loaded: loaded (/usr/lib/systemd/system/grafana-server.service; enabled; vendor preset: disabled)
   Active: active (running) since Tue 2023-06-06 23:35:46 EDT; 18s ago
     Docs: http://docs.grafana.org
 Main PID: 11668 (grafana)
   CGroup: /system.slice/grafana-server.service
           └─11668 /usr/share/grafana/bin/grafana server --config=/etc/grafana/grafana.ini --pidfile=/var/run/grafana/grafana-server.pid --p...

//可以通过配置改为部分中文
[root@granfana ~]# vi /usr/share/grafana/conf/defaults.ini
# default_language = en-US //注释这行
default_language = zh-Hans //添加这个
[root@granfana ~]# systemctl restart grafana-server
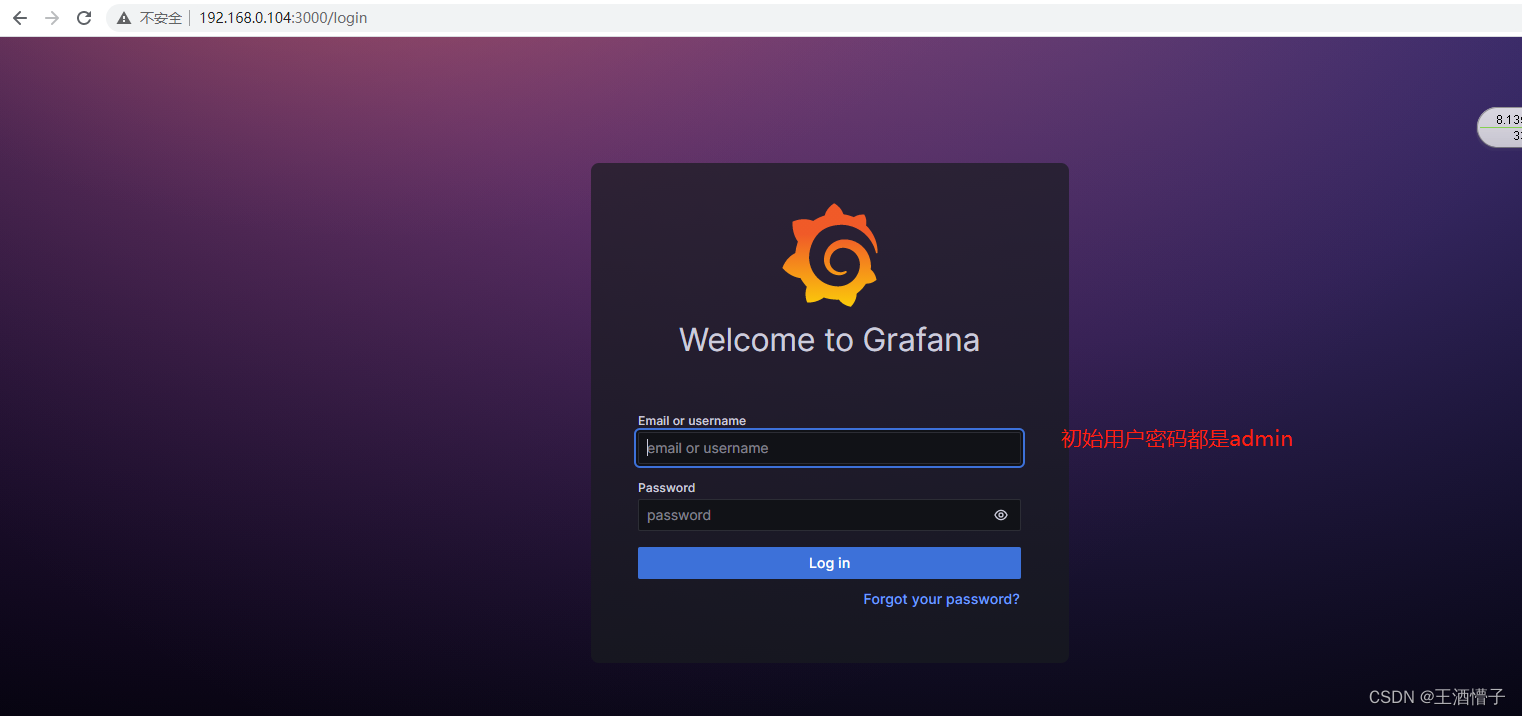
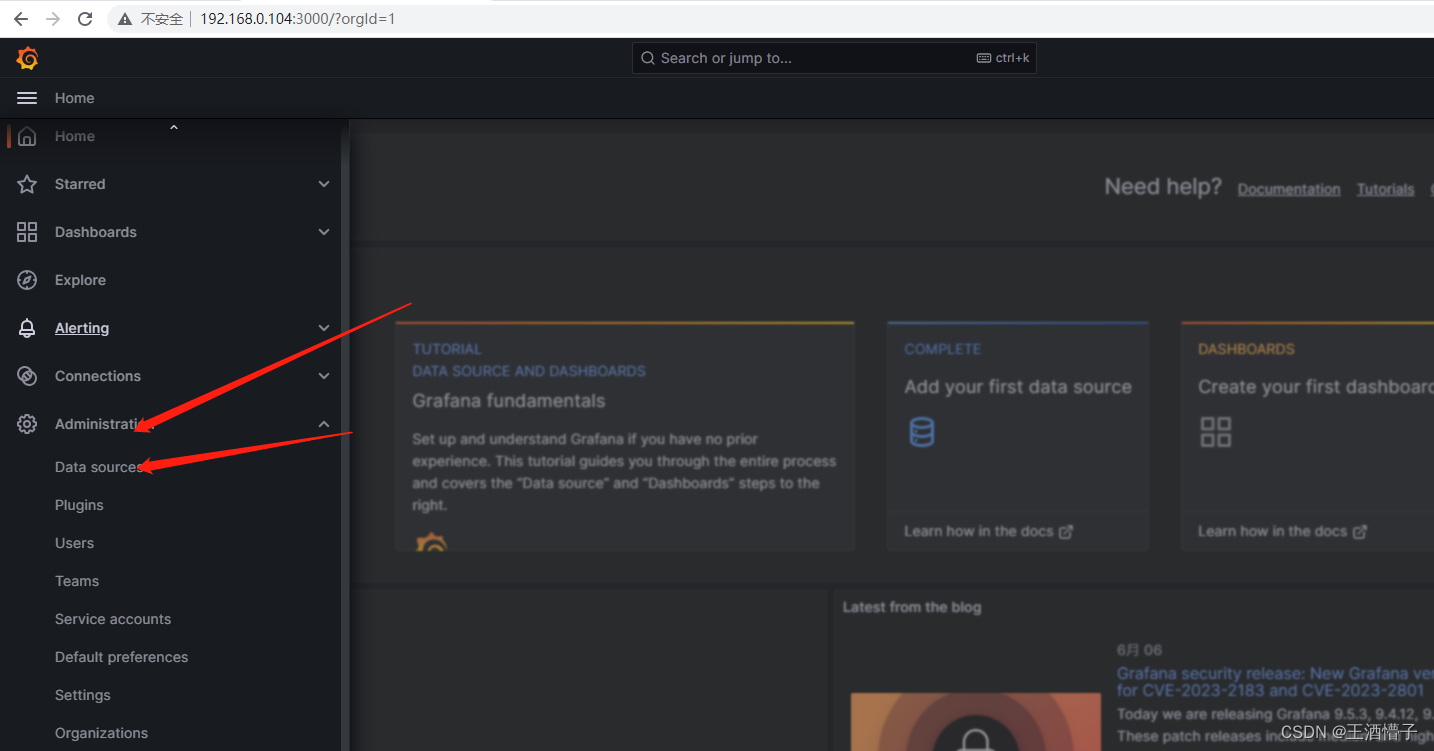
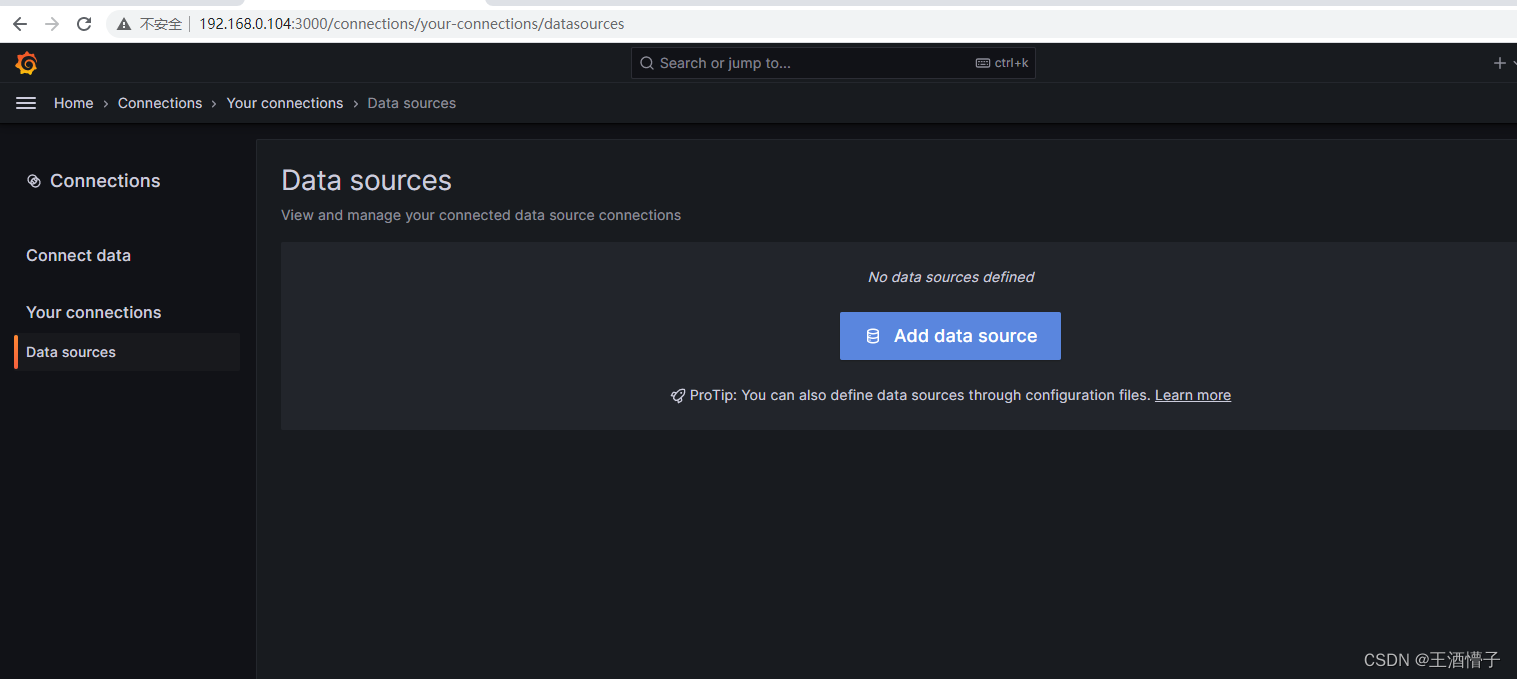
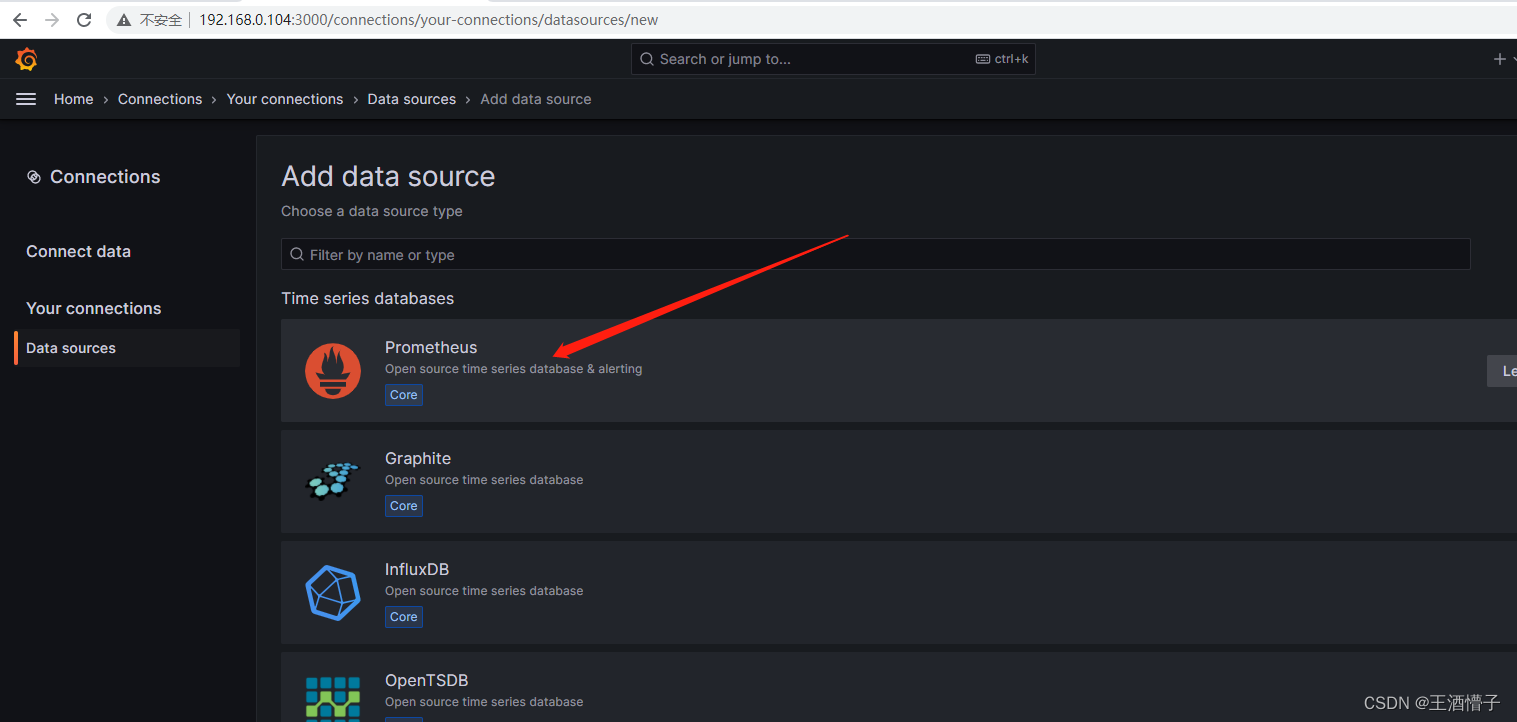
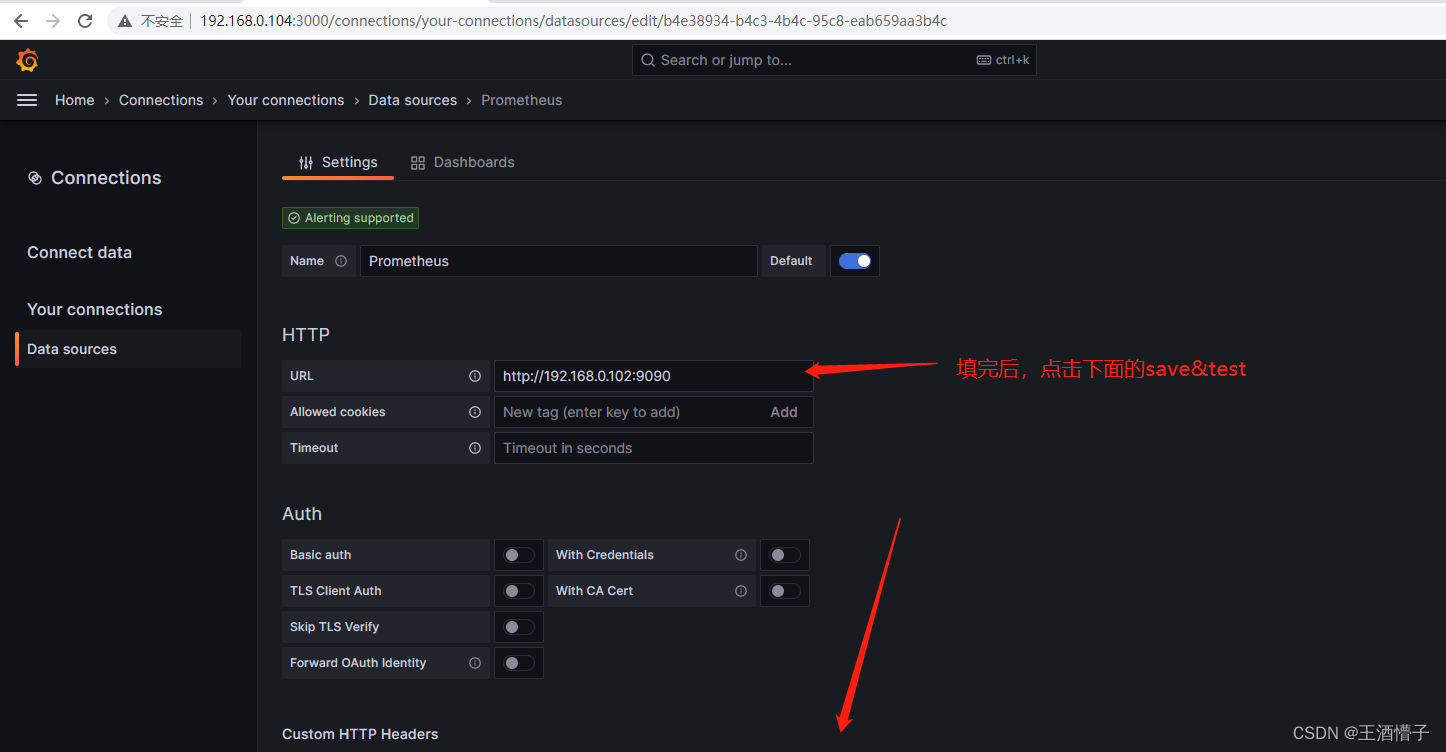
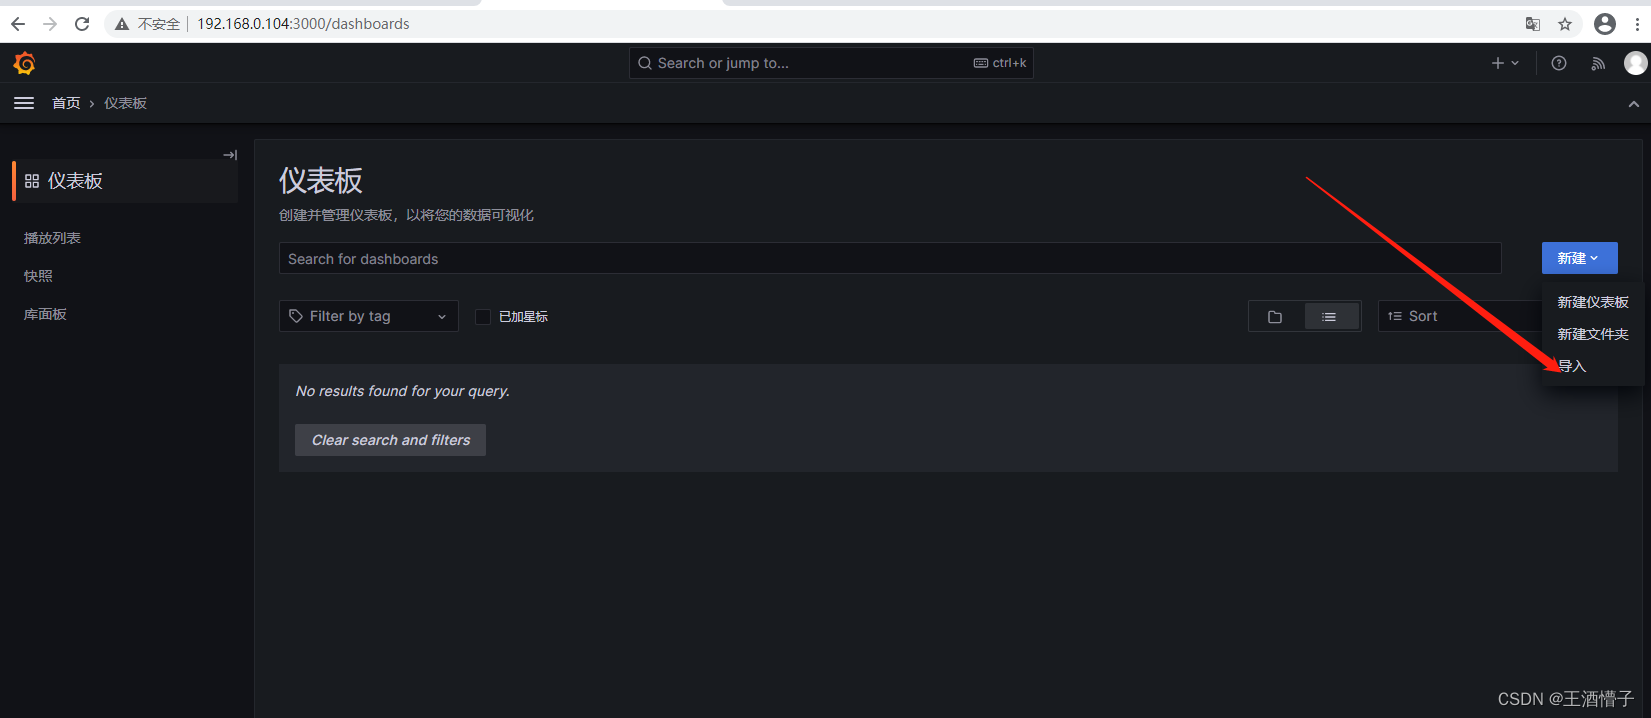
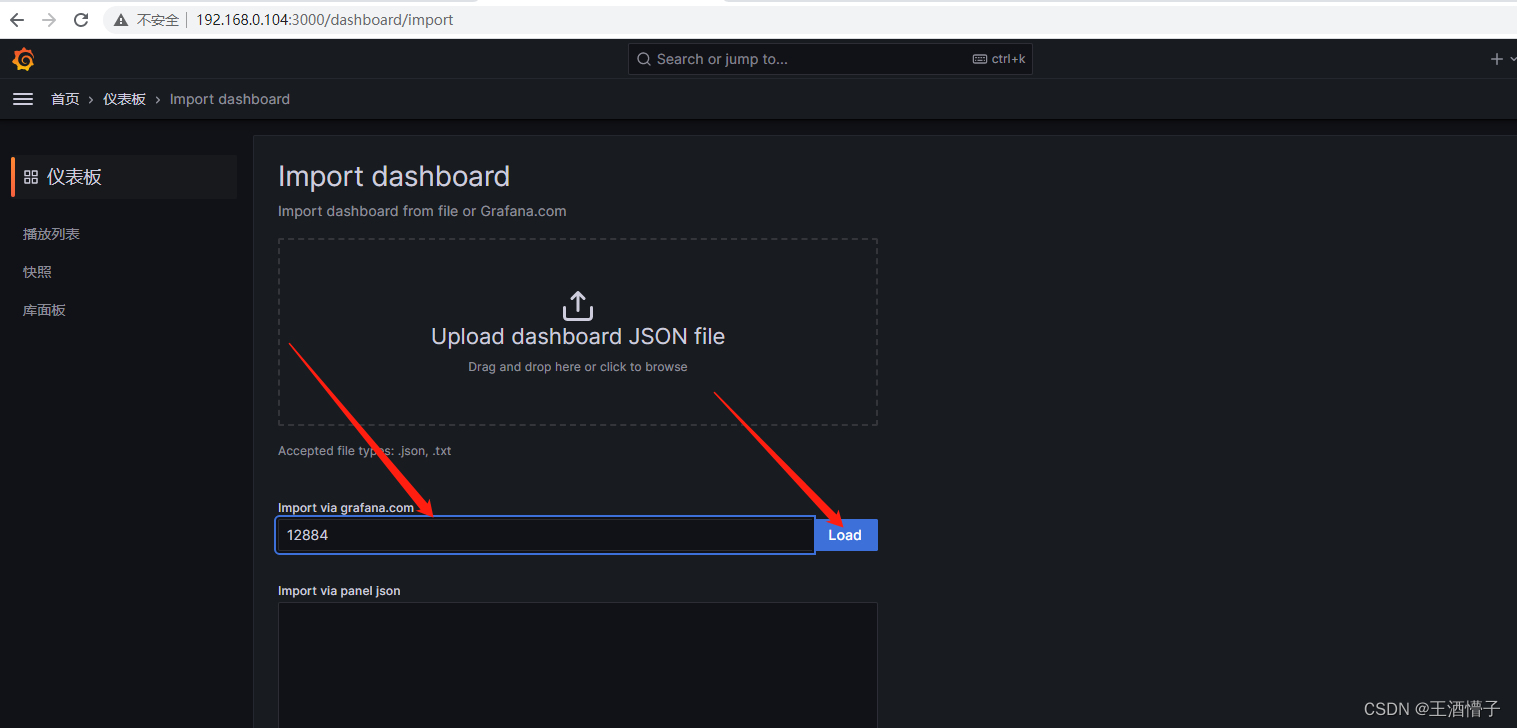
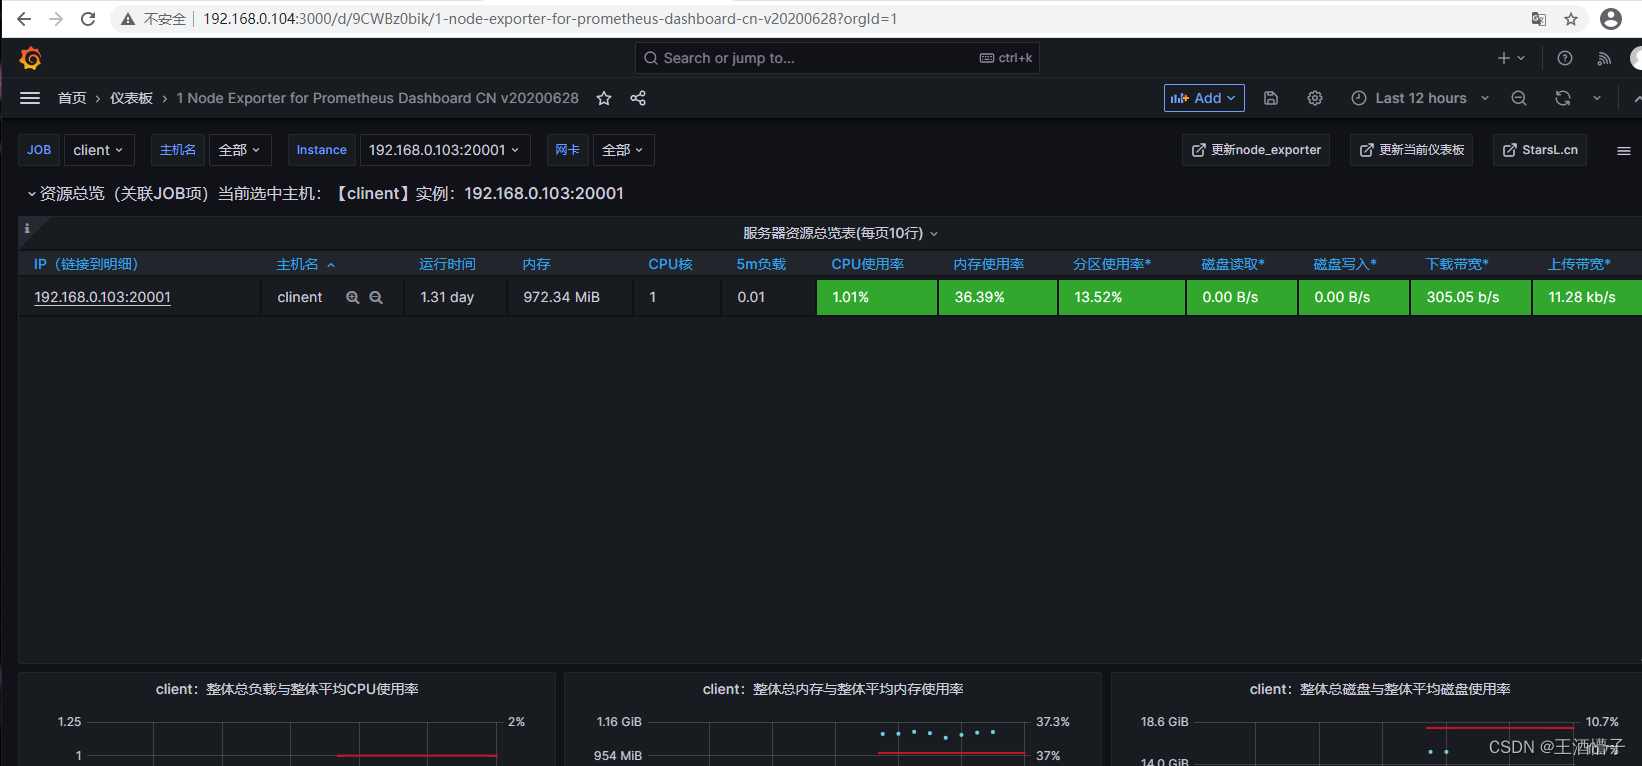
配置 Grafana 的 Web 界面

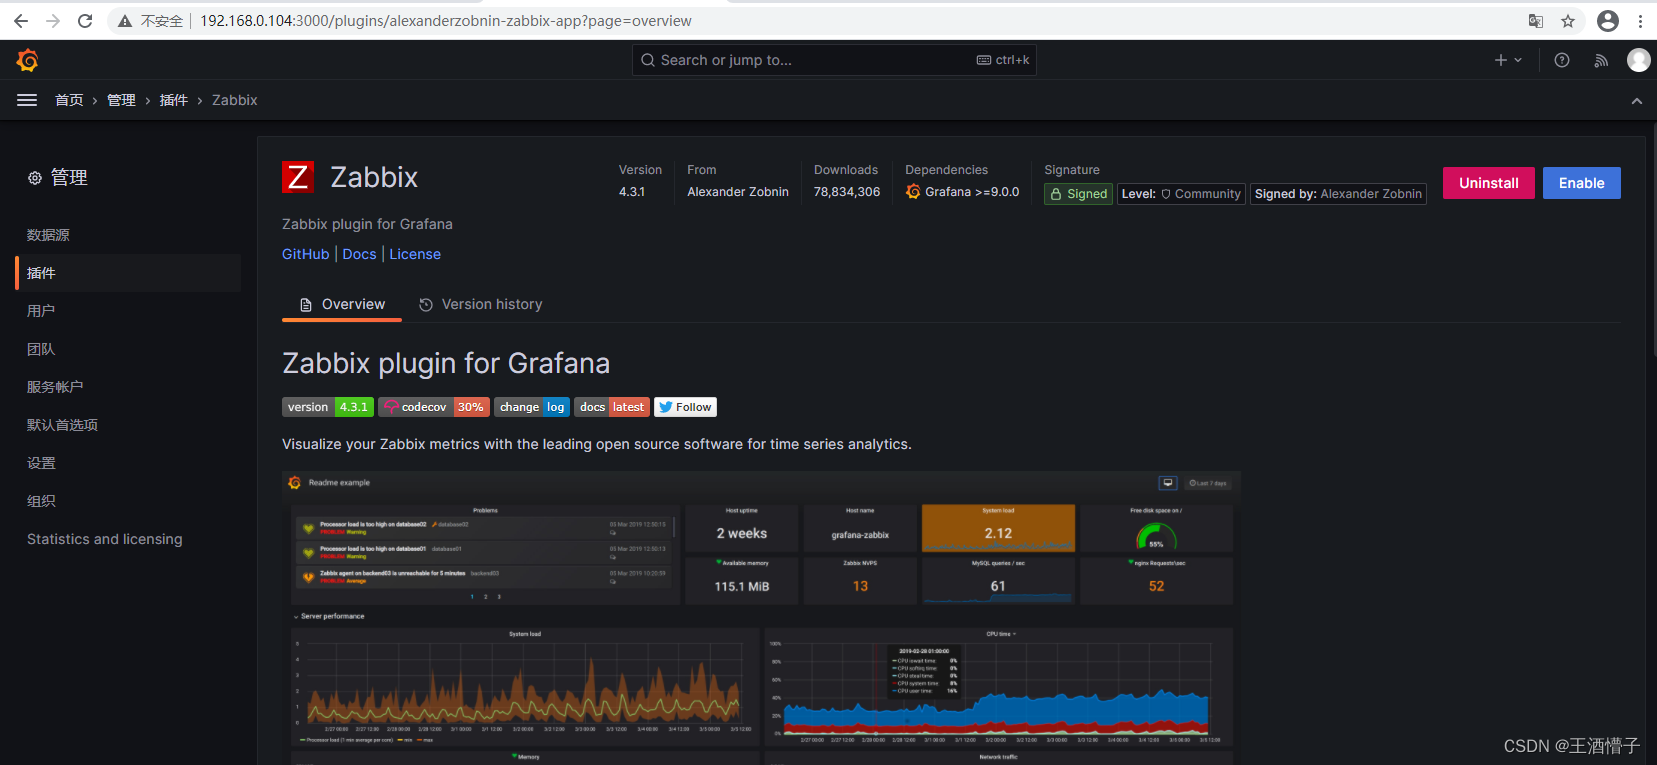
四.zabbix+grafana
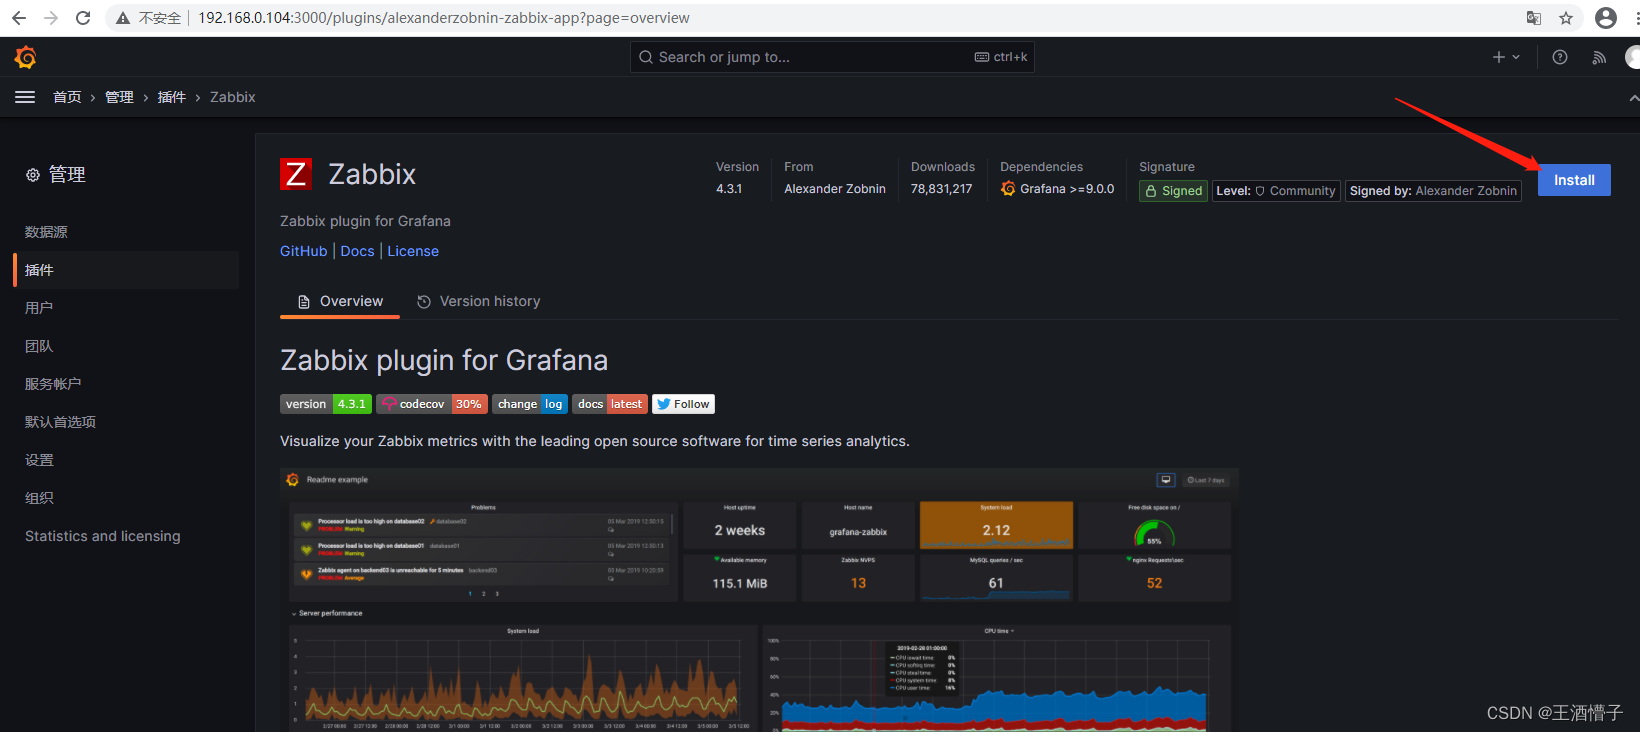
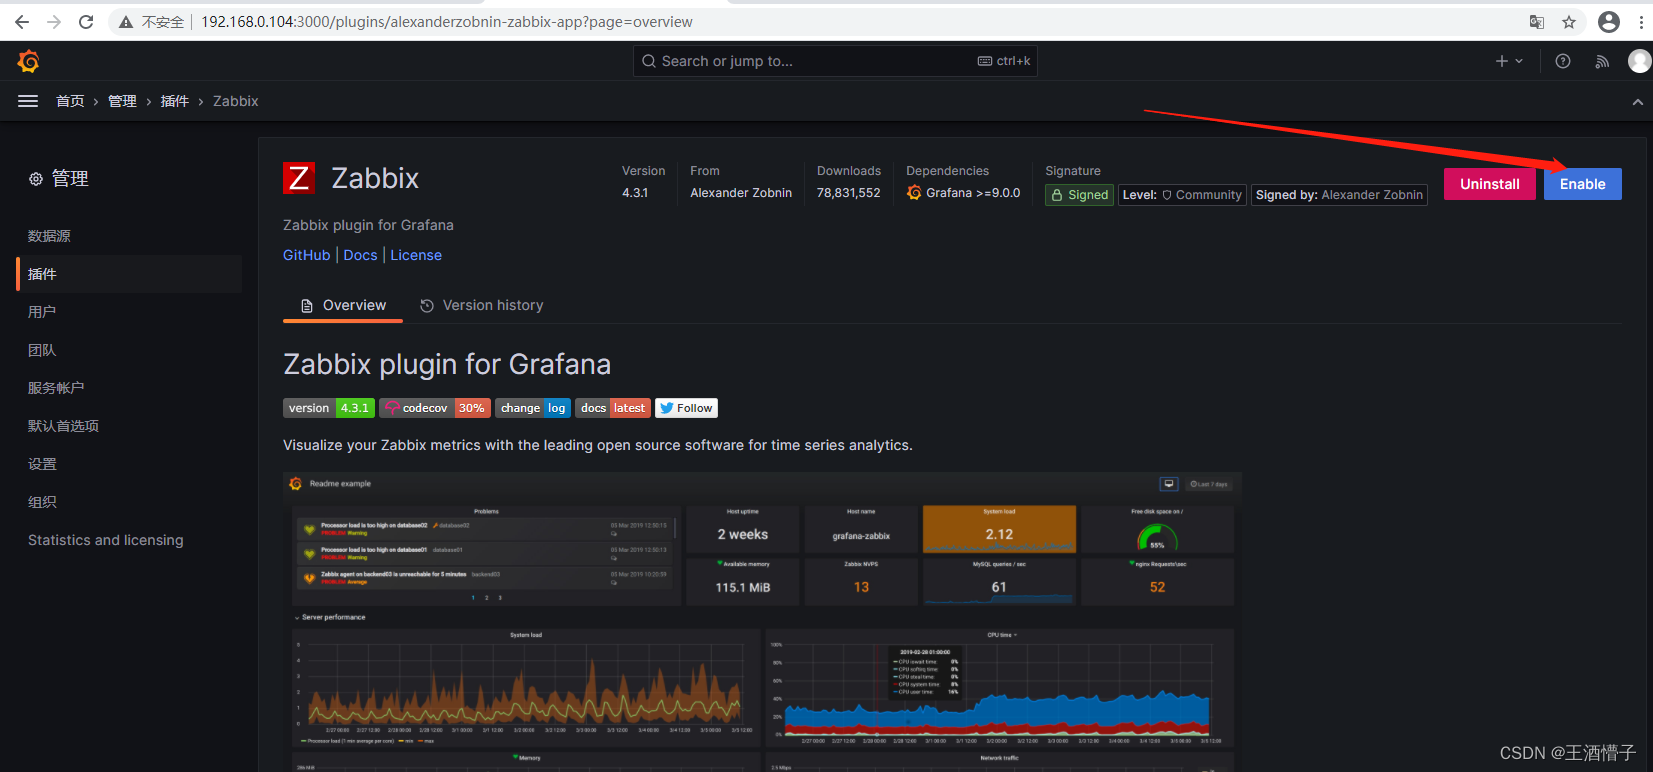
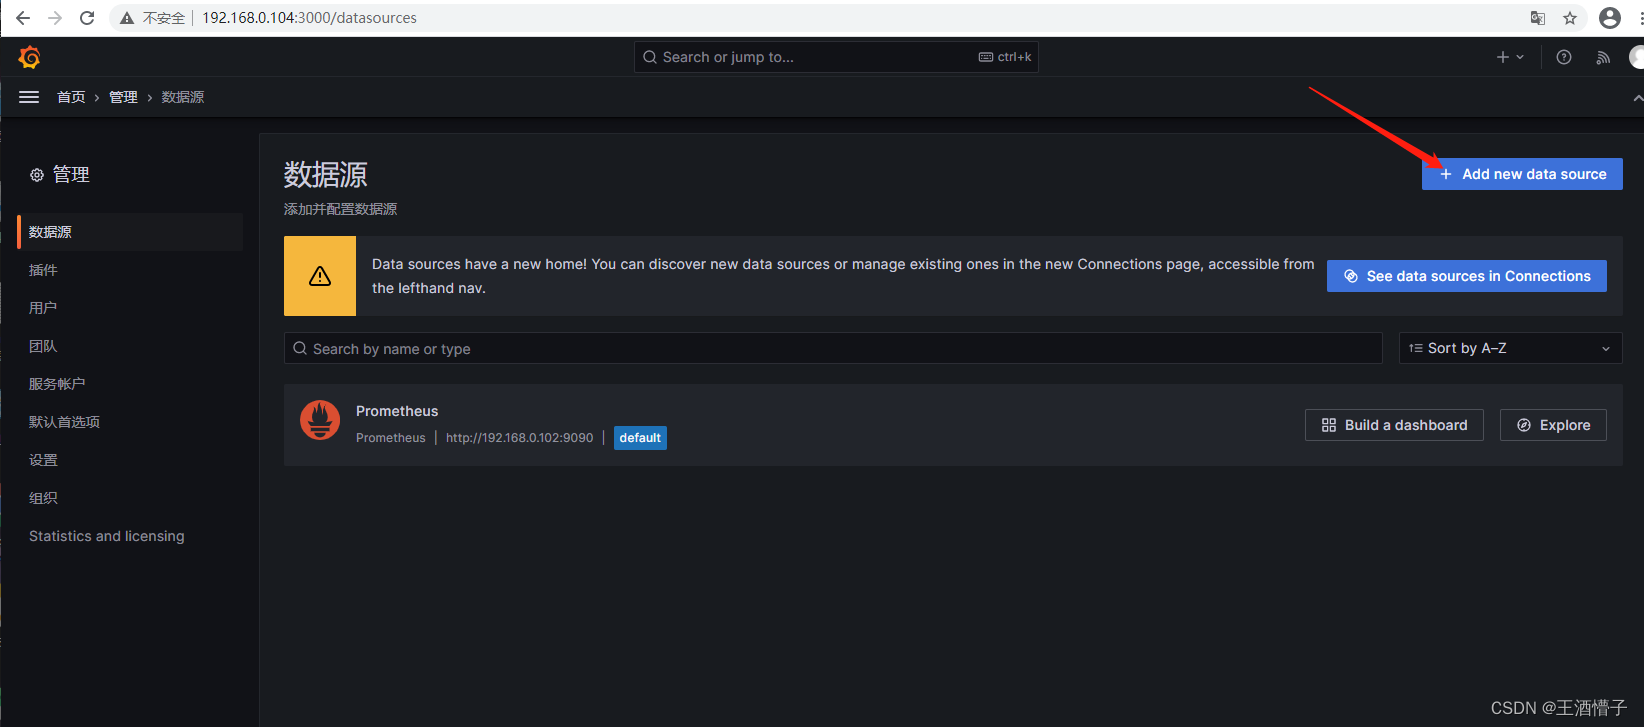
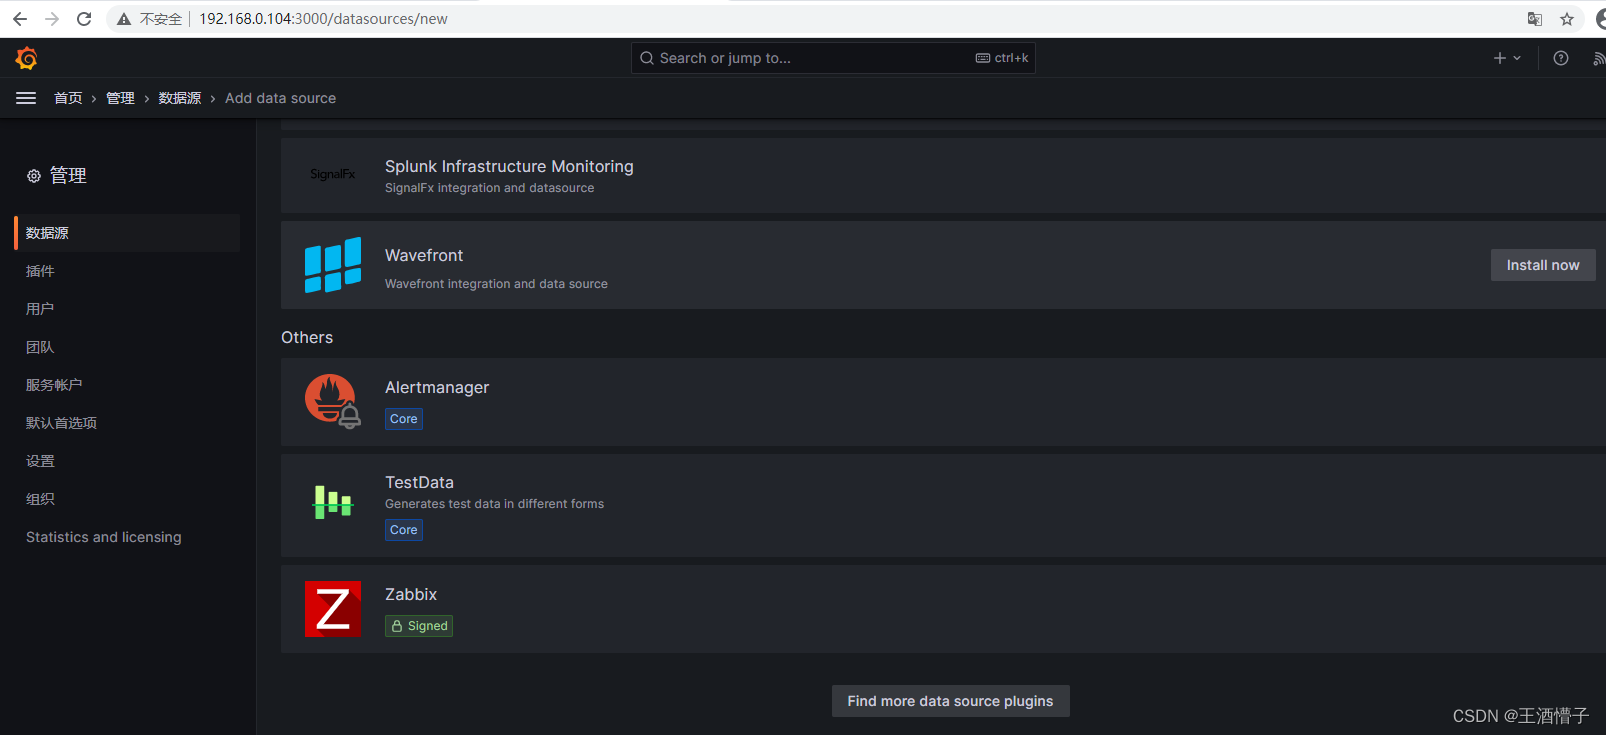
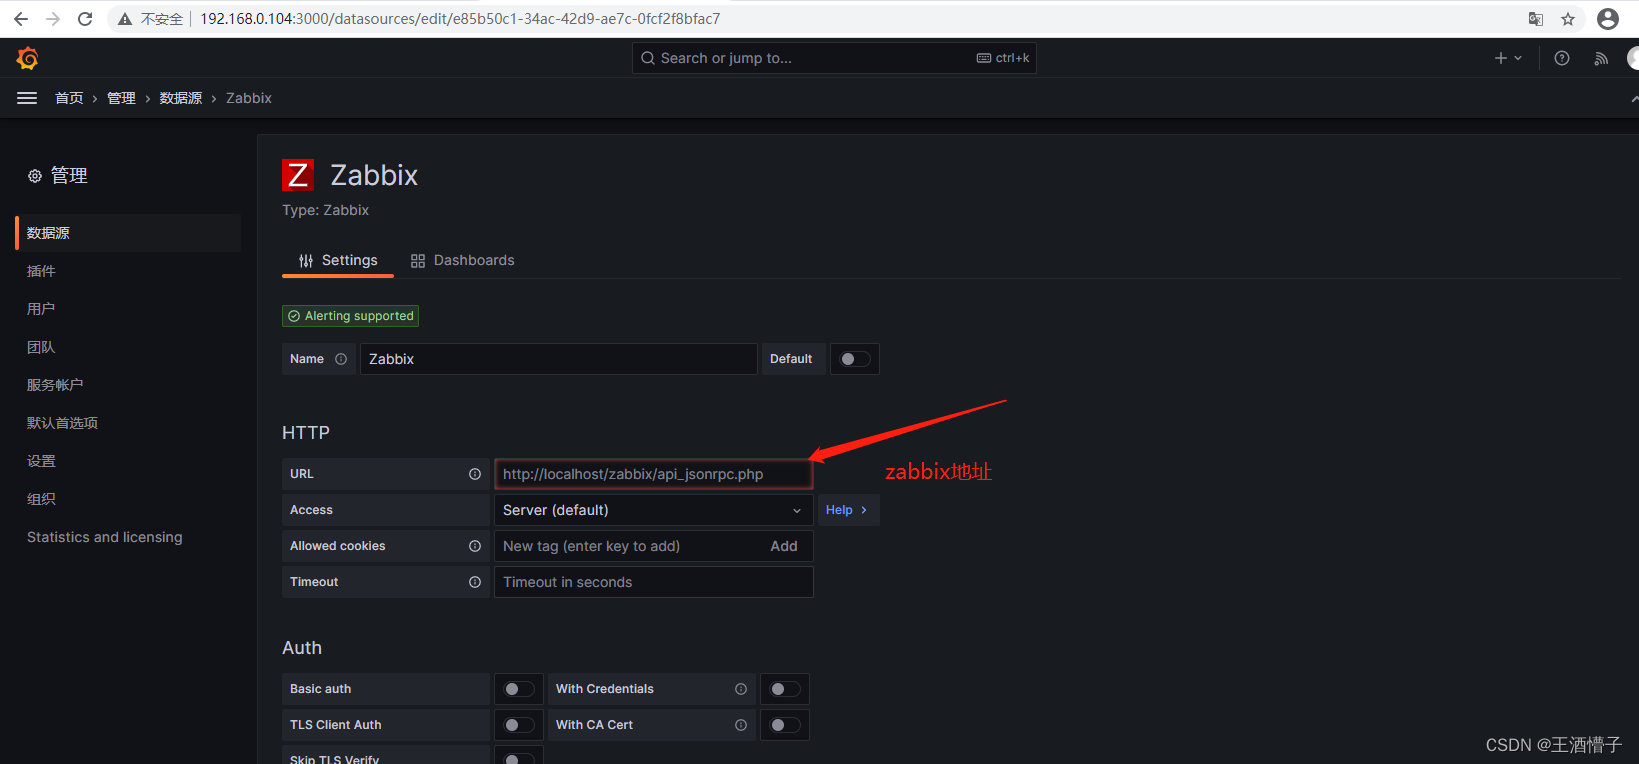
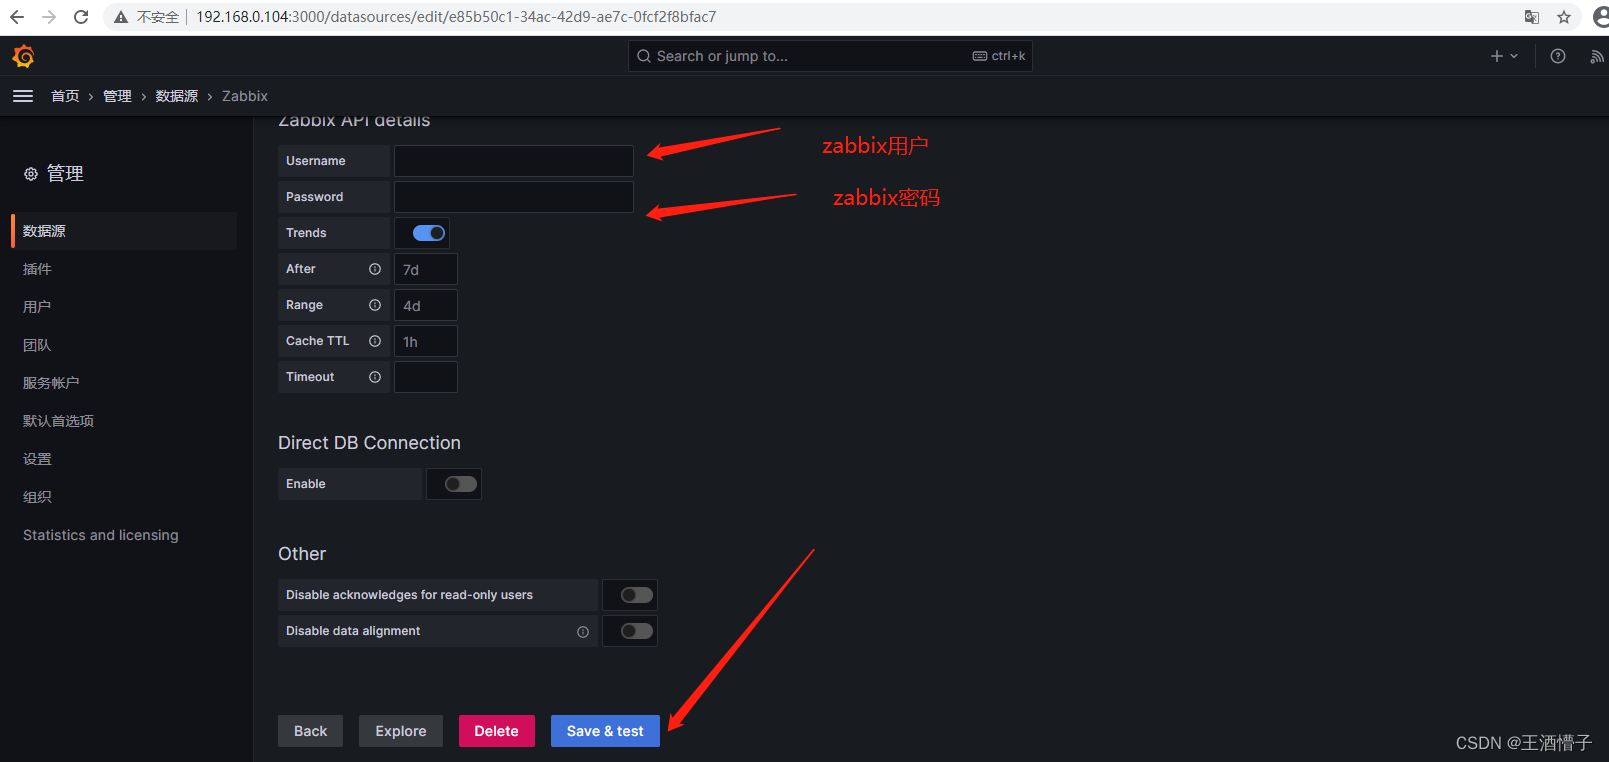
第二种
下载地址:https://grafana.com/api/plugins/alexanderzobnin-zabbix-app/versions/4.3.1/download
[root@granfana ~]# unzip alexanderzobnin-zabbix-app-4.3.1.zip
[root@granfana ~]# mv alexanderzobnin-zabbix-app /var/lib/grafana/plugins/
[root@granfana ~]# systemctl restart grafana-server
