文章目录
- 前言
- Spring Cloud Stream简析
- Spring Cloud Stream与rabbitmq整合
- 1、添加pom依赖
- 2、application.yml增加mq配置
- 3、定义输入输出信道
- 4、使用输入输出信道收发消息
- 5、模拟正常消息消费
- 6、模拟异常消息
前言
相信很多同学都开发过WEB服务,在WEB服务的开发中一般是通过缓存、队列、读写分离、削峰填谷、限流降级等手段来提高服务性能和保证服务的正常投用。对于削峰填谷就不得不用到我们的MQ消息中间件,比如适用于大数据的kafka,性能较高支持事务活跃度高的rabbitmq等等,MQ的选用和整合已经是JAVA WEB开发中不可或缺对的一部分。当然,作为号称JAVA微服务框架全家桶的Spring Cloud也提供了良好的适配中间件的功能。今天我们就来整合一下微服务全家桶Spring Cloud提供的消息驱动——Spring Cloud Stream。
Spring Cloud Stream简析
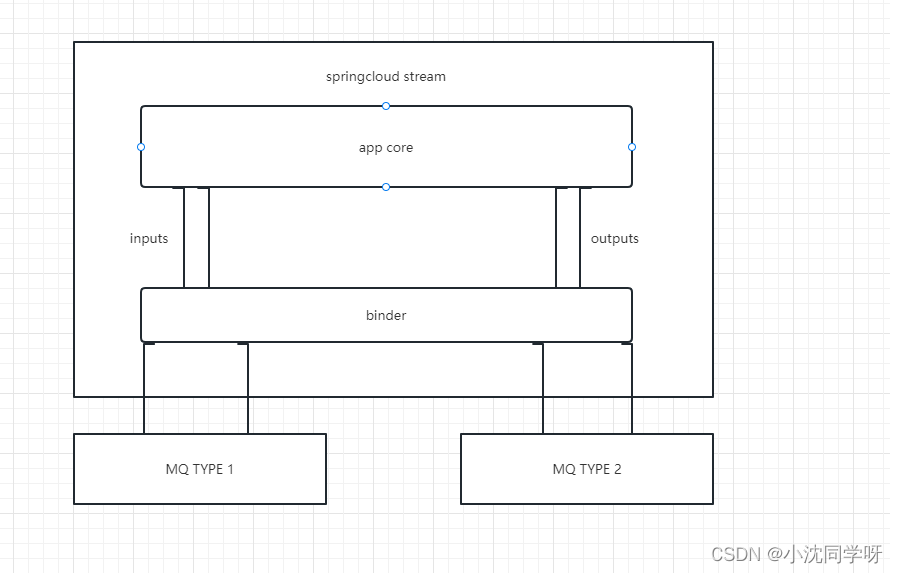
Spring Cloud Stream是用于构建微服务具有消息驱动能力的框架,应用程序通过inputs、outputs通道与binder进行交互,binder与消息中间件进行通信。
binder的作用是将消息中间件进行粘合,相当于对第三方中间件进行封装整合,让开发人员不用关心底层消息中间件如何运行。
inputs是消息输入通道,类似于消息中间件的consumer消费者;outputs是消息输出通道,类似于消息中间件的producer生产者。应用程序收发消息不再直接调用消息中间件的接口或者逻辑代码,直接使用Spring Cloud Stream 的OUTPUT与INPUT通道进行处理。
可以通过binder绑定选用各种消息中间件,用binding进行中间件的相关参数配置,让应用程序达到灵活配置和切换消息中间件的目的。
Spring Cloud Stream与rabbitmq整合
本次整合直接与rabbitmq整合,如果是使用kafka的同学,可以直接移植配置修改对应粘接mq即可。
本次整合加入了消费重试机制、死信队列,并提供死信队列消费监听方法,可直接移植到生产环境。
1、添加pom依赖
引入spring-cloud-starter-stream-rabbit 需要从Spring Cloud中引入,注意dependencyManagement的配置。
<properties>
    <java.version>1.8</java.version>
    <spring-cloud.version>Hoxton.SR10</spring-cloud.version>
</properties>

<dependencies>
    <dependency>
        <groupId>org.springframework.cloud</groupId>
        <artifactId>spring-cloud-starter-stream-rabbit</artifactId>
    </dependency>
</dependencies>

<dependencyManagement>
    <dependencies>
        <dependency>
            <groupId>org.springframework.cloud</groupId>
            <artifactId>spring-cloud-dependencies</artifactId>
            <version>${spring-cloud.version}</version>
            <type>pom</type>
            <scope>import</scope>
        </dependency>
    </dependencies>
</dependencyManagement>
2、application.yml增加mq配置
spring:
  rabbitmq:
    host: 127.0.0.1
    port: 5672
    username: admin
    password: admin
    virtual-host: /
  cloud:
    stream:
      binders: #stream框架粘接的mq
        myRabbit: #自定义个人mq名称
          type: rabbit
          environment:
            spring:
              rabbitmq:
                host: 127.0.0.1
                port: 5672
                username: admin
                password: admin
                virtual-host: /
      bindings: #stream绑定信道
        output_channel: #自定义发送信道名称
          destination: assExchange #目的地 交换机/主题
          content-type: application/json
          binder: myRabbit #粘接到的mq
          group: assGroup
        input_channel: #自定义接收信道
          destination: assExchange #目的地 交换机/主题
          content-type: application/json
          binder: myRabbit #粘接到的mq
          group: assGroup
          consumer:
            maxAttempts: 3 # 尝试消费该消息的最大次数(消息消费失败后,发布者会重新投递)。默认3
            backOffInitialInterval: 1000 # 重试消费消息的初始化间隔时间。默认1s,即第一次重试消费会在1s后进行
            backOffMultiplier: 2 # 相邻两次重试之间的间隔时间的倍数。默认2
            backOffMaxInterval: 10000 # 下一次尝试重试的最大时间间隔,默认为10000ms,即10s
      rabbit: #stream mq配置
        bindings:
          input_channel:
            consumer:
              concurrency: 1 #消费者数量
              max-concurrency: 5 #最大消费者数量
              durable-subscription: true  #持久化队列
              recovery-interval: 3000  #3s 重连
              acknowledge-mode: MANUAL  #手动
              requeue-rejected: false #是否重新放入队列
              auto-bind-dlq: true #开启死信队列
              requeueRejected: true #异常放入死信
3、定义输入输出信道
/**
 * MqChannel
 * @author senfel
 * @version 1.0
 * @date 2023/6/2 15:46
 */
public interface MqChannel {

    /**
     * 消息目的地 RabbitMQ中为交换机名称
     */
    String destination = "assExchange";
    /**
     * 输出信道
     */
    String OUTPUT_CHANNEL = "output_channel";
    /**
     * 输入信道
     */
    String INPUT_CHANNEL = "input_channel";
    /**
     * 死信队列
     */
    String INPUT_CHANNEL_DLQ = "assExchange.assGroup.dlq";

    @Output(MqChannel.OUTPUT_CHANNEL)
    MessageChannel output();

    @Input(MqChannel.INPUT_CHANNEL)
    SubscribableChannel input();

}
4、使用输入输出信道收发消息
TestMQService
/**
 * TestMQService
 * @author senfel
 * @version 1.0
 * @date 2023/6/2 15:47
 */
public interface TestMQService {

    /**
     * 发送消息
     */
    void send(String str);
}
TestMQServiceImpl
/**
 * TestMQServiceImpl
 * @author senfel
 * @version 1.0
 * @date 2023/6/2 15:49
 */
@Service
@Slf4j
@EnableBinding(MqChannel.class)
public class TestMQServiceImpl implements TestMQService {

    @Resource
    private MqChannel mqChannel;

    @Override
    public void send(String str) {
        mqChannel.output().send(MessageBuilder.withPayload("测试=========="+str).build());
    }


    /**
     * 接收消息监听
     * @param message 消息体
     * @param channel 信道
     * @param tag 标签
     * @param death
     * @author senfel
     * @date 2023/6/5 9:25
     * @return void
     */
    @StreamListener(MqChannel.INPUT_CHANNEL)
    public void process(String message,
                        @Header(AmqpHeaders.CHANNEL) Channel channel,
                        @Header(AmqpHeaders.DELIVERY_TAG) long tag) throws Exception {
        log.info("message : "+message);
        if(message.contains("9")){
            // 参数1为消息的tag  参数2为是否多条处理 参数3为是否重发
            //channel.basicNack(tag,false,false);
            System.err.println("--------------消费者消费异常--------------------------------------");
            System.err.println(message);
            throw new RuntimeException("抛出异常");
        }else{
            System.err.println("--------------消费者--------------------------------------");
            System.err.println(message);
            channel.basicAck(tag,false);
        }

    }


    /**
     * 死信监听
     * @param message 消息体
     * @param channel 信道
     * @param tag 标签
     * @param death
     * @author senfel
     * @date 2023/6/5 14:30
     * @return void
     */
    @RabbitListener(
            bindings = @QueueBinding(
                    value = @Queue(MqChannel.INPUT_CHANNEL_DLQ)
                    , exchange = @Exchange(MqChannel.destination)
            ),
            concurrency = "1-5"
    )
    public void processByDlq(String message,
                             @Header(AmqpHeaders.CHANNEL) Channel channel,
                             @Header(AmqpHeaders.DELIVERY_TAG) long tag) throws Exception {

        log.info("message : "+message);
        System.err.println("---------------死信消费者------------------------------------");
        System.err.println(message);
    }
}
controller
/**
 * @author senfel
 * @version 1.0
 * @date 2023/6/2 17:27
 */
@RestController
public class TestController{
    @Resource
    private TestMQService testMQService;

    @GetMapping("/test")
    public String testMq(String str){
        testMQService.send(str);
        return str;
    }
}
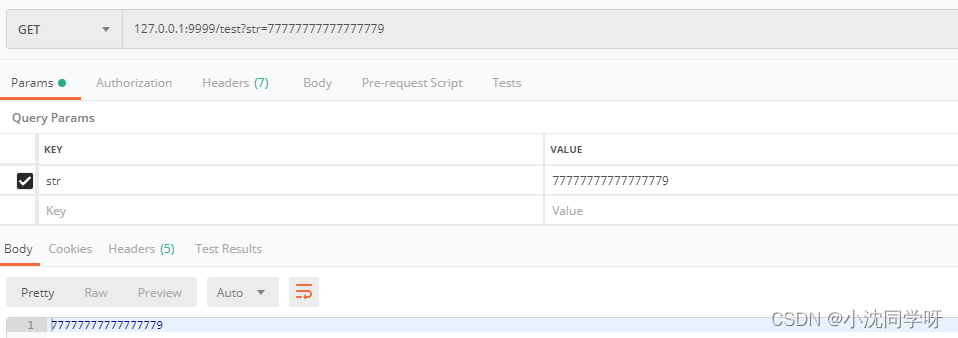
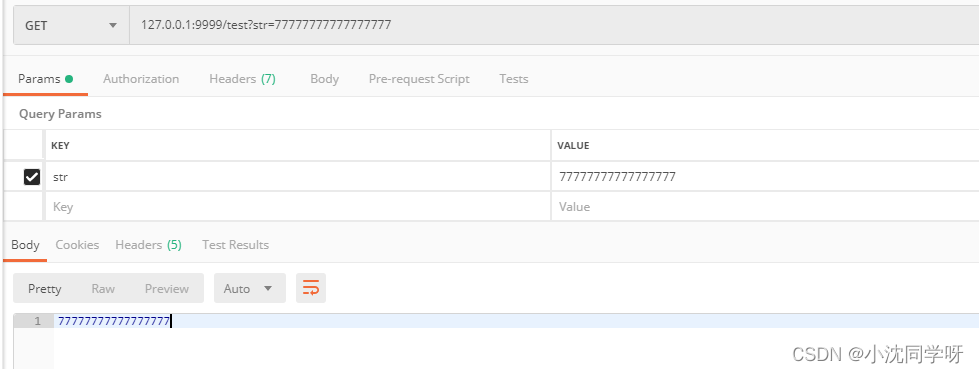
5、模拟正常消息消费

6、模拟异常消息
异常消息重试满足3次投递后进入死信消费
