目录
- Spring
- Spring简介
- Spring概述
- Spring Framework
- Spring Framework特征
- IOC
- 1、IOC的思想
- (1)传统方式的获取资源
- (2)控制反转方式的获取资源
- (3)DI
- 2、IOC 容器的两种实现
- BeanFactory
- ApplicationContext
- 基于XML管理bean
- 1.创建Maven
- 2.引入依赖
- 3.创建HelloWorld.Java类
- 4.创建spring核心配置文件
- 5.测试
- IOC创建对象
- 1.创建对象java类
- 2.创建bean
- 3.测试
- 注意:
- 原因:
- 获取bean的三种方式
- 1.根据bean的id来获取
- 2.根据bean的类型来获取(常用)
- 3.根据bean的id和类型来获取
- 4.用接口类来获取
- 依赖注入(赋值)
- 1.setter注入
- 2.有参构造注入
- 3.特殊值处理
- (1)null值
- (2)特殊符号值
- xml实体
- CDATA节
- 4.为类类型的属性赋值
- (1)引用外部的bean
- (2)级联方式(一般不用)
- (3)引用内部的bean
- 5.为数组、list、map类型的属性赋值
- (1)数组
- (2)list
- 内部引用
- 外部引用
- (3)map
- (4)p命名空间
- 6、引入外部属性文本
- 引入依赖
- 创建bean文件
- 测试
- 7、bean的作用域
- 被声明为singleton的bean
- 8、bean的生命周期
- 9、bean的作用域和生命周期的影响
- 10、FactoryBean
- 11、基于xml的自动装配
- 基于注解管理bean
- 1、标记和扫描
- (1)注解
- (2)扫描
- (3)引入依赖和创建配置文件
- (4)标识组件的常用注释
- (5)配置文件中扫描注释
- (6)注释+扫描下的bean的id
- (7)实现自动装配的注解
- AOP
- 1、代理模式简介
- 2、AOP概念及相关术语
- 2.1、概述
- 2.2、作用
- 2.3、AOP管理
- (1)引入依赖
- (2)配置applicationContext.xml
- (3)配置接口和方法
- (4)配置切面类
- (5)切面的优先级
- (6)基于xml下的AOP
- 事务层概念和相关事务
- 1、JdbcTemplate
- 1.1、简介
- 1.2、准备工作
- (1)引入依赖
- (2)配置核心xml
- (3)测试JdbcTemplate增删改查
- 2、声明式事务概念
- 2.1、编程式事务
- 2.2、声明式事务
- 3、基于注解的声明式事务
- 1. 在spring的配置文件中配置事务管理器(spring自带有切面和声明式事务管理)
- 2. 开启事务的注解驱动
- 3. 三种读取错误
- (1)脏读
- (2)不可重复读
- (3)幻读
- 4、基于xml的声明式事务
Spring
Spring简介

Spring概述
spring中文网:Spring 中文网 (springref.com)
Spring 使每个人可以更轻松、更安全地进行 Java 编程。对 Spring 的快速、简单性和关注成为世界上<<<Java框架。
Spring是Java EE编程领域的一个轻量级开源框架,该框架由一个叫Rod Johnson的程序员在 2002 年最早提出并随后创建
Spring是全面的和模块化的。Spring有分层的体系结构,这意味着你能选择使用它孤立的任何部分,它的架构仍然是内在稳定的。例如,你可能选择仅仅使用Spring来简单化JDBC的使用,或用来管理所有的业务对象
Spring Framework
Spring Framework为任何类型的部署平台上的基于Java的现代企业应用程序提供了全面的编程和配置模型
Spring Framework特征
- 核心技术:依赖项注入,事件,资源,i18n,验证,数据绑定,类型转换,SpEL,AOP。
- 测试:模拟对象,TestContext框架,Spring MVC测试,
WebTestClient。 - 数据访问:事务,DAO支持,JDBC,ORM,封送XML。
- Spring MVC和 Spring WebFlux Web框架。
- 集成:远程处理,JMS,JCA,JMX,电子邮件,任务,调度,缓存。
- 语言:Kotlin,Groovy,动态语言。
IOC
1、IOC的思想
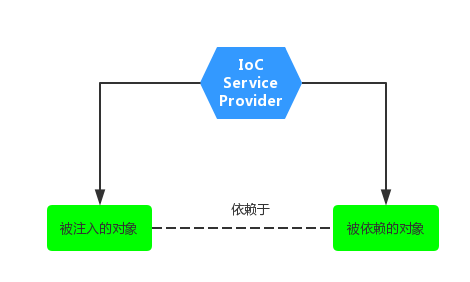
IOC 是 Inversion of Control 的简写,译为**“控制反转”**,它不是一门技术,而是一种设计思想,是一个重要的面向对象编程法则,能够指导我们如何设计出松耦合、更优良的程序。
Spring 通过 IOC 容器来管理所有 Java 对象的实例化和初始化,控制对象与对象之间的依赖关系。我们将由 IOC 容器管理的 Java 对象称为 Spring Bean,它与使用关键字 new 创建的 Java 对象没有任何区别。
IOC 容器是 Spring 框架中最重要的核心组件之一,它贯穿了 Spring 从诞生到成长的整个过程。
(1)传统方式的获取资源
全程参与整个Java项目的进程,必须清楚了解资源创建的整个过程
(2)控制反转方式的获取资源
不必关心资源创建过程的所有细节
开发人员不需要知道容器是如何创建资源对象的,只需要提供接收资源的方式即可
这种行为也称为查找的被动形式
(3)DI
DI:Dependency Injection,翻译过来是依赖注入
依赖注入(Denpendency Injection,简写为 DI)是 Martin Fowler 在 2004 年在对“控制反转”进行解释时提出的。Martin Fowler 认为“控制反转”一词很晦涩,无法让人很直接的理解“到底是哪里反转了”,因此他建议使用“依赖注入”来代替“控制反转”
在面向对象中,对象和对象之间是存在一种叫做“依赖”的关系。简单来说,依赖关系就是在一个对象中需要用到另外一个对象,即对象中存在一个属性,该属性是另外一个类的对象
public class UserController {
	@Autowired
	private UserService userService;
}
2、IOC 容器的两种实现
IOC 思想基于 IOC 容器实现的,IOC 容器底层其实就是一个 Bean 工厂。Spring 框架为我们提供了两种不同类型 IOC 容器,它们分别是 BeanFactory 和 ApplicationContext
BeanFactory
BeanFactory 是 IOC 容器的基本实现,也是 Spring 提供的最简单的 IOC 容器,它提供了 IOC 容器最基本的功能,由 org.springframework.beans.factory.BeanFactory 接口定义(用不到,内部人员使用)
ApplicationContext
ApplicationContext 是 BeanFactory 接口的子接口,是对 BeanFactory 的扩展。ApplicationContext 在 BeanFactory 的基础上增加了许多企业级的功能,例如 AOP(面向切面编程)、国际化、事务支持等
基于XML管理bean
1.创建Maven
2.引入依赖
<!-- https://mvnrepository.com/artifact/org.springframework/spring-context -->
<dependency>
    <groupId>org.springframework</groupId>
    <artifactId>spring-context</artifactId>
    <version>5.3.24</version>
</dependency>
不知道什么原因高版本下的spring-context不能用junit(已解决)
高版本的spring-context不能用junit-Java-CSDN问答
3.创建HelloWorld.Java类
public class HelloWorld {
	public void hello() {
		System.out.println("hellospring");
	}
4.创建spring核心配置文件
命名为applicationContext.xml
<?xml version="1.0" encoding="UTF-8"?>
<beans xmlns="http://www.springframework.org/schema/beans"
    xmlns:xsi="http://www.w3.org/2001/XMLSchema-instance"
    xsi:schemaLocation="http://www.springframework.org/schema/beans
http://www.springframework.org/schema/beans/spring-beans-2.5.xsd">

	 <!--
	 	bean:配置一个bean对象,将对象交给IOC容器管理
	 	属性:
	 	id:bean的唯一标识,不能重复
	 	class:设置bean对象所对应的类型
	  -->
	<bean id="hello" class="pojo.HelloWorld"></bean>
</beans>
5.测试
@Test
	public void testHello() {
        //获取ioc容器
		ApplicationContext ioc = new ClassPathXmlApplicationContext("applicationContext.xml");
        //获取bean
		HelloWorld bean = (HelloWorld) ioc.getBean("hello");
		bean.hello();
	}
IOC创建对象
1.创建对象java类
public class User {
	private Integer id;
	private String username;
	private String password;
	private Integer did;
	private DUser duser;
	public User() {
		super();
		// TODO Auto-generated constructor stub
	}
	public User(String username, String password, Integer did) {
		super();
		this.username = username;
		this.password = password;
		this.did = did;
	}

	public User(String username, String password, Integer did, DUser duser) {
		super();
		this.username = username;
		this.password = password;
		this.did = did;
		this.duser = duser;
	}

	public User(Integer id, String username, String password, Integer did, DUser duser) {
		super();
		this.id = id;
		this.username = username;
		this.password = password;
		this.did = did;
		this.duser = duser;
	}
	public int getId() {
		return id;
	}
	public void setId(Integer id) {
		this.id = id;
	}
	public DUser getDuser() {
		return duser;
	}
	public void setDuser(DUser duser) {
		this.duser = duser;
	}
	public String getUsername() {
		return username;
	}
	public void setUsername(String username) {
		this.username = username;
	}
	public String getPassword() {
		return password;
	}
	public void setPassword(String password) {
		this.password = password;
	}
	public int getDid() {
		return did;
	}
	public void setDid(Integer did) {
		this.did = did;
	}
	@Override
	public String toString() {
		return "User [id=" + id + ", username=" + username + ", password=" + password + ", did=" + did + ", duser=" + duser + "]";
	}
2.创建bean
3.测试
ApplicationContext ioc = new ClassPathXmlApplicationContext("applicationContext.xml");
//		HelloWorld bean = (HelloWorld) ioc.getBean("hello");
//		bean.hello();
		User bean = (User) ioc.getBean("user");
		System.out.println(bean.toString());
注意:
在创建对象java类下一定要有无参构造,否则会报错。
当没有无参构造时:警告: Exception encountered during context initialization - cancelling refresh attempt: org.springframework.beans.factory.BeanCreationException: Error creating bean with name ‘user’ defined in class path resource [applicationContext.xml]: Instantiation of bean failed; nested exception is org.springframework.beans.BeanInstantiationException: Failed to instantiate [pojo.User]: No default constructor found; nested exception is java.lang.NoSuchMethodException: pojo.User.< init>()
原因:
无参构造是固定的,而有参构造不是固定的。
获取bean的三种方式
1.根据bean的id来获取
User bean = (User) ioc.getBean("user");
2.根据bean的类型来获取(常用)
User bean = ioc.getBean(User.class);
注意:根据类型获取bean时,要求IOC容器中有且仅有一个类型匹配的bean
-
若没有任何一个类型匹配的bean,此时抛出异常NoSuchBeanDefinitionException
-
若有多个类型匹配的bean,此时抛出异常NoUniqueBeanDefinitionException
<bean id="userOne" class="pojo.User"></bean>
<bean id="userTwo" class="pojo.User"></bean>
3.根据bean的id和类型来获取
User bean = ioc.getBean("user",User.class);
4.用接口类来获取
实现前提是bean唯一
如果一个接口有多个实现类,这些实现类都配置了bean,可以根据接口类来获取bean吗?
不行,bean不唯一
结论:
根据类型来获取bean时,在满足bean的唯一性的前提下,其实只是看:【对象指定的类型】的返回结果,只要返回的是true就可以认定为和类型匹配,能够获取到。
相对的,通过bean的类型、bean所继承的类的类型、bean所实现的接口类的类型都可以获取到bean
依赖注入(赋值)
1.setter注入
property标签:通过组件类的setXX()方法给组件对象设置属性
- name属性:指定属性名(这个属性名时getXX()、setXX()方法定义的,和成员变量无关)
- value属性:指定属性值
<bean id="userOne" class="pojo.User">
		<property name="id" value="1"></property>
		<property name="username" value="hai"></property>
		<property name="password" value="hai123"></property>
	</bean>
2.有参构造注入
java类的有参构造:
public User(String username, String password, Integer did) {
		super();
		this.username = username;
		this.password = password;
		this.did = did;
	}
constructor-arg标签:这个标签必须与有参构造的属性个数对应,不然会报错
- index属性:指定参数所在位置的索引(从0开始)
- name属性:指定参数名(当类中两个有参构造的属性个数相同时,可以指定参数名来指定要选择的有参构造)
<bean id="userOne" class="pojo.User">
		<constructor-arg value="hai"></constructor-arg>
		<constructor-arg value="h123"></constructor-arg>
		<constructor-arg value="1"></constructor-arg>
	</bean>
3.特殊值处理
(1)null值
如果用value来赋值,能不能得到null值?
不行,这样是在给一个变量赋值一个“null”的字面量,而不是一个空字节
<bean id="userOne" class="pojo.User">
		<property name="id" value="1"></property>
		<property name="username" value="hai"></property>
		<property name="password" value="null"></property>
	</bean>
应该用<null>标签
<bean id="userOne" class="pojo.User">
		<property name="id" value="1"></property>
		<property name="username" value="hai"></property>
		<property name="password">
			<null></null>
		</property>
	</bean>
(2)特殊符号值
如果password要赋值<hai123>
解决方法:
-
xml实体
xml实体 数学字符 符号意义 << 小于 >> 大于 && 和号 '’ 单引号 "" 引号 <bean id="userOne" class="pojo.User"> <property name="id" value="1"></property> <property name="username" value="hai"></property> <property name="password" value="<hai123>"></property> </bean> -
CDATA节
CDATA节其中的内容会原样解析
<![CDATA[...]]>CDATA节是xml中一个特殊的标签,因此不能写在一个属性中
<!-- 错误写法 --> <property name="password" value="<![CDATA[<hai123>]]>"></property>eclipse有没有CDATA节的快捷键,求大佬们解答:
eclipse有没有CDATA节的快捷键-移动开发-CSDN问答
<bean id="userOne" class="pojo.User">
		<property name="id" value="1"></property>
		<property name="username" value="hai"></property>
		<property name="password">
			<value><![CDATA[<hai123>]]></value>
		</property>
	</bean>
4.为类类型的属性赋值
(1)引用外部的bean
<bean id="userOne" class="pojo.User">
		<property name="id" value="1"></property>
		<property name="username" value="hai"></property>
		<property name="password"><value><![CDATA[<hai123>]]></value></property>

    <!-- ref:引用IOC容器中的某个bean的id -->
    	<property name="duser" ref="duserOne"></property>
	</bean>
	<bean id="duserOne" class="pojo.DUser">
		<property name="did" value="1"></property>
		<property name="dname" value="A"></property>
	</bean>
(2)级联方式(一般不用)
级联的方式,要保证提前为duser属性赋值或者实例化
<bean id="userOne" class="pojo.User">
		<property name="id" value="1"></property>
		<property name="username" value="hai"></property>
		<property name="password"><value><![CDATA[<hai123>]]></value></property>
	 <!-- 先实例化,不然会报错 -->
    	<property name="duser" ref="duserOne"></property>
     <!-- 在下面修改的值会替换掉原先的值 -->
		<property name="duser.did" value="2"></property>
		<property name="duser.dname" value="B"></property>
	</bean>
	<bean id="duserOne" class="pojo.DUser">
		<property name="did" value="1"></property>
		<property name="dname" value="A"></property>
	</bean>
如果不先实例化,则报错为:Value of nested property ‘duser’ is null,它会先查找duser(如果值为空值),则后面的级联就不会执行了
(3)引用内部的bean
<bean id="userOne" class="pojo.User">
		<property name="id" value="1"></property>
		<property name="username" value="hai"></property>
		<property name="password"><value><![CDATA[<hai123>]]></value></property>
		<property name="duser">
            <!-- 内部bean,只能在当前bean的内部使用,不能直接通过IOC容器获取 -->
			<bean id="duserInner" class="pojo.DUser">
				<property name="did" value="2"></property>
				<property name="dname" value="B"></property>
			</bean>
		</property>
	</bean>
5.为数组、list、map类型的属性赋值
(1)数组
<bean id="duserOne" class="pojo.DUser">
		<property name="did" value="1"></property>
		<property name="dname" value="A"></property>
		<property name="hobbys">
		<set>
			<value>movie</value>
			<value>games</value>
		</set>
		</property>
	</bean>
(2)list
-
内部引用
<bean id="duserOne" class="pojo.DUser"> <property name="did" value="1"></property> <property name="dname" value="A"></property> <property name="users"> <list> <ref bean="userOne"/> <ref bean="userTwo"/> </list> </property> </bean> -
外部引用
引用前提:beans有util的声明
<?xml version="1.0" encoding="UTF-8"?>
<beans xmlns="http://www.springframework.org/schema/beans"
    xmlns:xsi="http://www.w3.org/2001/XMLSchema-instance"
	xmlns:util="http://www.springframework.org/schema/util"
    xsi:schemaLocation="http://www.springframework.org/schema/beans
     http://www.springframework.org/schema/beans/spring-beans-4.1.xsd
     http://www.springframework.org/schema/util
     http://www.springframework.org/schema/util/spring-util-4.1.xsd">
<bean id="duserOne" class="pojo.DUser">
		<property name="did" value="1"></property>
		<property name="dname" value="A"></property>
		<property name="users" ref="userlist"></property>
		<!-- <property name="users">
			<list>
				<ref bean="userOne"/>
				<ref bean="userTwo"/>
			</list>
		</property> -->
	</bean>
	<util:list id="userlist">
		<ref bean="userOne"/>
		<ref bean="userTwo"/>
	</util:list>
</beans>
(3)map
spring为集合属性赋值{map,list,set,properties} - beibidewomen - 博客园 (cnblogs.com)
(4)p命名空间
- 添加约束条件:xmlns
xmlns:p="http://www.springframework.org/schema/p"
- 书写bean
<bean id="userTwo" class="pojo.User" p:id="3"></bean>
6、引入外部属性文本
引入依赖
<!-- 连接mysql数据库 -->
<!-- https://mvnrepository.com/artifact/mysql/mysql-connector-java -->
<dependency>
    <groupId>mysql</groupId>
    <artifactId>mysql-connector-java</artifactId>
    <version>8.0.28</version>
</dependency>
<!-- 数据源 -->
<!-- https://mvnrepository.com/artifact/com.alibaba/druid -->
<dependency>
    <groupId>com.alibaba</groupId>
    <artifactId>druid</artifactId>
    <version>1.1.24</version>
</dependency>
创建bean文件
<bean id="dataSource" class="com.alibaba.druid.pool.DruidDataSource">
<property name="driverClassName" value="com.mysql.cj.jdbc.Driver"></property>
<property name="url" value="jdbc:mysql://127.0.0.1:3306/mybatis?useUnicode=true&characterEncoding=utf-8"></property>
<property name="username" value="root"></property>
<property name="password" value="123456"></property>
</bean>
可以用properties文件来简化连接
<!--
连接properties文件
	没有context的记得配置头文件中的xmlns
-->
	<context:property-placeholder location="Sql.properties"/>
	<bean id="dataSource" class="com.alibaba.druid.pool.DruidDataSource">
		<property name="driverClassName" value="${Sql.driver}"></property>
		<property name="url" value="${Sql.url}"></property>
		<property name="username" value="${Sql.username}"></property>
		<property name="password" value="${Sql.password}"></property>
	</bean>
测试
@SuppressWarnings("resource")
	@Test
	public void testContext() throws SQLException {
		 ClassPathXmlApplicationContext classPathXmlApplicationContext = new ClassPathXmlApplicationContext("applicationContext.xml");
		 DruidDataSource bean = classPathXmlApplicationContext.getBean(DruidDataSource.class);
		 System.out.println(bean.getConnection());

	}
7、bean的作用域
在Spring中,bean作用域用于确定哪种类型的bean实例应该从Spring容器中返回给调用者
目前Spring Bean的作用域范围有五种:
| bean标签下scope属性作用域 | 描述 |
|---|---|
| singleton | 在spring IoC容器仅存在一个Bean实例,Bean以单例方式存在,bean作用域范围的默认值 |
| prototype | 每次从容器中调用Bean时,都返回一个新的实例,即每次调用getBean()时,相当于执行newXxxBean() |
| WebApplicationContext环境下作用域 | 描述 |
| request | 每次HTTP请求都会创建一个新的Bean,该作用域仅适用于web的Spring |
| session | 同一个HTTP Session共享一个Bean,不同Session使用不同的Bean。该作用域仅适用于web的Spring WebApplicationContext环境 |
| application | 限定一个Bean的作用域为ServletContext的生命周期。该作用域仅适用于web的Spring WebApplicationContext环境 |
被声明为singleton的bean
如果bean的作用域的属性被声明为singleton,那么Spring Ioc容器只会创建一个共享的bean实例。对于所有的bean请求,只要id与该bean定义的相匹配,那么Spring在每次需要时都返回同一个bean实例。
Singleton是单例类型,就是在创建起容器时就同时自动创建了一个bean的对象,不管你是否使用,他都存在了,每次获取到的对象都是同一个对象。注意,singleton作用域是Spring中的缺省作用域。你可以在 bean 的配置文件中设置作用域的属性为 singleton,如下所示:
<!-- A bean definition with singleton scope -->
<bean id="..." class="..." scope="singleton">
    <!-- collaborators and configuration for this bean go here -->
</bean>
8、bean的生命周期
spring的bean的生命周期主要是创建bean的过程,一个bean的生命周期主要是4个步骤:
实例化,属性注入(依赖注入),初始化,销毁
但是对于一些复杂的bean的创建,spring会在bean的生命周期中开放很多的接口,可以让你加载bean的时候对bean做一些改变,因此spring的bean的生命周期总共有以下几步:
首先在spring中有一些特殊的bean会介入到其他bean的声明周期当中去,所以一个普通的bean的生命周期为:
- 实现了BeanFactoryPostProcessor接口的bean,在加载其他的bean的时候,也会调用这个bean的 postProcessBeanFactory方法,可以在这个步骤去对bean中的属性去赋值。设置年龄初始化18等等。
- 实现了InstantiationAwareBeanPostProcessor接口的bean,会在实例化bean之前调用 postProcessBeforeInstantiation方法
- 然后在对bean进行实例化
- 对bean进行属性注入
- 对bean进行初始化,在初始化中,包含了以下几个步骤: 1. 实现了BeanFactoryAware接口,会先调用setBeanFactory方法 2. 实现了BeanNameAware接口,会先调用setBeanName方法 3. 实现了BeanPostProcessor接口,会先调用postProcessBeforeInitialization方法 3. 实现了InitializingBean接口,会调用afterPropertiesSet方法 4. 然后在进行aop后置处理,通过实现BeanPostProcessor接口,在postProcessAfterInitialization方法中进行动态代理
- 销毁
9、bean的作用域和生命周期的影响
-
在
scope="singleton"下生命周期:实例化、依赖注入、初始化是在加载IOC容器下就进行了例:只执行
@SuppressWarnings("resource")
	@Test
	public void testContext() throws SQLException {
		 ClassPathXmlApplicationContext classPathXmlApplicationContext = new ClassPathXmlApplicationContext("applicationContext.xml");
	}
时,就会加载生命周期中的实例化、依赖注入、初始化
-
在
scope="prototype"下生命周期:实例化、依赖注入、初始化是在创建加载对象下进行的,同时销毁 的周期不属于IOC容器管理所以不会执行
生命周期还受bean的后置处理器影响
完整的生命周期:
- 实例化
- 依赖注入
- 后置处理器BeanPostProcessor初始化之前处理
- 初始化
- 后置处理器BeanPostProcessor初始化之后处理
- 销毁
10、FactoryBean
FactoryBean是Spring提供的一种整合第三方框架的常用机制,和普通的bean不同,配置一个FactoryBean类型的bean,在获取这个bean的时候得到的并不是class属性中配置的这个类的对象,而是Object()方法的返回值
- FactoryBean是一个接口,需要创建一类来实现该接口
- 其中的三个方法:
- getObject():通过一个对象交给IoCR容器管理
- getObjectType():设置对象的类型
- isSingleton():所提供的对象是否单例
public interface FactoryBean<T> {

	/**
	 * The name of an attribute that can be
	 * {@link org.springframework.core.AttributeAccessor#setAttribute set} on a
	 * {@link org.springframework.beans.factory.config.BeanDefinition} so that
	 * factory beans can signal their object type when it can't be deduced from
	 * the factory bean class.
	 * @since 5.2
	 */
	String OBJECT_TYPE_ATTRIBUTE = "factoryBeanObjectType";


	/**
	 * Return an instance (possibly shared or independent) of the object
	 * managed by this factory.
	 * <p>As with a {@link BeanFactory}, this allows support for both the
	 * Singleton and Prototype design pattern.
	 * <p>If this FactoryBean is not fully initialized yet at the time of
	 * the call (for example because it is involved in a circular reference),
	 * throw a corresponding {@link FactoryBeanNotInitializedException}.
	 * <p>As of Spring 2.0, FactoryBeans are allowed to return {@code null}
	 * objects. The factory will consider this as normal value to be used; it
	 * will not throw a FactoryBeanNotInitializedException in this case anymore.
	 * FactoryBean implementations are encouraged to throw
	 * FactoryBeanNotInitializedException themselves now, as appropriate.
	 * @return an instance of the bean (can be {@code null})
	 * @throws Exception in case of creation errors
	 * @see FactoryBeanNotInitializedException
	 */
	@Nullable
	T getObject() throws Exception;

	/**
	 * Return the type of object that this FactoryBean creates,
	 * or {@code null} if not known in advance.
	 * <p>This allows one to check for specific types of beans without
	 * instantiating objects, for example on autowiring.
	 * <p>In the case of implementations that are creating a singleton object,
	 * this method should try to avoid singleton creation as far as possible;
	 * it should rather estimate the type in advance.
	 * For prototypes, returning a meaningful type here is advisable too.
	 * <p>This method can be called <i>before</i> this FactoryBean has
	 * been fully initialized. It must not rely on state created during
	 * initialization; of course, it can still use such state if available.
	 * <p><b>NOTE:</b> Autowiring will simply ignore FactoryBeans that return
	 * {@code null} here. Therefore, it is highly recommended to implement
	 * this method properly, using the current state of the FactoryBean.
	 * @return the type of object that this FactoryBean creates,
	 * or {@code null} if not known at the time of the call
	 * @see ListableBeanFactory#getBeansOfType
	 */
	@Nullable
	Class<?> getObjectType();

	/**
	 * Is the object managed by this factory a singleton? That is,
	 * will {@link #getObject()} always return the same object
	 * (a reference that can be cached)?
	 * <p><b>NOTE:</b> If a FactoryBean indicates to hold a singleton object,
	 * the object returned from {@code getObject()} might get cached
	 * by the owning BeanFactory. Hence, do not return {@code true}
	 * unless the FactoryBean always exposes the same reference.
	 * <p>The singleton status of the FactoryBean itself will generally
	 * be provided by the owning BeanFactory; usually, it has to be
	 * defined as singleton there.
	 * <p><b>NOTE:</b> This method returning {@code false} does not
	 * necessarily indicate that returned objects are independent instances.
	 * An implementation of the extended {@link SmartFactoryBean} interface
	 * may explicitly indicate independent instances through its
	 * {@link SmartFactoryBean#isPrototype()} method. Plain {@link FactoryBean}
	 * implementations which do not implement this extended interface are
	 * simply assumed to always return independent instances if the
	 * {@code isSingleton()} implementation returns {@code false}.
	 * <p>The default implementation returns {@code true}, since a
	 * {@code FactoryBean} typically manages a singleton instance.
	 * @return whether the exposed object is a singleton
	 * @see #getObject()
	 * @see SmartFactoryBean#isPrototype()
	 */
	default boolean isSingleton() {
		return true;
	}
}
11、基于xml的自动装配
-
设置一个服务层service、依赖层dao、控制层controller
-
用控制层来控制服务层,服务层来调用依赖层中的方法去实现层层依赖
-
在xml文件中来配置bean
<bean class="controller.UserController"> <property name="userService" ref="userService"></property> </bean> <bean id="userDao" class="dao.UserDaoImpl"> </bean> <bean id="userService" class="service.UserServiceImpl"> <property name="userDao" ref="userDao"></property> </bean>-
手动装配
UserController bean = ioc.getBean(UserController.class); -
自动装配
可以通过bean标签中的autowire属性自动装配的策略
自动装配策略:
no、default:表示不装配,即bean中的属性不会自动匹配某个bean为属性赋值,此时用默认值
byType:装配为bean中属性的类型赋值,需要在其它bean中找到其属性相关的类型bean
-
 <bean id="userService" class="service.UserServiceImpl" autowire="byType">
	  	<property name="userDao" ref="userDao"></property>
	  </bean>
  注意:

  a> 若通过类型没有找到如何一个类型匹配的bean,此时就不装配

  b> 若通过类型找到了多个类型匹配的bean,此时会抛出异常

  总结:当使用byType实现自动匹配,IoC中有且只有一个匹配的bean

  byName:(通过类型找到了多个类型匹配的bean,但不是多个重复id名的bean)
基于注解管理bean
1、标记和扫描
(1)注解
和xml配置文件一样,注解本身并不能执行,具体功能是框架检测到注解标记的位置,然后针对这个位置按照标记注解的功能来执行具体操作
本质:所有的一切的操作都是java代码来完成的,xml和注解只是告诉框架中的java代码如何进行
(2)扫描
spring为了知道程序员在那些地方什么注解(一般实体类不交给Ioc来管理),需要通过扫描的方法来进行操作
(3)引入依赖和创建配置文件
(4)标识组件的常用注释
@Component:将类表示为普通文件
@Controller:将类标识为控制层组件
@Service:将类标识为业务层组件
@Repository:将类标识为持久层组件
(5)配置文件中扫描注释
<context:component-scan base-package="controller,dao,service"></context:component-scan>
注: 可以把所有包都放在一个包下,这样通过一个包来扫描所有注释:base-package=“spring”
一般情况下springMVC来扫描控制层,而spring来扫描其他层。
- 可以通过context:exclude-filter标签来排除组件
context:exclude-filter标签属性:type
- annotation:通过注释的类型来排除
- expression:通过类的全类名的类型来排除
<context:component-scan base-package="controller,dao,service">
	  	<context:exclude-filter type="annotation" expression="org.springframework.stereotype.Controller"/>
	  </context:component-scan>
- 可以通过context:include-filter标签来只读组件(包含扫描)
<context:include-filter type="annotation" expression="org.springframework.stereotype.Controller"/>
但是默认bean扫描一般是都扫描,所以要增加标签:use-default-filters=“false”,所设置的包下的类都不需要扫描
<context:component-scan base-package="controller,dao,service" use-default-filters="false">
	  	<!-- <context:exclude-filter type="annotation" expression="org.springframework.stereotype.Controller"/>  -->
	  	<context:include-filter type="annotation" expression="org.springframework.stereotype.Controller"/>
	  </context:component-scan>
(6)注释+扫描下的bean的id
默认值为类的小驼峰,即:类的首字母为小写的全类名
可以通过注释后加自定义id名(通过标识组件的注解的value属性来添加):
@Controller("controller")
(7)实现自动装配的注解
@Autowired 能够标识的位置
- 标识在成员变量上,此时不需要设置成员变量的set方法(常用)
- 标识在set方法上
- 标识在当前变量的有参构造上
@Autowired本质:
(1)默认通过byType的方式,在IoC容器中通过类型匹配某个bean为属性赋值
(2)如果有多个id相同的bean同注释下的类名字一样,注释会自动转换byName的方式来赋值
(3)若byType和byName都无法实现自动装配,即IoC容器中有多个类型匹配的bean,且这些bean的id和要赋值的属性的属性名都不一致,此时会抛出异常
(4)此时可以在要赋值的属性上加***@Qualifer***,通过该属性的value值,指定某个bean的id,将这个bean赋值
AOP
1、代理模式简介
基于对接口的方法附蹭一些功能时,可以利用代理模式来实现不改变接口方法去增加方法的功能
代理模式本质:方法接口–>代理接口管理–>调用代理接口实现方法
代理类模板:
public class ProxyFactroy {
	private Object target;

	public ProxyFactroy(Object target) {
		super();
		this.target = target;
	}

	public Object getproxy() {
		/**
		 * ClassLoader: 指加载动态代理类的类加载器
		 * Class<?>[]: 获取目标对象所以的class对象的数组
		 * InvocationHandler:设置代理类中的抽象方法怎么写
		 */
		ClassLoader classLoader = this.getClass().getClassLoader();
		Class<?>[] interfaces = target.getClass().getInterfaces();
		InvocationHandler h = new InvocationHandler() {

			@Override
			public Object invoke(Object proxy, Method method, Object[] args) throws Throwable {
//				System.out.println();
//			    proxy代表代理对象,method标识要执行的方法,args标识要执行的方法用到的参数
				Object result = method.invoke(target, args);
				return result;
			}
		};
		return Proxy.newProxyInstance(classLoader,interfaces,h);
	}
}
可以在代理类里增加一些功能,多用于日志功能。
2、AOP概念及相关术语
2.1、概述
AOP是一种设计思想,是软件设计领域中面向切面编程,它是面向对象编程的一种补充和完善,它以预编译方式和运行期间动态代理方式实现在不修改源代码的情况下给程序统一添加额外功能的一种技术(代理模式)。
2.2、作用
(1)简化代码:把方法中固定位置的重复的代码抽取出来,让被抽取的方法更专注于自己的核心功能,提高内聚性。
(2)代码增强:把特定的功能封装到切面中,看哪里需要就往上套,被套用了切面逻辑的方法就被切面增强了。
2.3、AOP管理
AOP注意事项:
切面类和目标类都需要交给IOC容器管理
切面类必须通过@Aspect注解标识为一个切面
在spring的配置文件中配置aop:aspectj-autoproxy
(1)引入依赖
<!-- https://mvnrepository.com/artifact/org.springframework/spring-aspects -->
<dependency>
    <groupId>org.springframework</groupId>
    <artifactId>spring-aspects</artifactId>
    <version>5.3.1</version>
</dependency>
(2)配置applicationContext.xml
<context:component-scan base-package="annotation" ></context:component-scan>
<!-- 开启基于注解的AOP -->
<aop:aspectj-autoproxy></aop:aspectj-autoproxy>
(3)配置接口和方法
package annotation;

public interface TestAspect {
	int add(int i, int j);
}
package annotation;

import org.springframework.stereotype.Component;

@Component
public class TsetAspectImpl implements TestAspect {

	@Override
	public int add(int i,int j) {
		int result = i + j;
		System.out.println(result);
		return result;
	}

}
(4)配置切面类
package annotation;


import java.util.Arrays;
import org.aspectj.lang.JoinPoint;
import org.aspectj.lang.ProceedingJoinPoint;
import org.aspectj.lang.Signature;
import org.aspectj.lang.annotation.After;
import org.aspectj.lang.annotation.AfterReturning;
import org.aspectj.lang.annotation.AfterThrowing;
import org.aspectj.lang.annotation.Around;
import org.aspectj.lang.annotation.Aspect;
import org.aspectj.lang.annotation.Before;
import org.aspectj.lang.annotation.Pointcut;
import org.springframework.stereotype.Component;

/**
 *1.
 *在切面中,需要通过指定的注解将方法标识为通知方法
 * @Before:前置通知,在目标对象方法执行之前执行
 * @After:后置通知,在目标对象方法执行之后执行
 * @AfterReturning:返回通知,在目标对象方法执行返回之后执行
 * @AfterThrowing:异常通知
 * @Around:环绕通知
 * 2.
 * 第一个*表示任意的访问修饰符和返回值类型
 * 第二个*表示类中任意的方法
 * 。。表示任意的参数列表
 * 类的地方也可以使用*,表示包下所以的类
 * 3.
 * 重用切入点表达式
 * @Pointcut声明一个公共的切入点表达式
 * @Pointcut("execution(* annotation.TsetAspectImpl.*(..))")
	public void pointCut() {

	}
 * 4.
 * 在通知方法的参数位置,设置JoinPoint类型的参数,就可以获取连接点所对应方法的信息
 *
 *
 */
@Component
@Aspect //将当前组件标志为切面

public class LoggerAspect {

	@Pointcut("execution(* annotation.TsetAspectImpl.*(..))")
	public void pointCut() {

	}

	//方法执行之前会执行
	@Before("pointCut()")
//	@Before(value = "execution(* annotation.TsetAspectImpl.*(..))")
//	@Before("execution(public void dao.UserDaoImpl.saveUser())")
	public void beforeadvicemethod(JoinPoint joinpoint) {
		//获取连接点所对应方法的签名信息
		Signature signature = joinpoint.getSignature();
		//获取连接点所对应方法的参数
		Object[] args = joinpoint.getArgs();
		System.out.println("LoggerAspect,方法:"+signature.getName()+",参数:"+Arrays.toString(args));
	}

	@After("pointCut()")
	public void afteradvicemethod() {
		System.out.println("后置通知");
	}

	/**
	 * 在返回通知中若要获取目标对象方法的返回值
	 * 只需要通过@AfterReturning中的returning属性
	 * 就可以将通知方法的某个参数指定为接收目标对象方法的返回值的参数
	 */
	@AfterReturning(value = "pointCut()",returning = "result")
	public void AfterReturningmethod(JoinPoint joinPoint,Object result) {
		Signature signature = joinPoint.getSignature();
		System.out.println("方法:"+signature.getName()+"结果:"+result);
	}

	/**
	 * 在异常通知中若要获取目标对象方法的异常
	 * 只需要通过@AfterThrowing中的throwing属性
	 * 就可以将通知方法的某个参数指定为接收目标对象方法出现的异常的参数
	 */
	@AfterThrowing(value = "pointCut()",throwing = "ex")
	public void AfterThrowingmethod(Throwable ex) {
		System.out.println("异常:"+ex);
	}

	@Around(value = "pointCut()")
	public Object aroundMethod(ProceedingJoinPoint JoinPoint) {
		Object proceed = null;
		Signature signature = JoinPoint.getSignature();
		Object[] args = JoinPoint.getArgs();
		try {
			//前置通知
			System.out.println("LoggerAspect,方法:"+signature.getName()+",参数:"+Arrays.toString(args));
			//表示目标对象方法的执行
			proceed = JoinPoint.proceed();
			//返回通知
			System.out.println("方法:"+signature.getName()+"结果:"+proceed);
		} catch (Throwable e) {
			// TODO Auto-generated catch block
			e.printStackTrace();
			//异常通知
			System.out.println("异常:"+e);
		}finally {
			//后置通知
			System.out.println("后置通知");
		}
		return proceed;
	}
}
(5)切面的优先级
用注释的@Order(value)通过value属性来设置优先级,默认值Interger的最大值
value值越小,优先级越高
public @interface Order {

	/**
	 * Default order value for elements not explicitly annotated with {@code @Order},
	 * equal to the value of {@code Integer.MAX_VALUE / 2}.
	 *
	 * @since 5.6
	 * @see Order#value
	 */
	@API(status = EXPERIMENTAL, since = "5.6")
	int DEFAULT = Integer.MAX_VALUE / 2;

	/**
	 * The order value for the annotated element (i.e., field, method, or class).
	 *
	 * <p>Elements are ordered based on priority where a lower value has greater
	 * priority than a higher value. For example, {@link Integer#MAX_VALUE} has
	 * the lowest priority.
	 *
	 * @see #DEFAULT
	 */
	int value();
(6)基于xml下的AOP
 <context:component-scan base-package="annotation" ></context:component-scan>


	  <aop:config>
	  	<aop:pointcut expression="pointCut" id="execution(* annotation.TsetAspectImpl.*(..))"/>
	  	<aop:aspect ref="loggerAspect">
	  		<aop:before method="beforeAdviceMethod" pointcut-ref="pointCut"/>
	  		<aop:after method="afterAdviceMethod" pointcut-ref="pointCut"/>
	  		<aop:after-returning method="afterReturningAdviceMethod" returning="result" pointcut-ref="pointCut"/>
	  		<aop:after-throwing method="afterThrowingAdviceMethod"  throwing="ex" pointcut-ref="pointCut"/>
	  		<aop:around method="aroundAdviceMethod" pointcut-ref="pointCut"/>
	  	</aop:aspect>
	  </aop:config>
事务层概念和相关事务
1、JdbcTemplate
1.1、简介
Spring 框架对JDBC进行封装,使用JdbcTemplate 方便实现对数据库操作
1.2、准备工作
(1)引入依赖
<!-- https://mvnrepository.com/artifact/org.springframework/spring-context -->
<dependency>
    <groupId>org.springframework</groupId>
    <artifactId>spring-context</artifactId>
    <version>5.3.1</version>
</dependency>
<!-- spring 持久化层支持jar包
	 spring 在执行持久化层操作、与持久化层技术进行整合过程中,需要使用orm、jdbc、tx三个jar
	 导入orm包就可以通过 Maven 的依赖传递性把其它两个也导入
-->
<!-- https://mvnrepository.com/artifact/org.springframework/spring-orm -->
<dependency>
    <groupId>org.springframework</groupId>
    <artifactId>spring-orm</artifactId>
    <version>5.3.10</version>
</dependency>
<!-- spring 相关测试 -->
<!-- https://mvnrepository.com/artifact/org.springframework/spring-test -->
<dependency>
    <groupId>org.springframework</groupId>
    <artifactId>spring-test</artifactId>
    <version>5.3.10</version>
</dependency>
<!-- 连接mysql数据库 -->
<!-- https://mvnrepository.com/artifact/mysql/mysql-connector-java -->
<dependency>
    <groupId>mysql</groupId>
    <artifactId>mysql-connector-java</artifactId>
    <version>8.0.28</version>
</dependency>
<!-- 数据源 -->
<!-- https://mvnrepository.com/artifact/com.alibaba/druid -->
<dependency>
    <groupId>com.alibaba</groupId>
    <artifactId>druid</artifactId>
    <version>1.1.24</version>
</dependency>
可能遇到的问题:关于不能用SpringJUnit4ClassRunner.class
Spring Junit测试找不到SpringJUnit4ClassRunner.class_TianXinCoord的博客-CSDN博客
(2)配置核心xml
<!-- 连接properties文件 -->
	<context:property-placeholder location="classpath:Sql.properties"/>
	<bean id="dataSource" class="com.alibaba.druid.pool.DruidDataSource">
		<property name="driverClassName" value="${Sql.driver}"></property>
		<property name="url" value="${Sql.url}"></property>
		<property name="username" value="${Sql.username}"></property>
		<property name="password" value="${Sql.password}"></property>
	</bean>
	<bean class="org.springframework.jdbc.core.JdbcTemplate">
		<property name="dataSource" ref="dataSource"></property>
	</bean>
(3)测试JdbcTemplate增删改查
package spring;

import java.util.List;

import org.junit.Test;
import org.junit.runner.RunWith;
import org.springframework.beans.factory.annotation.Autowired;
import org.springframework.jdbc.core.BeanPropertyRowMapper;
import org.springframework.jdbc.core.JdbcTemplate;
import org.springframework.test.context.ContextConfiguration;
import org.springframework.test.context.junit4.SpringJUnit4ClassRunner;

import pojo.DUser;

//指定当前测试类在spring的测试环境中执行,此时就可以通过注入的方式直接获取IOC容器中的bean
@RunWith(SpringJUnit4ClassRunner.class)
//设置spring测试环境的配置文件
@ContextConfiguration("classpath:applicationContext.xml")
public class TestJdbcTemplate {

	@Autowired
	private JdbcTemplate jdbcTemplate;
	@Test
	public void testadd() {
		String sql = "insert into d_user values(null,?)";
		//增删改都用update
		jdbcTemplate.update(sql,"D");
		System.out.println("add");
	}
	@Test
	public void testqueryById() {
		String sql = "select * from d_user where d_id = ?";
		DUser dUser = jdbcTemplate.queryForObject(sql, new BeanPropertyRowMapper<>(DUser.class),1);
		System.out.println(dUser.toString());

	}
	@Test
	public void testquery() {
		String sql = "select * from d_user";
		List<DUser> list = jdbcTemplate.query(sql, new BeanPropertyRowMapper<>(DUser.class));
		System.out.println(list);
	}
	@Test
	public void testgetCount() {
		String sql = "select count(*) from d_user";
		Integer integer = jdbcTemplate.queryForObject(sql,Integer.class);
		System.out.println(integer);
	}
}
2、声明式事务概念
2.1、编程式事务
事务功能的相关操作全部通过自己编写代码来实现:
public Connection getConnection() {
		Connection connection = null;
		try {
			connection.setAutoCommit(false);

			connection.commit();
		} catch (SQLException e) {
			try {
				connection.rollback();
			} catch (SQLException e1) {
				// TODO Auto-generated catch block
				e1.printStackTrace();
			}
			e.printStackTrace();
		}finally {
			try {
				connection.close();
			} catch (SQLException e) {
				e.printStackTrace();
			}
		}
		return connection;
	}
编程式的实现方式存在缺陷:
- 细节没有被屏蔽:具体操作过程中,所以细节都需要程序员自己来完成
- 代码复用性不高:如果没有有效抽取出来,每次实现功能都需要自己编写代码,代码没有得到复用
2.2、声明式事务
既然事务控制的代码有迹可循,代码的结构基本是确定的,所以框架就可以将固定模式的代码抽取出来,进行相关的封装。
封装起来后,我们只需要在配置文件中进行简单的配置即可完成操作。
所以总结两种概念事务:
- 编程式:自己写代码实现功能
- 声明式:通过配置让框架实现功能
3、基于注解的声明式事务
1. 在spring的配置文件中配置事务管理器(spring自带有切面和声明式事务管理)
<!-- 连接properties文件 -->
	<context:property-placeholder location="classpath:Sql.properties"/>
	<bean id="dataSource" class="com.alibaba.druid.pool.DruidDataSource">
		<property name="driverClassName" value="${Sql.driver}"></property>
		<property name="url" value="${Sql.url}"></property>
		<property name="username" value="${Sql.username}"></property>
		<property name="password" value="${Sql.password}"></property>
	</bean>
	<bean class="org.springframework.jdbc.core.JdbcTemplate">
		<property name="dataSource" ref="dataSource"></property>
	</bean>
	<!-- 配置事务管理器:相当于切面 -->
	<bean id="transactionManager" class="org.springframework.jdbc.datasource.DataSourceTransactionManager">
		<property name="dataSource" ref="dataSource"></property>
	</bean>
	<!-- 开启事务的注释驱动
		 将使用@Transactional注解所标识的方法或类中所有的方法使用事务进行管理
		 transaction-manager属性设置事务管理器的id
		 若事务管理器的bean的id默认为transactionManager,则该属性可以不写
	 -->
	<tx:annotation-driven transaction-manager="transactionManager"/>
2. 开启事务的注解驱动
在需要被事务管理的方法上,添加**@Transactional**注解,该方法就会被事务管理
@Transactional注解标识的位置:
- 标识在方法上
- 标识在类上,则类中所有的方法都会被事务管理
@Transactional 注解参数详解,以及注解的使用特性说明(典藏版)_transactional注解参数_Java Punk的博客-CSDN博客
事务隔离级别:
与持久层有关,数据库系统必须具有隔离并发运行各个事务的能力。一个事务与其它事务隔离的程度称为隔离级别。SQL标准中规定了多个事务隔离级别,不同隔离级别对应不同的干扰程度,隔离级别越高,数据一致性就越好,但并发性越弱。
3. 三种读取错误
(1)脏读
事务 B 去查询了事务 A 修改过的数据,但是此时事务 A 还没提交,所以事务 A 随时会回滚导致事务 B 再次查询就读不到刚才事务 A 修改的数据了,查询到的数据没有意义,这种叫做脏读
(2)不可重复读
事务A去第一次查询一条数据,同时事务B可以修改这条数据并提交事务(避免脏读),之后执行事务B,事务A再去查询这条数据时就查询不到原先的数据,而是事务B修改过的数据,这样多次查询到的数据是不一样的,这种数据叫做不可重复读
(3)幻读
事务A第一次查询一条数据,之后事务B并发执行在这条数据上进行了修改同时提交了事务,当事务A再次查询这条数据时发现数据改变了,简单来说,就是一个事务用一样的 SQL 多次查询,结果每次查询都会发现查到一些之前没看到过的数据,这种就叫幻读
4、基于xml的声明式事务
<!-- 连接properties文件 -->
	<context:property-placeholder location="classpath:Sql.properties"/>
	<bean id="dataSource" class="com.alibaba.druid.pool.DruidDataSource">
		<property name="driverClassName" value="${Sql.driver}"></property>
		<property name="url" value="${Sql.url}"></property>
		<property name="username" value="${Sql.username}"></property>
		<property name="password" value="${Sql.password}"></property>
	</bean>
	<bean class="org.springframework.jdbc.core.JdbcTemplate">
		<property name="dataSource" ref="dataSource"></property>
	</bean>
	<!-- 配置事务管理器:相当于切面 -->
	<bean id="transactionManager" class="org.springframework.jdbc.datasource.DataSourceTransactionManager">
		<property name="dataSource" ref="dataSource"></property>
	</bean>
<!-- tx:advice标签:配置事务通知
		 id属性:唯一标识
		 transaction-manager属性:关联事务管理器
	 -->
<tx:advice id="tx" transaction-manager="transactionManager">
		<tx:attributes>
            <!-- tx:method标签:配置具体的事务方法
	 	  		 name属性:指定方法名
	 		-->
			<tx:method name="testXML"/>
            <!-- * 表示当前类下的所有方法都受声明式事务管理 -->
			<tx:method name="*"/>
		</tx:attributes>
	</tx:advice>
	<aop:config>
        <!-- 配置事务通知和切入点表达式 -->
		<aop:advisor advice-ref="tx" pointcut="execution(* service.TsetServiceImpl.*(..))"/>
	</aop:config>
注: 基于xml实现的声明式事务,必须引入aspectj的依赖
<dependency>
    <groupId>org.springframework</groupId>
    <artifactId>spring-aspects</artifactId>
    <version>5.3.1</version>
</dependency>


