一、项目准备:
1.创建一个Springboot项目。
2.注册一个微软的Azure AD服务,并且注册应用,创建用户。
springboot项目pom文件如下:
<?xml version="1.0" encoding="UTF-8"?>
<project xmlns="http://maven.apache.org/POM/4.0.0"
         xmlns:xsi="http://www.w3.org/2001/XMLSchema-instance"
         xsi:schemaLocation="http://maven.apache.org/POM/4.0.0 http://maven.apache.org/xsd/maven-4.0.0.xsd">
    <modelVersion>4.0.0</modelVersion>

    <parent>
        <groupId>org.springframework.boot</groupId>
        <artifactId>spring-boot-starter-parent</artifactId>
        <version>2.7.2</version>
        <relativePath/>
    </parent>

    <groupId>com.framework</groupId>
    <artifactId>security-azure-test</artifactId>
    <version>1.0-SNAPSHOT</version>
    <description>Demo project for Spring Boot</description>

    <properties>
        <java.version>11</java.version>
        <spring-cloud-azure.version>4.7.0</spring-cloud-azure.version>
    </properties>
    <dependencies>
        <dependency>
            <groupId>org.springframework.boot</groupId>
            <artifactId>spring-boot-starter-web</artifactId>
        </dependency>

        <!-- Spring Security -->
        <dependency>
            <groupId>org.springframework.boot</groupId>
            <artifactId>spring-boot-starter-security</artifactId>
        </dependency>

        <!-- 引入前端模板依赖   -->
        <dependency>
            <groupId>org.springframework.boot</groupId>
            <artifactId>spring-boot-starter-thymeleaf</artifactId>
        </dependency>

        <dependency>
            <groupId>org.springframework.boot</groupId>
            <artifactId>spring-boot-starter-oauth2-client</artifactId>
        </dependency>

        <dependency>
            <groupId>com.azure.spring</groupId>
            <artifactId>spring-cloud-azure-starter-active-directory</artifactId>
        </dependency>

        <!--引入jpa -->
        <dependency>
            <groupId>org.springframework.boot</groupId>
            <artifactId>spring-boot-starter-data-jpa</artifactId>
        </dependency>

        <!--数据库链接驱动-->
        <dependency>
            <groupId>mysql</groupId>
            <artifactId>mysql-connector-java</artifactId>
        </dependency>

        <!-- 日志系统 -->
        <dependency>
            <groupId>org.slf4j</groupId>
            <artifactId>slf4j-api</artifactId>
            <version>1.7.25</version>
        </dependency>

        <dependency>
            <groupId>org.slf4j</groupId>
            <artifactId>slf4j-log4j12</artifactId>
            <version>1.7.25</version>
        </dependency>

        <dependency>
            <groupId>org.apache.commons</groupId>
            <artifactId>commons-lang3</artifactId>
            <version>3.5</version>
        </dependency>

        <dependency>
            <groupId>org.projectlombok</groupId>
            <artifactId>lombok</artifactId>
            <version>1.18.2</version>
            <scope>provided</scope>
        </dependency>

        <dependency>
            <groupId>org.springframework.boot</groupId>
            <artifactId>spring-boot-starter-test</artifactId>
            <scope>test</scope>
        </dependency>
    </dependencies>

    <dependencyManagement>
        <dependencies>
            <dependency>
                <groupId>com.azure.spring</groupId>
                <artifactId>spring-cloud-azure-dependencies</artifactId>
                <version>${spring-cloud-azure.version}</version>
                <type>pom</type>
                <scope>import</scope>
            </dependency>
        </dependencies>
    </dependencyManagement>
</project>
二、构建SpringSecurityConfig
这里在HttpSecurity需要配置常规登录选项,并且同时使用oauth2Login登录选项。
1.在authorizationManagerBuilder中构建自定义的一个Provider。
2.在httpSecurity构建常规账号密码登录的选项。
3.在httpSecurity构建oauth2login授权登录选项。
4.在httpSecurity构建Oauth2LoginConfigurer,并且实现自定义实现Oauth2UserService,来完成用户角色权限的构建。
5.在httpSecurity添加授权认证成功后的handler实现,用于重定向授权后的登录成功接口。
代码如下:
/**
 * @Author: LongGE
 * @Date: 2023-05-12
 * @Description:
 */
@EnableWebSecurity
@EnableGlobalMethodSecurity(prePostEnabled = true)
public class SpringSecurityConfig extends WebSecurityConfigurerAdapter {

    /**
     * 在授权成功后查询本地数据库用户以及角色和权限信息。
     */
    @Autowired
    private CustomOidcService customOidcService;

    /**
     * 自定义的provider,用于账号密码登录
     */
    @Autowired
    private CustomDaoAuthenticationProvider customDaoAuthenticationProvider;

    /**
     * 自定义在授权成功后,控制授权登录成功后跳转本地项目的页面和接口,并且也可以用于添加session和cookie
     */
    @Autowired
    private CustomAuthenticationSuccessHandler customAuthenticationSuccessHandler;

    /**
     * 密码校对验证器
     * @return
     */
    @Bean
    public BCryptPasswordEncoder passwordEncoder() {
        return new BCryptPasswordEncoder();
    }

    /**
     * 构建manager认证器
     * @return
     * @throws Exception
     */
    @Bean
    public AuthenticationManager authenticationManagerBean() throws Exception {
        return super.authenticationManagerBean();
    }

    /**
     * 添加自定义的provider,通过自定义的provider可以实现不同的账号密码登录
     * @param authenticationManagerBuilder
     * @throws Exception
     */
    @Override
    public void configure(AuthenticationManagerBuilder authenticationManagerBuilder) {
        authenticationManagerBuilder.authenticationProvider(customDaoAuthenticationProvider);
    }

    /**
     * 构建HttpSecurity 认证
     * @param http
     * @throws Exception
     */
    @Override
    protected void configure(HttpSecurity http) throws Exception {
        http
                .csrf().disable()
                .authorizeRequests()
                .antMatchers("/login").permitAll()
                .antMatchers("/login/oauth2/code/azure").permitAll()
                .antMatchers("/AuthLoginController/**").permitAll()
                .anyRequest().authenticated()
                .and()
                //构建UsernamePasswordAuthenticationFilter拦截器
                .formLogin()
                .loginPage("/login").permitAll()
                .and()
                //构建OAuth2LoginConfigurer,用于OAuth2Login授权登录
                .oauth2Login()
                .loginPage("/login").permitAll()
                //授权服务器UserInfo端点的配置选项。
                .userInfoEndpoint()
                //添加一个自定义的OAuth2UserService,用于实现授权成功后对用户信息和角色权限信息的封装
                .oidcUserService(customOidcService)
                .and()
                //添加一个Handler,用于授权成功后,对跳转登录成功后的重定向页面进行指向,也可以用于添加授权登录成功的sessionID和Cookie
                .successHandler(customAuthenticationSuccessHandler);
    }

    /**
     * 过滤静态页面和图片信息,不让Filter拦截
     * @param web
     */
    @Override
    public void configure(WebSecurity web) {
        web.ignoring().antMatchers("/assets/images/**");
    }
}
三、自定义CustomDaoAuthenticationProvider
自己实现AuthenticationProvider接口,这样可以根据自己传入的不同TAuthenticationToken去执行自己定义Provider,可以更加灵活自主的实现登录业务逻辑。
/**
 * @Author: LongGE
 * @Date: 2023-04-10
 * @Description:
 */
@Component
@Slf4j
public class CustomDaoAuthenticationProvider implements AuthenticationProvider {

    @Autowired
    private CustomUserDetailsServiceImpl customUserDetailsService;

    @Override
    public Authentication authenticate(Authentication authentication) throws AuthenticationException {
        CustomUserDetails customUserDetails = (CustomUserDetails) customUserDetailsService.loadUserByUsername(authentication.getPrincipal().toString());
        CustomDaoUsernameToken customDaoUsernameToken = new CustomDaoUsernameToken(customUserDetails,null, customUserDetails.getAuthorities());
        return customDaoUsernameToken;
    }

    /**
     * As a business judgment, built in the controller,
     * the judgment is made here so that you can call the AuthenticationProvider that encapsulates the corresponding one in ProviderManeger
     * @param authentication
     * @return
     */
    @Override
    public boolean supports(Class<?> authentication) {
        return CustomDaoUsernameToken.class.isAssignableFrom(authentication);
    }
}
四、自定义CustomDaoUsernameToken
继承AbstractAuthenticationToken抽象类,自己定义一个AuthenticationToken类,这样在登录时候调用authenticate()方法时候传入自己定义的AuthenticationToken就可以,这样ProviderManager类就会自动匹配自定义的Provider去实现登录认证逻辑。
/**
 * @Author: LongGE
 * @Date: 2023-04-10
 * @Description:
 */
public class CustomDaoUsernameToken extends AbstractAuthenticationToken {

    private static final long serialVersionUID = SpringSecurityCoreVersion.SERIAL_VERSION_UID;

    private final Object principal;

    private Object credentials;

    public CustomDaoUsernameToken(Object principal, Object credentials) {
        super(null);
        this.principal = principal;
        this.credentials = credentials;
        setAuthenticated(false);
    }

    public CustomDaoUsernameToken(Object principal, Object credentials,
                                               Collection<? extends GrantedAuthority> authorities) {
        super(authorities);
        this.principal = principal;
        this.credentials = credentials;
        super.setAuthenticated(true);
    }


    @Override
    public Object getCredentials() {
        return credentials;
    }

    @Override
    public Object getPrincipal() {
        return principal;
    }

    @Override
    public void setAuthenticated(boolean isAuthenticated) throws IllegalArgumentException {
        Assert.isTrue(!isAuthenticated,
                "Cannot set this token to trusted - use constructor which takes a GrantedAuthority list instead");
        super.setAuthenticated(false);
    }

    @Override
    public void eraseCredentials() {
        super.eraseCredentials();
        this.credentials = null;
    }
}
五、自定义CustomUserDetailsServiceImpl
自定义的登录认证,实现UserDetailService接口,在provider中会调用自定义的CustomUserDetailsServiceImpl类的loadUserByUsername()方法来认证账号是否存在并且查询用户角色以及权限信息,并且封装到了Security的上下文中,后续方法可以直接在上线文中回去这些用户信息。
@Service
public class CustomUserDetailsServiceImpl implements UserDetailsService {

	private static final Logger LOGGER = LoggerFactory.getLogger(CustomUserDetailsServiceImpl.class);

	@Autowired
	private SystemUserDao systemUserDao;

	@Override
	public UserDetails loadUserByUsername(String username) throws BadCredentialsException {

		LOGGER.debug("CustomUserDetailsServiceImpl: " + ":loadUserByUsername()={}", username);

		User user = new User();
		Set<Authority> hasAuthority = new HashSet<>();
		SystemUser systemUser = systemUserDao.queryByUsername(username);
		user.setId(systemUser.getId());
		user.setUsername(username);
		user.setEnabled(true);
		user.setAuthorities(hasAuthority);
		return new CustomUserDetails(user);
	}
}
六、自定义CustomOidcService
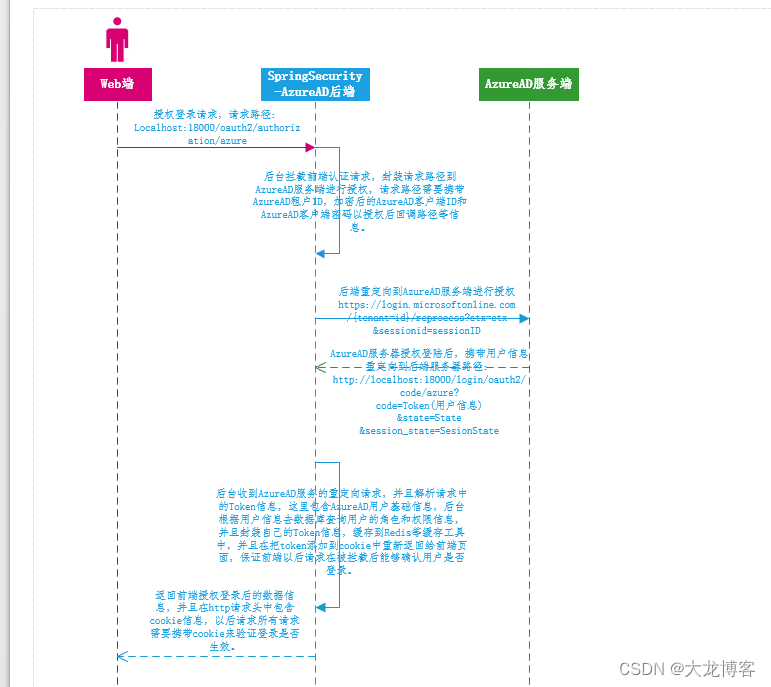
在AzureAD授权认证后,返回给我们用户信息,由OAuth2LoginAuthenticationFilter拦截器拦截,调用attemptAuthentication()方法,在此方法中会获取ProviderManager类,在调用ProviderManager的authenticate()方法进行认证,传入的参数是OAuth2LoginAuthenticationToken类型的token,在封装在ProviderManager中只有OidcAuthorizationCodeAuthenticationProvider类满足认证条件,在此provider的authenticate()方法中会调用自定义的CustomOidcService类的loadUser()方法进行认证,传入的参数是OidcUserRequest类型,在这里通过userRequest.getIdToken();方法获取OidcIdToken,这里封装AzureAD中的基础用户信息,通过用户信息去数据库查询用户角色和权限,将角色和权限封装到Security的上下文中,并且也可以封装到redis等缓存中,方便后续使用。
/**
 * @Author: LongGE
 * @Date: 2023-05-15
 * @Description:
 */
@Slf4j
@Service
public class CustomOidcService implements OAuth2UserService<OidcUserRequest, OidcUser> {

    @Autowired
    private SystemUserDao systemUserDao;

    @Override
    public OidcUser loadUser(OidcUserRequest userRequest) throws OAuth2AuthenticationException {
        OidcIdToken idToken = userRequest.getIdToken();
        log.info("打印请求参数: {}",idToken);
        Set<String> authorityStrings = new HashSet<>();
        Set<SimpleGrantedAuthority> authorities = authorityStrings.stream()
                .map(SimpleGrantedAuthority::new)
                .collect(Collectors.toSet());
        SystemUser systemUser = systemUserDao.queryByUsername(userRequest.getIdToken().getPreferredUsername());
        CustomOidcUser customOidcUser = new CustomOidcUser(authorities, idToken, systemUser);
        return customOidcUser;
    }
}
七、自定义CustomAuthenticationSuccessHandler
在第六步认证成功后,AbstractAuthenticationProcessingFilter拦截器,会调用AuthenticationSuccessHandler接口的successfulAuthentication()方法,自定义的CustomAuthenticationSuccessHandler类是实现了这个接口的successfulAuthentication()方法,实现此方法主要是用户在用户通过AzureAD授权登录成功后,可以控制用户去加载登录成功后的浏览页面,并且还需要给前端返回的Response中添加Http请求头中添加cookie,这样以后前端每次访问后端接口,都携带此cookie那么就可以通过拦截器去确认用户是否登录。
/**
 * @Author: LongGE
 * @Date: 2023-05-22
 * @Description:    用户认证成功后处理后续重定向操作的
 * Strategy used to handle a successful user authentication.
 * <p>
 * Implementations can do whatever they want but typical behaviour would be to control the
 * navigation to the subsequent destination (using a redirect or a forward). For example,
 * after a user has logged in by submitting a login form, the application needs to decide
 * where they should be redirected to afterwards (see
 * {@link AbstractAuthenticationProcessingFilter} and subclasses). Other logic may also be
 * included if required.
 */
@Service
@Slf4j
public class CustomAuthenticationSuccessHandler implements AuthenticationSuccessHandler {


    @Override
    public void onAuthenticationSuccess(HttpServletRequest request, HttpServletResponse response, FilterChain chain, Authentication authentication) throws IOException, ServletException {
        onAuthenticationSuccess(request, response, authentication);
        chain.doFilter(request, response);
    }

    @Override
    public void onAuthenticationSuccess(HttpServletRequest request, HttpServletResponse response, Authentication authentication) throws IOException, ServletException {
        CustomOidcUser customOidcUser = (CustomOidcUser)authentication.getPrincipal();
        SystemUser user = customOidcUser.getSystemUser();
        // Session ID
        String sessionId = UUID.randomUUID().toString();
        Map<String,Object> tokenClaims = new HashMap<>();
        tokenClaims.put("SessionId", sessionId);

        //Create token
        //Token newAccessToken = tokenProvider.generateAccessToken(user.getUsername(), tokenClaims, authentication, tokenExpirationSec);
        //Enter token log
        //customBaseService.logToken(newAccessToken);

       /* if(user != null && user.getId() != null) {
            //Add Session Id to UserSession DB
            customBaseService.addUserSession(user.getId(), sessionId, request);
            //Add Redis cache with expiration time
            customBaseService.addRedisUserSession(user.getId(), user.getUsername());
        }
        //Set the redirect path and add the token cache to the cookie
        response.addHeader("Set-Cookie", cookieUtil.createAccessTokenCookie(newAccessToken.getTokenValue(),
                newAccessToken.getDuration()).toString());*/
        response.sendRedirect("/index");
    }
}
八、登录页面
登录页面支持简单的账号密码登录,同时也支持AzureAD的授权方式登录。
<!DOCTYPE html>
<html xmlns:th="http://www.thymeleaf.org/" lang="en">
    <meta charset="utf-8">
    <meta http-equiv="X-UA-Compatible" content="IE=edge">
    <!-- Tell the browser to be responsive to screen width -->
    <meta name="viewport" content="width=device-width, initial-scale=1">
    <link rel="icon" type="image/png" sizes="16x16" href="/assets/images/favicon.png">
    <head>
        <meta charset="UTF-8">
        <title>Title</title>
    </head>
    <body>
        <h1>用户登录</h1>
        <!--th:action="@{/AuthLoginController/doLogin}" method="post"-->
        <form id="loginform">
            <div id="divError" class="input-group mb-12 aui-message aui-message-error" style="display: none">
                <span style="color: red" id="errorMessage"></span>
            </div>
            <div class="input-group mb-3">
                <div class="input-group-prepend">
                    <span class="input-group-text" id="basic-addon1">用户名:</span>
                </div>
                <input type="text" class="form-control form-control-lg"
                       placeholder="Username" id="username" name="username"
                       aria-label="username" aria-describedby="basic-addon1" required>
            </div>
            <div class="input-group mb-3">
                <div class="input-group-prepend">
                    <span class="input-group-text" id="basic-addon2">密码:</span>
                </div>
                <input type="password" class="form-control form-control-lg"
                       placeholder="Password" id="password" name="password"
                       aria-label="Password" aria-describedby="basic-addon1" required>
            </div>
            <div class="form-group text-center">
                <div class="col-xs-12 pb-3">
                    <!-- input class="btn btn-block btn-lg btn-info" type="submit" value="Log in" /-->
                    <button id="ldaploginbtn" class="btn btn-block btn-lg btn-info"
                            type="button">LDAP Log in</button>
                </div>
            </div>
        </form>
        <br/>
        <br/>
        <br/>
        <!--<form th:action="@{/oauth2/authorization/uuc}" method="post">
            <input type="submit" value="UUC登录">
        </form>-->
        <br/>
        <br/>
        <br/>
        <form th:action="@{/oauth2/authorization/azure}" method="post">
            <input type="submit" value="AzureAD授权登录">
        </form>
    </body>
    <script src="/assets/libs/jquery/dist/jquery.min.js"></script>
    <script src="/assets/libs/bootstrap/dist/js/bootstrap.min.js"></script>
    <script src="/assets/libs/jquery/dist/jquery.serializejson.js"></script>
    <script src="/js/common/login.js"></script>
</html>
login.js的js代码:
$(document).ready(function() {

	document.getElementById("password").addEventListener("keyup", function(event) {
		if (event.keyCode === 13) {
			$('#loginbtn').click();
			return false;
		}
	});

	//LDAP Login
    $('#ldaploginbtn').click(function() {
        $('#errorMessage').text('');
        $('#divError').hide();

        //Check account password
        let $name=$('#username');
        let $pwd=$('#password');
        // 按钮点击后检查输入框是否为空,为空则找到span便签添加提示
        if ($name.val().length===0 || $name.val() == ("") || $pwd.val().length===0 || $pwd.val() == ("")) {
            $('#errorMessage').text('Please fill in the account password!');
            $('#divError').show();
        }else {
            var formData = $("#loginform").serializeJSON();
            var jsonData = JSON.stringify(formData);

            $.ajax({
                url: "AuthLoginController/doLogin",
                type: 'POST',
                data: jsonData,
                contentType: 'application/json; charset=utf-8',
                dataType: 'json',
                success: function(data) {
                    if (data.status == "SUCCESS") {
                        console.log("登录成功返回!")
                        window.location.href = data.redirectPath;//"/index";
                    } else {
                        $('#errorMessage').text(data.message);
                        $('#divError').show();
                    }
                },
                error: function(xhr, ajaxOptions, thrownError) {
                    swalexceptionhandler(xhr.status, xhr.responseText);
                }
            });
        }
    });
});

function swalexceptionhandler(status, responseText) {
    if (status == "412" || status == "422") {
        var obj = JSON.parse(responseText);
        var displaymsg = "";
        for (let i = 0; i < obj.errors; i++) {
            displaymsg += obj.errorInfo[i].errCode + ":" + obj.errorInfo[i].errDescription + " (" + obj.errorInfo[i].errField + ")" + "<br>";
        }
        //swal('Validation', displaymsg, 'warning');
    } else {
        //swal('Exception', responseText, 'error');
    }
}
九、登录接口AuthLoginController与LoginController
LoginController:主要加载登录页面和登录成功页面。
AuthLoginController:处理简单的账号密码登录请求逻辑。
代码分别如下:
/**
 * @Author: LongGE
 * @Date: 2023-05-19
 * @Description:
 */
@Controller
@Slf4j
public class LoginController {

    @RequestMapping("/login")
    public String loginHtml(){
        return "login";
    }

    @RequestMapping("/index")
    public String indexHtml() {
        log.info("发送请求违背拦截!");
        return "index";
    }
}
/**
* @Author: LongGE
* @Date: 2023-05-12
* @Description:
*/
@RestController
@RequestMapping("/AuthLoginController")
@Slf4j
public class AuthLoginController {
@Autowired
private AuthenticationManager authenticationManager;
@Autowired
private ServletContext context;
@PostMapping("/doLogin")
public ResponseEntity<LoginResponse> auth(@RequestBody LoginRequest loginRequest, HttpServletRequest request, HttpServletResponse response) {
log.info("开始登录! username={}, password={}", loginRequest.getUsername(), loginRequest.getPassword());
Authentication authentication = authenticationManager.authenticate(
new CustomDaoUsernameToken(loginRequest.getUsername(), loginRequest.getPassword()));
SecurityContextHolder.getContext().setAuthentication(authentication);
log.info("登录成功! {}", authentication);
HttpHeaders responseHeaders = new HttpHeaders();
String loginPath = context.getContextPath() + "/index";
LoginResponse loginResponse = new LoginResponse(LoginResponse.SuccessFailure.SUCCESS, "Auth successful. Tokens are created in cookie.", loginPath);
return ResponseEntity.ok().headers(responseHeaders).body(loginResponse);
}
}总结:
附一张授权登录的基础流程图:
