一、导入OpenCV
别忘记把libopencv_java3.so添加进来。
二、初始化
OpenCVLoader.initDebug();
三、常用方法
1. CvType 数据类型
以CV_64FC2为例,64指64位,F指浮点数,C指通道,2为2通道。
| 数值 | 具体类型 | 取值范围 |
|---|---|---|
| CV_8U | 8 位无符号整数 | (0……255) |
| CV_8S | 8 位符号整数 | (-128……127) |
| CV_16U | 16 位无符号整数 | (0……65535) |
| CV_16S | 16 位符号整数 | (-32768……32767) |
| CV_32S | 32 位符号整数 | (-2147483648……2147483647) |
| CV_32F | 32 位浮点数 | (-FLT_MAX ………FLT_MAX,INF,NAN) |
| CV_64F | 64 位浮点数 | (-DBL_MAX ……….DBL_MAX,INF,NAN) |
public static final int CV_8UC1 = CV_8UC(1);
public static final int CV_8UC2 = CV_8UC(2);
public static final int CV_8UC3 = CV_8UC(3);
public static final int CV_8UC4 = CV_8UC(4);
public static final int CV_8SC1 = CV_8SC(1);
public static final int CV_8SC2 = CV_8SC(2);
public static final int CV_8SC3 = CV_8SC(3);
public static final int CV_8SC4 = CV_8SC(4);
public static final int CV_16UC1 = CV_16UC(1);
public static final int CV_16UC2 = CV_16UC(2);
public static final int CV_16UC3 = CV_16UC(3);
public static final int CV_16UC4 = CV_16UC(4);
public static final int CV_16SC1 = CV_16SC(1);
public static final int CV_16SC2 = CV_16SC(2);
public static final int CV_16SC3 = CV_16SC(3);
public static final int CV_16SC4 = CV_16SC(4);
public static final int CV_32SC1 = CV_32SC(1);
public static final int CV_32SC2 = CV_32SC(2);
public static final int CV_32SC3 = CV_32SC(3);
public static final int CV_32SC4 = CV_32SC(4);
public static final int CV_32FC1 = CV_32FC(1);
public static final int CV_32FC2 = CV_32FC(2);
public static final int CV_32FC3 = CV_32FC(3);
public static final int CV_32FC4 = CV_32FC(4);
public static final int CV_64FC1 = CV_64FC(1);
public static final int CV_64FC2 = CV_64FC(2);
public static final int CV_64FC3 = CV_64FC(3);
public static final int CV_64FC4 = CV_64FC(4);
2. Mat的加载方式
2.1 文件形式加载——Imgcodecs.imread
Mat mat = Imgcodecs.imread(filename); // 默认转成bgr格式,即Imgcodecs.IMREAD_COLOR
Mat mat = Imgcodecs.imread(filename, flags);
参数:filename
输入可为相对路径也可为绝对路径,自动通过后缀名识别文件的格式。
支持读取的图像格式有:
Windows bitmaps - *.bmp, *.dib (always supported)
JPEG files - *.jpeg, *.jpg, *.jpe (see the Note section)
JPEG 2000 files - *.jp2 (see the Note section)
Portable Network Graphics - *.png (see the Note section)
WebP - *.webp (see the Note section)
Portable image format - *.pbm, *.pgm, *.ppm *.pxm, *.pnm (always supported)
PFM files - *.pfm (see the Note section)
Sun rasters - *.sr, *.ras (always supported)
TIFF files - *.tiff, *.tif (see the Note section)
OpenEXR Image files - *.exr (see the Note section)
Radiance HDR - *.hdr, *.pic (always supported)
Raster and Vector geospatial data supported by GDAL (see the Note section)
**参数:**flags,当不写时,默认为Imgcodecs.IMREAD_COLOR
| 值 | 枚举名 | 定义 | 解释 |
|---|---|---|---|
| -1 | IMREAD_UNCHANGED | If set, return the loaded image as is (with alpha channel, otherwise it gets cropped). Ignore EXIF orientation. | 如果设置,则按原样返回加载的图像(使用Alpha通道,否则会被裁剪) |
| 0 | IMREAD_GRAYSCALE | If set, always convert image to the single channel grayscale image (codec internal conversion). | 如果设置,则始终将图像转换为单通道灰度图像(编解码器内部转换) |
| 1 | IMREAD_COLOR | If set, always convert image to the 3 channel BGR color image. | 如果设置,请始终将图像转换为3通道BGR彩色图像 |
| 2 | IMREAD_ANYDEPTH | If set, return 16-bit/32-bit image when the input has the corresponding depth, otherwise convert it to 8-bit. | 如果设置,则在输入具有相应深度时返回16位/ 32位图像,否则将其转换为8位 |
| 4 | IMREAD_ANYCOLOR | If set, the image is read in any possible color format. | 如果设置,则以任何可能的颜色格式读取图像 |
| 8 | IMREAD_LOAD_GDAL | If set, use the gdal driver for loading the image. | 如果设置,使用gdal驱动程序加载图像 |
| 16 | IMREAD_REDUCED_GRAYSCALE_2 | If set, always convert image to the single channel grayscale image and the image size reduced 1/2. | 如果设置,则始终将图像转换为单通道灰度图像,图像尺寸减小1/2 |
| 17 | IMREAD_REDUCED_COLOR_2 | If set, always convert image to the 3 channel BGR color image and the image size reduced 1/2. | 如果设置,则始终将图像转换为3通道BGR彩色图像,图像尺寸减小1/2 |
| 32 | IMREAD_REDUCED_GRAYSCALE_4 | If set, always convert image to the single channel grayscale image and the image size reduced 1/4. | 如果设置,则始终将图像转换为单通道灰度图像,图像尺寸减小1/4 |
| 33 | IMREAD_REDUCED_COLOR_4 | If set, always convert image to the 3 channel BGR color image and the image size reduced 1/4. | 如果设置,则始终将图像转换为3通道BGR彩色图像,图像尺寸减小1/4 |
| 64 | IMREAD_REDUCED_GRAYSCALE_8 | If set, always convert image to the single channel grayscale image and the image size reduced 1/8. | 如果设置,则始终将图像转换为单通道灰度图像,图像尺寸减小1/8 |
| 65 | IMREAD_REDUCED_COLOR_8 | If set, always convert image to the 3 channel BGR color image and the image size reduced 1/8. | 如果设置,则始终将图像转换为3通道BGR彩色图像,图像尺寸减小1/8 |
| 128 | IMREAD_IGNORE_ORIENTATION | If set, do not rotate the image according to EXIF’s orientation flag. | 如果设置,请不要根据EXIF的方向标志旋转图像 |
2.2 数组形式导入——mat.put
Mat mat = new Mat(height, width, CvType.CV_8UC1);
mat.put(0,0,bytes);
根据数组的存储格式和宽高导入,格式见前文 CvType 数据类型
2.3 YUV数组转mat(图像格式转换)——Imgproc.cvtColor
public static Mat nv21Mat(byte[] nv21, int width, int height) {
    Mat nv21Mat = new Mat(height*3/2,width,CvType.CV_8UC1);//按单通道位图构建mat
    int re =  nv21Mat.put(0,0,nv21);
    Mat mat = new Mat();
    Imgproc.cvtColor(nv21Mat , mat, Imgproc.COLOR_YUV2BGR_NV21);
    return mat;
}
yuv格式的数组要先按单通道位图构建mat,再通过Imgproc.cvtColor()进行格式转换。
3. 存位图——Imgcodecs.imwrite
//存取16位单通道图
public static void saveShortToPng(short[] shortBytes, int width, int height, String path) {
    String mPath = path;
    Mat mat = new Mat(height, width, CvType.CV_16UC1);
    mat.put(0,0,shortBytes);
    Imgcodecs.imwrite(mPath,mat);
}
可根据文件名的后缀自行保存。
4. 图像缩放——Imgproc.resize
public static byte[] resizeByte(byte[] sBytes, int width, int height) {
    byte[] bytes = new byte[sBytes.length];
    System.arraycopy(sBytes,0,bytes,0,sBytes.length);
    Mat src = new Mat(height, width, CvType.CV_8UC1);
    src.put(0,0,bytes);
    Imgproc.resize(src, src, new Size(src.width()*0.5, src.height()*0.5));
    byte[] dBytes = new byte[width/2 * height/2];
    src.get(0,0,dBytes);
    return dBytes;
}
5. 抠图——mat.submat
public static void saveFace(byte[] nv21, int[] position, int width, int height, String path){
    //YUV 转 Mat
    Mat matNv21 = new Mat(height*3/2,width,CvType.CV_8UC1);//按单通道位图构建mat
    int re =  matNv21.put(0,0,nv21);
    Mat matBgr = new Mat();
    Imgproc.cvtColor(matNv21 , matBgr, Imgproc.COLOR_YUV2BGR_NV21);//nv21 to bgr
    //Android自带也有个Rect方法,要区分开
    org.opencv.core.Rect rect = new org.opencv.core.Rect(position[0], position[1], position[2], position[3]);
    //抠图
    Mat sub = matBgr.submat(rect);
    Mat mat = new Mat();
    Size size = new Size(position[2],position[3]);
    Imgproc.resize(sub, mat, size);//将人脸进行截图并保存
    String mPath = path;
    Imgcodecs.imwrite(mPath,mat);
}
6. 图像旋转
/**
* 图像旋转
*/
public static byte[] rotateByte(byte[] sBytes, int width, int height) {
    byte[] dBytes = new byte[sBytes.length];
    Mat mat = new Mat(height, width, CvType.CV_8UC1);//单通道位图
    mat.put(0,0,sBytes);
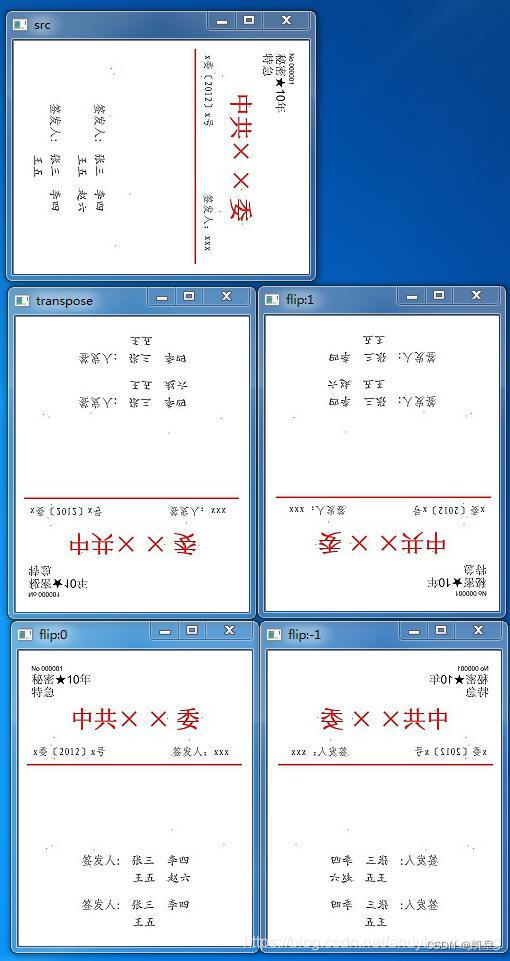
    Core.transpose(mat,mat);// 转置(行列互换),即顺时针旋转90度且左右镜像
    Core.flip(mat, mat, 1);// 1:左右镜像;0:上下镜像;-1:旋转180度
    mat.get(0,0,dBytes);
    return dBytes;
}
