本文目录
- 1、试验环境
- 2、eBPF字节码源代码实现
- 3、用户态应用层管理与控制程序的源代码实现
- 4、编译与运行
- 5、测试结果
我们在此文的进阶部分 或者 此文中已经描述了如何设置Linux网桥,并将多个以太接口加入网桥后实现一个最基本的二层交换机的二层交换转发功能。Linux网桥可以学习到连接到网桥的每个端口上的各个设备MAC地址,并生成MAC/端口映射表,进而依据这个MAC/端口映射表对收到的数据包进行二层转发。
主要分以下二个过程:
- MAC地址的学习与老化,生成并更新MAC/端口映射表(控制面过程)
- 根据MAC/端口映射表,将收到的报文从正确的端口进行转发(数据面过程)
我们知道,配置完Linux网桥后,就自动具备了这个功用,但我们知道,如果使用Linux网桥来实现这个功能的话,每个数据包,需要经过XDP, Qdisc, Bridge_check,netfilter的link-layer的各个tables/chains的处理后(详见此文),才能转到正确的出口,转发的链路很长,效率和性能比较低。
这里我们准备使用BPF框架实现的Linux网桥的基本功能,以绕过Qdisc, bridge_check, netfilter等内核协议栈处理程序,实现性能更好的Linux网桥。
本例子中,会实现数据面和控制面分离(前提,读者已经理解了如何用用户态程序自动去加载与卸载eBPF字节码):
- 由BPF程序在XDP框架里查询MAC地址与端口对应表实现报文转发
- 由运行在用户态的应用程序管理MAC地址与端口对应表的更新与老化
我们可以借此进一步理解BPF, BPF map的框架与BPF程序的工作原理。
1、试验环境
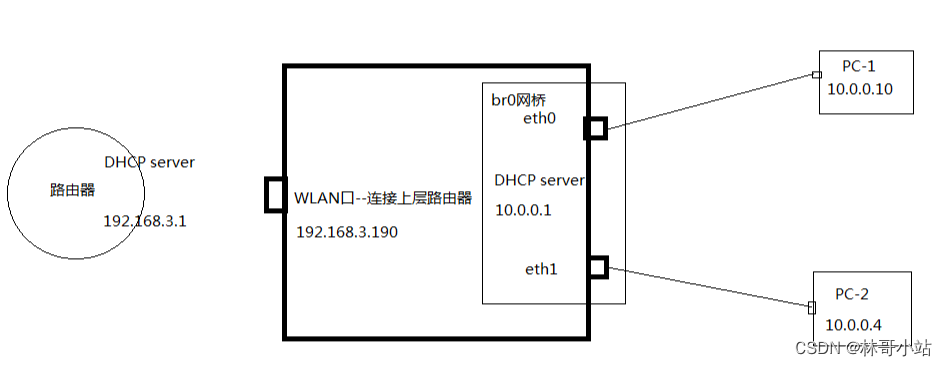
试验环境与上一篇文章XDP入门–通过用户态程序自动加载与卸载eBPF程序字节码到网卡相同。
硬件:基于树莓派Zero w + 带二个以太网卡的扩展底板----图中的RPi
网络:如下图所示
                                                     +- RPi -------+          +- old pc1----+
                                                     |         Eth0+----------+ Eth0        |
                 +- Router ----+                     |  DHCP server|          | 10.0.0.10   |
                 | Firewall    |                     |   10.0.0.1  |          |             |
(Internet)---WAN-+ DHCP server +-WLAN AP-+-)))   (((-+ WLAN        |          +-------------+
                 | 192.168.3.1 |                     |             |
                 +-------------+                     |             |          +- old pc2----+
                                                     |         Eth1+----------+ Eth0        |
                                                     |             |          | 10.0.0.4    |
                                                     +-------------+          |             |
                                                                              +-------------+
2、eBPF字节码源代码实现
实现的原理很简单,检查每个收到的报文的目标mac地址,并在MAC地址-端口对应表里查询:
- 如果查不到,则上送给内核tcp/ip协议栈处理
- 如果查到了,则按目标mac地址对应的端口直接转发报文
#include <linux/bpf.h>
#include <linux/if_ether.h>
#include "/usr/include/bpf/bpf_helpers.h"

#ifndef __section
# define __section(NAME)                  \
   __attribute__((section(NAME), used))
#endif


// mac_port_map保存该目标MAC地址/端口的映射关系表,以目标MAC地址为key, 以端口为value
struct bpf_map_def __section("maps") mac_port_map = {
        .type = BPF_MAP_TYPE_HASH,
        .key_size = sizeof(long long),
        .value_size = sizeof(int),
        .max_entries = 100,
};

__section("prog")
int xdp_bridge_prog(struct xdp_md *ctx)
{
        void *data_end = (void *)(long)ctx->data_end;
        void *data = (void *)(long)ctx->data;
        long dst_mac = 0;
        int in_index = ctx->ingress_ifindex, *out_index;
        // data即数据包开始位置
        struct ethhdr *eth = (struct ethhdr *)data;
        char info_fmt[] = "Dst Addr:0x%llx From:[%d]---Redirect to:[%d]\r\n";
        char info_fmt1[] = "xdp_pass";
        char info_fmt2[] = "xdp_drop";

        // 错误包检查,必选
        if (data + sizeof(struct ethhdr) > data_end) {
                return XDP_DROP;
        }

        // 获取目标MAC地址
        __builtin_memcpy(&dst_mac, eth->h_dest, 6);

        // 目标MAC地址/端口的映射表里查找目标端口
        out_index = bpf_map_lookup_elem(&mac_port_map, &dst_mac);
        if (out_index == 0) {
                // 如若找不到,则上传到内核TCP/IP协议栈处理
                bpf_trace_printk(info_fmt1, sizeof(info_fmt1));
                return XDP_PASS;
        }
        // 错误报文,进出同一个端口的,丢弃
        if (in_index == *out_index) {
                bpf_trace_printk(info_fmt2, sizeof(info_fmt2));
                return XDP_DROP;
        }

        // 打印转发信息到/sys/kernel/tracing/trace_pipe
        bpf_trace_printk(info_fmt, sizeof(info_fmt), dst_mac, in_index, *out_index);

        // 转发到目标端口
        return  bpf_redirect(*out_index, 0);
}

char _license[] SEC("license") = "GPL";
3、用户态应用层管理与控制程序的源代码实现
功能也不复杂:
- 加载指定的eBPF字节码进所有二个网卡
- 监听mac地址notify更新、删除信息,并将目标MAC地址/端口的映射关系更新到mac_port_map 表,供eBPF字节码查询使用
- 退出时自动卸载eBPF字节码
#include <stdio.h>
#include <signal.h>
#include <sys/socket.h>
#include <net/if.h>
#include <bpf/bpf.h>
#include <linux/bpf.h>
#include <linux/rtnetlink.h>
#include "/usr/src/linux-6.1/tools/testing/selftests/bpf/bpf_util.h"

int flags = XDP_FLAGS_UPDATE_IF_NOEXIST;
static int mac_port_map_fd;
static int *ifindex_list;

// 退出时卸载XDP
static void int_exit(int sig)
{
        int i = 0;
        for (i = 0; i < 2; i++) {
                bpf_set_link_xdp_fd(ifindex_list[i], -1, 0);
        }
        exit(0);
}

int main(int argc, char *argv[])
{
        int sock, i;
        char buf[1024];
        char filename[64];
        static struct sockaddr_nl g_addr;
        struct bpf_object *obj;
        struct bpf_prog_load_attr prog_load_attr = {
                .prog_type      = BPF_PROG_TYPE_XDP,
        };
        int prog_fd;
        printf("we are starting...\r\n");
        snprintf(filename, sizeof(filename), "bridge.o");
        prog_load_attr.file = filename;

        // 载入eBPF代码
        if (bpf_prog_load_xattr(&prog_load_attr, &obj, &prog_fd)) {
                return 1;
        }

        mac_port_map_fd = bpf_object__find_map_fd_by_name(obj, "mac_port_map");
        ifindex_list = (int *)calloc(2, sizeof(int *));

        //通过ifname查询所有二个网卡的ifindex
        ifindex_list[0] = if_nametoindex(argv[1]);
        ifindex_list[1] = if_nametoindex(argv[2]);

        for (i = 0; i < 2; i++) {
                // 将eBPF字节码注入到所有网卡
                if (bpf_set_link_xdp_fd(ifindex_list[i], prog_fd, flags) < 0) {
                        printf("link set xdp fd failed\n");
                        return 1;
                }
        }
        // 设置CTRL+C退出程序时要执行的卸载函数
        signal(SIGINT, int_exit);

        bzero(&g_addr, sizeof(g_addr));
        g_addr.nl_family = AF_NETLINK;
        g_addr.nl_groups = RTM_NEWNEIGH;
        printf("we are starting socket...\r\n");
        if ((sock = socket(AF_NETLINK, SOCK_DGRAM, NETLINK_ROUTE)) < 0) {
                int_exit(0);
                return -1;
        }

        if (bind(sock, (struct sockaddr *) &g_addr, sizeof(g_addr)) < 0) {
                int_exit(0);
                return 1;
        }


        // 持续监听socket,捕获更新信息,更新删除MAC/端口对应表
        while (1) {
                int len;
                struct nlmsghdr *nh;
                struct ndmsg *ifimsg ;
                int ifindex = 0;
                unsigned char *cmac;
                unsigned long long lkey = 0;

                len = recv(sock, buf, sizeof(buf), 0);
                printf("recv...\r\n");
                if (len <= 0) continue;
                printf("get mac notification\r\n");
                for (nh = (struct nlmsghdr *)buf; NLMSG_OK(nh, len); nh = NLMSG_NEXT(nh, len)) {
                        ifimsg = NLMSG_DATA(nh) ;
                        if (ifimsg->ndm_family != AF_BRIDGE) {
                                continue;
                                printf("not AF_BRIDGE\r\n");
                        }

                        printf("AF_BRIDGE\r\n");
                        // 获取notify信息中的端口
                        ifindex = ifimsg->ndm_ifindex;
                        for (i = 0; i < 2; i++) {
                                printf("find ifindex = %d\r\n", ifindex);
                                if (ifindex == ifindex_list[i]) break;
                        }
                        if (i == 2) continue;

                        printf("i=%d,  ifindex=%d\r\n",i,ifindex);
                        // 获取notify信息中的MAC地址
                        cmac = (unsigned char *)ifimsg + sizeof(struct ndmsg) + 4;

                        memcpy(&lkey, cmac, 6);
                        printf("sizeof lkey %d\r\n", sizeof(lkey));
                        printf("2nd i=%d, ifindex=%d\r\n",i,ifindex);
                        if (nh->nlmsg_type == RTM_DELNEIGH) {
                                bpf_map_delete_elem(mac_port_map_fd, (const void *)&lkey);
                                printf("Delete XDP item from [HW Address:Port] table-------------[0x%llx]:[%d]\r\n", lkey, ifindex);
                        } else if (nh->nlmsg_type == RTM_NEWNEIGH) {
                                bpf_map_update_elem(mac_port_map_fd, (const void *)&lkey, (const void *)&ifindex, 0);
                                printf("Update XDP item from [HW Address:Port] table-------------[0x%llx]:[%d]\r\n", lkey, ifindex);
                        }
                }
                printf("out of for()\r\n");
        }
}
4、编译与运行
- 编译
sudo clang -O2 -Wall -target bpf -c bridge.c -o bridge.o
gcc main.c -lbpf
在当前目录下生成a.out和brideg.o二个文件
- 运行
sudo ./a.out eth0 eth1
5、测试结果
我们通过,关闭和开启网桥的功能,来对这个代码进行测试。
步骤如下:
- 初始状态下,网桥br0是开启,未运行本程序时,我们从10.0.0.4 ping 10.0.0.10,然后在10.0.0.4这个网口上用tcpdump命令抓包。
可以看到:
-
ping是通的

-
tcpdump能看到icmp req/reply报文

- 运行程序,并先关闭然后开启网桥
- 运行程序
sudo ./a.out eth0 eth1
- 在另外一个终端运行关闭和开启网桥,来触发MAC地址端口的更新通知
sudo ifconfig br0 down
sudo ifconfig br0 up
用户面程序会打印如下,先是删除二个表项,然后增加二个表项
get mac notification
AF_BRIDGE
find ifindex = 3
i=0,  ifindex=3
sizeof lkey 8
2nd i=0, ifindex=3
Delete XDP item from [HW Address:Port] table-------------[0x26513558577c]:[3]
out of for()
recv...
get mac notification
AF_BRIDGE
find ifindex = 4
find ifindex = 4
i=1,  ifindex=4
sizeof lkey 8
2nd i=1, ifindex=4
Delete XDP item from [HW Address:Port] table-------------[0x40f046730318]:[4]
out of for()
recv...
get mac notification
out of for()
recv...
get mac notification
out of for()
recv...
get mac notification
out of for()
recv...
get mac notification
AF_BRIDGE
find ifindex = 3
i=0,  ifindex=3
sizeof lkey 8
2nd i=0, ifindex=3
Update XDP item from [HW Address:Port] table-------------[0x26513558577c]:[3]
out of for()
recv...
get mac notification
AF_BRIDGE
find ifindex = 4
find ifindex = 4
i=1,  ifindex=4
sizeof lkey 8
2nd i=1, ifindex=4
Update XDP item from [HW Address:Port] table-------------[0x40f046730318]:[4]
out of for()
recv...
get mac notification
out of for()
recv...
get mac notification
out of for()
recv...
get mac notification
out of for()
recv...
get mac notification
out of for()
- 查看ping和tcpdump的情况
此时,ping是通的,但tcpdump里抓不到的icmp 的req/reply报文了


- 查看内核打印log记录
我们可以看到10.0.0.4和10.0.0.10之间的ping报文已经直接在XDP里转发走了。
sudo cat /sys/kernel/tracing/trace_pipe






![[元带你学: eMMC协议详解 10] Device 识别流程 与 中断模式](https://img-blog.csdnimg.cn/img_convert/262abfa94e2b5642120b21810384ce4b.png)


