二次元的登录界面

news2024/11/27 8:35:09

今天还是继续坚持写博客,然后今天给大家带来比较具有二次元风格的登录界面,也只是用html和css来写的,大家可以来看看!

个人名片:
 😊作者简介:一名大一在校生,web前端开发专业
 🤡 个人主页:几何小超
 🐼
座右铭:懒惰受到的惩罚不仅仅是自己的失败,还有别人的成功。
 🎅**学习目标: 坚持每一次的学习打卡,掌握更多知识!虽然都说前端已死,但是就算不靠这个吃饭,学一点东西总比啥也不知道的

HTML部分

既然是制作登录界面我们可以使用表单元素,会比盒子更加简单一些,个人相信大家应该可以明白里头的啥意思吧!!!

这边就介绍一下CSS部分吧

<div class="shell">
        <div id="img-box">
            <img src="./a34a7810c48ee409750f92812023beb0-1.jpg" alt="">
        </div>
        <form action="" method="post">
            <div id="form-body">
                <div id="welcome-lines">
                    <div id="w-line-1">HI,xiaochao</div>
                    <div id="w-line-2">Welcome Back</div>
                </div>
                <div id="input-area">
                    <div class="f-inp">
                        <input type="text" placeholder="Email Address">
                    </div>
                    <div class="f-inp">
                        <input type="password" placeholder="Password">
                    </div>
                </div>
                <div id="submit-button-cvr">
                    <button type="submit" id="submit-button">LOGIN</button>
                </div>
                <div id="forgot-pass">
                    <a href="#">Forgot password?</a>
                </div>
            </div>
        </form>
    </div>

CSS部分

还是给我们先清除内外边距

然后这个ountline:none;的意思是鼠标点击文本框的时候,文本的边框焦点会被去除掉

还是设置一个背景颜色,这里我们使用的是渐变色:然后在需要让盒子来正中间,需要使用弹性布局

感觉下面都挺简单的,我就着重讲一下这个伪元素吧placeholder

placeholder 是HTML5 中新增的一个属性。placeholder可以用来描述输入字段预期值的简短的提示信息。提示信息会在用户输入值之前显示,一旦用户输入信息该提示就会自动消失。比如:我们在登录时需要输入用户名和密码,它会提示你什么地方输入用户名,什么地方输入密码,这个就是使用的placeholder属性。

* {
            padding: 0;
            margin: 0;
            outline: none;
        }

        body {
            background: linear-gradient(45deg, #fbda61, #ff5acd);
            display: flex;
            justify-content: center;
            align-items: center;
            height: 100vh;
        }

        .shell,
        form {
            position: relative;
        }

        .shell {
            display: flex;
            justify-content: center;
        }

        form {
            width: 562px;
            height: 520px;
            background-color: #fff;
            box-shadow: 0px 15px 40px #b6354e;
            border-radius: 15px;
            display: flex;
            justify-content: center;
            align-items: center;
        }

        #img-box {
            width: 330px;
            height: 520px;
        }

        #img-box img {
            height: 100%;
			margin-left: -175px;
			border-radius: 20px;
        }

        #form-body {
            width: 320px;
            display: flex;
            justify-content: center;
            align-items: center;
            flex-direction: column;
        }

        #welcome-lines {
            width: 100%;
            text-align: center;
            line-height: 1;
        }

        #w-line-1 {
            color: #7f7f7f;
            font-size: 50px;
        }

        #w-line-2 {
            color: #9c9c9c;
            font-size: 30px;
            margin-top: 17px;
        }

        #input-area {
            width: 100%;
            margin-top: 40px;
        }

        .f-inp {
            padding: 13px 25px;
            border: 2px solid #6e6d6d;
            line-height: 1;
            border-radius: 20px;
            margin-bottom: 15px;
        }

        .f-inp input {
            width: 100%;
            font-size: 14px;
            padding: 0;
            margin: 0;
            border: 0;
        }

        .f-inp input::placeholder {
            color: #b9b9b9;
        }

        #submit-button-cvr {
            margin-top: 20px;
        }

        #submit-button {
            display: block;
            width: 100%;
            color: #fff;
            font-size: 14px;
            margin: 0;
            padding: 14px 40px;
            border: 0;
            background-color: #f5506e;
            border-radius: 25px;
            line-height: 1;
            cursor: pointer;
        }

        #forgot-pass {
            text-align: center;
            margin-top: 10px;
        }

        #forgot-pass a {
            color: #868686;
            font-size: 12px;
            text-decoration: none;
        }

接下来展示源码,素材图片就是封面哦

<!DOCTYPE html>
<html lang="en">

<head>
    <meta charset="UTF-8">
    <meta http-equiv="X-UA-Compatible" content="IE=edge">
    <meta name="viewport" content="width=device-width, initial-scale=1.0">
    <title>小超&&前端小窝</title>
    <style>
        * {
            padding: 0;
            margin: 0;
            outline: none;
        }

        body {
            background: linear-gradient(45deg, #fbda61, #ff5acd);
            display: flex;
            justify-content: center;
            align-items: center;
            height: 100vh;
        }

        .shell,
        form {
            position: relative;
        }

        .shell {
            display: flex;
            justify-content: center;
        }

        form {
            width: 562px;
            height: 520px;
            background-color: #fff;
            box-shadow: 0px 15px 40px #b6354e;
            border-radius: 15px;
            display: flex;
            justify-content: center;
            align-items: center;
        }

        #img-box {
            width: 330px;
            height: 520px;
        }

        #img-box img {
            height: 100%;
			margin-left: -175px;
			border-radius: 20px;
        }

        #form-body {
            width: 320px;
            display: flex;
            justify-content: center;
            align-items: center;
            flex-direction: column;
        }

        #welcome-lines {
            width: 100%;
            text-align: center;
            line-height: 1;
        }

        #w-line-1 {
            color: #7f7f7f;
            font-size: 50px;
        }

        #w-line-2 {
            color: #9c9c9c;
            font-size: 30px;
            margin-top: 17px;
        }

        #input-area {
            width: 100%;
            margin-top: 40px;
        }

        .f-inp {
            padding: 13px 25px;
            border: 2px solid #6e6d6d;
            line-height: 1;
            border-radius: 20px;
            margin-bottom: 15px;
        }

        .f-inp input {
            width: 100%;
            font-size: 14px;
            padding: 0;
            margin: 0;
            border: 0;
        }

        .f-inp input::placeholder {
            color: #b9b9b9;
        }

        #submit-button-cvr {
            margin-top: 20px;
        }

        #submit-button {
            display: block;
            width: 100%;
            color: #fff;
            font-size: 14px;
            margin: 0;
            padding: 14px 40px;
            border: 0;
            background-color: #f5506e;
            border-radius: 25px;
            line-height: 1;
            cursor: pointer;
        }

        #forgot-pass {
            text-align: center;
            margin-top: 10px;
        }

        #forgot-pass a {
            color: #868686;
            font-size: 12px;
            text-decoration: none;
        }
        
    </style>
</head>

<body>
    <div class="shell">
        <div id="img-box">
            <img src="./a34a7810c48ee409750f92812023beb0-1.jpg" alt="">
        </div>
        <form action="" method="post">
            <div id="form-body">
                <div id="welcome-lines">
                    <div id="w-line-1">HI,xiaochao</div>
                    <div id="w-line-2">Welcome Back</div>
                </div>
                <div id="input-area">
                    <div class="f-inp">
                        <input type="text" placeholder="Email Address">
                    </div>
                    <div class="f-inp">
                        <input type="password" placeholder="Password">
                    </div>
                </div>
                <div id="submit-button-cvr">
                    <button type="submit" id="submit-button">LOGIN</button>
                </div>
                <div id="forgot-pass">
                    <a href="#">Forgot password?</a>
                </div>
            </div>
        </form>
    </div>
</body>

</html>

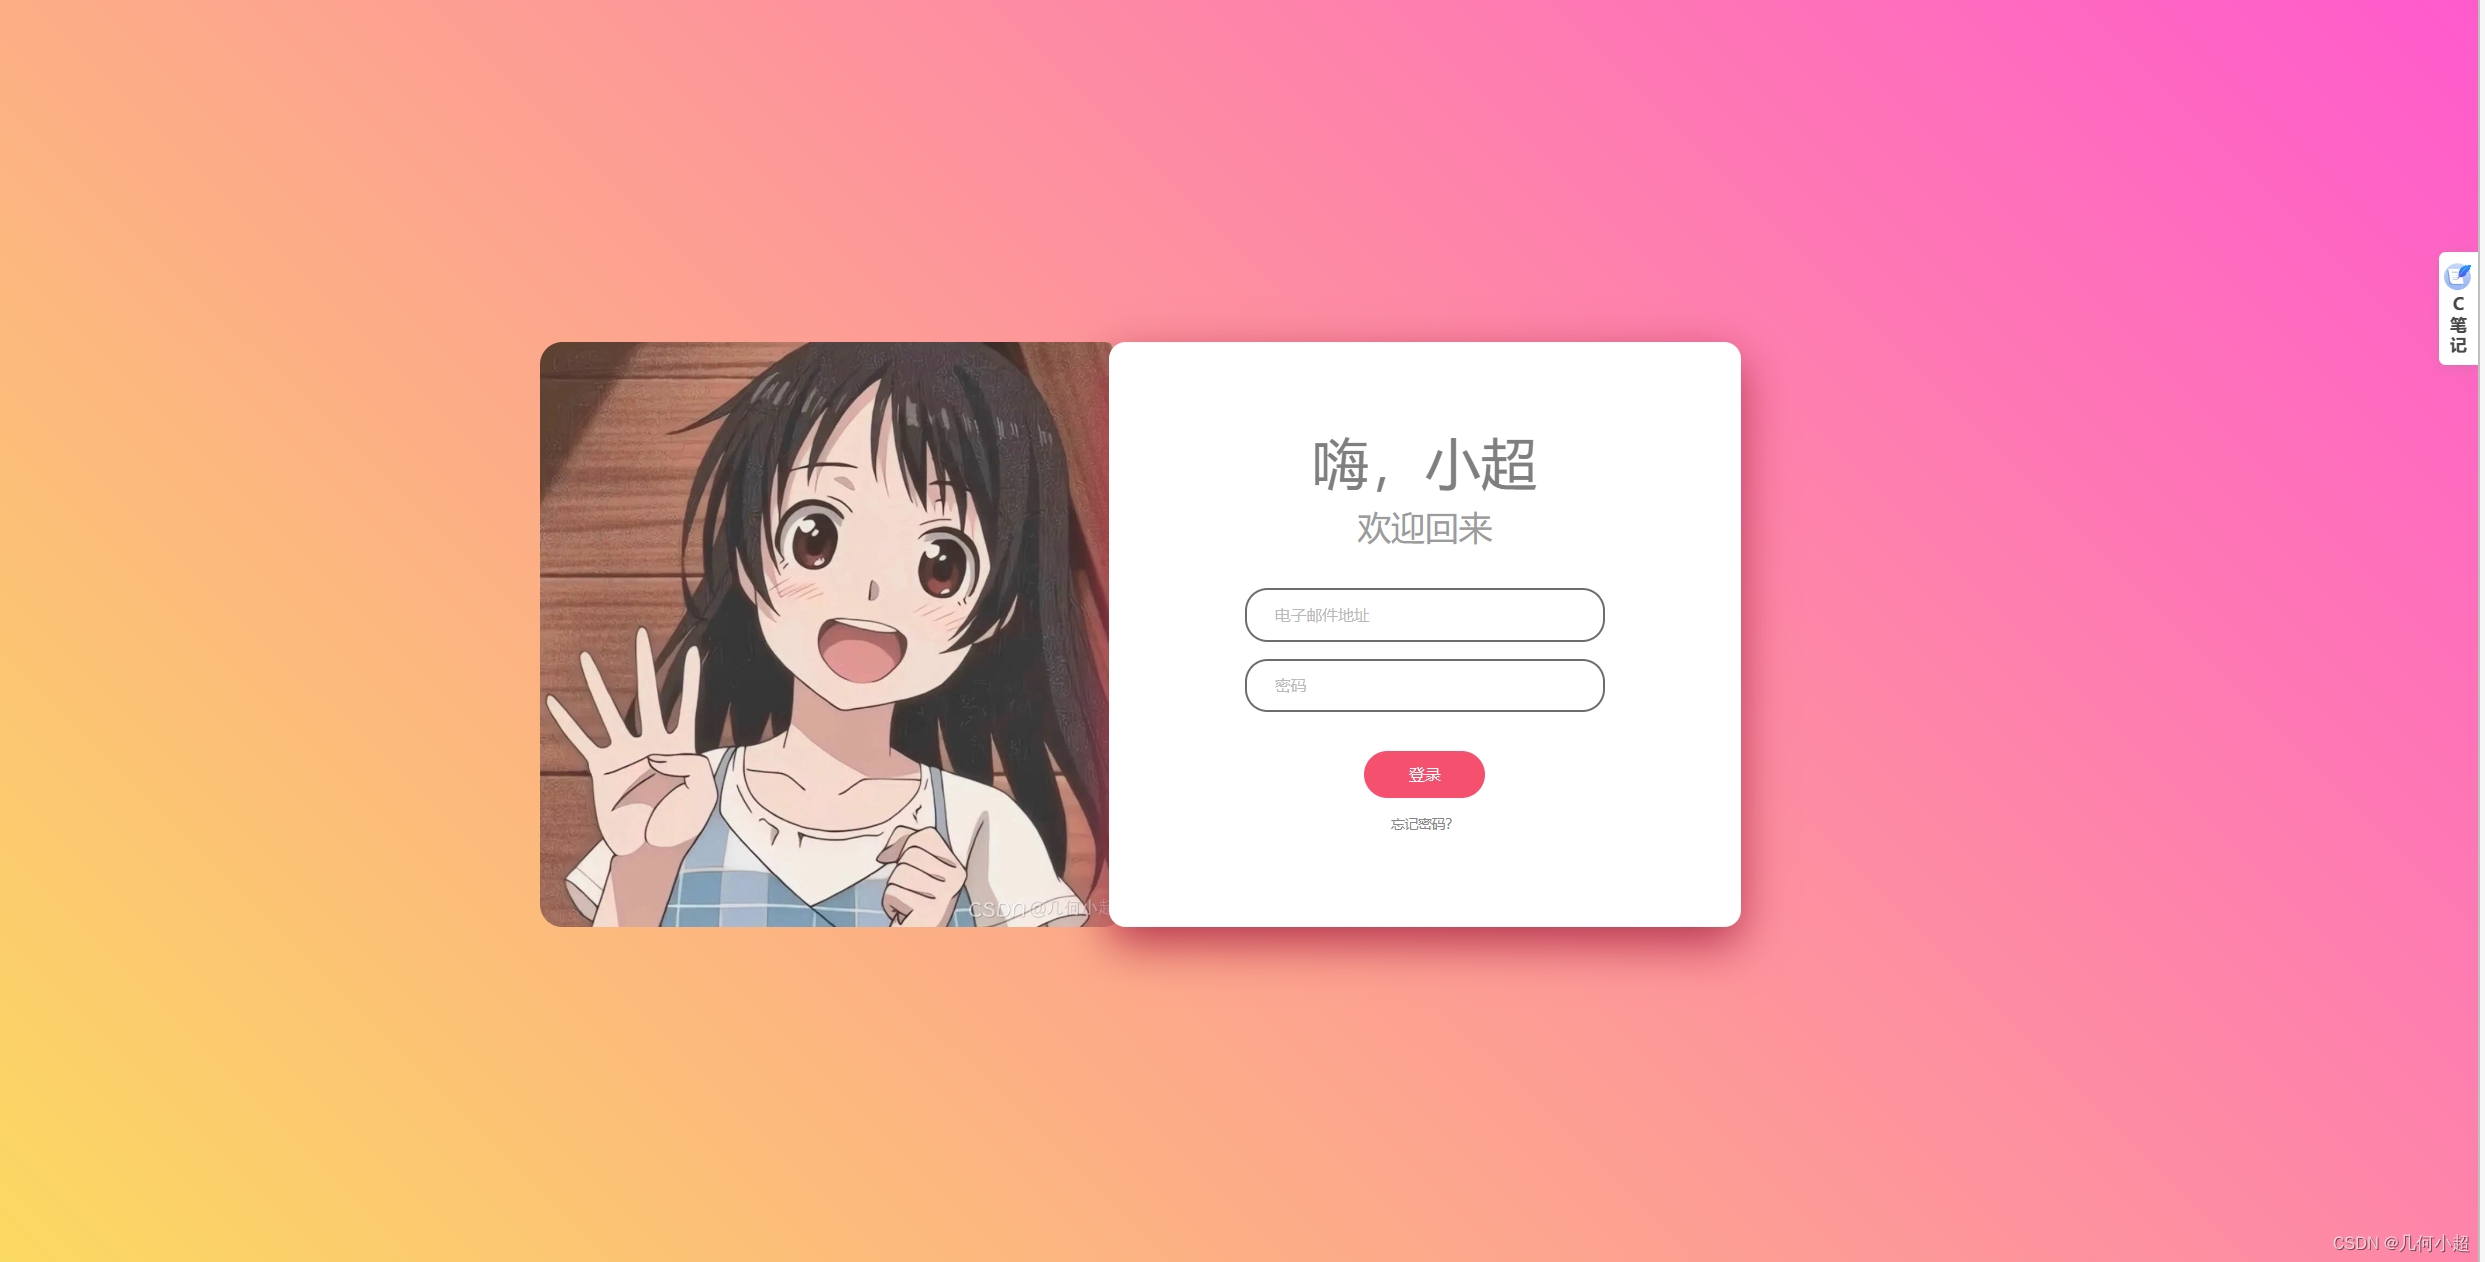
最后的效果是这样子的:

大家可以尝试敲一敲,这样一步步就会了解到这种类型的布局,然后自己在尝试几次就可以自己来写自己的专属登录界面然后后期通过js完善一下会更加完美哦!!

看到这别忘三连加关注,爱你们!!!!

本文来自互联网用户投稿,该文观点仅代表作者本人,不代表本站立场。本站仅提供信息存储空间服务,不拥有所有权,不承担相关法律责任。如若转载,请注明出处:http://www.coloradmin.cn/o/577711.html

如若内容造成侵权/违法违规/事实不符,请联系多彩编程网进行投诉反馈,一经查实,立即删除!

相关文章

[acwing周赛复盘] 第 105 场周赛20230527

[acwing周赛复盘] 第 105 场周赛20230527 总结5029. 极值数量1. 题目描述2. 思路分析3. 代码实现 5030. 核心元素1. 题目描述2. 思路分析3. 代码实现 5031. 矩阵扩张1. 题目描述2. 思路分析3. 代码实现 六、参考链接 总结 又是笨比的一周&#xff0c;只做出1题。T1 模拟T2 计…

leetcode刷题之链表相关问题(js)

21.合并两个有序链表 var mergeTwoLists function(list1, list2) {if(list1null) return list2if(list2null) return list1let newHead new ListNode(0,null) //创建一个虚拟节点let cur newHeadlet cur1 list1,cur2 list2while(cur1&&cur2){if(cur1.val<cur2.…

PowerToys Windows 工具集

Microsoft PowerToys | Microsoft Learn Microsoft PowerToys&#xff1a;用于自定义 Windows 的实用工具 项目2023/04/1918 个参与者 反馈 Microsoft PowerToys 是一组实用工具&#xff0c;可帮助高级用户调整和简化其 Windows 体验&#xff0c;从而提高工作效率。 安装 …

Unity之效应器

主要作用&#xff1a;在一个区域内让游戏对象受到力和扭矩力的作用 1、创建一个精灵&#xff08;绿色区域&#xff09; 2、为其添加碰撞器&#xff08;要将Used By Effector和is Trigger打钩&#xff09; 3、添加效应器组件 4、区域效应器参数 Use Collider Mask&#xff1a;…

第3章 Class and Object

构造函数 Guaranteed initialization with the constructor使用构造函数保证初始化 • If a class has a constructor, the compiler automatically calls that constructor at the point an object is created, before client programmers can get their hands on the o…

Solidity基础五

暂时的一事无成也代表将来万事皆有可能&#xff01; 目录 一、对Solidity文件的理解 二、Solidity的导sol文件&#xff08;库、合约&#xff09; 三、Solidity的继承 1.继承的分类 2.继承的可见性 3.父合约构造函数的传参 4.调用父合约成员 5.重写 四、Solidity的抽象…

Solidity基础八

别慌&#xff0c;月亮也在大海某处迷茫 目录 一、Solidity 编程风格 1. 代码布局 2. 代码中各部分的顺序 3. 命名约定 二、Solidity 智能合约编写过程 1. solidity Hello World 2. 版本声明 3. 导入声明 4. 合约声明 三、Solidity 合约结构 智能合约 Test 四、So…

Solidity基础六

生活本来就是平凡琐碎的&#xff0c;哪有那么多惊天动地的大事&#xff0c;快乐的秘诀就是不管对大事小事都要保持热情 目录 一、Solidity的特殊变量(全局) 二、Solidity的不可变量 immutable的赋值方式 三、Solidity的事件与日志 事件和日志加深理解 四、Solidity的异常…

EMLP2021 | Google大模型微调经典论文prompt tuning

一、概述 title&#xff1a;The Power of Scale for Parameter-Efficient Prompt Tuning 论文地址&#xff1a;https://arxiv.org/abs/2104.08691 代码&#xff1a;GitHub - google-research/prompt-tuning: Original Implementation of Prompt Tuning from Lester, et al, …

系列一、RuoYi前后端分离(登录密码加密)

一、部署前后端服务 http://doc.ruoyi.vip/ruoyi-vue/ 二、现象 若依前后端环境分离版本&#xff0c;本地部署好前后端环境后&#xff0c;访问登录接口密码是明文的&#xff0c;这样显然hi不安全的&#xff0c;如下图所示&#xff1a; 三、解决方法 3.1、加密流程 ①、后端…

Linux-0.11 文件系统namei.c详解

Linux-0.11 文件系统namei.c详解 模块简介 namei.c是整个linux-0.11版本的内核中最长的函数&#xff0c;总长度为700行。其核心是namei函数&#xff0c;即根据文件路径寻找对应的i节点。 除此以外&#xff0c;该模块还包含一些创建目录&#xff0c;删除目录&#xff0c;创建目…

Day2:Windows网络编程-TCP

今天开始进入Windows网络编程的学习&#xff0c;在学习的时候总是陷入Windows复杂的参数&#xff0c;纠结于这些。从老师的讲解中&#xff0c;这些内容属于是定式&#xff0c;主要学习写的逻辑。给自己提个醒&#xff0c;要把精力放在正确的位置&#xff0c;不要无端耗费精力。…

【JavaScript】文件分片上传

文章目录 普通文件上传分片上传整体流程技术点分析文件选择方式隐藏input框&#xff0c;自定义trigger拖拽上传 分片动态分片 计算哈希workerrequestIdleCallback抽样 请求并发控制进度展示手动中止/暂停 合并流式并发合并 反思分片命名问题并发控制代码实现的问题 参考文献 普…

ChatGPT桌面客户端支持gpt4模型,附使用说明

#软件核心功能&#xff1a; 1、支持OpenAI官方秘钥及API2D双秘钥使用&#xff1b;如果全局魔法&#xff0c;可以自己用官方秘钥&#xff1b;没魔法国内可直接使用API2D秘钥&#xff1b; 2、内置GPT4模型选项&#xff0c;如果你的官方秘钥支持可直接使用&#xff1b;你也可以注册…

【Labview如何显示数据库表格中的内容】

Labview如何显示数据库表格中的内容 前提操作思路框图 前提 已经成功将数据库与Labview相连接&#xff0c;若还没有链接可以查看&#xff1a;Labview与SQL Server互联 进行操作 操作 思路 首先创建一个表格控件&#xff0c;通过一个按钮启动程序&#xff0c;通过程序调用数…

SAP MM 根据采购订单反查采购申请

如何通过采购订单号查询到其前端的采购申请号。 首先从采购申请的相关报表着手&#xff0c;比如ME5A, 发现它是可以满足需求的。 例如&#xff1a;如下的采购订单&#xff0c; 该订单是由采购申请10003364转过来的。 如果想通过这个采购订单找到对应的采购申请&#xff0c;在…

Packet Tracer – 配置命名标准 IPv4 ACL

Packet Tracer – 配置命名标准 IPv4 ACL 地址分配表 设备 接口 IP 地址 子网掩码 默认网关 R1 F0/0 192.168.10.1 255.255.255.0 N/A F0/1 192.168.20.1 255.255.255.0 N/A E0/0/0 192.168.100.1 255.255.255.0 N/A E0/0/1 192.168.200.1 255.255.2…

第五十五天学习记录:C语言进阶:动态内存管理Ⅲ

柔性数组 C99中&#xff0c;结构中的最后一个元素允许是未知大小的数组&#xff0c;这就叫做柔性数组成员。 柔性数组的特点&#xff1a; 。结构体中的柔性数组成员前面必须至少有一个其他成员。 。sizeof返回的这种结构大小不包括柔性数组的内存。 。包含柔性数组成员的结构…

【C++学习】智能指针

&#x1f431;作者&#xff1a;一只大喵咪1201 &#x1f431;专栏&#xff1a;《C学习》 &#x1f525;格言&#xff1a;你只管努力&#xff0c;剩下的交给时间&#xff01; 智能指针 &#x1f96e;智能指针&#x1f362;为什么需要智能指针&#x1f362;RAII &#x1f96e;au…

chatgpt赋能python:Python自动开机:提高效率的必备工具

Python 自动开机&#xff1a;提高效率的必备工具 随着科技的发展&#xff0c;计算机在我们的日常生活中扮演了越来越重要的角色。为了提高工作效率和使用体验&#xff0c;越来越多的人开始探索利用自动化工具来简化日常操作。 Python 称得上是自动化领域中的一把利器。通过代…