一.简介
在前面的文章中,我们使用表单方式完成登录提交,但是目前基本都是前后端分离项目,很少使用表单提交的方式,基本都是json方式,使用ajax提交,那么我们怎么将表单提交方式改成json格式登录呢?
二.思路分析
通过前面源码部分学习中,已经知道在HttpSecurity配置中,每新增一种配置,都会加入一个过滤器,或者覆盖默认的过滤器,那么使用的表单登录也是同样使用过滤器,追踪源码看下他的过滤器:UsernamePasswordAuthenticationFilter
2.1原始表单过滤器提交认证请求的逻辑
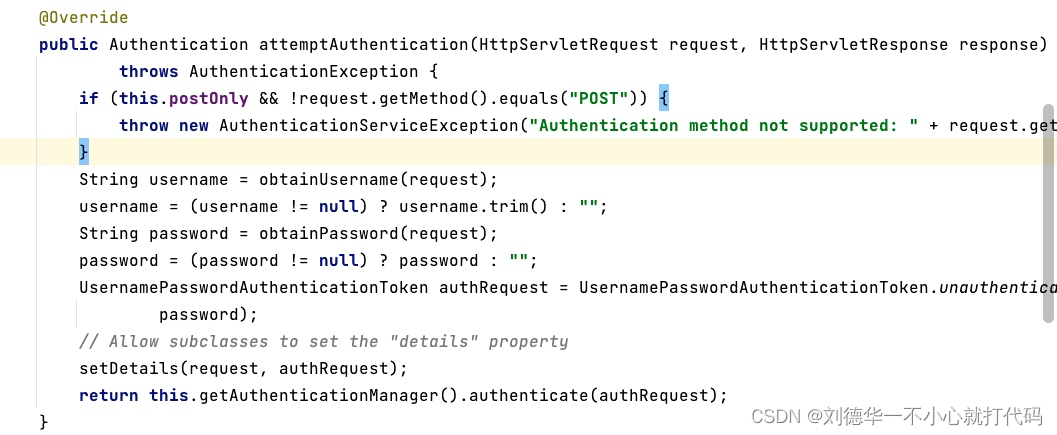
- 使用Obtain获取用户名和密码,其实就是通过request.getParameter获取
- 然后将用户名和密码封装在token
- 调用proverManager.authenticate()进行认证 所以基于这块我们可以参考上节课验证码的思路:
2.2实现思路
- 写一个过滤器,继承UsernamePasswordAuthenticationFilter
- 从json格式参数中获取用户名和密码
- 然后进行封装成token
- 调用this.getAuthenticationManager().authenticate(authRequest) 完成认证
- 如果不是json格式请求则还是走原先的逻辑,调用父类attemptAuthentication(request, response);按照原先参数传递方式进行认证。
三.创建项目
如何创建一个SpringSecurity项目,前面文章已经有说明了,这里就不重复写了。
四.代码实现
4.1定义Json 过滤器
- 定义json过滤器,
- 继承UsernamePasswordAuthenticationFilter,
- 从json格式参数中获取用户名和密码,
- 然后进行封装成token,
- 调用this.getAuthenticationManager().authenticate(authRequest) 完成认证,
如果不是json格式请求则还是走原先的逻辑,调用父类attemptAuthentication(request, response);按照原先参数传递方式进行认证。
代码如下:
public class JsonLoginFilter extends UsernamePasswordAuthenticationFilter {
    @Override
    public Authentication attemptAuthentication(HttpServletRequest request, HttpServletResponse response) throws AuthenticationException {
        if (request.getContentType().equalsIgnoreCase(MediaType.APPLICATION_JSON_VALUE)){
            try {
                Map<String,String> map = new ObjectMapper().readValue(request.getInputStream(), new TypeReference<>() {
                });
                String userName = map.get(getUsernameParameter());
                String passwd = map.get(getPasswordParameter());
                UsernamePasswordAuthenticationToken authenticationToken = new UsernamePasswordAuthenticationToken(userName, passwd);
                return this.getAuthenticationManager().authenticate(authenticationToken);
            } catch (IOException e) {
                throw new RuntimeException(e);
            }
        }

        return super.attemptAuthentication(request, response);
    }
}
4.2配置Json过滤器
配制json过滤器的代码如下:
@Bean
    public JsonLoginFilter jsonLoginFilter(){
        JsonLoginFilter jsonLoginFilter = new JsonLoginFilter();
        jsonLoginFilter.setAuthenticationManager(authenticationManager());
        jsonLoginFilter.setAuthenticationFailureHandler(new AuthenticationFailureHandler() {
            @Override
            public void onAuthenticationFailure(HttpServletRequest request, HttpServletResponse response, AuthenticationException exception) throws IOException, ServletException {
                Map<String,Object> result = new HashMap<>();
                result.put("code",-1);
                result.put("msg","登录失败");
                result.put("data",exception.getMessage());
                writeResp(result,response);
            }
        });
        jsonLoginFilter.setAuthenticationSuccessHandler(new AuthenticationSuccessHandler() {
                    @Override
                    public void onAuthenticationSuccess(HttpServletRequest request, HttpServletResponse response, Authentication authentication) throws IOException, ServletException {
                        Map<String,Object> result = new HashMap<>();
                        result.put("code",-1);
                        result.put("msg","登录成功");
                        result.put("data",authentication);
                        writeResp(result,response);
                    }
                });
        return jsonLoginFilter;
    }
4.3配置SecurigyFilterChain
配置SecurigyFilterChain的代码如下:
 @Bean
    public SecurityFilterChain securityFilterChain(HttpSecurity http) throws Exception {
        http.authorizeHttpRequests().anyRequest().authenticated()
                .and()
                .addFilterAt(jsonLoginFilter(), UsernamePasswordAuthenticationFilter.class)
                .csrf().disable();
        return http.build();
    }
4.4配置SecurityFilterchain
配置SecurityFilterchain的代码如下:
@Bean
    public SecurityFilterChain securityFilterChain(HttpSecurity http) throws Exception {
        http.authorizeHttpRequests((auth) ->{
            try {
                auth.antMatchers("/kaptcha").permitAll()
                        .anyRequest().authenticated()
                        .and().formLogin()
                        .loginPage("/login.html")
                        .loginProcessingUrl("/login")
                        .failureForwardUrl("/login.html")
                        .permitAll()
                        .and()
                        .csrf().disable();
            }
            catch (Exception e){
            }
        });
        return http.build();
    }
这样就实现了将表单提交方式改成json格式登录。



![[快速入门前端17] CSS 选择器(6) 选择器总结](https://img-blog.csdnimg.cn/854f0ddf406b4889a8cf6f1f27727167.png)
