OpenVINO 2022.3之九:Post-training Optimization Tool (POT)
Post-training Optimization Tool (POT) 通过在已训练好的模型上应用量化算法,将模型的权重和激活函数从 FP32/FP16 的值域映射到 INT8 的值域中,从而实现模型压缩,以降低模型推理所需的计算资源和内存带宽,进一步提高模型的推理性能。不同于 Quantization-aware Training(QAT) 方法,POT在不需要对原模型进行 fine-tuning 的情况下进行量化,也能得到精度较好的 INT8 模型,因此广泛地被应用于工业界的量化实践中。
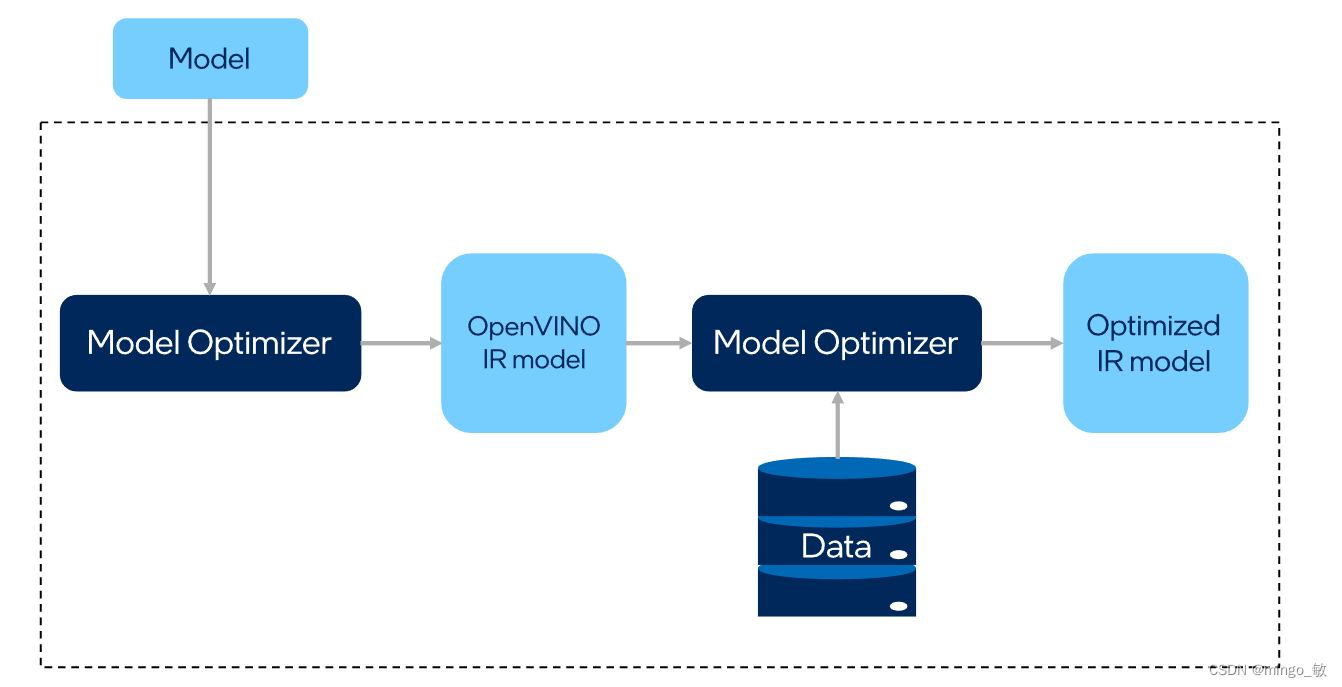
POT提供了两种量化算法: Default Quantization 和 Accuracy-aware Quantization,
-
Default Quantization (DQ) 提供了一种快速的量化方法,量化后的模型在大多数情况下能够提供较好的精度,适合作为模型 INT8 量化的 baseline。
{ "name": "DefaultQuantization", # Optimization algorithm name "params": { "preset": "performance", # Preset [performance, mixed] which controls # the quantization scheme. For the CPU: # performance - symmetric quantization of weights and activations. # mixed - symmetric weights and asymmetric activations. "stat_subset_size": 300 # Size of subset to calculate activations statistics that can be used # for quantization parameters calculation. } } -
Accuracy-aware Quantization ( AAQ ) 是一种基于 Default Quantization 上的迭代量化算法,以 DQ 量化后的模型作为 baseline,若 INT8 模型精度达到预期精度范围,则停止迭代,反之,量化算法会分析模型各层对精度的影响,并将对精度影响最大的层回退到FP32精度,然后重新评估模型精度,重复以上流程,直至模型达到预期精度范围。
{
    "name": "DefaultQuantization",
    "params": {
        "preset": "performance",
        "stat_subset_size": 300

        "activations": {                 # defines activation
            "range_estimator": {         # defines how to estimate statistics
                "max": {                 # right border of the quantizating floating-point range
                    "aggregator": "max", # use max(x) to aggregate statistics over calibration dataset
                    "type": "abs_max"    # use abs(max(x)) to get per-sample statistics
                }
            }
        }
    }
}
1 Default Quantization (DQ)
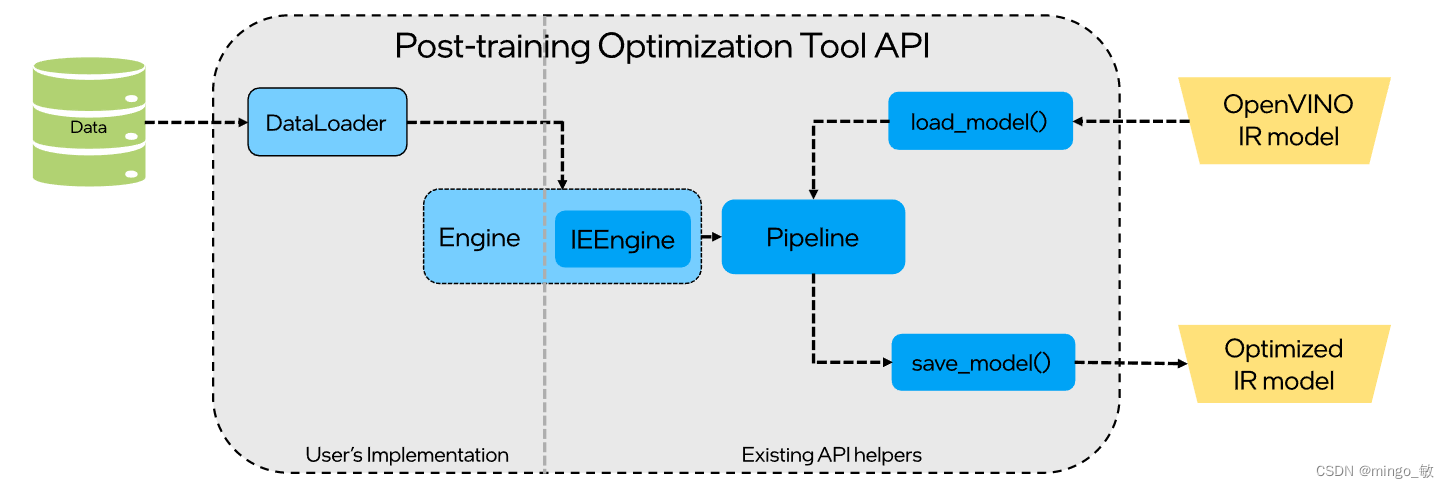
提供了 POT 量化流水线通用化的接口,包括 DataLoader 和 Metric 等基类,用户可以通过继承 DataLoader 来定义客制化的数据集加载及预处理模块,通过继承 Metric 来定义客制化的后处理和精度计算的模块。这种方式更加灵活,可以适用不同客制化模型的量化需求.
1-1 Prepare data and dataset interface
import os
import numpy as np
import cv2 as cv

from openvino.tools.pot import DataLoader

class ImageLoader(DataLoader):
    """ Loads images from a folder """
    def __init__(self, dataset_path):
        # Use OpenCV to gather image files
        # Collect names of image files
        self._files = []
        all_files_in_dir = os.listdir(dataset_path)
        for name in all_files_in_dir:
            file = os.path.join(dataset_path, name)
            if cv.haveImageReader(file):
                self._files.append(file)

        # Define shape of the model
        self._shape = (224,224)

    def __len__(self):
        """ Returns the length of the dataset """
        return len(self._files)

    def __getitem__(self, index):
        """ Returns image data by index in the NCHW layout
        Note: model-specific preprocessing is omitted, consider adding it here
        """
        if index >= len(self):
            raise IndexError("Index out of dataset size")

        image = cv.imread(self._files[index]) # read image with OpenCV
        image = cv.resize(image, self._shape) # resize to a target input size
        image = np.expand_dims(image, 0)  # add batch dimension
        image = image.transpose(0, 3, 1, 2)  # convert to NCHW layout
        return image, None   # annotation is set to None
1-2 Select quantization parameters
{
    "name": "DefaultQuantization",
    "params": {
        "target_device": "ANY",
        "stat_subset_size": 300,
        "stat_batch_size": 1
    },
}
1-3 Define and run quantization process
from openvino.tools.pot import IEEngine
from openvino.tools.pot load_model, save_model
from openvino.tools.pot import compress_model_weights
from openvino.tools.pot import create_pipeline

# Model config specifies the name of the model and paths to .xml and .bin files of the model.
model_config =
{
    "model_name": "model",
    "model": path_to_xml,
    "weights": path_to_bin,
}

# Engine config.
engine_config = {"device": "CPU"}

algorithms = [
    {
        "name": "DefaultQuantization",
        "params": {
            "target_device": "ANY",
            "stat_subset_size": 300,
            "stat_batch_size": 1
        },
    }
]

# Step 1: Implement and create a user data loader.
data_loader = ImageLoader("<path_to_images>")

# Step 2: Load a model.
model = load_model(model_config=model_config)

# Step 3: Initialize the engine for metric calculation and statistics collection.
engine = IEEngine(config=engine_config, data_loader=data_loader)

# Step 4: Create a pipeline of compression algorithms and run it.
pipeline = create_pipeline(algorithms, engine)
compressed_model = pipeline.run(model=model)

# Step 5 (Optional): Compress model weights to quantized precision
#                     to reduce the size of the final .bin file.
compress_model_weights(compressed_model)

# Step 6: Save the compressed model to the desired path.
# Set save_path to the directory where the model should be saved.
compressed_model_paths = save_model(
    model=compressed_model,
    save_path="optimized_model",
    model_name="optimized_model",
)
2 Accuracy-aware Quantization ( AAQ )
2-1 Prepare data and dataset interface
同 2-1-1.
2-2 Define accuracy metric
from openvino.tools.pot import Metric

class Accuracy(Metric):

    # Required methods
    def __init__(self, top_k=1):
        super().__init__()
        self._top_k = top_k
        self._name = 'accuracy@top{}'.format(self._top_k)
        self._matches = [] # container of the results

    @property
    def value(self):
        """ Returns accuracy metric value for all model outputs. """
        return {self._name: self._matches[-1]}

    @property
    def avg_value(self):
        """ Returns accuracy metric value for all model outputs. """
        return {self._name: np.ravel(self._matches).mean()}

    def update(self, output, target):
        """ Updates prediction matches.
        :param output: model output
        :param target: annotations
        """
        if len(output) > 1:
            raise Exception('The accuracy metric cannot be calculated '
                            'for a model with multiple outputs')
        if isinstance(target, dict):
            target = list(target.values())
        predictions = np.argsort(output[0], axis=1)[:, -self._top_k:]
        match = [float(t in predictions[i]) for i, t in enumerate(target)]

        self._matches.append(match)

    def reset(self):
        """ Resets collected matches """
        self._matches = []

    def get_attributes(self):
        """
        Returns a dictionary of metric attributes {metric_name: {attribute_name: value}}.
        Required attributes: 'direction': 'higher-better' or 'higher-worse'
                             'type': metric type
        """
        return {self._name: {'direction': 'higher-better',
                             'type': 'accuracy'}}
调用:
metric = Accuracy()
engine = IEEngine(config=engine_config, data_loader=data_loader, metric=metric)
2-3 Select quantization parameters
Accuracy-aware Quantization所独有的唯一参数是 maximal_drop, 表明模型量化后必须实现的最大降低精度,默认是0.01(1%)
2-4 Define and run quantization process
from openvino.tools.pot import IEEngine
from openvino.tools.pot load_model, save_model
from openvino.tools.pot import compress_model_weights
from openvino.tools.pot import create_pipeline

# Model config specifies the model name and paths to model .xml and .bin file
model_config = Dict(
    {
        "model_name": "model",
        "model": path_to_xml,
        "weights": path_to_bin,
    }
)

# Engine config
engine_config = Dict({"device": "CPU"})

algorithms = [
    {
        "name": "AccuracyAwareQuantization",
        "params": {
            "target_device": "ANY",
            "stat_subset_size": 300,
            'maximal_drop': 0.02
        },
    }
]

# Step 1: Implement and create user's data loader.
data_loader = UserDataLoader()

# Step 2: Implement and create user's data loader.
metric = Accuracy()

# Step 3: Load the model.
model = load_model(model_config=model_config)

# Step 4: Initialize the engine for metric calculation and statistics collection.
engine = IEEngine(config=engine_config, data_loader=data_loader, metric=metric)

# Step 5: Create a pipeline of compression algorithms and run it.
pipeline = create_pipeline(algorithms, engine)
compressed_model = pipeline.run(model=model)

# Step 6 (Optional): Compress model weights to quantized precision
#                    in order to reduce the size of the final .bin file.
compress_model_weights(compressed_model)

# Step 7: Save the compressed model to the desired path.
# Set save_path to the directory where the model should be saved.
compressed_model_paths = save_model(
    model=compressed_model,
    save_path="optimized_model",
    model_name="optimized_model",
)

# Step 8 (Optional): Evaluate the compressed model. Print the results.
metric_results = pipeline.evaluate(compressed_model)
