最近在做一个动态线程池的组件,遇到了关于阻塞队列长度刷新的问题,所以记录下来,很有意思
我们都知道常用线程池分为二类,Spring-ThreadPoolTaskExecutor和JDK-ThreadPoolExecutor的,当然了Spring也是基于JDK做一步封装,其次Spring提供了可以调整阻塞队列大小的api并且支持初始化线程池的时候阻塞队列为0,但是JDK线程池其实是不允许调整,那么我们如果想调整线程池的阻塞队列应该怎么做呢?下面我们探究一下Spring提供的线程池能否平滑的做到这一点
一.Spring-ThreadPoolTaskExecutor
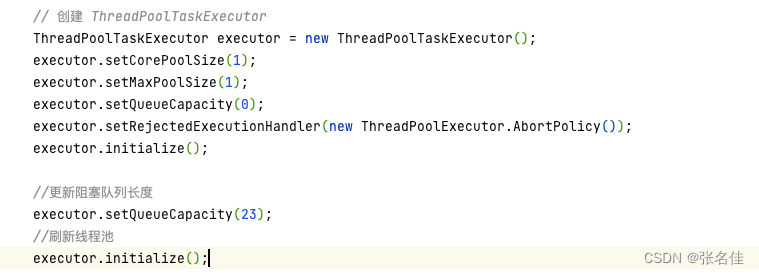
1. 如何更改阻塞队列
spring线程池,可以初始化线程池为0,并且提供修改的方法,但是注意修改后需要调用initialize刷新线程池
2. 验证生效
        // 创建 ThreadPoolTaskExecutor
        ThreadPoolTaskExecutor executor = new ThreadPoolTaskExecutor();
        executor.setCorePoolSize(1);
        executor.setMaxPoolSize(1);
        executor.setQueueCapacity(20);
        executor.setRejectedExecutionHandler(new ThreadPoolExecutor.AbortPolicy());
        executor.initialize();

        // 提交任务
        for (int i = 1; i <= 20; i++) {
            int taskNumber = i;
            executor.execute(() -> {
                System.out.println("刷新前任务 " + taskNumber + " running in thread " + Thread.currentThread().getName());
                try {
                    TimeUnit.SECONDS.sleep(1);
                } catch (InterruptedException e) {
                    e.printStackTrace();
                }
            });
        }


        // 延迟一段时间后降低阻塞队列长度
        TimeUnit.SECONDS.sleep(3);
        int size = executor.getThreadPoolExecutor().getQueue().size();
        int ableSize = executor.getThreadPoolExecutor().getQueue().remainingCapacity();
        System.out.println("降低前队列使用的容量 = " + size + ",剩余的可用容量" + ableSize);


        //刷新阻塞队列
        executor.setQueueCapacity(0);
        executor.initialize();
        int newSize = executor.getThreadPoolExecutor().getQueue().size();
        int newAbleSize = executor.getThreadPoolExecutor().getQueue().remainingCapacity();
        System.out.println("降低后队列使用的容量 = " + newSize+",剩余的可用容量" + newAbleSize);

        try {
            for (int i = 1; i <= 5; i++) {
                int taskNumber = i;
                executor.execute(() -> {
                    System.out.println("刷新后任务===> " + taskNumber + " running in thread " + Thread.currentThread().getName());
                });
            }
        } catch (Exception e) {
            System.out.println("触发线程池拒绝!");
            e.printStackTrace();
        }
分析:简述一下这段代码逻辑,创建了一个Spring的线程池,最大=核心=1,阻塞队列为20,提交了20个任务,每个任务延迟一会模拟业务逻辑,主线程提交20个任务后,等待了3秒,然后修改了阻塞队列长度为0并刷新线程池,最后给刷新阻塞队列后的线程池提交了5个任务,刷新阻塞队列前后打印了阻塞队列的使用长度,以及剩余容量
我们看看执行结果
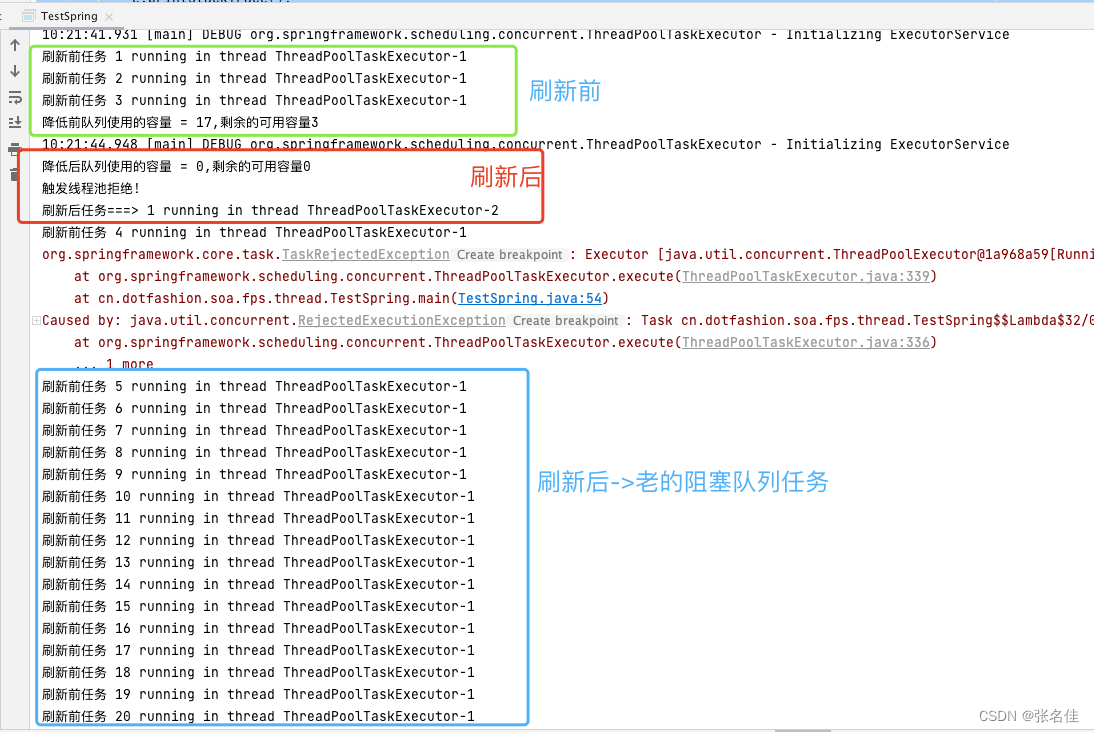
分析:
首先提交20个任务,我们看到日志输出3个任务执行,又因核心=最大=1,所以阻塞队列里面存了17(20-3)个待处理任务,剩余3 (容量20-17个使用)个空闲容量。此时等待的主线程刷新了阻塞队列为0,所以降低后的队列使用和剩余容量都是0;
注意这个时候使用的队列容量也为0,说明之前队列中的剩余17个任务已经存放在另一个地方,不在这个队列中, 最后我们向刷新的线程中提交5个任务,由于我们的核心线程是1,所以最起码有一个任务被调度了(也可能多个,这个是随机的),当第二个任务再次提交的时候,阻塞队列为0,无法存储,触发异常拒绝策略;
但是我们可以看到,之前阻塞队列的17个任务在后面陆续执行了,并没有丢失,且刷新后的线程名称和之前的已经不一样了(y一个是ThreadPoolTaskExecutor-1 另一个是ThreadPoolTaskExecutor-2)。如果大家好奇可以打印executor对象的hashcode,其实也是没变,也就是说变化的是spring里面开辟的线程。
3. sping如何做到的
在上面的结论中我们发现Spirng的阻塞队列更新容量的时候平滑的进行了切换,那么到底他做了啥呢,我们把其中涉及的对象hashcode打印出来研究一下
ThreadPoolTaskExecutor executor = new ThreadPoolTaskExecutor();
        executor.setCorePoolSize(5);
        executor.setMaxPoolSize(5);
        executor.setQueueCapacity(1);
        executor.setRejectedExecutionHandler(new ThreadPoolExecutor.AbortPolicy());
        executor.initialize();

        // 提交任务
        for (int i = 1; i <= 5; i++) {
            int taskNumber = i;
            executor.execute(() -> {
                System.out.println("刷新前任务 " + taskNumber + " && " + Thread.currentThread().getName());
            });
        }


        // 延迟一段时间后降低阻塞队列长度
        TimeUnit.SECONDS.sleep(3);
        System.out.println("before executor hashCode = " + executor.hashCode() + " queue hashCode" + executor.getThreadPoolExecutor().getQueue().hashCode());


        //刷新阻塞队列
        executor.setQueueCapacity(1);
        executor.initialize();
        System.out.println("after executor hashCode = " + executor.hashCode() + " queue hashCode" + executor.getThreadPoolExecutor().getQueue().hashCode());

        for (int i = 1; i <= 5; i++) {
            int taskNumber = i;
            executor.execute(() -> {
                System.out.println("刷新后任务===> " + taskNumber + " & " + Thread.currentThread().getName());
            });
        }
运行结果如下:

分析:
通过上面的代码我们可以看出,阻塞队列的更改,spring为了平滑的度过,会开辟同样配置的新线程执行新提交的任务,同时也会开后创建新的阻塞队列去执行新的任务,通作这样来保证我们之前的任务继续执行不会被丢弃依然被旧的线程执行调度,同时新的线程来执行新的任务,次过程中executor对象保持不变




![[LitCTF 2023]Flag点击就送!(cookie伪造)](https://img-blog.csdnimg.cn/d5efae44feeb4ee68a05b93ca4e744b9.png)

