内核调试工具crash使用
- 前言
- 初识
- 获取vmlinux
- Dwarf Error: wrong version in compilation unit header (is 5, should be 2, 3, or 4)
- 其他
前言
在编写内核驱动的过程中,时不时就导致内核崩溃,也没啥好的调试方法,要么dmesg打印内核日志,要么搭建kgdb环境调试,但kgdb比较繁琐,dmesg有时候也不能打印内核堆栈,故调试内核纯看运气,如果是能稳定复现的bug还好调试,最怕的就是测试程序刚开始跑的好好的,突然鼠标动不了了,这个时候就知道糟了。之前的思路是一直时快速刷新dmesg以求能看到内核崩溃时日志打印,但没有成功过。后面有一次面试的时候面试官提到了crash这一内核调试工具,看起来还挺有用,故记录一下使用过程。
环境说明:
虚拟机1:
cat /proc/version
Linux version 5.15.0-69-generic (buildd@lcy02-amd64-071) (gcc (Ubuntu 9.4.0-1ubuntu1~20.04.1) 9.4.0, GNU ld (GNU Binutils for Ubuntu) 2.34) #76~20.04.1-Ubuntu SMP Mon Mar 20 15:54:19 UTC 2023
初识
运行环境:虚拟机1
参考博客:
官方文档:Kernel crash dump
ubuntu 20.04 启用kdump服务及下载vmlinux
crash调试内核入门-老司机带你上车
实际上crash的安装步骤非常简单,安装linux-crashdump后重启即可
apt install linux-crashdump # 安装linux-crashdump
reboot # 重启
# 验证
kdump-config show
DUMP_MODE:        kdump
USE_KDUMP:        1
KDUMP_SYSCTL:     kernel.panic_on_oops=1
KDUMP_COREDIR:    /var/crash
crashkernel addr: 0xb3000000
   /var/lib/kdump/vmlinuz: symbolic link to /boot/vmlinuz-5.15.0-69-generic
kdump initrd:
   /var/lib/kdump/initrd.img: symbolic link to /var/lib/kdump/initrd.img-5.15.0-69-generic
current state:    ready to kdump

kexec command:
  /sbin/kexec -p --command-line="BOOT_IMAGE=/boot/vmlinuz-5.15.0-69-generic root=UUID=70b5c7aa-174c-45ff-84de-ea3325883bc6 ro find_preseed=/preseed.cfg auto noprompt priority=critical locale=en_US quiet reset_devices systemd.unit=kdump-tools-dump.service nr_cpus=1 irqpoll nousb" --initrd=/var/lib/kdump/initrd.img /var/lib/kdump/vmlinuz

cat /proc/cmdline
BOOT_IMAGE=/boot/vmlinuz-5.15.0-69-generic root=UUID=70b5c7aa-174c-45ff-84de-ea3325883bc6 ro find_preseed=/preseed.cfg auto noprompt priority=critical locale=en_US quiet crashkernel=512M-:192M


dmesg | grep -i crash
[    0.000000] Command line: BOOT_IMAGE=/boot/vmlinuz-5.15.0-69-generic root=UUID=70b5c7aa-174c-45ff-84de-ea3325883bc6 ro find_preseed=/preseed.cfg auto noprompt priority=critical locale=en_US quiet crashkernel=512M-:192M
[    0.006128] Reserving 192MB of memory at 2864MB for crashkernel (System RAM: 8191MB)
[    0.574934] Kernel command line: BOOT_IMAGE=/boot/vmlinuz-5.15.0-69-generic root=UUID=70b5c7aa-174c-45ff-84de-ea3325883bc6 ro find_preseed=/preseed.cfg auto noprompt priority=critical locale=en_US quiet crashkernel=512M-:192M
安装过程只需要简单看一看官方文档即可
# 试验kdump是否有效,主动触发kernel panic
cat /proc/sys/kernel/sysrq
176
echo c > /proc/sysrq-trigger

# 自动重启后生成如下文件
root@ubuntu /boot# cd /var/crash/
root@ubuntu /v/crash# ls
202305201923/  kdump_lock  kexec_cmd  linux-image-5.15.0-69-generic-202305201923.crash
root@ubuntu /v/crash# cd 202305201923/
root@ubuntu /v/c/202305201923# ls
dmesg.202305201923  dump.202305201923

# dmesg.202305201923
[  150.144897] rfkill: input handler disabled
[  235.080620] sysrq: Trigger a crash
[  235.080633] Kernel panic - not syncing: sysrq triggered crash
[  235.080638] CPU: 3 PID: 6014 Comm: fish Kdump: loaded Not tainted 5.15.0-69-generic #76~20.04.1-Ubuntu
[  235.080645] Hardware name: VMware, Inc. VMware Virtual Platform/440BX Desktop Reference Platform, BIOS 6.00 07/22/2020
[  235.080650] Call Trace:
[  235.080655]  <TASK>
[  235.080660]  dump_stack_lvl+0x4a/0x63
[  235.080672]  dump_stack+0x10/0x16
[  235.080676]  panic+0x149/0x321
[  235.080685]  sysrq_handle_crash+0x1a/0x20
[  235.080694]  __handle_sysrq.cold+0xb4/0x18e
[  235.080702]  write_sysrq_trigger+0x28/0x40
[  235.080706]  proc_reg_write+0x6a/0xa0
[  235.080712]  vfs_write+0xb9/0x270
[  235.080718]  ksys_write+0x67/0xf0
[  235.080724]  __x64_sys_write+0x1a/0x20
[  235.080728]  do_syscall_64+0x5c/0xc0
[  235.080735]  ? do_syscall_64+0x69/0xc0
[  235.080741]  ? irqentry_exit_to_user_mode+0x9/0x20
[  235.080746]  ? irqentry_exit+0x1d/0x30
[  235.080750]  ? exc_page_fault+0x89/0x170
[  235.080754]  entry_SYSCALL_64_after_hwframe+0x61/0xcb
[  235.080761] RIP: 0033:0x7f8e32f2432f
[  235.080767] Code: 89 54 24 18 48 89 74 24 10 89 7c 24 08 e8 29 fd ff ff 48 8b 54 24 18 48 8b 74 24 10 41 89 c0 8b 7c 24 08 b8 01 00 00 00 0f 05 <48> 3d 00 f0 ff ff 77 2d 44 89 c7 48 89 44 24 08 e8 5c fd ff ff 48
[  235.080772] RSP: 002b:00007f8e22ffcda0 EFLAGS: 00000293 ORIG_RAX: 0000000000000001
[  235.080778] RAX: ffffffffffffffda RBX: 0000000000000000 RCX: 00007f8e32f2432f
[  235.080782] RDX: 0000000000000002 RSI: 0000555cf0465e58 RDI: 0000000000000009
[  235.080785] RBP: 0000000000000002 R08: 0000000000000000 R09: 000000006469809d
[  235.080788] R10: 0000000000000000 R11: 0000000000000293 R12: 0000000000000009
[  235.080791] R13: 0000555cf0465e58 R14: 0000555cf0389560 R15: 00007f8e22ffcfc0
[  235.080797]  </TASK>
接下来就是分析dump文件,可惜我并没有成功。
使用crash分析dump文件,还需要vmlinux文件

用法类似于crash dump vmlinux
crash --help
USAGE:

  crash [OPTION]... NAMELIST MEMORY-IMAGE[@ADDRESS]     (dumpfile form)
  crash [OPTION]... [NAMELIST]                          (live system form)

OPTIONS:

  NAMELIST
    This is a pathname to an uncompressed kernel image (a vmlinux
    file), or a Xen hypervisor image (a xen-syms file) which has
    been compiled with the "-g" option.  If using the dumpfile form,
    a vmlinux file may be compressed in either gzip or bzip2 formats.

  MEMORY-IMAGE
    A kernel core dump file created by the netdump, diskdump, LKCD
    kdump, xendump or kvmdump facilities.
获取vmlinux
方法1: apt下载方法(失败)
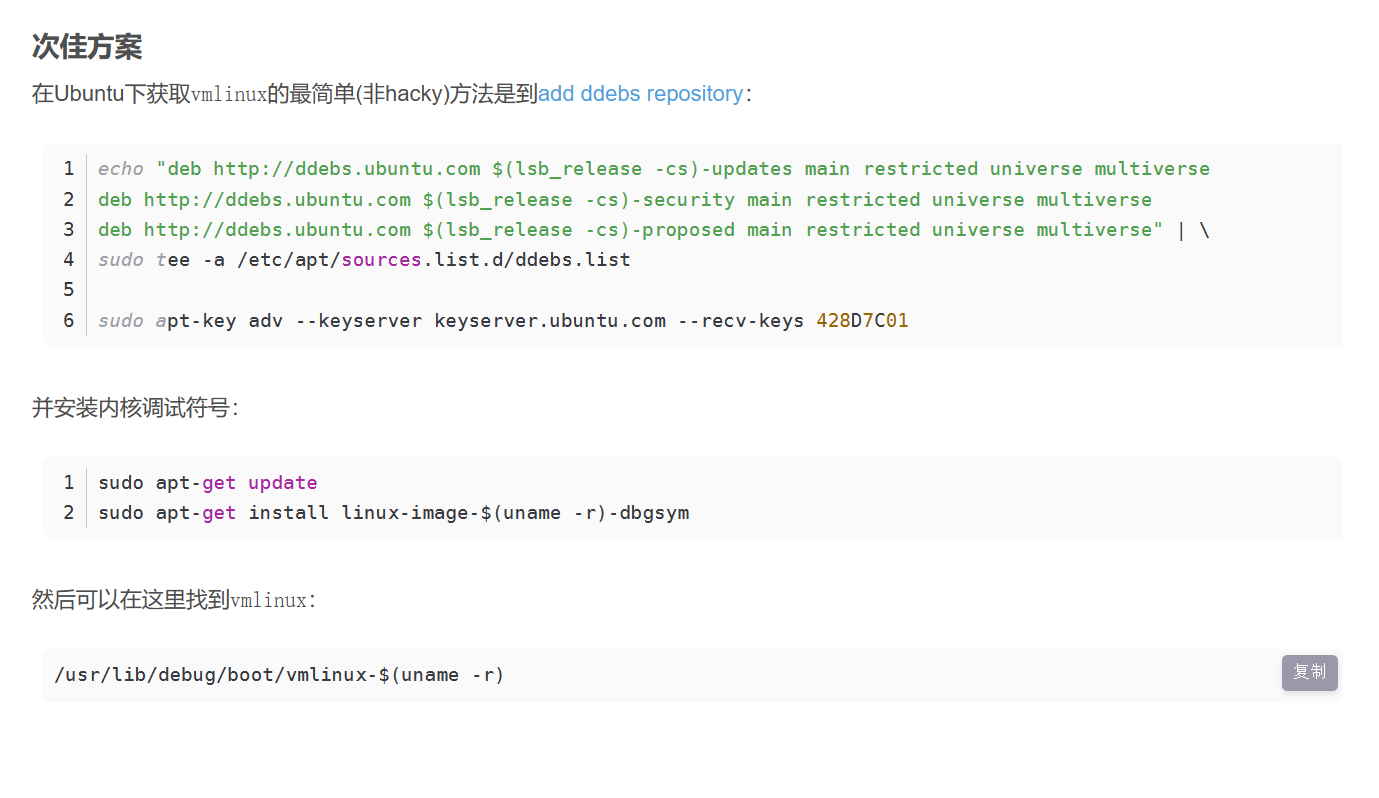
Ubuntu安装上的vmlinux在哪里?
Where is vmlinux on my Ubuntu installation?
apt-get install linux-image-$(uname -r)-dbgsym
Reading package lists... Done
Building dependency tree
Reading state information... Done
E: Unable to locate package linux-image-5.15.0-69-generic-dbgsym
E: Couldn't find any package by glob 'linux-image-5.15.0-69-generic-dbgsym'
E: Couldn't find any package by regex 'linux-image-5.15.0-69-generic-dbgsym'
方法2: 下载ddeb包

网址:http://ddebs.ubuntu.com/pool/main/l/linux/


没找到amd64架构的linux-image-5.15.0-69-generic-dbgsym,只好下了一个unsigned版本的,下个比较慢,翻墙的话快一点。
之后dpkg -i安装
root@ubuntu /u/l/d/boot# cd /usr/lib/debug/boot/
root@ubuntu /u/l/d/boot# ls -lah
-rw-r--r-- 1 root root 705M Mar 17 09:56 vmlinux-5.15.0-69-generic
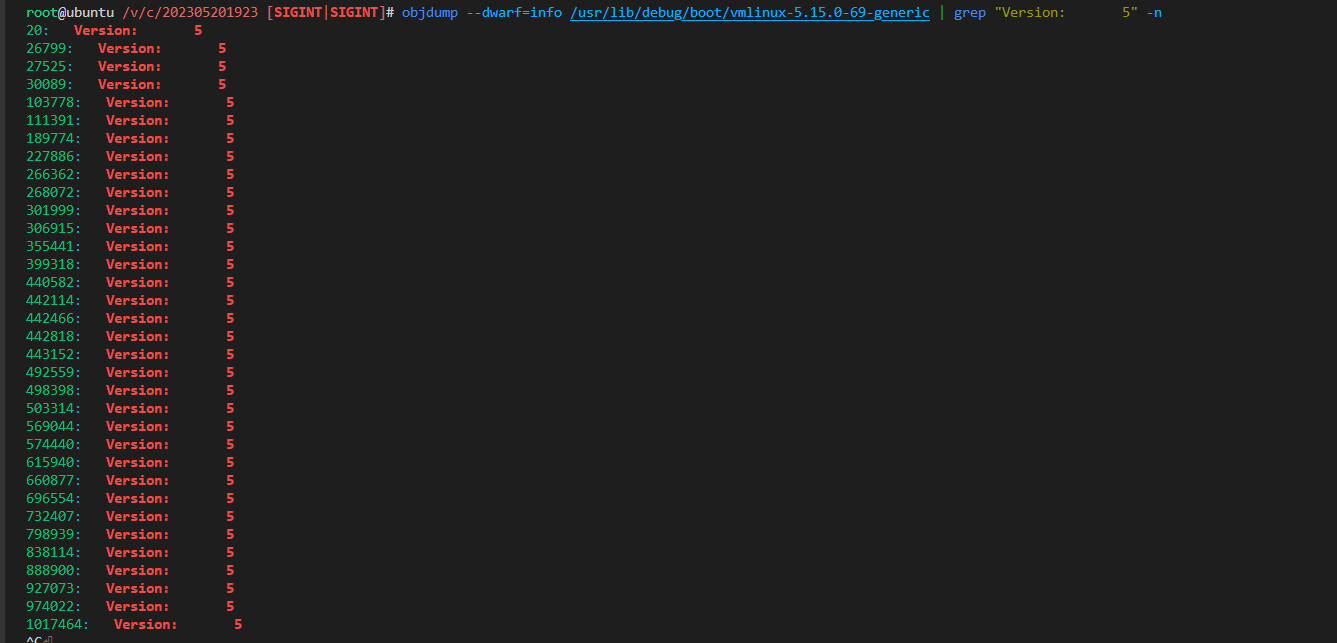
Dwarf Error: wrong version in compilation unit header (is 5, should be 2, 3, or 4)
使用crash分析dump文件
crash /usr/lib/debug/boot/vmlinux-5.15.0-69-generic dump.202305201923

crash 7.2.8
Copyright (C) 2002-2020  Red Hat, Inc.
Copyright (C) 2004, 2005, 2006, 2010  IBM Corporation
Copyright (C) 1999-2006  Hewlett-Packard Co
Copyright (C) 2005, 2006, 2011, 2012  Fujitsu Limited
Copyright (C) 2006, 2007  VA Linux Systems Japan K.K.
Copyright (C) 2005, 2011  NEC Corporation
Copyright (C) 1999, 2002, 2007  Silicon Graphics, Inc.
Copyright (C) 1999, 2000, 2001, 2002  Mission Critical Linux, Inc.
This program is free software, covered by the GNU General Public License,
and you are welcome to change it and/or distribute copies of it under
certain conditions.  Enter "help copying" to see the conditions.
This program has absolutely no warranty.  Enter "help warranty" for details.

GNU gdb (GDB) 7.6
Copyright (C) 2013 Free Software Foundation, Inc.
License GPLv3+: GNU GPL version 3 or later <http://gnu.org/licenses/gpl.html>
This is free software: you are free to change and redistribute it.
There is NO WARRANTY, to the extent permitted by law.  Type "show copying"
and "show warranty" for details.
This GDB was configured as "x86_64-unknown-linux-gnu"...
gdb called without error_hook: Dwarf Error: wrong version in compilation unit header (is 5, should be 2, 3, or 4) [in module /usr/lib/debug/boot/vmlinux-5.15.0-69-generic]
Dwarf Error: wrong version in compilation unit header (is 5, should be 2, 3, or 4) [in module /usr/lib/debug/boot/vmlinux-5.15.0-69-generic]

crash: /usr/lib/debug/boot/vmlinux-5.15.0-69-generic: no debugging data available
crash内嵌的gdb版本过低(7.6),只支持dwarf 2 3 4版本,不支持5版本
相关博客推荐:从Dwarf Error说开去
objdump --dwarf=info /usr/lib/debug/boot/vmlinux-5.15.0-69-generic | more

/usr/lib/debug/boot/vmlinux-5.15.0-69-generic:     file format elf64-x86-64

Contents of the .debug_info section:

  Compilation Unit @ offset 0x0:
   Length:        0x1e (32-bit)
   Version:       2
   Abbrev Offset: 0x0
   Pointer Size:  8
 <0><b>: Abbrev Number: 1 (DW_TAG_compile_unit)
    <c>   DW_AT_stmt_list   : 0x0
    <10>   DW_AT_ranges      : 0x0
    <14>   DW_AT_name        : (indirect string, offset: 0x0): /build/linux-DADscI/linux-5.15.0/arch/x86/kernel/head_64.S
    <18>   DW_AT_comp_dir    : (indirect string, offset: 0x3b): /build/linux-DADscI/linux-5.15.0/debian/build/build-generic
    <1c>   DW_AT_producer    : (indirect string, offset: 0x77): GNU AS 2.38
    <20>   DW_AT_language    : 32769    (MIPS assembler)
  Compilation Unit @ offset 0x22:
   Length:        0xd225 (32-bit)
   Version:       5
   Abbrev Offset: 0x12
   Pointer Size:  8
 <0><2e>: Abbrev Number: 130 (DW_TAG_compile_unit)
    <30>   DW_AT_producer    : (indirect string, offset: 0x2e88): GNU C89 11.3.0 -mno-sse -mno-mmx -mno-sse2 -mno-3dnow -mno-avx -m64 -mno-80387 -mno-fp-ret-in-387 -mpreferred-stack-boundary=3 -mskip-rax-setup -mtune=generic -mno-red-zone -mcmodel=kernel -mindirect-branch=thunk-extern -mindirect-branc
h-register -mindirect-branch-cs-prefix -mfunction-return=thunk-extern -mharden-sls=all -mrecord-mcount -mfentry -march=x86-64 -g -gdwarf-5 -O2 -std=gnu90 -fno-strict-aliasing -fno-common -fshort-wchar -fno-PIE -fcf-protection=none -falign-jumps=1 -falign-loops=1 -fno-asynchronous-unwind-tables -fno-ju
mp-tables -fno-delete-null-pointer-checks -fno-allow-store-data-races -fstack-protector-strong -fno-omit-frame-pointer -fno-optimize-sibling-calls -fno-stack-clash-protection -fno-inline-functions-called-once -fno-strict-overflow -fstack-check=no -fconserve-stack -fno-stack-protector -fsanitize=bounds
 -fsanitize=shift -fsanitize=bool -fsanitize=enum
    <34>   DW_AT_language    : 1        (ANSI C)
    <35>   DW_AT_name        : (indirect line string, offset: 0x0): /build/linux-DADscI/linux-5.15.0/arch/x86/kernel/head64.c
    <39>   DW_AT_comp_dir    : (indirect line string, offset: 0x3a): /build/linux-DADscI/linux-5.15.0/debian/build/build-generic
    <3d>   DW_AT_ranges      : 0x2f0
    <41>   DW_AT_low_pc      : 0x0
    <49>   DW_AT_stmt_list   : 0x222
 <1><4d>: Abbrev Number: 46 (DW_TAG_base_type)
    <4e>   DW_AT_byte_size   : 8
    <4f>   DW_AT_encoding    : 7        (unsigned)
    <50>   DW_AT_name        : (indirect string, offset: 0x469a): long unsigned int
 <1><54>: Abbrev Number: 20 (DW_TAG_const_type)
其他
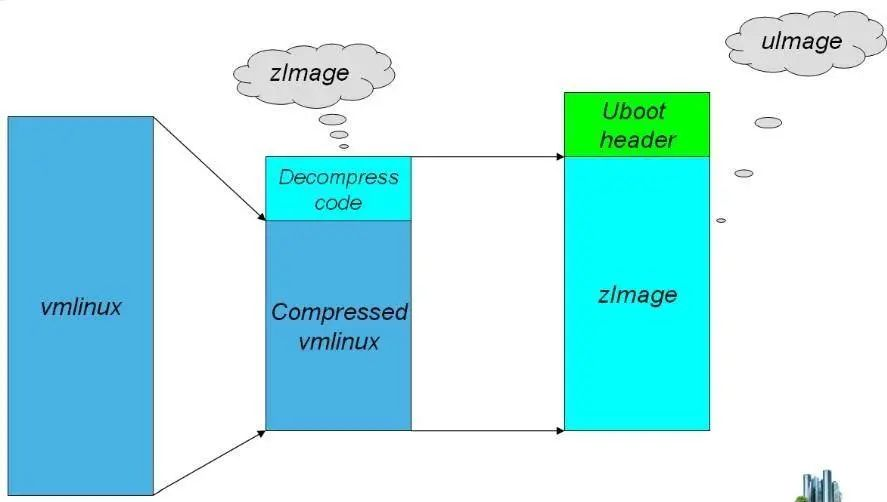
Linux内核映像vmlinux、Image、zImage、uImage区别
grep -C 5 foo file 显示file文件里匹配foo字串那行以及上下5行
grep -B 5 foo file 显示foo及前5行
grep -A 5 foo file 显示foo及后5行
linux image中的signed与unsigned,之前一直以为是有符号与无符号,觉得很怪,后面才知道是签名与未签名
我应该安装未签名的二进制文件吗?

