🍉文章主页:阿博历练记
📖文章专栏:数据结构与算法
🚍代码仓库:阿博编程日记
🍥欢迎关注:欢迎友友们点赞收藏+关注哦🌹

文章目录
- 🌾前言
- 🎬队列
- 🔍1.队列的结构框架
- 🔍2.队列的初始化
- 👑为什么初始化不使用二级指针
- 🔍3.队列的释放
- 🔍4.队列的插入数据
- 🔍5.队列的删除数据
- 🔍6.队列取队头数据
- 🔍7.队列取队尾数据
- 🔍8.返回队列数据的个数
- 🔍9.判断队列是否为空
- 🚀Queue.h代码
- 🛸Queue.c代码
- 🛳Test.c代码
- 🧋代码效果展示
- 1.🖋题目描述
- 💡逻辑分析
- 🎥代码实现
- 2.🖋题目描述
- 💡逻辑分析
- 🎥代码实现
🌾前言
友友们,上期阿博给大家介绍了栈的实现,今天阿博给大家介绍一种新的数据结构:队列.
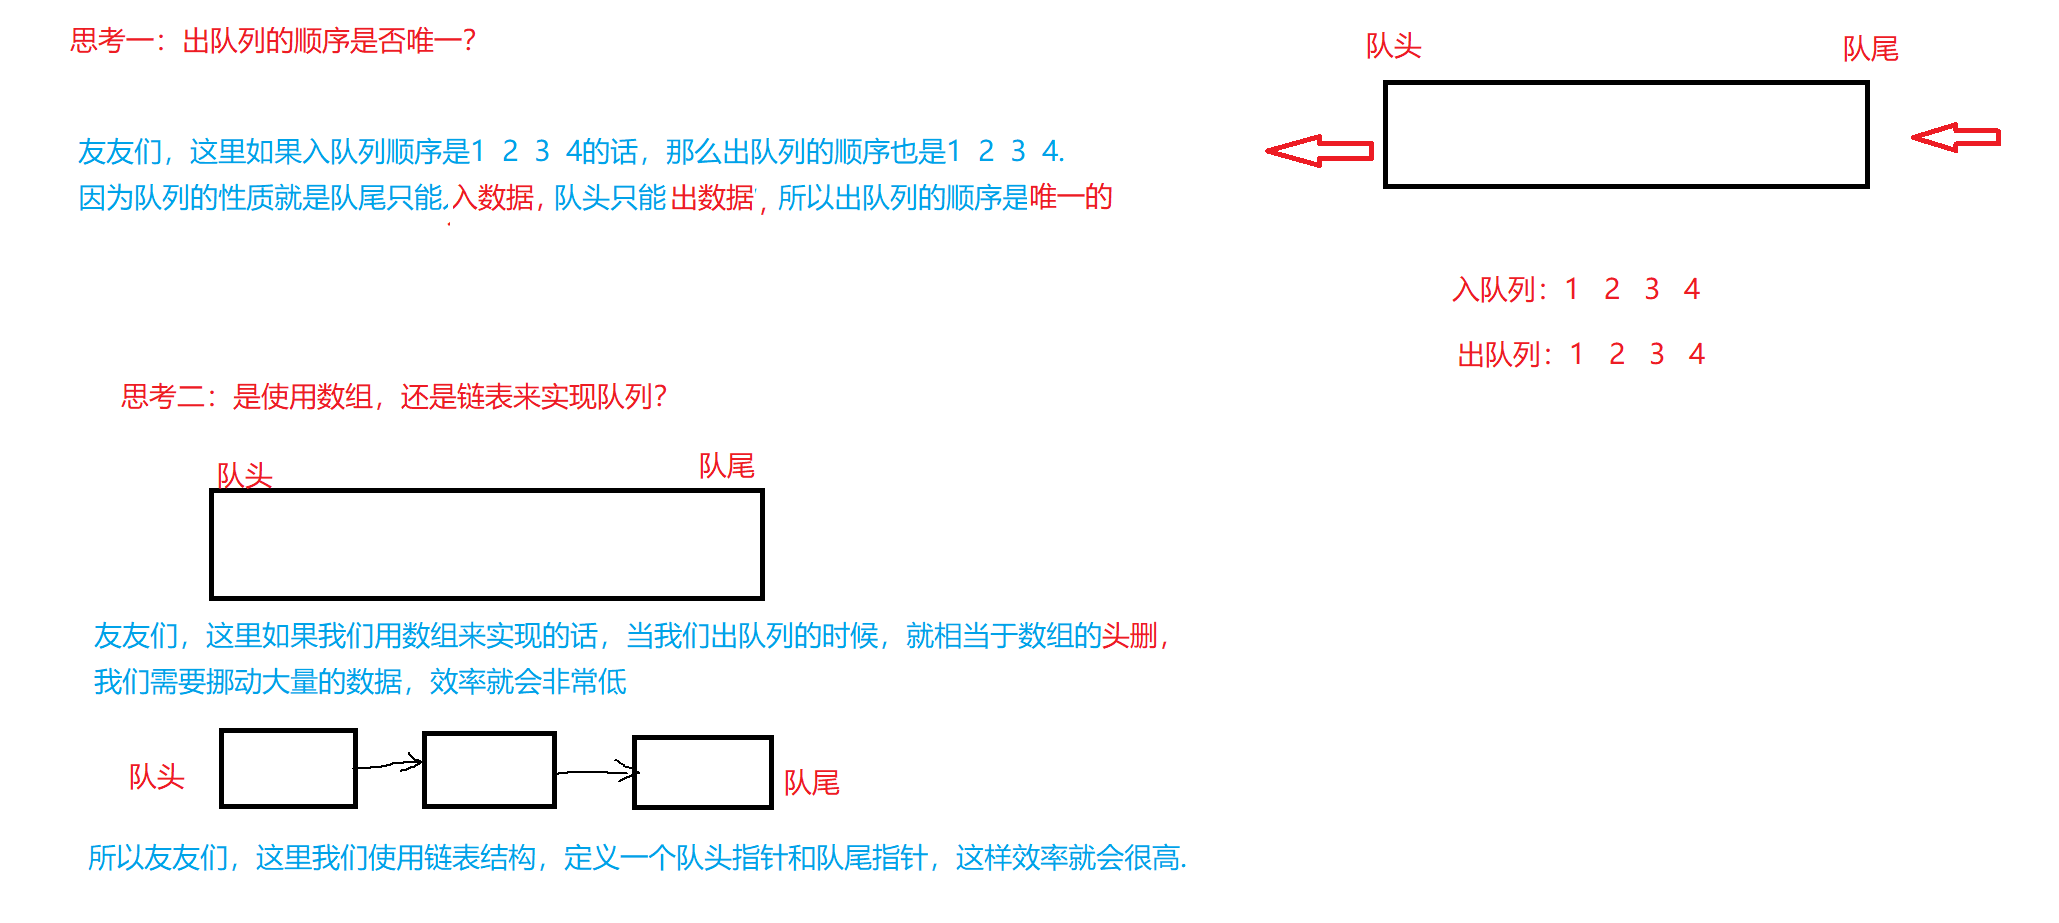
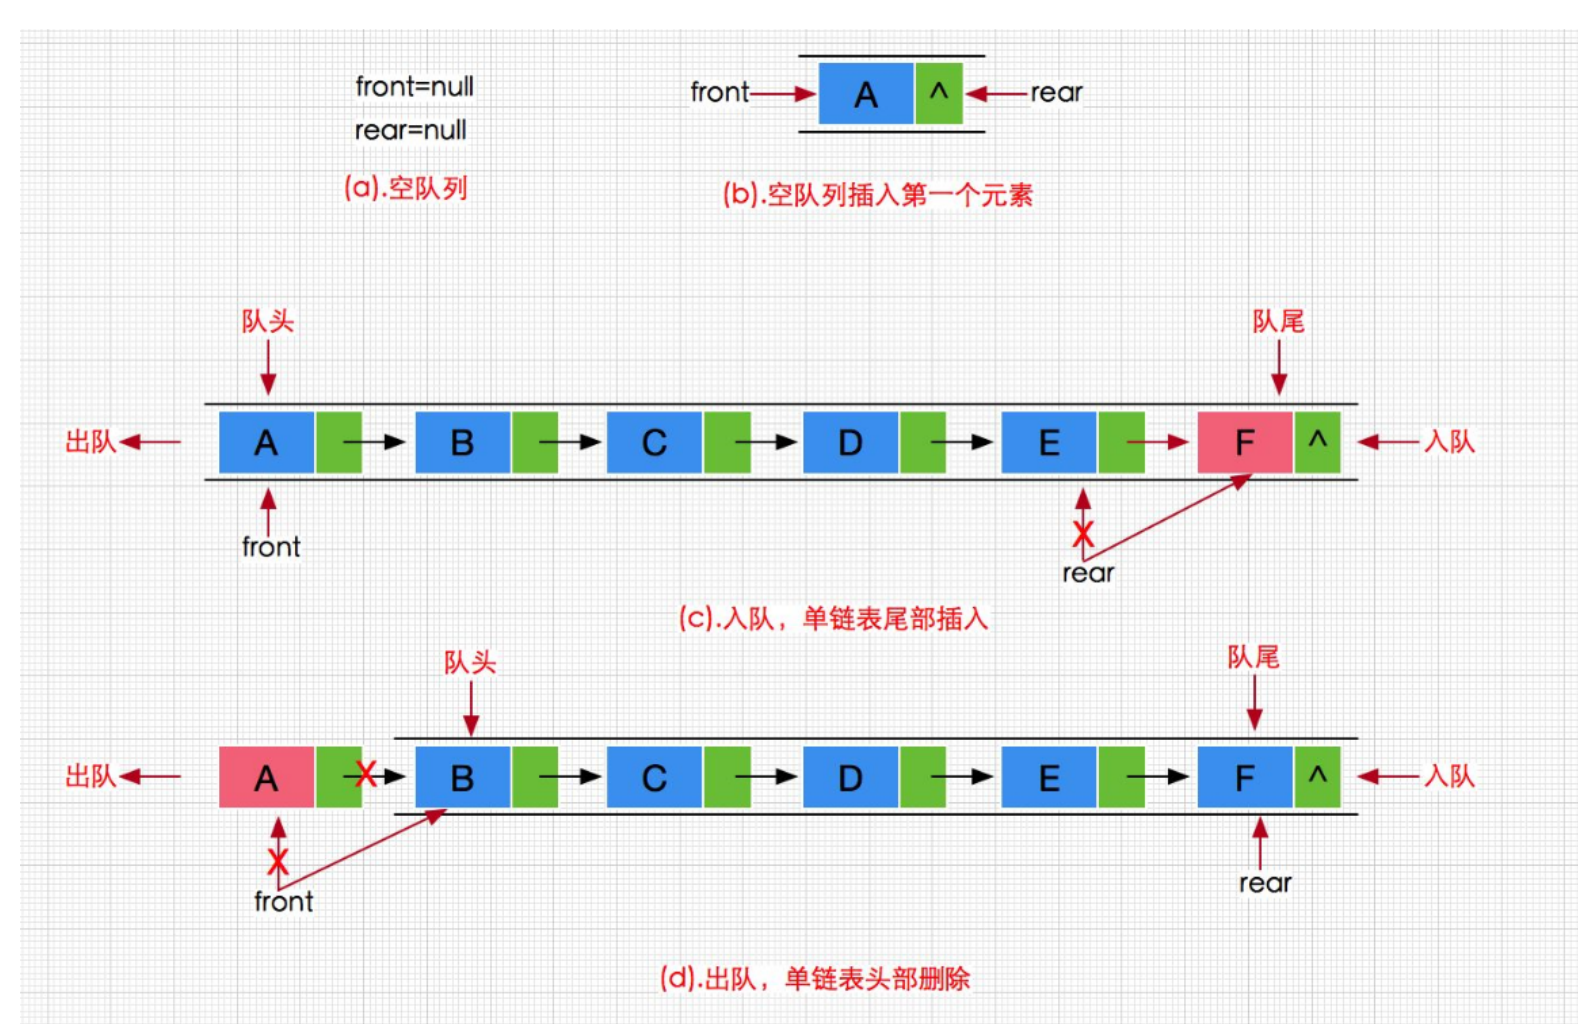
队列:只允许在一端进行插入数据操作,在另一端进行删除数据操作的特殊线性表,队列具有先进先出FIFO(First In First Out)的性质。
入队列:进行插入操作的一端称为队尾。
出队列:进行删除操作的一端称为队头。
队列也可以使用数组和链表的结构实现,使用链表的结构实现更优一些,因为如果使用数组的结构,出队列在数组头上出数据,效率会比较低.
🎬队列
🔍1.队列的结构框架
typedef  int QDataType;
typedef struct QueueNode
{
	struct QueueNode* next;
	QDataType  data;
}QNode;
typedef struct  Queue
{
	QNode* phead;
	QNode* ptail;
	int  size;
}Queue;
⛳⛳友友们注意,这两个结构体不能合并到一起,因为它们所代表的意义不一样,第一个结构体是每一个结点的结构,第二个结构体代表的是这个队列的结构,它表示的是队列整体.
🔍2.队列的初始化
void  QueueInit(Queue* pq)
{
	assert(pq);
	pq->phead = pq->ptail = NULL;
	pq->size = 0;
}
👑为什么初始化不使用二级指针
⛳⛳这里有可能友友们会有疑问,我们初始化不是要改变phead指针和ptail指针,它们两个都是结构体指针,我们要改变它们,为什么不用二级指针呢?这里友友们注意了,phead指针和ptail指针又在一个新的结构体Queue里面放着,它们就属于这个结构体里面的成员,我们要改变它,只需要传这个新结构体的地址就可以访问并改变它们了.
这里阿博给友友们总结几种不用二级指针的方法:
⭐1.我们在函数外部定义一个同类型的指针,通过返回值的方式接收,这本质上是一个值拷贝(赋值)
⭐2.带哨兵位的头结点,它的本质是改变结构体里面的next指针,next指针属于结构体的成员,所以我们只需要传结构体的指针就可以访问到它了.
⭐3.把结构体指针重新放在一个结构体里面,这样它就属于这个结构体的成员了,我们只需要传这个结构体的地址就可以改变结构体指针了.
🔍3.队列的释放
1.保存下一结点的地址迭代释放
void  QueueDestroy(Queue* pq)
{
	assert(pq);
	QNode* cur = pq->phead;
	while (cur)
	{
		QNode* next = cur->next;
		free(cur);
		cur = next;
	}
	pq->phead = pq->ptail = NULL;
	pq->size = 0;
}
2.保存当前结点的地址迭代释放
void  QueueDestroy(Queue* pq)
{
	assert(pq);
	QNode* cur = pq->phead;
	while (cur)
	{
	    QNode* del = cur;
		cur = cur->next;
		free(del);
	}
	pq->phead = pq->ptail = NULL;
	pq->size = 0;
}
🚩🚩友友们,这里要注意两个点:⭐1.如果保存当前结点的地址的话,我们就需要先让cur=cur->next往后迭代,然后在释放保留的那个地址,如果先释放的话,那么cur=cur->next这一步就会报错,此时cur已经被释放了,我们还在使用,它就是一个
野指针.⭐2.如果保留下一结点地址的话,我们就需要先释放当前结点,在让cur=next往后进行迭代,如果我们先往后迭代的话,此时cur=next已经指向下一结点了,我们在把它释放,这样就会导致上一个结点没有释放和下次再使用cur就是野指针.🌈🌈
🔍4.队列的插入数据
void  QueuePush(Queue* pq, QDataType x)
{
	assert(pq);
	QNode* newnode = (QNode*)malloc(sizeof(QNode));
	if (newnode == NULL)
	{
		perror("malloc fail");
		return;
	}
	newnode->data = x;
	newnode->next = NULL;
	if (pq->phead == NULL)
	{
		assert(pq->ptail == NULL);
		pq->phead = pq->ptail = newnode;
	}
	else
	{
		pq->ptail->next = newnode;
		pq->ptail = newnode;
	}
	pq->size++;
}
⛳⛳友友们注意,就算这里是首次插入数据,我们也不需要
二级指针,因为phead和ptail指针都在结构体里面放着,所以我们传这个结构体的指针就可以改变它们.
🔍5.队列的删除数据
❌错误案例
void  QueuePop(Queue* pq)
{
        assert(pq);
        QNode* next = pq->phead->next;
		free(pq->phead);
		pq->phead = next;
		pq->size--;
}

✔代码纠正
void  QueuePop(Queue* pq)
{
	assert(pq);
	assert(!QueueEmpty(pq));
	//1个结点
	if (pq->phead->next == NULL)
	{
		free(pq->phead);
		pq->phead =pq->ptail= NULL;     //不能对同一动态开辟出来的空间进行多次free释放,这里我们释放完pq->phead之后,pq->ptail也已经被释放了,所以我们主要的目的就是把pq->phead和pq->ptail都置空
	}
	//多个结点
	else
	{
		QNode* next = pq->phead->next;
		free(pq->phead);
		pq->phead = next;
	}
	pq->size--;
}
⛳⛳友友们注意,pq->phead和pq->ptail指向相同的结点,free(pq->phead)之后就已经把这块内存空间释放了,此时我们就不能再free(pq->ptail)了,因为动态开辟出来的空间不能进行多次free释放.
🔍6.队列取队头数据
QDataType  QueueFront(Queue* pq)
{
	assert(pq);
	assert(!QueueEmpty(pq));
	return  pq->phead->data;
}
这里我们需要断言队列不能为空,如果为空,pq->phead就是空指针,这时pq->phead->data就是对空指针的解引用,程序就会报错.
🔍7.队列取队尾数据
QDataType  QueueBack(Queue* pq)
{
	assert(pq);
	assert(!QueueEmpty(pq));
	return  pq->ptail->data;
}
🔍8.返回队列数据的个数
int   QueueSize(Queue* pq)
{
	assert(pq);
	return  pq->size;
}
🔍9.判断队列是否为空
bool  QueueEmpty(Queue* pq)
{
	assert(pq);
	return  pq->phead == NULL
		&&  pq->ptail == NULL;
}
🚀Queue.h代码
#pragma once
#include<stdlib.h>
#include<assert.h>
#include<stdbool.h>

typedef  int QDataType;
typedef struct QueueNode
{
	struct QueueNode* next;
	QDataType  data;
}QNode;
typedef struct  Queue
{
	QNode* phead;
	QNode* ptail;
	int  size;
}Queue;
void  QueueInit(Queue*pq);
void  QueueDestroy(Queue* pq);
void  QueuePush(Queue* pq, QDataType x);
void  QueuePop(Queue* pq);
QDataType  QueueFront(Queue* pq);
QDataType  QueueBack(Queue* pq);
int   QueueSize(Queue* pq);
bool  QueueEmpty(Queue* pq);
🛸Queue.c代码
#define  _CRT_SECURE_NO_WARNINGS 1
#include"Queue.h"
void  QueueInit(Queue* pq)
{
	assert(pq);
	pq->phead = pq->ptail = NULL;
	pq->size = 0;
}
void  QueueDestroy(Queue* pq)
{
	assert(pq);
	QNode* cur = pq->phead;
	while (cur)
	{
		QNode* next = cur->next;
		free(cur);
		cur = next;
		/*QNode* del = cur;
		cur = cur->next;
		free(del);*/
	}
	pq->phead = pq->ptail = NULL;
	pq->size = 0;
}
void  QueuePush(Queue* pq, QDataType x)
{
	assert(pq);
	QNode* newnode = (QNode*)malloc(sizeof(QNode));
	if (newnode == NULL)
	{
		perror("malloc fail");
		return;
	}
	newnode->data = x;
	newnode->next = NULL;
	if (pq->phead == NULL)
	{
		assert(pq->ptail == NULL);
		pq->phead = pq->ptail = newnode;
	}
	else
	{
		pq->ptail->next = newnode;
		pq->ptail = newnode;
	}
	pq->size++;
}
void  QueuePop(Queue* pq)
{
	assert(pq);
	assert(!QueueEmpty(pq));
	//1个结点
	if (pq->phead->next == NULL)
	{
		free(pq->phead);
		pq->phead = pq->ptail=NULL;     //不能对同一动态开辟出来的空间进行多次free释放,这里我们释放完pq->phead之后,pq->ptail也已经被释放了,所以我们主要的目的就是把pq->phead和pq->ptail都置空
	}
	//多个结点
	else
	{
		QNode* next = pq->phead->next;
		free(pq->phead);
		pq->phead = next;
	}
	pq->size--;
}
QDataType  QueueFront(Queue* pq)
{
	assert(pq);
	assert(!QueueEmpty(pq));
	return  pq->phead->data;
}
QDataType  QueueBack(Queue* pq)
{
	assert(pq);
	assert(!QueueEmpty(pq));
	return  pq->ptail->data;
}
int   QueueSize(Queue* pq)
{
	assert(pq);
	return  pq->size;
}
bool  QueueEmpty(Queue* pq)
{
	assert(pq);
	return  pq->phead == NULL
		&&  pq->ptail == NULL;
}
🛳Test.c代码
#define  _CRT_SECURE_NO_WARNINGS 1
#include"Queue.h"
#include<stdio.h>
TestQueue()
{
	Queue  q;
	QueueInit(&q);

	QueuePush(&q, 1);
	QueuePush(&q, 2);
	QueuePush(&q, 3);
	QueuePush(&q, 4);
	while (!QueueEmpty(&q))
	{
		printf("%d ", QueueFront(&q));
		QueuePop(&q);
	}
	QueueDestroy(&q);
	return  0;
}
int main()
{
	TestQueue();
	return  0;
}
🧋代码效果展示

1.🖋题目描述

💡逻辑分析
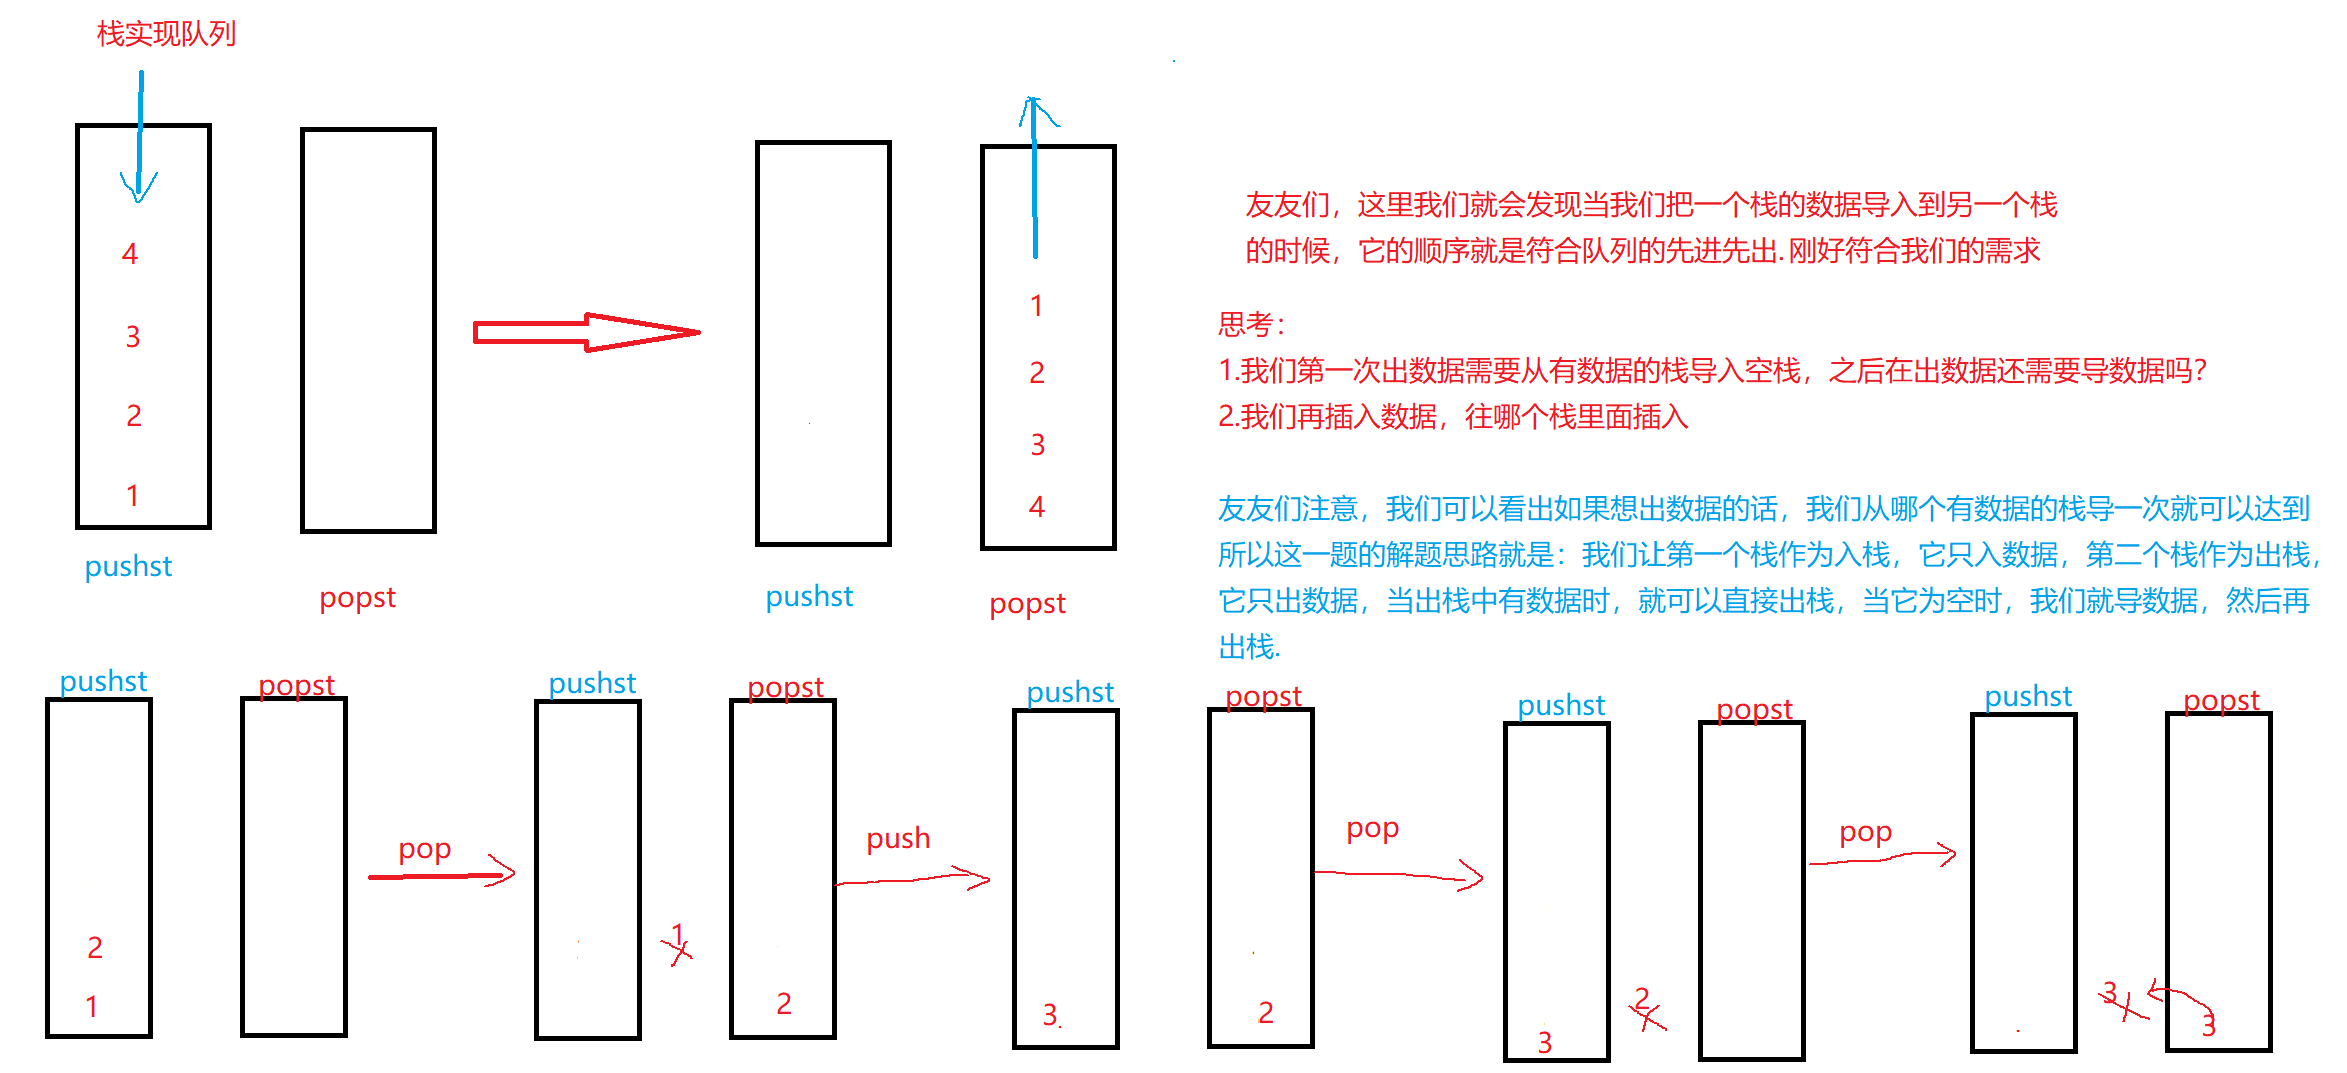
友友们,通过这里也可以看出我们的入栈顺序是1,2,3,我们的出栈顺序也是1,2,3.
🎥代码实现
typedef  int  STDataType;
typedef struct  Stack
{
	STDataType* a;
	int top;                    //top指向栈顶的位置
	int capacity;
}ST;

void  STInit(ST* pst);
void  STDestroy(ST* pst);
void  STPush(ST* pst,STDataType x);
STDataType  STTop(ST* pst);
void  STPop(ST* pst);
bool  STEmpty(ST* pst);
int   STSize(ST* pst);

void  STInit(ST* pst)
{
	assert(pst);
	pst->a = NULL;
	pst->top = 0;    //如果我们初始化为0,top就指向栈顶元素的下一个位置,初始化为-1,top就是指向栈顶元素.
	pst->capacity = 0;
}
void  STDestroy(ST* pst)
{
	assert(pst);
	free(pst->a);
	pst->a = NULL;
	pst->capacity = pst->top = 0;
}
void  STPush(ST* pst, STDataType x)
{
	assert(pst);
	if (pst->top == pst->capacity)
	{
		int newcapacity= pst->capacity==0 ? 4 : pst->capacity * 2 ;
		STDataType* tmp = (STDataType*)realloc(pst->a,newcapacity * sizeof(STDataType));
		if (tmp == NULL)
		{
			perror("realloc fail");
			return;
		}
		pst->a = tmp;
		pst->capacity = newcapacity;
	}
	pst->a[pst->top] = x;
	pst->top++;
}
STDataType  STTop(ST* pst)
{
	assert(pst);
	assert(!STEmpty(pst));
	return pst->a[pst->top - 1];
}
bool  STEmpty(ST* pst)
{
	assert(pst);
	return  pst->top == 0;
}
void  STPop(ST* pst)
{
	assert(pst);
	assert(!STEmpty(pst));
	pst->top--;
}
int   STSize(ST* pst)
{
	assert(pst);
	return   pst->top;
}

typedef struct {
  ST  pushst;
  ST  popst;
} MyQueue;


MyQueue* myQueueCreate() {
   MyQueue*obj=(MyQueue*)malloc(sizeof(MyQueue));
   if(obj==NULL)
   {
       perror("malloc fail");
       return;
   }
   STInit(&obj->pushst);
   STInit(&obj->popst);
   return   obj;
}

void myQueuePush(MyQueue* obj, int x) {
   STPush(&obj->pushst,x);
}

int myQueuePop(MyQueue* obj) {
   int  front=myQueuePeek(obj);
   STPop(&obj->popst);
   return  front;
}

int myQueuePeek(MyQueue* obj) {
  if(STEmpty(&obj->popst))
  {
      while(!STEmpty(&obj->pushst))
      {
      STPush(&obj->popst,STTop(&obj->pushst));
      STPop(&obj->pushst);
      }
  }
  return  STTop(&obj->popst);
}

bool myQueueEmpty(MyQueue* obj) {
return  (STEmpty(&obj->pushst))
        &&(STEmpty(&obj->popst));
}

void myQueueFree(MyQueue* obj) {
   STDestroy(&obj->popst);
   STDestroy(&obj->pushst);
   free(obj);
}
2.🖋题目描述

💡逻辑分析
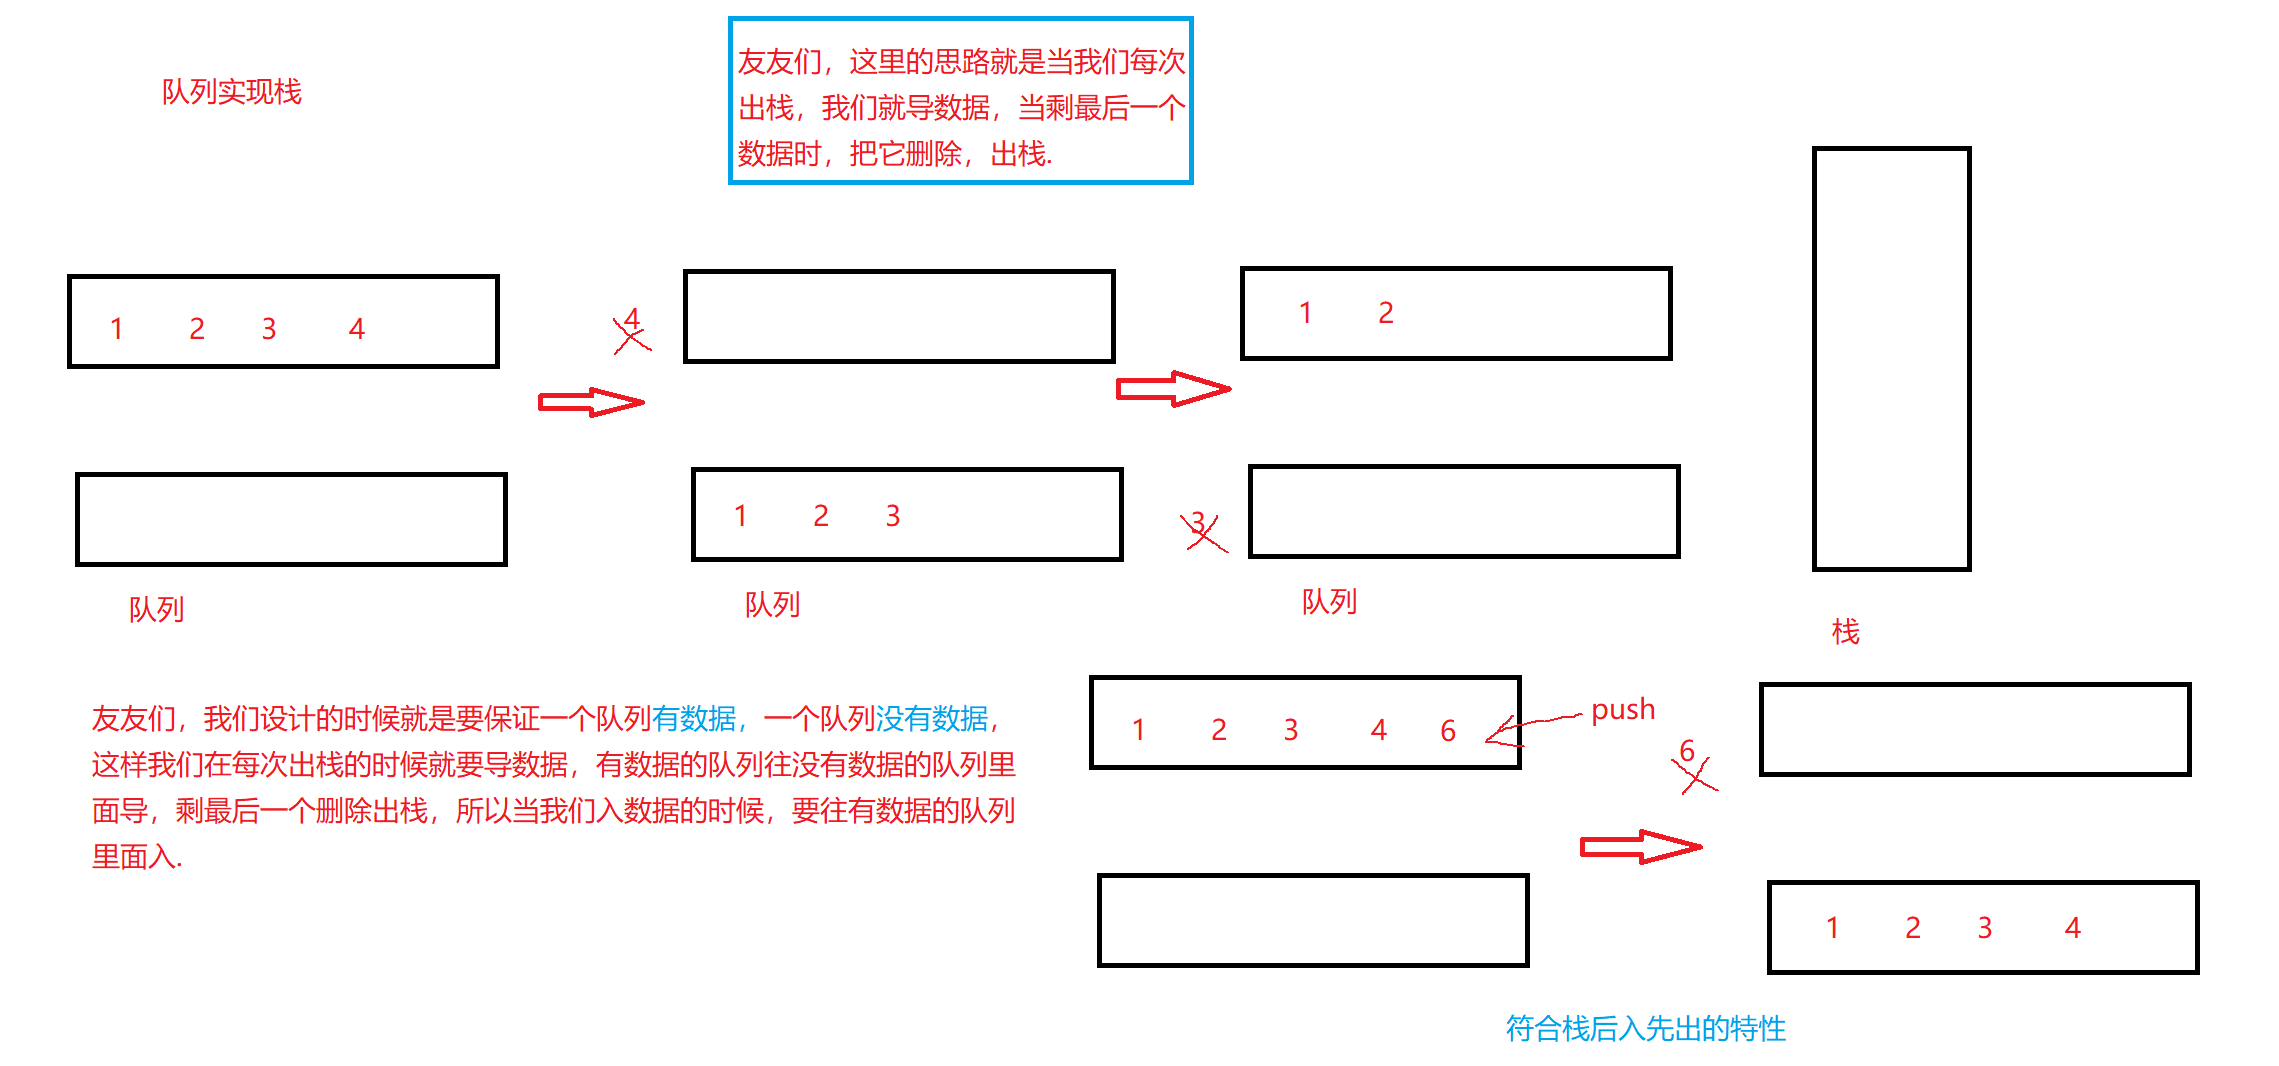
🎥代码实现
typedef  int QDataType;
typedef struct QueueNode
{
	struct QueueNode* next;
	QDataType  data;
}QNode;
typedef struct  Queue
{
	QNode* phead;
	QNode* ptail;
	int  size;
}Queue;
void  QueueInit(Queue*pq);
void  QueueDestroy(Queue* pq);
void  QueuePush(Queue* pq, QDataType x);
void  QueuePop(Queue* pq);
QDataType  QueueFront(Queue* pq);
QDataType  QueueBack(Queue* pq);
int   QueueSize(Queue* pq);
bool  QueueEmpty(Queue* pq);
void  QueueInit(Queue* pq)
{
	assert(pq);
	pq->phead = pq->ptail = NULL;
	pq->size = 0;
}
void  QueueDestroy(Queue* pq)
{
	assert(pq);
	QNode* cur = pq->phead;
	while (cur)
	{
		QNode* next = cur->next;
		free(cur);
		cur = next;
		/*QNode* del = cur;
		cur = cur->next;
		free(del);*/
	}
	pq->phead = pq->ptail = NULL;
	pq->size = 0;
}
void  QueuePush(Queue* pq, QDataType x)
{
	assert(pq);
	QNode* newnode = (QNode*)malloc(sizeof(QNode));
	if (newnode == NULL)
	{
		perror("malloc fail");
		return;
	}
	newnode->data = x;
	newnode->next = NULL;
	if (pq->phead == NULL)
	{
		assert(pq->ptail == NULL);
		pq->phead = pq->ptail = newnode;
	}
	else
	{
		pq->ptail->next = newnode;
		pq->ptail = newnode;
	}
	pq->size++;
}
void  QueuePop(Queue* pq)
{
	assert(pq);
	assert(!QueueEmpty(pq));
	//1个结点
	if (pq->phead->next == NULL)
	{
		free(pq->phead);
		pq->phead =pq->ptail= NULL;     //不能对同一动态开辟出来的空间进行多次free释放,这里我们释放完pq->phead之后,pq->ptail也已经被释放了,所以我们主要的目的就是把pq->phead和pq->ptail都置空
	}
	//多个结点
	else
	{
		QNode* next = pq->phead->next;
		free(pq->phead);
		pq->phead = next;
	}
	pq->size--;
}
QDataType  QueueFront(Queue* pq)
{
	assert(pq);
	assert(!QueueEmpty(pq));
	return  pq->phead->data;
}
QDataType  QueueBack(Queue* pq)
{
	assert(pq);
	assert(!QueueEmpty(pq));
	return  pq->ptail->data;
}
int   QueueSize(Queue* pq)
{
	assert(pq);
	return  pq->size;
}
bool  QueueEmpty(Queue* pq)
{
	assert(pq);
	return  pq->phead == NULL
		&&  pq->ptail == NULL;
}


typedef struct {
   Queue  p;
   Queue  q;
} MyStack;


MyStack* myStackCreate() {
  MyStack*obj=(MyStack*)malloc(sizeof(MyStack));
  if(obj==NULL)
  {
      perror("malloc fail");
      return;
  }
  QueueInit(&obj->p);
  QueueInit(&obj->q);
   return  obj;
}

void myStackPush(MyStack* obj, int x) {
    if(!QueueEmpty(&obj->q))
    {
        QueuePush(&obj->q,x);
    }
    else
    {
        QueuePush(&obj->p,x);
    }
}

int myStackPop(MyStack* obj) {
      Queue* NoFull=&obj->p;
      Queue*  Full=&obj->q;
      if(QueueEmpty(&obj->p))
      {
          Full=&obj->p;
          NoFull=&obj->q;
      }
      while(QueueSize(NoFull)>1)
      {
          QueuePush(Full,QueueFront(NoFull));
          QueuePop(NoFull);
      }
      int top=QueueBack(NoFull);
      QueuePop(NoFull);
      return  top;
}

int myStackTop(MyStack* obj) {
   if(!QueueEmpty(&obj->p))
   {
       return  QueueBack(&obj->p);
   }
   else
   {
        return  QueueBack(&obj->q);
   }
}

bool myStackEmpty(MyStack* obj) {
return   QueueEmpty(&obj->p)
         &&QueueEmpty(&obj->q);
}

void myStackFree(MyStack* obj) {
   QueueDestroy(&obj->p);
   QueueDestroy(&obj->q);
   free(obj);
}

