属性选择器
<!DOCTYPE html>
<html lang="en">

<head>
  <meta charset="UTF-8">
  <meta name="viewport" content="width=device-width, initial-scale=1.0">
  <title>属性选择器</title>
  <style>
    /*1. 必须是 input 但是同时具有 value 这个值 */
    input[value] {
      color: aqua;
    }

    /* 2.属性选择器还可以选择属性=值的某些元素(重点) */
    input[type=text] {
      color: pink
        /* 这里会覆盖上面的样式 */
    }

    /* 3.属性选择器可以选择属性值开头的某些元素 */
    div[class^=icon] {
      color: red;
    }

    /* 4.属性选择器可以选择属性值结尾的某些元素 */
    /* section[class$=data] {
      color: royalblue;
    } */

    /* 5.只要属性中有 n3 都选出来 */
    section[class*=n3] {
      color: rgb(65, 225, 145);
    }
  </style>
</head>
<!-- 注意 类选择器和属性选择器  伪类选择器的权重都是 10 -->

<body>
  <!-- 1.利用属性选择器就可以不用借助于类或者id选择器 -->
  <!-- <input type="text" value="请输入用户名">
  <input type="text"> -->

  <!-- 2.属性选择器还可以选择属性=值的某些元素 -->
  <!-- <input type="text" name="" id="">
  <input type="password" name="" id=""> -->

  <!-- 3.属性选择器可以选择属性值开头的某些元素 -->
  <!-- <div class="icon1">小图标1</div>
  <div class="icon2">小图标2</div>
  <div class="icon3">小图标3</div>
  <div class="icon4">小图标4</div>
  <div>我是打酱油的</div> -->

  <!-- 4.属性选择器可以选择属性值结尾的某些元素 -->
  <section class="incon1-data">我是安其拉</section>
  <section class="incon2-data">我是哥斯拉</section>
  <section class="incon3-ico">那我是谁</section>

</body>

</html>
css3结构选择器上
<!DOCTYPE html>
<html lang="en">

<head>
  <meta charset="UTF-8">
  <meta name="viewport" content="width=device-width, initial-scale=1.0">
  <title>Document</title>
  <style>
    /* 1.选择ul里面的第一个孩子 li */
    /* ul li:first-child {
      background-color: pink;
    } */

    /* 2.选择ul里面的最后一个孩子 li */
    /* ul li:last-child {
      background-color: pink;
    } */

    /* 3.选择ul里面的某个孩子 li nth-child(n) 1.可以是数字 ,2可以是关键字:even偶数,odd奇数*/
    /* ul li:nth-child(2) {
      background-color: skyblue;
    } */

    /* 4.选择ul里面的偶数行 */
    /* ul li:nth-child(even) {
      background-color: skyblue;
    } */

    /* 5.选择ul里面的奇数行 */
    /* ul li:nth-child(odd) {
      background-color: rgb(135, 235, 177);
    } */

    /* 6.选择ol里面 的所有孩子 n从0开始每次加一 */
    /* ol li:nth-child(n) {
      background-color: rgb(135, 235, 177);
    } */

    /* 7.nth-child(n) 里面可以加公式 1. 2n  偶数  2.2n+1 奇数  3.5n  5 10 15....
         4.n+5 从第五个开始(包括第5个)到最后一个  5.-n+5 前五个(包括第5个)*/
    dl :nth-child(2n) {
      background-color: rgb(135, 235, 177);
    }

    dl :nth-child(2n+1) {
      background-color: rgb(231, 16, 44);
    }
  </style>
</head>

<body>
  <!-- <ul>
    <li>我是第1一个孩子</li>
    <li>我是第2一个孩子</li>
    <li>我是第3一个孩子</li>
    <li>我是第4一个孩子</li>
    <li>我是第5一个孩子</li>
    <li>我是第6一个孩子</li>
    <li>我是第7一个孩子</li>
    <li>我是第8一个孩子</li>
  </ul> -->
  <ol>
    <li>我是第1一个孩子</li>
    <li>我是第2一个孩子</li>
    <li>我是第3一个孩子</li>
    <li>我是第4一个孩子</li>
    <li>我是第5一个孩子</li>
    <li>我是第6一个孩子</li>
    <li>我是第7一个孩子</li>
    <li>我是第8一个孩子</li>
  </ol>
  <dl>
    <dt>我是第1一个孩子</dt>
    <dd>我是第2一个孩子</dd>
    <dd>我是第3一个孩子</dd>
    <dd>我是第4一个孩子</dd>
    <dd>我是第5一个孩子</dd>
    <dd>我是第6一个孩子</dd>
    <dd>我是第7一个孩子</dd>
    <dd>我是第8一个孩子</dd>
    <dd>我是第9一个孩子</dd>
    <dd>我是第10一个孩子</dd>
  </dl>
</body>

</html>
css3结构选择器下
<!DOCTYPE html>
<html lang="en">

<head>
  <meta charset="UTF-8">
  <meta name="viewport" content="width=device-width, initial-scale=1.0">
  <title>Document</title>

</head>
<style>
  /* 1.选择ul里面的第一个孩子 li */
  ul li:first-of-type {
    background-color: pink;
  }

  /* 2.选择ul里面的最后一个孩子 li */
  ul li:last-of-type {
    background-color: pink;
  }

  /* 3.选择ul里面的某个孩子 li nth-child(n) 1.可以是数字 ,2可以是关键字:even偶数,odd奇数*/
  ul li:nth-of-type(2) {
    background-color: pink;
  }

  /* 区别:nth-child会把所有的盒子都排列序号 */
  /* 不起效 */
  section div:nth-child(1) {
    background-color: rgb(31, 168, 72);
  }

  /* nth-of-type(n) 会把指定的盒子排列序号 */
  section div:nth-of-type(1) {
    background-color: rgb(201, 114, 15);
  }
</style>

<body>
  <ul>
    <li>我是第1一个孩子</li>
    <li>我是第2一个孩子</li>
    <li>我是第3一个孩子</li>
    <li>我是第4一个孩子</li>
    <li>我是第5一个孩子</li>
    <li>我是第6一个孩子</li>
    <li>我是第7一个孩子</li>
    <li>我是第8一个孩子</li>
  </ul>
  <section>
    <p>光头强</p>
    <div>熊大</div>
    <div>熊二</div>
  </section>
</body>

</html>
伪元素选择器
伪元素选择器可以帮助我们利用css创建新的标签元素,而不需要HTNL标签,从而简化HTML结构
| 选择符 | 简介 |
| ::before | 在元素内部的前面插入内容 |
| ::after | 在元素内部的后面插入内容 |
语法:
element::before{} 注意点:
- bofore和after创建一个元素,但是属于行内元素
- 新创建的在个元素在文档中是找不到的,所以我们称为伪元素
-
bofore和after必须有content属性
-
before在元素内部的前面创建内容,after 在元素内部的后面创建内容
-
伪元素选择器和标签选择器的权重一样 为 1
示例
<!DOCTYPE html>
<html lang="en">

<head>
  <meta charset="UTF-8">
  <meta name="viewport" content="width=device-width, initial-scale=1.0">
  <title>Document</title>

</head>

<style>
  div {
    width: 200px;
    height: 200px;
    background-color: pink;
  }

  div::before {
    display: inline-block;
    /* 这个content是必须要写的 */
    content: "我";
    width: 30px;
    height: 40px;
    background-color: rgb(101, 19, 196);

  }

  div::after {
    content: "小猪佩奇";
  }
</style>

<body>
  <div>
    是
  </div>
</body>

</html>
伪元素选择器应用场景-字体图标
<!DOCTYPE html>
<html lang="en">
<head>
<meta charset="UTF-8">
<meta name="viewport" content="width=device-width, initial-scale=1.0">
<title>Document</title>
<style>
@font-face {
font-family: 'icomoon';
src: url('fonts/icomoon.eot?ctob7o');
src: url('fonts/icomoon.eot?ctob7o#iefix') format('embedded-opentype'),
url('fonts/icomoon.ttf?ctob7o') format('truetype'),
url('fonts/icomoon.woff?ctob7o') format('woff'),
url('fonts/icomoon.svg?ctob7o#icomoon') format('svg');
font-weight: normal;
font-style: normal;
font-display: block;
}
div {
position: relative;
width: 200px;
height: 35px;
border: 1px solid red;
}
/* ::before 在元素内部的前面插入内容
::after 在元素内部的后面插入内容 */
div::after {
position: absolute;
top: 5px;
right: 10px;
font-family: 'icomoon';
/* content: ''; */
content: '\ea52';
font-size: 18px;
color: rgb(46, 235, 124);
}
</style>
</head>
<body>
<div></div>
</body>
</html>仿土豆网隐藏遮罩层案例
<!DOCTYPE html>
<html lang="en">

<head>
    <meta charset="UTF-8">
    <meta name="viewport" content="width=device-width, initial-scale=1.0">
    <title>Document</title>
    <style>
        .tudou {
            position: relative;
            width: 210px;
            height: 318px;
            background-color: pink;
            margin: 30px auto;
        }

        .tudou img {
            width: 100%;
            height: 100%;
        }

        .tudou::before {
            /* 伪元素必须写的属性 */
            content: "";
            /* display:none;隐藏遮罩层 隐藏元素后不占有原来的位置  */
            display: none;
            position: absolute;
            top: 0;
            left: 0;
            width: 100%;
            height: 100%;
            background: rgba(0, 0, 0, .5) url(../HTML5和css3-基础/images/tudo2.png) no-repeat center;

        }

        /* 当我们鼠标经过 土豆这个盒子 就让里面::before的遮罩层显示出来 */
        .tudou:hover::before {
            /* 显示元素 */
            display: block;
        }
    </style>
</head>

<body>
    <div class="tudou">
        <img src="../HTML5和css3-基础/images/tudo.jfif" alt="">
    </div>
    <div class="tudou">
        <img src="../HTML5和css3-基础/images/tudo.jfif" alt="">
    </div>
    <div class="tudou">
        <img src="../HTML5和css3-基础/images/tudo.jfif" alt="">
    </div>
    <div class="tudou">
        <img src="../HTML5和css3-基础/images/tudo.jfif" alt="">
    </div>
</body>

</html>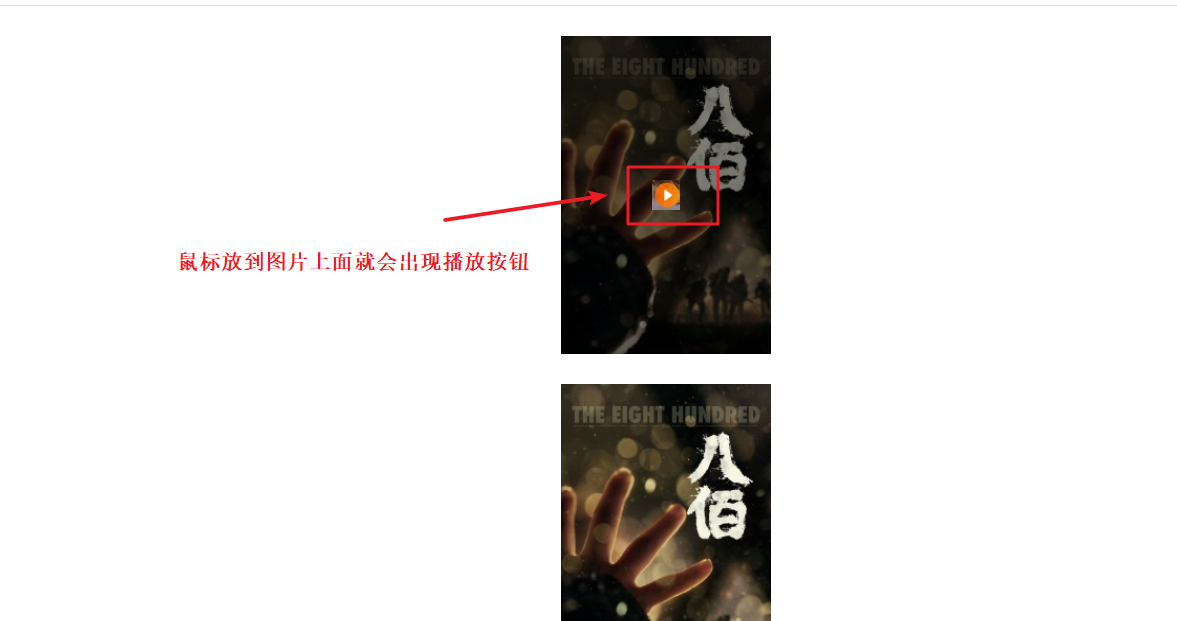
伪元素清除浮动
<!DOCTYPE html>
<html lang="en">

<head>
    <meta charset="UTF-8">
    <meta name="viewport" content="width=device-width, initial-scale=1.0">
    <title>Document</title>
    <style>
        /* 清除浮动:方法三:伪元素清除*/
        /* 优点:相当于标签法的升级版,没有增加标签,结构更简单 */
        /* 缺点:照顾底版本的浏览器 */
        /* 代表网站:百度、淘宝网、网易等。 */
        .clearfix:after {
            /* 隐藏元素 */
            visibility: hidden;
            /* 核心代码清除浮动 */
            clear: both;
            /* 插入的元素必须是块级元素  伪元素选择器是行内元素 */
            display: block;
            /* 伪元素必须写的属性 */
            content: "";
            /* 不要看到这个盒子 */
            height: 0;
        }

        .clearfix {
            /* 提高可视等级 */
            *zoom: 1;
        }

        /* 清除浮动:方法四:双伪元素清除*/
        /* 优点:代码简洁 */
        /* 缺点:照顾底版本的浏览器 */
        /* 代表网站:小米、腾讯等。 */
        .clearfix::before,
        .clearfix:after {
            /* 伪元素必须写的属性 */
            content: "";
            /* 转换成块级元素 并且在一行显示 */
            display: table;
        }

        .clearfix::after {
            /* 核心代码清除浮动 */
            clear: both;
        }

        .clearfix {
            /* 提高可视等级 */
            *zoom: 1;
        }
    </style>
</head>

<body>

</body>

</html>

