公司已有springboot项目引入swagger
1、swagger介绍
官网:https://swagger.io/
Swagger 是一个用于生成、描述和调用 RESTful 接口的 Web 服务。通俗的来讲,Swagger 就是将项目中所有(想要暴露的)接口展现在页面上,并且可以进行接口调用和测试的服务
2、引入目的
Swagger 有以下 3 个重要的作用:将项目中所有的接口展现在页面上,这样后端程序员就不需要专门为前端使用者编写专门的接口文档;当接口更新之后,只需要修改代码中的 Swagger 描述就可以实时生成新的接口文档了,从而规避了接口文档老旧不能使用的问题;通过 Swagger 页面,我们可以直接进行接口调用,方便我们开发。
3、引入相关依赖
在pom.xml中加入相关依赖
    <dependency>
        <groupId>io.springfox</groupId>
        <artifactId>springfox-swagger2</artifactId>
        <version>2.9.2</version>
    </dependency>

    <dependency>
        <groupId>io.springfox</groupId>
        <artifactId>springfox-swagger-ui</artifactId>
        <version>2.9.2</version>
    </dependency>

4、测试
4.1创建一个controller类 SwaggerTestController
package com.zoweunion.mechanic.controller;


import org.springframework.beans.factory.annotation.Autowired;
import org.springframework.web.bind.annotation.PostMapping;
import org.springframework.web.bind.annotation.RequestMapping;
import org.springframework.web.bind.annotation.RestController;

@RestController
@RequestMapping("/swaggerTest")
public class SwaggerTestController {

    @PostMapping("/hello")
    public String hello(String str){
        return "hello,"+str;
    }


}
4.2创建一个SwaggerConfig配置文件
package com.zoweunion.mechanic.config;

import org.springframework.context.annotation.Bean;
import org.springframework.context.annotation.Configuration;
import springfox.documentation.builders.ParameterBuilder;
import springfox.documentation.builders.RequestHandlerSelectors;
import springfox.documentation.schema.ModelRef;
import springfox.documentation.service.ApiInfo;
import springfox.documentation.service.Parameter;
import springfox.documentation.spi.DocumentationType;
import springfox.documentation.spring.web.plugins.Docket;
import springfox.documentation.swagger2.annotations.EnableSwagger2;

import java.util.ArrayList;
import java.util.List;

@Configuration
@EnableSwagger2//开始Swagger2
public class SwaggerConfig {


    //配置了Swagger 的Docket的bean实例
    @Bean
    public Docket docket(){

        ParameterBuilder ticketPar = new ParameterBuilder();
        List<Parameter> pars = new ArrayList<>();
        ticketPar.name("Authorization").description("token")//Token 以及Authorization 为自定义的参数,session保存的名字是哪个就可以写成那个
                .modelRef(new ModelRef("string")).parameterType("header")
                .required(false).build(); //header中的ticket参数非必填,传空也可以
        pars.add(ticketPar.build());    //根据每个方法名也知道当前方法在设置什么参数

        return new Docket(DocumentationType.SPRING_WEB)
                .apiInfo(apiInfo())
                .select()
                //RequestHandlerSelectors, 配置要扫描接口的方式
                //basePackage:指定要扫描的包
                //any():扫描全部
                //withClassAnnotation: 扫描类上的注解
                //withMethodAnnotation: 扫描方法上的注解
                .apis(RequestHandlerSelectors.basePackage("com.example.swagger.controller"))
                .build()
                .globalOperationParameters(pars);
    }

    //配置Swagger 信息=apiInfo
    private ApiInfo apiInfo(){
        return new ApiInfo(
                "Logistics Api",//文檔命名
                "test",//文檔描述
                "v1.0",//
                "http:127.0.0.1/",
                null,//contact
                "Apache 2.0",
                "http://www.apache.org/licenses/LICENSE-2.0",
                new ArrayList()
        );
    }
}
上面我们需要把 com.example.swagger.controller 改成自己项目的路径

4.3解决问题
不出意外的话是会报错的
Error starting ApplicationContext. To display the conditions report re-run your application with 'debug' enabled.
2023-05-19 10:20:15.314 ERROR 2016 --- [  restartedMain] o.s.boot.SpringApplication               : Application run failed

org.springframework.context.ApplicationContextException: Failed to start bean 'documentationPluginsBootstrapper'; nested exception is java.lang.NoSuchMethodError: com.google.common.collect.FluentIterable.append(Ljava/lang/Iterable;)Lcom/google/common/collect/FluentIterable;
	at org.springframework.context.support.DefaultLifecycleProcessor.doStart(DefaultLifecycleProcessor.java:184) ~[spring-context-5.0.8.RELEASE.jar:5.0.8.RELEASE]
	at org.springframework.context.support.DefaultLifecycleProcessor.access$200(DefaultLifecycleProcessor.java:52) ~[spring-context-5.0.8.RELEASE.jar:5.0.8.RELEASE]
	at org.springframework.context.support.DefaultLifecycleProcessor$LifecycleGroup.start(DefaultLifecycleProcessor.java:356) ~[spring-context-5.0.8.RELEASE.jar:5.0.8.RELEASE]
	at org.springframework.context.support.DefaultLifecycleProcessor.startBeans(DefaultLifecycleProcessor.java:157) ~[spring-context-5.0.8.RELEASE.jar:5.0.8.RELEASE]
	at org.springframework.context.support.DefaultLifecycleProcessor.onRefresh(DefaultLifecycleProcessor.java:121) ~[spring-context-5.0.8.RELEASE.jar:5.0.8.RELEASE]
	at org.springframework.context.support.AbstractApplicationContext.finishRefresh(AbstractApplicationContext.java:885) ~[spring-context-5.0.8.RELEASE.jar:5.0.8.RELEASE]
	at org.springframework.boot.web.servlet.context.ServletWebServerApplicationContext.finishRefresh(ServletWebServerApplicationContext.java:161) ~[spring-boot-2.0.4.RELEASE.jar:2.0.4.RELEASE]
	at org.springframework.context.support.AbstractApplicationContext.refresh(AbstractApplicationContext.java:553) ~[spring-context-5.0.8.RELEASE.jar:5.0.8.RELEASE]
	at org.springframework.boot.web.servlet.context.ServletWebServerApplicationContext.refresh(ServletWebServerApplicationContext.java:140) ~[spring-boot-2.0.4.RELEASE.jar:2.0.4.RELEASE]
这里我们把新增的 SwaggerConfig 里的注解给注释掉,再重启应用,发现能正常运行

4.3.1 尝试方案一 没成功
这里我们把原来的两个依赖替换成这一个
<dependency>
   <groupId>io.springfox</groupId>
   <artifactId>springfox-boot-starter</artifactId>
   <version>3.0.0</version>
</dependency>
把 SwaggerConfig 里的 @EnableSwagger2 注解替换成这两个
@EnableSwagger2
@EnableWebMvc

我这里的springboot 的版本是2.0.4 release
再次重启,还是不行
4.3.2 尝试方案二 成功
把上面的回滚到方案一之前,pom.xml回滚,去除@EnableWebMvc
再重新添加以下依赖
<!-- 解决FluentIterable.class找不到问题 -->
<dependency>
    <groupId>com.google.guava</groupId>
    <artifactId>guava</artifactId>
    <version>26.0-jre</version>
</dependency>
<!-- java8 不需要添加,高版本需要添加 -->
<dependency>
    <groupId>javax.xml.bind</groupId>
    <artifactId>jaxb-api</artifactId>
    <version>2.3.0</version>
</dependency>
在启动类加上 @EnableSwagger2 注解

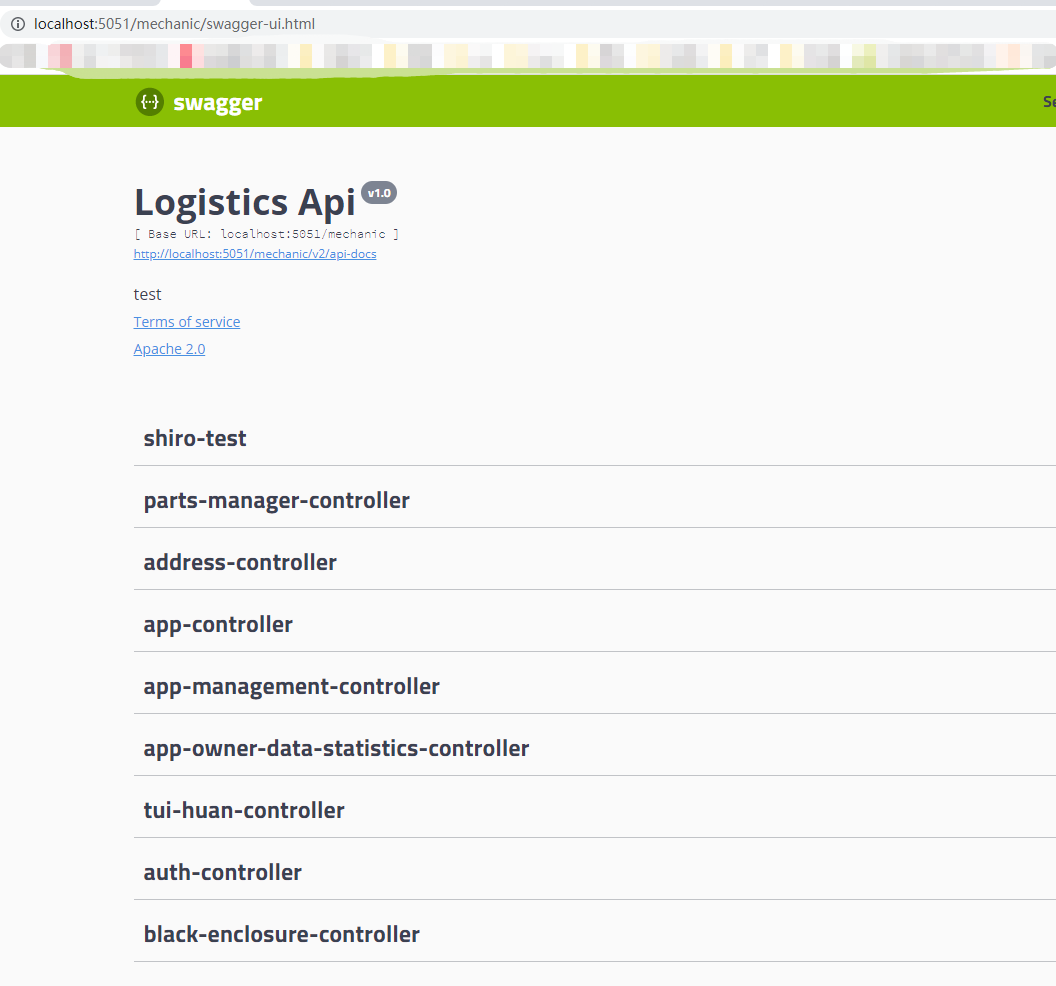
重启应用,发现应用能正常启动了,但是访问 http://127.0.0.1:8080/swagger-ui.html 是提示无法访问的

这里要注意一下,这里的地址应该是你应用的地址后加上 /swagger-ui.html
而我项目的地址是 http://localhost:5051/mechanic ,所以我这边需要访问 http://localhost:5051/mechanic/swagger-ui.html
