Su+ELK实现网络监测(3)——实际应用配置
- Suricata
- 一、启动项
- 二、规则使用
- 三、解析eve.json文件
- 四、主要目录及文件位置
- ElasticSearch
- 一、启动项
- 二、主要目录及文件位置
- Logstash
- 一、启动项
- 二、配置项
- 三、主要目录及文件位置
- kibana
- 一、启动项
- 二、可视化
- 三、DSL语法、es索引别名
- 四、查看索引、删除索引、删除索引模板
- 其他
- 一、生命周期
- 二、任务调度
- 三、补充
前两章节内容:
Su+ELK实现网络监测(1)——Suricata安装与配置
Su+ELK实现网络监测(2)——ELK安装与配置
在服务器上部署suricata+elk环境,交换机上配置好端口镜像(服务器网口连接交换机上的观察端口、交换机上的出入网口配置为镜像口)可实现对所有进出公司网络的数据流量进行实时监测
参考:https://support.huawei.com/enterprise/zh/doc/EDOC1000069579?section=z05d
- 对suricata的suricata.yaml配置好需要监测的网段、数据文件保存的位置,并定期对规则集进行更新,且定期处理输出的eve.json文件;
- 对elasticsearch的elasticsearch.yml配置好集群、节点、数据文件保存的位置;
- 对logstash的logstash.conf配置好相应的input、filter、output原则(特别是fliter);
- 在kibana上对索引进行可视化、设计看板等;
Suricata
一、启动项
默认启动、设置开机自启
- 默认启动
/usr/bin/suricata -c /etc/suricata/suricata.yaml -i eth0 # eth0为网卡的名称
若需要 停止suricata,运行如下命令即可:
ps -ef | grep suricata | grep -v grep		# 查看suricata的执行进程
kill -9 id					                # 杀死suricata的进程id
rm -f /var/run/suricata.pid                 # 文件锁,防止重复启动
- 设置开机自启
[root@localhost ]# cd /usr/lib/systemd/system
[root@localhost /usr/lib/systemd/system]# vim suricata.service
[Unit]
Description=Suricata Intrusion Detection System
After=network.target

[Service]
Type=simple
ExecStart=/usr/bin/suricata -c /etc/suricata/suricata.yaml -i eth0
PrivateTmp=true

[Install]
WantedBy=multi-user.target
[root@localhost /usr/lib/systemd/system]# systemctl daemon-reload	        # 重新加载刷新服务
[root@localhost /usr/lib/systemd/system]# systemctl enable suricata.service	# 设置开机自启
[root@localhost /usr/lib/systemd/system]# systemctl start suricata.service	# 开启
[root@localhost /usr/lib/systemd/system]# systemctl status suricata.service	# 查状态
[root@localhost /usr/lib/systemd/system]# systemctl stop suricata.service	# 关闭
查看系统服务命令:systemctl list-unit-files --type=service
二、规则使用
vim /etc/suricata/suricata.yaml
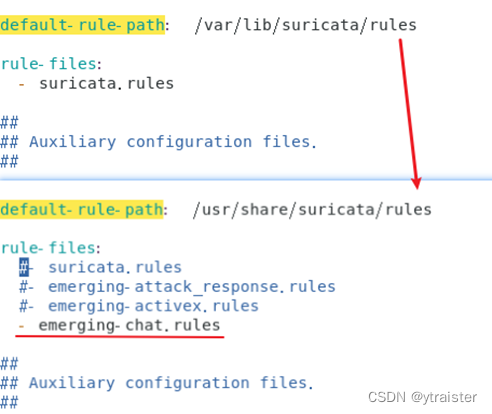
》设置规则目录:
default-rule-path: /var/lib/suricata/rules		# /var/lib/suricata/rules是放置定期更改的规则位置,可以每天下载/更新规则集
  rule-files					                # 用来选择启用哪些规则(默认只有suricata.rules文件)
-
默认情况下,suricata-update管理规则会将多个规则集的每一条都写到 /var/lib/suricata/rules/ suricata.rules文件中
-
如果要引入第三方规则,那就需要修改default-rule-path路径,并且在rule-files中注释掉suricata.rules
而引入第三方规则,路径可以选择在 /usr/share/suricata/rules中/usr/share/suricata/rules 是随 Suricata 包提供的只读规则,这些规则通常在解码数据包和协议时发出异常警报
所以找到第三方规则下载拷贝到 /usr/share/suricata/rules 中,并在rule-files里进行添加相应规则名称即可
如:- 方法一:
wget -P /usr/share/suricata/rules/ https://rules.emergingthreats.net/open/suricata/rules/emerging-activex.rules - 方法二:
wget https://rules.emergingthreats.net/open/suricata/emerging.rules.tar.gz
tar -zxvf emerging.rules.tar.gz -C /usr/share/suricata/rules# 将其解压到/usr/share/suricata/rules
- 方法一:
-
注意!如果引入第三方规则或者还有其他规则需要更新,那么需要先执行suricata-update,再做测试suricata -T
-
更改后的效果如图所示:
-
Emerging Threats维护的规则(常用此规则库)链接:Proofpoint Emerging Threats Rules
ET规则集每条规则的作用解释,可参考:Suricata规则介绍、以及使用suricata-update做规则管理
三、解析eve.json文件
eve.json文件解析: event_type类型解析
官方eve.json文件解析文档: https://www.osgeo.cn/suricata/output/eve/eve-json-format.html#event-type-rdp
日志代码解析: https://zhuanlan.zhihu.com/p/344571466
在线json校验格式化工具: https://www.bejson.com/
四、主要目录及文件位置
目录:
/usr/bin/suricata		     # suricata启动路径
/etc/suricata/			     # 存放suricata执行和配置文件目录(classification.config  reference.config  suricata.yaml  threshold.config)
/usr/share/suricata/rules/ 	 # 是随 suricata 包提供的只读规则。这些规则通常在解码数据包和协议时发出异常警报
/var/lib/suricata/rules/	 # 规则文件存放目录,如果不做更改,后续suricata-update更新来的规则都存在这
文件:
/etc/suricata/suricata.yaml	 # suricata的配置文件,重中之重!
/var/data/suricata/fast.log	 # 简单告警日志文件,日志匹配的输出都在这里
/var/data/suricata/eve.json	 # 详细事件输出文件,json格式,该条信息包括数据包的时间戳、元组信息、对应的签名信息等
ElasticSearch
一、启动项
默认启动、设置开机自启
- 默认启动
su es							  # 因为elasticsearch是不允许root用户启动的,所以需要切换用户
cd /usr/local/elasticsearch/bin
./elasticsearch					  # 非后台启动,主要用于调试
./elasticsearch -d				  # 后台启动
# 首次启动成功后,可以使用如下命令测试
curl http://192.168.234.10:9200
curl '192.168.234.10:9200/_cluster/health?pretty'		# 查看es健康状态
# 若需要 停止elasticSearch,运行如下命令即可:
ps -ef | grep elasticsearch | grep -v grep		# 方法一:查看elastic的执行进程
jps						                        # 方法二:查看java运行的程序(找到elasticsearch程序)
kill -9 id						                # 杀死elastic的进程id
- 设置开机自启
在 /etc/init.d/ 目录下创建一个名为es的文件,使用vim编辑器进行编辑,并添加以下内容:
vim es
#!/bin/bash
#chkconfig: 345 63 37
#description: elasticsearch startup script
#processname: elasticsearch

ES_HOME=/usr/local/elasticsearch

case $1 in
  start)
    su - es -c "$ES_HOME/bin/elasticsearch -d -p pid"
    echo "elasticsearch is started"
    ;;
  stop)
    pid=`cat $ES_HOME/pid`
    kill -9 $pid
    echo "elasticsearch is stopped"
    ;;
  restart)
    pid=`cat $ES_HOME/pid`
    kill -9 $pid
    echo "elasticsearch is stopped"
    sleep 1
    su - es -c "$ES_HOME/bin/elasticsearch -d -p pid"
    echo "elasticsearch is started"
    ;;
  *)
    echo "Usage: $0 {start|stop|restart}"
    ;;
esac
exit 0
保存并退出,修改es文件的权限为可执行:
chmod +x es
将es添加到系统启动项中:chkconfig --add es
启动时可以使用/etc/init.d/es start让其运行;当不小心或者系统原因被杀死进程后,可以使用/etc/init.d/es restart进行再次启动
在/etc/init.d/下配置服务开机自启,参考链接:
#chkconig的意思: https://blog.csdn.net/cbuy888/article/details/87190065
/etc/init.d/介绍: https://blog.csdn.net/liaowenxiong/article/details/117083906
二、主要目录及文件位置
目录:
/usr/local/elasticsearch/bin/	# elasticsearch启动路径
/var/data/es-data		   		# 数据存放目录
/var/data/es-log				# 日志存放目录
文件:
/usr/local/elasticsearch/config/elasticsearch.yml # elasticsearch的配置文件
Logstash
一、启动项
默认启动、设置开机自启
- 默认启动
cd /usr/local/logstash/bin/
./logstash -f ../config/logstash.conf
# 因为logstash由java编写的,若需要 停止logstash,运行如下命令即可:
jps					# 查看java运行的程序
kill id				# 找到logstash的进程id,并杀死
若执行时出现如下报错(表示之前运行的instance有缓存,需要更改data设置)

cd /usr/local/logstash/data
ls -la
rm -rf .lock
参考自:Logstash报错:Logstash could not be started because there is already another instance using the configured data directory
- 设置开机自启
在 /etc/init.d/ 目录下创建一个名为logstash的文件,使用vim编辑器进行编辑,并添加以下内容:
[root@localhost ~]# cd /etc/init.d
[root@localhost /etc/init.d]# vim logstash
#!/bin/sh
#chkconfig: 345 80 20
#description: logstash startup script
#processname: logstash

LOGSTASH_HOME=/usr/local/logstash
LOG_FILE=$LOGSTASH_HOME/logs/start.log

case $1 in
  start)
    echo "Starting logstash..."
    $LOGSTASH_HOME/bin/logstash -f $LOGSTASH_HOME/config/logstash.conf >> $LOG_FILE &
    ;;
  stop)
    echo "Stopping logstash..."
    kill `ps -ef | grep logstash | grep -v grep | awk '{print $2}'`
    ;;
  *)
    echo "Usage: $0 {start|stop}"
    ;;
esac
exit 0
保存并退出,修改logstash文件的权限为可执行:
chmod +x
logstash 将logstash添加到系统启动项中:chkconfig--add logstash
启动时可以使用/etc/init.d/logstash start让其运行;当不小心或者系统原因被杀死进程后,可以使用/etc/init.d/logstash start进行再次启动
二、配置项
将suricata入侵检测数据采集到es中,修改logstash中管道的规则(input、filter、output)
vim /usr/local/logstash/config/logstash.conf
修改如下配置:
参考:logstash.conf、 logstash.conf中关于filter的其他原则参考:logstash - 副本.conf
关于logstash.conf中input设置 参考该链接:https://blog.csdn.net/qq330983778/article/details/105644835
关于logstash.conf中input中的sincedb字段 参考该链接: https://blog.csdn.net/qq_39669058/article/details/86480578
官方配置说明文档: https://www.elastic.co/guide/en/logstash/current/event-dependent-configuration.html
三、主要目录及文件位置
目录:
/usr/local/logstash/bin/ # logstash启动路径
文件:
/usr/local/logstash/config/logstash.conf	# logstash的配置文件,重中之重,特别重要!
/usr/local/logstash/config/logstash.yml		# logstash设置文件,用于控制logstash的执行过程
关于logstash.yml文件,可参考:https://blog.csdn.net/JineD/article/details/106642424
kibana
一、启动项
默认启动、设置开机自启
- 默认启动
cd /usr/local/kibana/bin
./kibana --allow-root
浏览器访问该网址:192.168.234.10:5601 进入kibana工作台(若服务器有开启防火墙,需将5601端口加入防火墙中)
- 设置开机自启
[root@localhost ]# cd /usr/lib/systemd/system
[root@localhost /usr/lib/systemd/system]# vim kibana.service
[Unit]
Description=kibana
After=network.target

[Service]
Type=simple
ExecStart=/usr/local/kibana/bin/kibana --allow-root
PrivateTmp=true

[Install]
WantedBy=multi-user.target
[root@localhost /usr/lib/systemd/system]# systemctl daemon-reload
[root@localhost /usr/lib/systemd/system]# systemctl enable kibana.service
[root@localhost /usr/lib/systemd/system]# systemctl start kibana.service
[root@localhost /usr/lib/systemd/system]# systemctl status kibana.service
二、可视化
可视化看板导入
附件已导出的可视化模板:Kibana可视化看板文件
-
进入kibana工作台,找到已创建好的kibana索引模板,进去后找到其对应的url地址,”index_patterns/” 后面的id就是该索引模板的id;

-
在附件中找到模板(ndjson文件)打开并编辑,定位到references字段(一般在每条数据的末尾处),把其中的id值修改成第一步找到的索引模板id;
如:“references”:[{“id”:“243ce1a0-d73d-11ed-****”,“name”:“kibanaSavedObjectMeta.searchSourceJSON.index”,“type”:“index-pattern”}] -
进入kibana工作台,左边栏选择设置,找到kibana中的 “已保存对象“,点击右上角的 ”导入“即可。
三、DSL语法、es索引别名
参考附件: DSL语法、es索引别名的解释与使用
DSL查询与过滤: https://yiyige.blog.csdn.net/article/details/94875073
Es索引别名的含义与基本用法(es开源社区文档): https://blog.csdn.net/wlei0618/article/details/125363206
es索引别名的使用方法: https://cloud.tencent.com/developer/article/1531847
四、查看索引、删除索引、删除索引模板
查看接口名称(终端输入 或 kibana输入api)
curl '192.168.234.10/_cat/indices?v'
GET _cat/indices?v
获取指定索引详细信息(终端输入 或 kibana输入api)
curl -XGET '192.168.234.10:9200/suricata_logxx?pretty'	# 其中suricata_log xx表示索引名称 ,即output所指定的名称
GET suricata_logxx/_search
{
  "query": {
    "match_all": {}
  }
}
删除指定索引(终端输入 或 kibana输入api)
curl -XDELETE '192.168.234.10:9200/suricata_logxx'
DELETE /suricata_logxx
删除索引模式只能在kibana操作面板中找到对应的索引模式进行删除操作
其他
一、生命周期
可以解决单个索引中数据量过大的问题,根据需要可设置每条索引至多存在多少条数据、存放多少天等(以下api配置是在kibana的开发工具中输入的)
注意:先暂停logstash的启动,设置完生命周期后再启动!
配置信息:es生命周期
二、任务调度
1、生命周期更换索引名称(每日执行)
vim es_ilm.sh
#!/bin/bash
yesterday=$(date +%Y%m%d -d "yesterday")
today=$(date +%Y%m%d)

# 当过了第二天0时0分,将之前es生命周期配置好的索引及其索引别名进行替换
cmd1="curl -XPOST 'http://192.168.234.10:9200/_aliases' -H 'Content-Type: application/json' -d '{\"actions\": [{\"remove\": {\"index\": \"suricata_$yesterday*\",\"alias\": \"suricata_alias\"}},{\"add\": {\"index\": \"suricata_$yesterday*\",\"alias\": \"suricata_${yesterday}_alias\"}}]}'"

# 根据当天日期创建新的初始化索引信息,并指定为可写索引
cmd2="curl -XPUT 'http://192.168.234.10:9200/suricata_${today}-000001' -H 'Content-Type: application/json' -d'{\"aliases\":{\"suricata_alias\":{\"is_write_index\": true}}}'"

# 执行完上面的代码后,还需要再运行如下命令:
# 查看所有索引别名信息(api写法:GET _cat/aliases?v)
cmd3="curl -XGET 'http://192.168.234.10:9200/_cat/aliases?v'"

# 查看当前索引别名的解释信息(api写法:GET /suricata_alias/_ilm/explain)
cmd4="curl -XGET 'http://192.168.234.10:9200/suricata_alias/_ilm/explain'"

# 逐条执行每个命令
eval "$cmd1";
eval "$cmd2";
eval "$cmd3";
eval "$cmd4"
crontab -e
0 0 * * * /root/es_ilm.sh
2、存储eve.json文件(每月执行)
mkdir /var/data/suricata/evefiles
vim su _month.sh
#!/bin/bash
month=$(date +%Y%m)
systemctl stop suricata.service;
mv /var/data/suricata/eve.json /var/data/suricata/evefiles/eve_${month}.json;
suricata-update;
systemctl start suricata.service;
crontab -e
59 23 28-31 * * /root/su_month.sh
3、定期删除过期的eve.json文件(每月执行)
vim del_evejson.sh
#!/bin/bash
current_time=$(date "+%Y-%m-%d %H:%M:%S")
# 计算3个月前的时间戳
three_months_ago=$(date -d "-3 months" +%s)

# 遍历文件夹中的文件
for file in /var/data/suricata/evefiles/eve_*.json
do
  # 获取文件的修改时间戳
  file_time=$(date -r $file +%s)
  # 判断文件是否是3个月前的文件
  if [ $file_time -lt $three_months_ago ]
  then
    # 删除文件
    rm -rf $file
    echo "$current_time Deleted $file"
  fi
done
crontab -e
0 1 1 * * /root/ del_evejson.sh
三、补充
- 解决es单机版索引状态显示为yellow:在生命周期的索引模板中添加如下两条参数即可
number_of_shards: 1				# 分片数
number_of_replicas: 0			# 副本数
参考链接:https://www.cnblogs.com/longweiqiang/p/13596795.html
