ygtu
May 16, 2023 • 27 min read

推荐:将 NSDT场景编辑器 加入你的3D工具链
3D工具集: NSDT简石数字孪生
创建您的第一个运行时 UI
本页将指导您完成使用 UI 工具包设置简单字符选择屏幕的步骤。它涵盖了 UI 元素和模板的创建、场景设置以及如何将脚本逻辑连接到 UI。本指南不会介绍通过 USS 设置样式,并且仅使用默认样式和主题。
您可以在本页底部此处找到本指南的最终源代码。
主题:UI 生成器、列表视图、标签、面板设置、UIDocument、选择处理

本指南将指导您完成以下步骤:
- 创建主 UI 视图
- 设置场景
- 创建要显示的示例数据
- 为主视图创建控制器
- 创建列表条目 UI 模板
- 为列表条目创建控制器
- 对用户选择做出反应
创建主 UI 视图
最终的 UI 屏幕由两个单独的 UI 模板 (UXML) 组成。主视图模板包含包含字符名称的列表、用于显示所选字符详细信息的较小面板以及一个按钮。在本节中,您将使用 UI 生成器设置此模板。
注意:如果您熟悉 UI 生成器并希望跳过此步骤,则可以从此页面底部复制主视图的 UXML 代码,并将其直接粘贴到新文件中。将其另存为 Assets/UI/MainView.uxml。
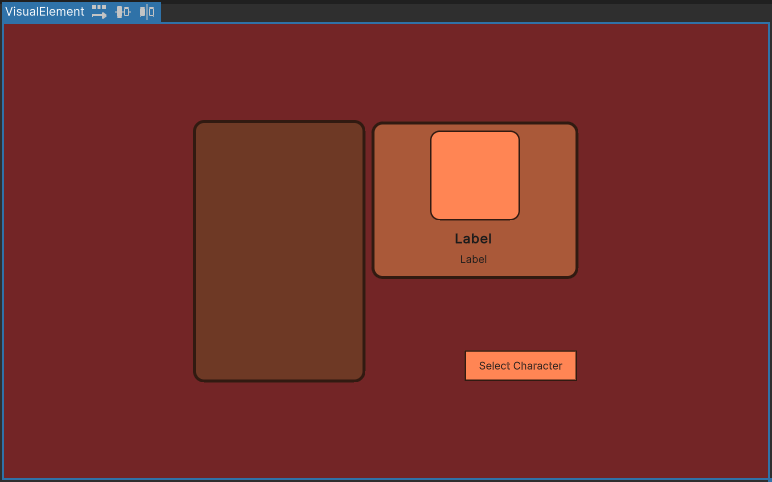
主视图的 UI 布局设置
通过菜单“UI Toolkit> UI Builder”打开“UI 生成器”窗口>“UI 生成器”窗口。使用视口左上角的文件菜单创建新的 UXML 文档。
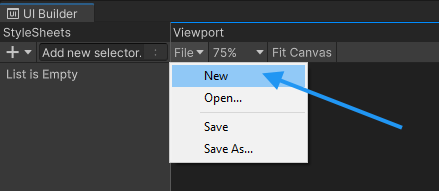
UI 生成器文件菜单
开发游戏 UI 时,请始终确保选择 UI 生成器视口右上角的 。编辑器和运行时主题之间的默认字体大小和颜色不同,这会影响布局。Unity Default Runtime Theme
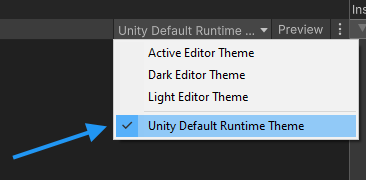
通过从库中拖动来创建新元素
在层次结构中选择新的 UXML 文件,然后启用匹配游戏视图复选框。您可能需要将 Unity 编辑器设置为横向分辨率(如果尚未设置)。

启用比赛游戏视图
现在是时候创建 UI 元素了! 通过将新的可视元素从库拖到层次结构中来创建新的可视元素。
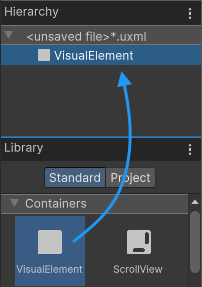
通过从库中拖动来创建新元素
新元素需要覆盖整个屏幕,因此需要将属性设置为 1。从层次结构中选择元素,然后在右侧的“检查器”面板中找到标记为 Flex 的折叠页。将“增长”的值从 0 更改为 1。flex-grow

设置 Flex 属性
若要将此可视元素的所有子项居中置于屏幕中间,请更改可视元素的“对齐”属性。您需要将“对齐项目”和“内容对齐”都设置为居中。

居中儿童
最后,您可以在“背景>颜色”下选择一种背景颜色。此步骤是可选的。此示例用作颜色。#732526

根元素背景色
接下来,在现有可视元素下创建一个新的可视元素。这将成为 UI 左侧和右侧部分的父容器。
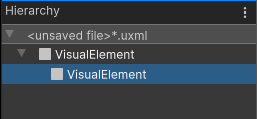
添加子可视元素
将此新元素的属性设置为 (默认为列)。您还需要将固定高度设置为 350 像素。flex-directionrow
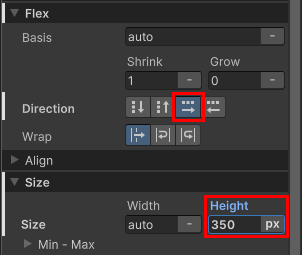
中心容器属性
这就是当前 UI 的外观。请注意,您的屏幕可能看起来会有所不同,具体取决于游戏视图的分辨率和纵横比。
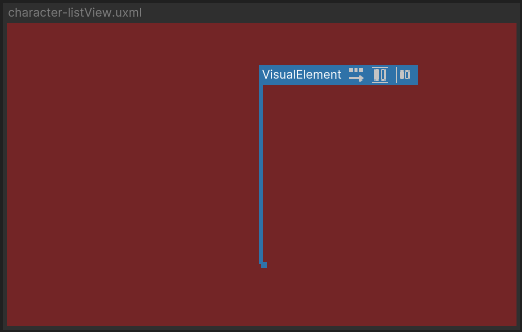
内部有空元素的背景容器
若要为字符名称创建列表,请从库中选择一个 ListView 控件,并将其作为子项添加到刚创建的可视元素下。选择元素并在检查器中为其指定名称。这是必需的,以便您稍后可以通过控制器脚本访问此列表。CharacterList

内部有空元素的背景容器
将列表设置为固定宽度为 230 像素。还要在右侧给它一个 6 px 宽的边距,以便与要创建的下一个元素保持一定距离。
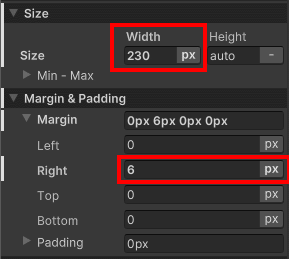
字符列表的大小和边距折叠
您还可以为列表指定背景颜色并设置圆角边框。本指南用于背景和边框颜色,边框宽为 4px,半径为 15px。此步骤是可选的。#6E3925#311A11
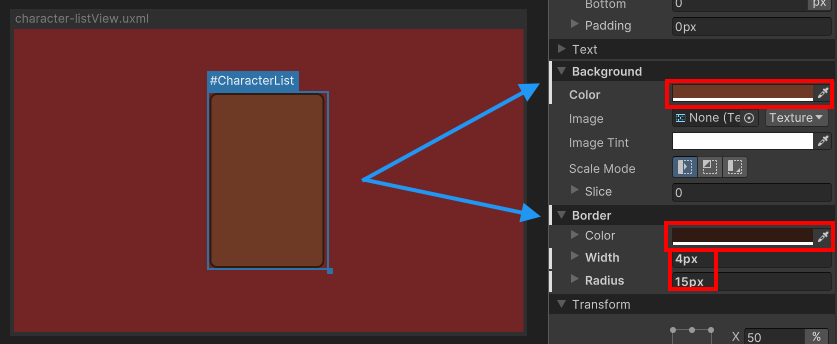
样式字符列表
在与 相同的父级下添加新的可视元素。这将包含角色详细信息面板和按钮。在“对齐”折叠式下,将“项目对齐”和“内容对齐”的设置更改为 。CharacterListflex-endspace-between

证明内容属性的合理性
将新的可视元素添加到此新容器。这将成为角色详细信息面板。当用户从左侧列表中选择一个角色时,它将显示该角色的肖像、名称和类。
为元素设置 276 像素的固定宽度,并将“对齐项目”和“内容对齐”切换为居中。还要为元素添加一个 8 像素宽的填充,以便子项与容器边界保持最小距离。
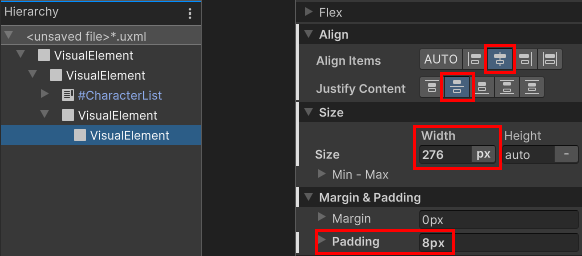
字符详细信息容器的属性
您可以通过将背景颜色设置为 4px 宽边框和 15px 半径的边框颜色来设置面板样式。此步骤是可选的。#AA5939#311A11
您的 UI 布局现在应类似于下图。
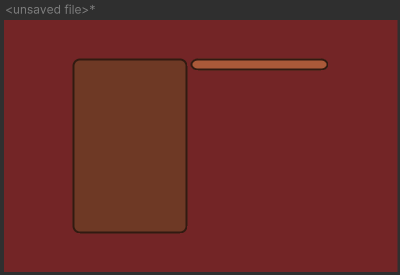
空字符详细信息面板
接下来,您将各个 Ui 控件添加到字符详细信息中。首先是人物肖像。它由两个元素组成 - 背景中的帧和前景中的图像。
首先将新的可视元素添加到背景帧的字符详细信息容器中。为其分配 120x120 像素的固定大小和 4 像素的填充,以便包含的图像不会直接接触边框。
您可以使用 2px 宽、半径为 15px 的边框(颜色为 和背景色)来设置元素样式。随意应用您自己的颜色和样式。#311A11#FF8554

人物肖像的背景框架
对于实际图像,将新的可视元素作为子元素添加到刚创建的框架中。为其命名,以便以后可以在控制器脚本中访问它。CharacterPortrait
将“Flex > Grow”设置为 1,以便图像利用所有可用空间。此外,请确保将“背景>缩放模式”下的缩放模式更改为 ,以便可以放大或缩小图像以匹配元素大小,同时保持正确的纵横比。scale-to-fit

纵向图像的可视元素
接下来,将两个标签控件添加到字符详细信息容器,稍后将使用这些控件显示所选字符的名称和类。将它们命名为 和 。CharacterNameCharacterClass
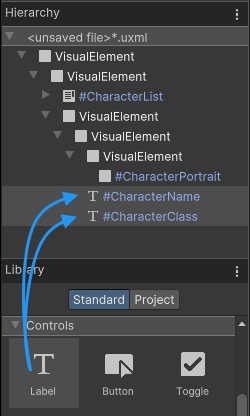
为名称和类添加标签
若要使字符的名称比类更突出,请将标签的字体大小更改为 18,并将样式设置为粗体。
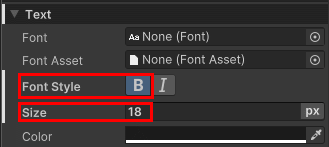
更改字体设置
您的 UI 屏幕现在应类似于下图。
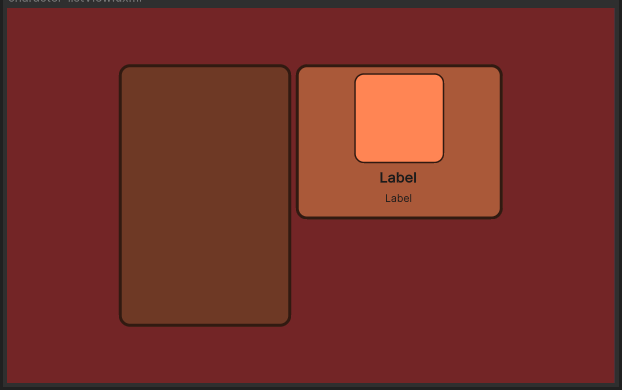
完成的角色详细信息面板
最后,将按钮控件添加到右侧 UI 容器。稍后,您将在控制器脚本中访问此按钮,并在选择或取消选择字符时启用或禁用它。命名按钮并为其指定 150px 的固定宽度。还应将按钮的标签文本设置为 。SelectCharButtonSelect Character
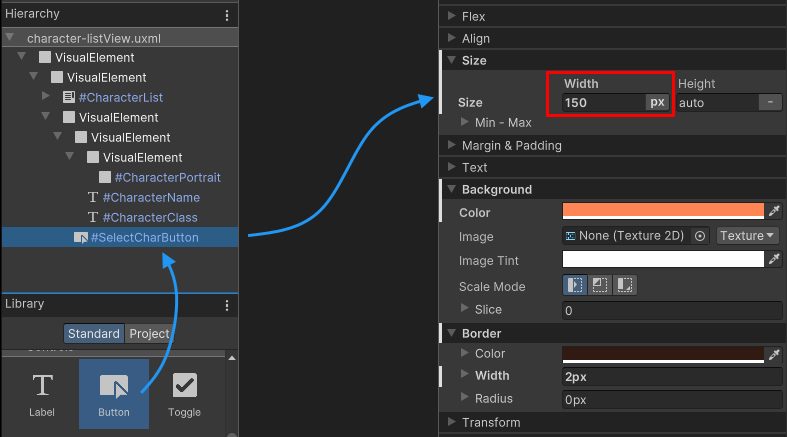
用于字符选择的“添加”按钮
要设置按钮样式,请将背景色设置为 ,并将 2px 边框设置为颜色为 。此步骤是可选的。#FF8554#311A11
完成的主视图应类似于下图。

最终主视图布局
将 UXML 模板另存为 Assets/UI/MainView.uxml。 您还可以在此处的页面底部找到此模板的最终 UXML 代码。
设置场景
在本节中,你将了解如何在运行时在游戏中加载和显示你在上一节中创建的 UI 模板。
要开始,您需要创建一个面板设置资产。此资产将定义屏幕的设置,例如缩放模式和渲染顺序。它还将确定 UI 在 UI 工具包调试器中显示的名称。
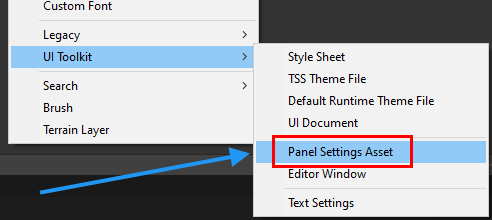
创建新的面板设置资源
通过在项目视图中单击鼠标右键来创建新的。选择创建> UI 工具包>面板设置资产。将新创建的文件命名为 。 对于本指南,您可以将所有设置保留为其默认值。Panel Settings AssetGameUI_Panel
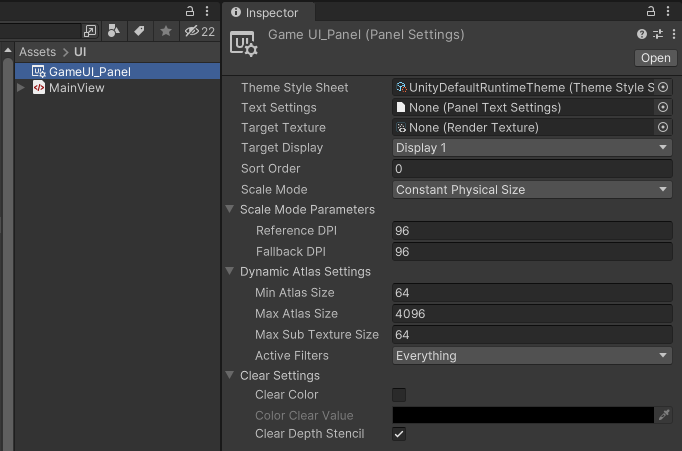
无需更改默认面板设置
要显示上一节中的主视图 UI 模板,您需要在场景中创建新的游戏对象。将 UIDocument 组件附加到它。
在 Unity 中进入播放模式时,将自动加载分配的内容。A 是一个 UXML 模板。将面板设置和新面板设置都分配给组件。UIDocumentVisualTreeAssetVisualTreeAssetMainView.uxmlGameUI_Panel
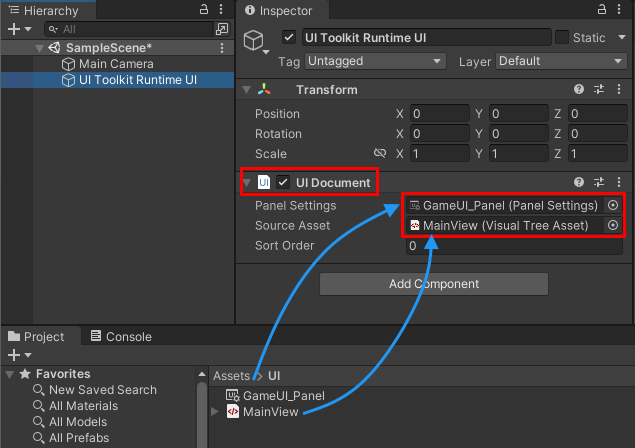
UI 文档组件
注意:如果未将资源分配给 UI 文档组件,它将自动搜索项目并使用自动找到的第一个面板设置资源。重命名或移动资产时请记住这一点。PanelSettings
现在,您可以在 Unity 编辑器中进入运行模式,并在游戏视图中查看您的 UI。
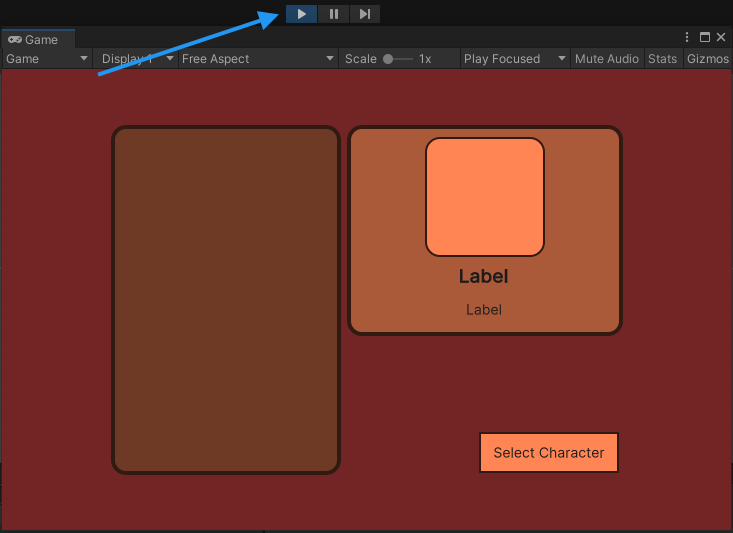
运行时显示的 UI
注: 如果场景中有多个 UI 文档,则可以将同一面板设置资源分配给所有文档。这将导致所有 UI 呈现在同一面板上,从而优化性能。
创建要显示的示例数据
在本节中,你将创建一些示例数据,这些数据将用于用数据填充 UI 中的字符列表。
对于字符列表,您需要一个简单的类,其中包含角色名称、类和肖像图像。 创建新的 ScriptableObject 脚本 Assets/Scripts/CharacterData.cs并将以下代码粘贴到文件中:
using UnityEngine;

public enum ECharacterClass
{
    Knight, Ranger, Wizard
}

[CreateAssetMenu]
public class CharacterData : ScriptableObject
{
    public string m_CharacterName;
    public ECharacterClass m_Class;
    public Sprite m_PortraitImage;
}
该属性将自动向“创建”菜单添加一个条目。 右键单击“项目”视图中的文件夹以创建新的脚本化对象的实例。[CreateAssetMenu]

新建“创建”菜单项
现在,您需要创建一些实例并用随机数据填充它们。将它们全部放在资源/字符文件夹中。稍后您将编写一个脚本,该脚本会自动解析并加载此文件夹中的所有字符数据。CharacterData

创建一些示例字符
创建列表条目 UI 模板
在本节中,您将为列表中的各个条目创建 UI 模板。在运行时,控制器脚本将为每个字符创建此 UI 的实例,并将其添加到列表中。 字符列表条目的 UI 由彩色背景框架和字符名称组成。

显示字符名称的列表条目
注意:如果要跳过此步骤,可以从此页面底部复制列表条目的UXML代码,并将其直接粘贴到新文件中。将其另存为 Assets/UI/ListEntry.uxml。
通过菜单“UI Toolkit> UI Builder”打开“UI 生成器”窗口>“UI 生成器”窗口。 通过选择“新建文件”>创建新的 UXML 模板。

在 UI 生成器中创建新的 UXML 模板
为背景添加一个视觉元素,并将固定高度设置为 41px。由于条目内的文本应左对齐并放置在元素的中间,因此请打开“对齐”折叠页并将“项目左对齐”和“内容对齐”设置为居中。 还要设置 10px 的左边距,以使标签与框架左边框的距离最小。
对于样式,您可以使用背景色并添加 2px 宽的边框,半径为 15px,颜色为 .此步骤是可选的,您可以应用自己的颜色和样式。#AA5939#311A11

背景视觉元素
将标签作为子项添加到现有可视元素并命名 ,以便稍后可以在控制器脚本中访问它。将“字体样式”设置为粗体,将“字体大小”设置为 18。CharacterName
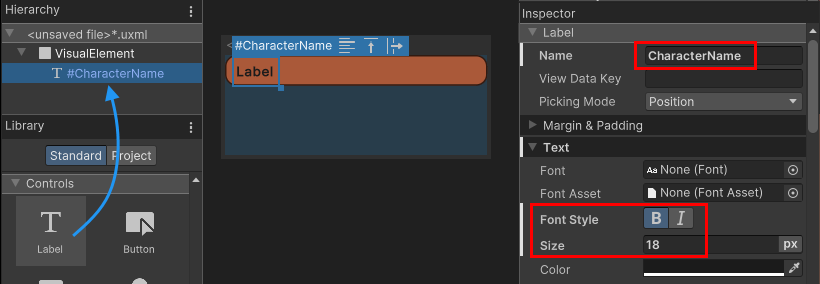
为角色名称添加标签
将 UXML 模板另存为 Assets/UI/ListEntry.uxml。 您还可以在此处的页面底部找到此模板的最终 UXML 代码。
为列表条目创建控制器
在本节中,您将为列表条目创建控制器脚本。该脚本的目的是在列表条目的 UI 中显示字符实例的数据。它需要访问字符名称的标签,并将其设置为显示给定字符实例的名称。
创建一个新脚本 Assets/Scripts/UI/CharacterListEntryController.cs并将以下代码粘贴到其中:
using UnityEngine.UIElements;

public class CharacterListEntryController
{
    Label m_NameLabel;

    public void SetVisualElement(VisualElement visualElement)
    {
        m_NameLabel = visualElement.Q<Label>("CharacterName");
    }

    public void SetCharacterData(CharacterData characterData)
    {
        m_NameLabel.text = characterData.m_CharacterName;
    }
}
此类中有两个函数,它们都是函数。Set
SetVisualElement(VisualElement visualElement)此函数将接收一个可视元素,该元素是您在上一节中创建的 UI 模板的实例。主视图控制器将创建此实例。此函数的目的是检索对 UI 元素内字符名称标签的引用。ListEntry
SetCharacterData(CharacterData characterData)此函数接收此列表元素应显示其名称的字符。由于 中的元素列表是池化和重用的,因此必须有一个函数来更改要显示的角色的数据。ListViewSet
请注意,该类不是 .由于 UI 工具包中的可视元素不是游戏对象,因此无法将组件附加到它们。相反,此类将附加到下一节中的属性。CharacterListEntryMonoBehaviouruserData
为主视图创建控制器
在本节中,您将为主视图中的字符列表创建一个控制器脚本,以及一个实例化并将其分配给可视化树的 MonoBehavior 脚本。
首先,在 Assets/Scripts/UI/CharacterListController 下创建一个新脚本.cs并将以下代码粘贴到其中。
using System.Collections.Generic;
using UnityEngine;
using UnityEngine.UIElements;

public class CharacterListController
{
    public void InitializeCharacterList(VisualElement root, VisualTreeAsset listElementTemplate)
    {
    }
}
稍后将填充该方法,但现在添加空方法很重要,以便可以在下一节中调用它。InitializeCharacterList()
将控制器脚本附加到主视图
就像 一样,the 不是 ,需要以不同的方式附加到可视化树。 您需要创建一个 MonoBehavior 脚本,该脚本可以附加到与 相同的游戏对象。它将实例化并将其附加到可视化树。CharacterListEntryControllerCharacterListControllerMonoBehaviourUIDocumentCharacterListController
创建一个新脚本 Assets/Scripts/UI/MainView.cs并将以下代码粘贴到其中:
using UnityEngine;
using UnityEngine.UIElements;

public class MainView : MonoBehaviour
{
    [SerializeField]
    VisualTreeAsset m_ListEntryTemplate;

    void OnEnable()
    {
        // The UXML is already instantiated by the UIDocument component
        var uiDocument = GetComponent<UIDocument>();

        // Initialize the character list controller
        var characterListController = new CharacterListController();
        characterListController.InitializeCharacterList(uiDocument.rootVisualElement, m_ListEntryTemplate);
    }
}
进入 Unity 编辑器,将脚本附加到 所在的同一游戏对象。将 分配给“列表条目模板”属性。UIDocumentListEntry.uxml

添加主视图脚本并分配引用
脚本组件无需实例化 MainView UXML,因为这是在同一游戏对象的组件中自动完成的。该脚本访问 UIDocument 组件以获取已实例化的可视化树的引用。然后,它会创建可视化树的根元素和用于各个列表元素的 UXML 模板的 和 的实例。UIDocumentMainViewCharacterListController
注意:重新加载 UI 时,包含该组件的同一游戏对象上的配套 MonoBehavior 组件将在重新加载之前被禁用,然后在重新加载后重新启用。因此,最好将与 UI 交互的代码放置在这些 MonoBehavior 的 and 方法中。UIDocumentOnEnableOnDisable
枚举所有字符数据实例
应添加到控制器脚本的第一个功能是枚举之前创建的所有字符数据实例的函数。这些将用于填写列表。
将下面的代码复制到类中。CharacterListController
List<CharacterData> m_AllCharacters;

void EnumerateAllCharacters()
{
    m_AllCharacters = new List<CharacterData>();
    m_AllCharacters.AddRange(Resources.LoadAll<CharacterData>("Characters"));
}
注意:此代码假定您在“资源/字符”文件夹中创建了字符实例。如果将字符放在其他文件夹中,则可能需要相应地调整文件夹名称。
现在,您需要在初始化期间调用该方法。将对其的调用添加到方法的顶部:EnumerateAllCharacterInitializeCharacterList
public void InitializeCharacterList(VisualElement root, VisualTreeAsset listElementTemplate)
{
    EnumerateAllCharacters();
}
获取对 UI 元素的引用
在本节中,您将填写该方法的内容。此方法需要做的第一件事是获取对它访问以显示信息所需的所有单个 UI 控件的引用。使用 UQuery 系列 API 按名称、USS 类、类型或这些控件的组合检索各个 UI 控件。InitializeCharacterList
使用以下代码扩展类中的代码:CharacterListController
// UXML template for list entries
VisualTreeAsset m_ListEntryTemplate;

// UI element references
ListView m_CharacterList;
Label m_CharClassLabel;
Label m_CharNameLabel;
VisualElement m_CharPortrait;
Button m_SelectCharButton;

public void InitializeCharacterList(VisualElement root, VisualTreeAsset listElementTemplate)
{
    EnumerateAllCharacters();

    // Store a reference to the template for the list entries
    m_ListEntryTemplate = listElementTemplate;

    // Store a reference to the character list element
    m_CharacterList = root.Q<ListView>("CharacterList");

    // Store references to the selected character info elements
    m_CharClassLabel = root.Q<Label>("CharacterClass");
    m_CharNameLabel = root.Q<Label>("CharacterName");
    m_CharPortrait = root.Q<VisualElement>("CharacterPortrait");

    // Store a reference to the select button
    m_SelectCharButton = root.Q<Button>("SelectCharButton");
}
用条目填充列表
接下来,您需要用之前枚举和加载的字符填充屏幕上的列表。为此,您需要在类中创建一个新方法。FillCharacterListCharacterListController
用元素填充列表视图需要 4 个步骤:
- 创建函数
makeItem - 创建函数
bindItem - 设置项目高度
- 设置项目源
makeItem 回调函数的目的是创建一个小的可视化树,该树表示单个列表项的 UI,并返回此树的根可视元素。
在这种情况下,回调需要实例化您为列表条目创建的 UXML 模板。它还需要创建控制器脚本的实例,该实例负责使用来自 .makeItemCharacterListEntryControllerCharacterData
在类内创建一个方法并粘贴下面的代码。FillCharacterList
void FillCharacterList()
{
    // Set up a make item function for a list entry
    m_CharacterList.makeItem = () =>
    {
        // Instantiate the UXML template for the entry
        var newListEntry = m_ListEntryTemplate.Instantiate();

        // Instantiate a controller for the data
        var newListEntryLogic = new CharacterListEntryController();

        // Assign the controller script to the visual element
        newListEntry.userData = newListEntryLogic;

        // Initialize the controller script
        newListEntryLogic.SetVisualElement(newListEntry);

        // Return the root of the instantiated visual tree
        return newListEntry;
    };
}
作为回调的一部分,将控制器脚本存储在实例化可视元素的属性中。这允许您稍后访问脚本并为列表元素分配不同的字符。makeItemuserData
// Assign the controller script to the visual element
newListEntry.userData = newListEntryLogic;
作为内存和性能优化,重用列表元素,而不是为列表中的每个条目实例化一个元素。它只创建足够的视觉元素来填充可见区域,然后在滚动列表时汇集并重复使用它们。ListView
出于这个原因,你需要提供一个 bindItem 回调,它将你的一个实例(在本例中)绑定到一个单独的列表元素。CharacterData
通过在底部添加下面的代码来扩展该方法。FillCharacterList
// Set up bind function for a specific list entry
m_CharacterList.bindItem = (item, index) =>
{
    (item.userData as CharacterListEntryController).SetCharacterData(m_AllCharacters[index]);
};
回调接收对列表条目的可视化树的根可视元素的引用,以及数据的索引。由于您在可视元素的属性中存储了对 的引用,因此代码可以访问它并直接设置 .bindItemCharacterListEntryControlleruserDataCharacterData
最后,您需要设置元素的项高度,并为列表提供对数据源的引用。这告诉列表它包含多少元素。
通过在底部添加下面的代码来扩展该方法。FillCharacterList
// Set a fixed item height
m_CharacterList.fixedItemHeight = 45;

// Set the actual item's source list/array
m_CharacterList.itemsSource = m_AllCharacters;
最后,您需要在初始化结束时调用该方法。 将调用添加到方法底部,如下所示:FillCharacterListInitializeCharacterList
FillCharacterList();
如果您现在进入播放模式,角色列表将填满您创建的角色的名称。

字符列表不再为空
您可以在本指南底部找到脚本的最终代码,此处CharacterListController
对用户选择做出反应
当用户选择角色时,角色的详细信息 - 即肖像,全名和类别 - 需要显示在屏幕右侧的角色详细信息部分中。此外,选择字符时,需要启用选择按钮。如果未选择任何字符,该按钮应再次禁用。
请注意,您已经可以单击并选择列表中的字符。用于选择和突出显示的功能是 ListView 控件的一部分。您只需要添加一个回调函数,以便在用户更改列表中的选择时做出反应。该控件包含用于此目的的事件:ListViewonSelectionChange
将以下代码添加到方法的底部:InitializeCharacterList
// Register to get a callback when an item is selected
m_CharacterList.onSelectionChange += OnCharacterSelected;
现在,您需要实现在上面的代码中设置的回调函数。此函数将接收列表中所有选定项目的列表。但是,由于列表仅允许选择单个项,因此可以直接通过列表的 selectedItem 属性访问所选项。OnCharacterSelected
将以下代码复制到您的类中:
void OnCharacterSelected(IEnumerable<object> selectedItems)
{
    // Get the currently selected item directly from the ListView
    var selectedCharacter = m_CharacterList.selectedItem as CharacterData;
}
该属性可能返回 null。如果未选择任何内容,或者用户按下该键取消选择所有内容,则会出现这种情况。这个案子需要先处理。selectedItemESC
扩展方法,如下所示:OnCharacterSelected
void OnCharacterSelected(IEnumerable<object> selectedItems)
{
    // Get the currently selected item directly from the ListView
    var selectedCharacter = m_CharacterList.selectedItem as CharacterData;

    // Handle none-selection (Escape to deselect everything)
    if (selectedCharacter == null)
    {
        // Clear
        m_CharClassLabel.text = "";
        m_CharNameLabel.text = "";
        m_CharPortrait.style.backgroundImage = null;

        // Disable the select button
        m_SelectCharButton.SetEnabled(false);

        return;
    }
}
如果选择有效,则需要在UI中显示角色的详细信息。可以通过在类的方法中检索到的引用来访问标签和纵向图像视觉元素。InitializeCharacterList
将下面的代码复制到方法中:OnCharacterSelected
// Fill in character details
m_CharClassLabel.text = selectedCharacter.m_Class.ToString();
m_CharNameLabel.text = selectedCharacter.m_CharacterName;
m_CharPortrait.style.backgroundImage = new StyleBackground(selectedCharacter.m_PortraitImage);

// Enable the select button
m_SelectCharButton.SetEnabled(true);
您现在可以进入播放模式并查看您的角色选择列表。按键取消选择字符。Escape

最终运行时 UI
最终脚本
您可以在下面找到本指南中创建的所有文件的完整源代码。
MainView.uxml
<ui:UXML xmlns:ui="UnityEngine.UIElements" xmlns:uie="UnityEditor.UIElements" editor-extension-mode="False">
    <ui:VisualElement style="flex-grow: 1; align-items: center; justify-content: center; background-color: rgb(115, 37, 38);">
        <ui:VisualElement style="flex-direction: row; height: 350px;">
            <ui:ListView focusable="true" name="CharacterList" style="width: 230px; border-left-color: rgb(49, 26, 17); border-right-color: rgb(49, 26, 17); border-top-color: rgb(49, 26, 17); border-bottom-color: rgb(49, 26, 17); border-left-width: 4px; border-right-width: 4px; border-top-width: 4px; border-bottom-width: 4px; background-color: rgb(110, 57, 37); border-top-left-radius: 15px; border-bottom-left-radius: 15px; border-top-right-radius: 15px; border-bottom-right-radius: 15px; margin-right: 6px;" />
            <ui:VisualElement style="justify-content: space-between; align-items: flex-end;">
                <ui:VisualElement style="align-items: center; background-color: rgb(170, 89, 57); border-left-width: 4px; border-right-width: 4px; border-top-width: 4px; border-bottom-width: 4px; border-left-color: rgb(49, 26, 17); border-right-color: rgb(49, 26, 17); border-top-color: rgb(49, 26, 17); border-bottom-color: rgb(49, 26, 17); border-top-left-radius: 15px; border-bottom-left-radius: 15px; border-top-right-radius: 15px; border-bottom-right-radius: 15px; width: 276px; justify-content: center; padding-left: 8px; padding-right: 8px; padding-top: 8px; padding-bottom: 8px;">
                    <ui:VisualElement style="border-left-color: rgb(49, 26, 17); border-right-color: rgb(49, 26, 17); border-top-color: rgb(49, 26, 17); border-bottom-color: rgb(49, 26, 17); border-left-width: 2px; border-right-width: 2px; border-top-width: 2px; border-bottom-width: 2px; height: 120px; width: 120px; border-top-left-radius: 13px; border-bottom-left-radius: 13px; border-top-right-radius: 13px; border-bottom-right-radius: 13px; padding-left: 4px; padding-right: 4px; padding-top: 4px; padding-bottom: 4px; background-color: rgb(255, 133, 84);">
                        <ui:VisualElement name="CharacterPortrait" style="flex-grow: 1; -unity-background-scale-mode: scale-to-fit;" />
                    </ui:VisualElement>
                    <ui:Label text="Label" name="CharacterName" style="-unity-font-style: bold; font-size: 18px;" />
                    <ui:Label text="Label" display-tooltip-when-elided="true" name="CharacterClass" style="margin-top: 2px; margin-bottom: 8px; padding-top: 0; padding-bottom: 0;" />
                </ui:VisualElement>
                <ui:Button text="Select Character" display-tooltip-when-elided="true" name="SelectCharButton" style="width: 150px; border-left-color: rgb(49, 26, 17); border-right-color: rgb(49, 26, 17); border-top-color: rgb(49, 26, 17); border-bottom-color: rgb(49, 26, 17); background-color: rgb(255, 133, 84); border-left-width: 2px; border-right-width: 2px; border-top-width: 2px; border-bottom-width: 2px;" />
            </ui:VisualElement>
        </ui:VisualElement>
    </ui:VisualElement>
</ui:UXML>
ListEntry.uxml
<ui:UXML xmlns:ui="UnityEngine.UIElements" xmlns:uie="UnityEditor.UIElements" editor-extension-mode="False">
    <ui:VisualElement style="height: 41px; align-items: flex-start; justify-content: center; padding-left: 10px; background-color: rgba(170, 89, 57, 255); border-left-color: rgba(49, 26, 17, 255); border-right-color: rgba(49, 26, 17, 255); border-top-color: rgba(49, 26, 17, 255); border-bottom-color: rgba(49, 26, 17, 255); border-left-width: 2px; border-right-width: 2px; border-top-width: 2px; border-bottom-width: 2px; border-top-left-radius: 15px; border-bottom-left-radius: 15px; border-top-right-radius: 15px; border-bottom-right-radius: 15px;">
        <ui:Label text="Label" display-tooltip-when-elided="true" name="CharacterName" style="-unity-font-style: bold; font-size: 18px;" />
    </ui:VisualElement>
</ui:UXML>
字符数据.cs
using UnityEngine;

public enum ECharacterClass
{
    Knight, Ranger, Wizard
}

[CreateAssetMenu]
public class CharacterData : ScriptableObject
{
    public string m_CharacterName;
    public ECharacterClass m_Class;
    public Sprite m_PortraitImage;
}
字符列表入口控制器.cs
using UnityEngine.UIElements;

public class CharacterListEntryController
{
    Label m_NameLabel;

    public void SetVisualElement(VisualElement visualElement)
    {
        m_NameLabel = visualElement.Q<Label>("CharacterName");
    }

    public void SetCharacterData(CharacterData characterData)
    {
        m_NameLabel.text = characterData.m_CharacterName;
    }
}
主视图.cs
using UnityEngine;
using UnityEngine.UIElements;

public class MainView : MonoBehaviour
{
    [SerializeField]
    VisualTreeAsset m_ListEntryTemplate;

    void OnEnable()
    {
        // The UXML is already instantiated by the UIDocument component
        var uiDocument = GetComponent<UIDocument>();

        // Initialize the character list controller
        var characterListController = new CharacterListController();
        characterListController.InitializeCharacterList(uiDocument.rootVisualElement, m_ListEntryTemplate);
    }
}
字符列表控制器.cs
using System.Collections.Generic;
using UnityEngine;
using UnityEngine.UIElements;

public class CharacterListController
{
    // UXML template for list entries
    VisualTreeAsset m_ListEntryTemplate;

    // UI element references
    ListView m_CharacterList;
    Label m_CharClassLabel;
    Label m_CharNameLabel;
    VisualElement m_CharPortrait;
    Button m_SelectCharButton;

    public void InitializeCharacterList(VisualElement root, VisualTreeAsset listElementTemplate)
    {
        EnumerateAllCharacters();

        // Store a reference to the template for the list entries
        m_ListEntryTemplate = listElementTemplate;

        // Store a reference to the character list element
        m_CharacterList = root.Q<ListView>("CharacterList");

        // Store references to the selected character info elements
        m_CharClassLabel = root.Q<Label>("CharacterClass");
        m_CharNameLabel = root.Q<Label>("CharacterName");
        m_CharPortrait = root.Q<VisualElement>("CharacterPortrait");

        // Store a reference to the select button
        m_SelectCharButton = root.Q<Button>("SelectCharButton");

        FillCharacterList();

        // Register to get a callback when an item is selected
        m_CharacterList.onSelectionChange += OnCharacterSelected;
    }

    List<CharacterData> m_AllCharacters;

    void EnumerateAllCharacters()
    {
        m_AllCharacters = new List<CharacterData>();
        m_AllCharacters.AddRange(Resources.LoadAll<CharacterData>("Characters"));
    }

    void FillCharacterList()
    {
        // Set up a make item function for a list entry
        m_CharacterList.makeItem = () =>
        {
            // Instantiate the UXML template for the entry
            var newListEntry = m_ListEntryTemplate.Instantiate();

            // Instantiate a controller for the data
            var newListEntryLogic = new CharacterListEntryController();

            // Assign the controller script to the visual element
            newListEntry.userData = newListEntryLogic;

            // Initialize the controller script
            newListEntryLogic.SetVisualElement(newListEntry);

            // Return the root of the instantiated visual tree
            return newListEntry;
        };

        // Set up bind function for a specific list entry
        m_CharacterList.bindItem = (item, index) =>
        {
            (item.userData as CharacterListEntryController).SetCharacterData(m_AllCharacters[index]);
        };

        // Set a fixed item height
        m_CharacterList.fixedItemHeight = 45;

        // Set the actual item's source list/array
        m_CharacterList.itemsSource = m_AllCharacters;
    }

    void OnCharacterSelected(IEnumerable<object> selectedItems)
    {
        // Get the currently selected item directly from the ListView
        var selectedCharacter = m_CharacterList.selectedItem as CharacterData;

        // Handle none-selection (Escape to deselect everything)
        if (selectedCharacter == null)
        {
            // Clear
            m_CharClassLabel.text = "";
            m_CharNameLabel.text = "";
            m_CharPortrait.style.backgroundImage = null;

            // Disable the select button
            m_SelectCharButton.SetEnabled(false);

            return;
        }

        // Fill in character details
        m_CharClassLabel.text = selectedCharacter.m_Class.ToString();
        m_CharNameLabel.text = selectedCharacter.m_CharacterName;
        m_CharPortrait.style.backgroundImage = new StyleBackground(selectedCharacter.m_PortraitImage);

        // Enable the select button
        m_SelectCharButton.SetEnabled(true);
    }
}
