文章目录
- 一.enbase64
- 1.main函数
- 2.换表函数
- 3. check函数
- 4. 解题脚本:
- 二.snake
- 1. 修复MagicNumber
- 2. 反编译
- 3. 解题脚本
- 三.For Aiur
- 1. 注意点
- 2. 解包
- 3. 反编译
- 4. 解题脚本
- 四.程序和人有一个能跑就行了
- 1. fakeflag
- 2. 真flag
- 五.debase64
- 1. encode函数
- 2. 函数逻辑
- 3. 根据程序逻辑得到前16个字符
- 4. 爆破后四个字符得到flag
一.enbase64
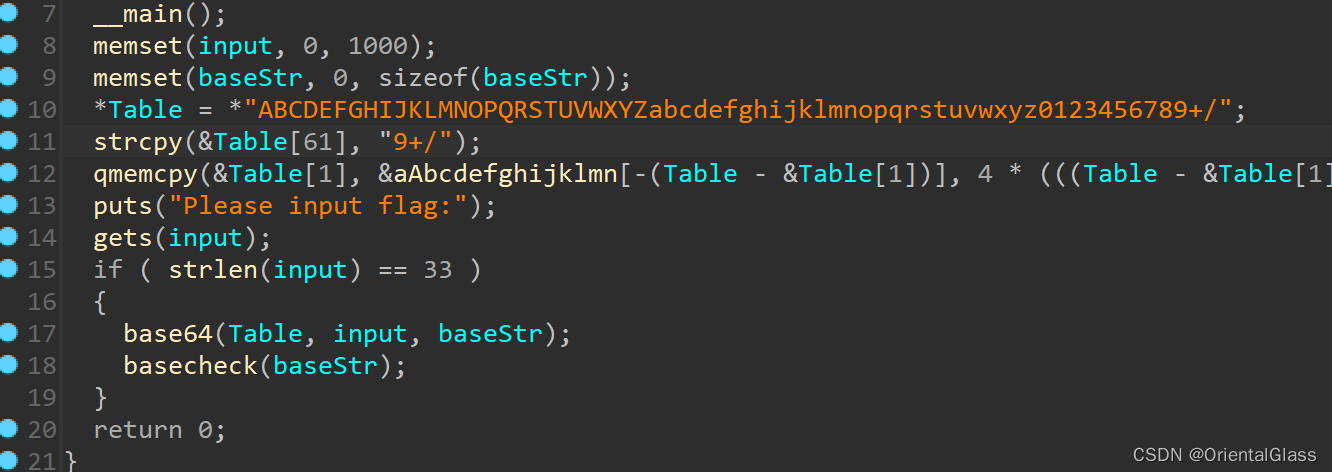
1.main函数
经典的base64换表,第10和11行作用重复,12行也没有实际作用,此处的base表根本没有变化
2.换表函数
在17行的base64函数中有一个basechange换表操作
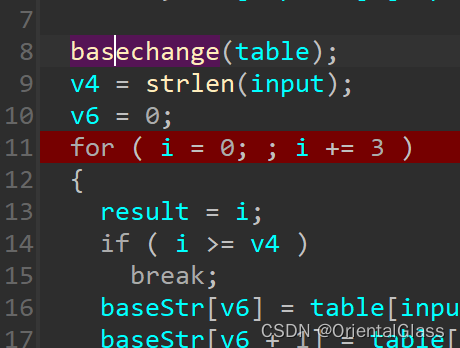
basechange函数关键代码:
  result = strcpy(des, table);
  for ( i = 0; i <= 47; ++i )
  {
    for ( j = 0; j <= 63; ++j )
      table[j] = des[key[j]];		//换表1
    result = strcpy(des, table);	//换表2
  }
  return result;
}
3. check函数
basecheck函数:用于检查input经过加密后是否正确
这里本来想动调得到base表,但是少了dll文件,所以只能用笨方法脚本硬解了
4. 解题脚本:
- 求更换后的base64表
#include <stdio.h>
#include <string.h>
void basechange(char* table)
{
    char* result; // eax
    char des[65]; // [esp+13h] [ebp-155h] BYREF
    int key[65]; // [esp+54h] [ebp-114h] BYREF
    int j; // [esp+158h] [ebp-10h]
    int i; // [esp+15Ch] [ebp-Ch]

    memset(key, 0, sizeof(key));
    key[0] = 16;
    key[1] = 34;
    key[2] = 56;
    key[3] = 7;
    key[4] = 46;
    key[5] = 2;
    key[6] = 10;
    key[7] = 44;
    key[8] = 20;
    key[9] = 41;
    key[10] = 59;
    key[11] = 31;
    key[12] = 51;
    key[13] = 60;
    key[14] = 61;
    key[15] = 26;
    key[16] = 5;
    key[17] = 40;
    key[18] = 21;
    key[19] = 38;
    key[20] = 4;
    key[21] = 54;
    key[22] = 52;
    key[23] = 47;
    key[24] = 3;
    key[25] = 11;
    key[26] = 58;
    key[27] = 48;
    key[28] = 32;
    key[29] = 15;
    key[30] = 49;
    key[31] = 14;
    key[32] = 37;
    key[34] = 55;
    key[35] = 53;
    key[36] = 24;
    key[37] = 35;
    key[38] = 18;
    key[39] = 25;
    key[40] = 33;
    key[41] = 43;
    key[42] = 50;
    key[43] = 39;
    key[44] = 12;
    key[45] = 19;
    key[46] = 13;
    key[47] = 42;
    key[48] = 9;
    key[49] = 17;
    key[50] = 28;
    key[51] = 30;
    key[52] = 23;
    key[53] = 36;
    key[54] = 1;
    key[55] = 22;
    key[56] = 57;
    key[57] = 63;
    key[58] = 8;
    key[59] = 27;
    key[60] = 6;
    key[61] = 62;
    key[62] = 45;
    key[63] = 29;
    strcpy(des, table);
    for (i = 0; i <= 47; ++i)
    {
        for (j = 0; j <= 63; ++j)
            table[j] = des[key[j]];
        strcpy(des, table);
    }
}
int main()
{
    unsigned char table[65] = "ABCDEFGHIJKLMNOPQRSTUVWXYZabcdefghijklmnopqrstuvwxyz0123456789+/";
    basechange(table);
    printf("%s", table);
    return 0;
}
运行得到更换后的表:gJ1BRjQie/FIWhEslq7GxbnL26M4+HXUtcpmVTKaydOP38of5v90ZSwrkYzCAuND
- base64解码
import base64
str1 = "GQTZlSqQXZ/ghxxwhju3hbuZ4wufWjujWrhYe7Rce7ju"#待解密数据
string1 = "gJ1BRjQie/FIWhEslq7GxbnL26M4+HXUtcpmVTKaydOP38of5v90ZSwrkYzCAuND"#更改后的base64表
string2 = "ABCDEFGHIJKLMNOPQRSTUVWXYZabcdefghijklmnopqrstuvwxyz0123456789+/"
print (base64.b64decode(str1.translate(str.maketrans(string1,string2))))
#LitCTF{python_snake_is_so_easy!}
二.snake
1. 修复MagicNumber
下载得到pyc文件,用010editor或者winhex打开可以发现第一行数据全为0,需要修复MagicNumber
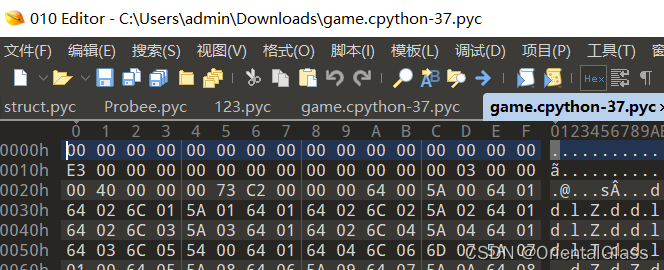
前面四字节改为420D0D0A保存即可(注意不要改动了后面的数据,最初多添加了一个字节导致错误)

2. 反编译
然后用pycdc或者python在线反编译输出代码
如果不会使用pycdc等pyhton反编译操作可以看我的另一篇文章Python逆向基本操作步骤
反编译代码:
# Source Generated with Decompyle++
# File: game.cpython-37.pyc (Python 3.7)

'''\xe8\xb4\xaa\xe5\x90\x83\xe8\x9b\x87'''
import random
import sys
import time
import pygame
from pygame.locals import *
from collections import deque
SCREEN_WIDTH = 600
SCREEN_HEIGHT = 480
SIZE = 20
LINE_WIDTH = 1
SCOPE_X = (0, SCREEN_WIDTH // SIZE - 1)
SCOPE_Y = (2, SCREEN_HEIGHT // SIZE - 1)
FOOD_STYLE_LIST = [
    (10, (255, 100, 100)),
    (20, (100, 255, 100)),
    (30, (100, 100, 255))]
LIGHT = (100, 100, 100)
DARK = (200, 200, 200)
BLACK = (0, 0, 0)
RED = (200, 30, 30)
BGCOLOR = (40, 40, 60)

def print_text(screen, font, x, y, text, fcolor = ((255, 255, 255),)):
    imgText = font.render(text, True, fcolor)
    screen.blit(imgText, (x, y))


def init_snake():
    snake = deque()
    snake.append((2, SCOPE_Y[0]))
    snake.append((1, SCOPE_Y[0]))
    snake.append((0, SCOPE_Y[0]))
    return snake


def create_food(snake):
    food_x = random.randint(SCOPE_X[0], SCOPE_X[1])
    food_y = random.randint(SCOPE_Y[0], SCOPE_Y[1])
    while (food_x, food_y) in snake:
        food_x = random.randint(SCOPE_X[0], SCOPE_X[1])
        food_y = random.randint(SCOPE_Y[0], SCOPE_Y[1])
    return (food_x, food_y)


def get_food_style():
    return FOOD_STYLE_LIST[random.randint(0, 2)]


def main():
    pygame.init()
    screen = pygame.display.set_mode((SCREEN_WIDTH, SCREEN_HEIGHT))
    pygame.display.set_caption('\xe8\xb4\xaa\xe5\x90\x83\xe8\x9b\x87')
    font1 = pygame.font.SysFont('SimHei', 24)
    font2 = pygame.font.Font(None, 72)
    (fwidth, fheight) = font2.size('GAME OVER')
    b = True
    snake = init_snake()
    food = create_food(snake)
    food_style = get_food_style()
    pos = (1, 0)
    game_over = True
    start = False
    score = 0
    orispeed = 0.5
    speed = orispeed
    last_move_time = None
    pause = False
    while None:
        for event in pygame.event.get():
            if event.type == QUIT:
                sys.exit()
                continue
            if event.type == KEYDOWN or event.key == K_RETURN or game_over:
                start = True
                game_over = False
                b = True
                snake = init_snake()
                food = create_food(snake)
                food_style = get_food_style()
                pos = (1, 0)
                score = 0
                last_move_time = time.time()
                continue
                if not event.key == K_SPACE or game_over:
                    pause = not pause
                    continue
                    if not (event.key in (K_w, K_UP) or b) and pos[1]:
                        pos = (0, -1)
                        b = False
                        continue
                        if not (event.key in (K_s, K_DOWN) or b) and pos[1]:
                            pos = (0, 1)
                            b = False
                            continue
                            if not (event.key in (K_a, K_LEFT) or b) and pos[0]:
                                pos = (-1, 0)
                                b = False
                                continue
                                if not event.key in (K_d, K_RIGHT) and b and pos[0]:
                                    pos = (1, 0)
                                    b = False
                                screen.fill(BGCOLOR)
                                for x in range(SIZE, SCREEN_WIDTH, SIZE):
                                    pygame.draw.line(screen, BLACK, (x, SCOPE_Y[0] * SIZE), (x, SCREEN_HEIGHT), LINE_WIDTH)

        for y in range(SCOPE_Y[0] * SIZE, SCREEN_HEIGHT, SIZE):
            pygame.draw.line(screen, BLACK, (0, y), (SCREEN_WIDTH, y), LINE_WIDTH)

        if not game_over:
            curTime = time.time()
            if not curTime - last_move_time > speed and pause:
                b = True
                last_move_time = curTime
                next_s = (snake[0][0] + pos[0], snake[0][1] + pos[1])
                if next_s == food:
                    snake.appendleft(next_s)
                    score += food_style[0]
                    speed = orispeed - 0.03 * (score // 100)
                    food = create_food(snake)
                    food_style = get_food_style()
                elif next_s[0] <= next_s[0] or next_s[0] <= SCOPE_X[1]:
                    pass
                else:
                    SCOPE_X[0]
            elif next_s[1] <= next_s[1] or next_s[1] <= SCOPE_Y[1]:
                pass
            else:
                SCOPE_Y[0]
        elif next_s not in snake:
            snake.appendleft(next_s)
            snake.pop()
        else:
            game_over = True
        if not game_over:
            pygame.draw.rect(screen, food_style[1], (food[0] * SIZE, food[1] * SIZE, SIZE, SIZE), 0)
        for s in snake:
            pygame.draw.rect(screen, DARK, (s[0] * SIZE + LINE_WIDTH, s[1] * SIZE + LINE_WIDTH, SIZE - LINE_WIDTH * 2, SIZE - LINE_WIDTH * 2), 0)

        print_text(screen, font1, 450, 7, f'''\xe5\xbe\x97\xe5\x88\x86: {score}''')
        if score > 1000:
            flag = [
                30,
                196,
                52,
                252,
                49,
                220,
                7,
                243,
                3,
                241,
                24,
                224,
                40,
                230,
                25,
                251,
                28,
                233,
                40,
                237,
                4,
                225,
                4,
                215,
                40,
                231,
                22,
                237,
                14,
                251,
                10,
                169]
            for i in range(0, len(flag), 2):
                flag[i] = flag[i + 1] ^ 136
                flag[i + 1] = flag[i] ^ 119

            print_text(screen, font2, (SCREEN_WIDTH - fwidth) // 2, (SCREEN_HEIGHT - fheight) // 2, bytes(flag).decode(), RED)
            pygame.display.update()
        if game_over and start:
            print_text(screen, font2, (SCREEN_WIDTH - fwidth) // 2, (SCREEN_HEIGHT - fheight) // 2, 'GAME OVER', RED)
        pygame.display.update()

if __name__ == '__main__':
    main()
3. 解题脚本
关键代码是最后一段对flag的操作,不过这里可能是有意为之或者是反编译的问题,意思应该是flag[i]和flag[i+1]的数据异或后互换
flag = [
                30,
                196,
                52,
                252,
                49,
                220,
                7,
                243,
                3,
                241,
                24,
                224,
                40,
                230,
                25,
                251,
                28,
                233,
                40,
                237,
                4,
                225,
                4,
                215,
                40,
                231,
                22,
                237,
                14,
                251,
                10,
                169]
for i in range(0, len(flag), 2):
    tmp=flag[i]
    flag[i] = flag[i + 1] ^ 136
    flag[i + 1] = tmp ^ 119     #编译或者是故意这样,要添加一个tmp变量才可以输出正常的值
    print(chr(flag[i]),end='')
    print(chr(flag[i+1]),end='')
#LitCTF{python_snake_is_so_easy!}
三.For Aiur
这题经过其他师傅点拨才整出来,可以说出题人有点小坏坏
1. 注意点
使用解包工具时要注意环境问题,这题是python3.8编写的,所以要用python3.8的环境,否则会缺少输出文件,建议使用anaconda管理python版本
推荐文章:
①anaconda的安装和使用(管理python环境看这一篇就够了)
②Anaconda安装及配置(详细版)
安装好后打开Anaconda Prompt使用命令:
conda crate python38 python=3.8即可创建python3.8环境
使用activate python38切换到python3.8环境
可以使用uncompyle6或者pyinstxtractor.py这两个解包工具,使用方法就不再多赘述可以参考Python逆向基本操作步骤捏
2. 解包
将Probee.exe和解包工具放在一起,在conda环境中切换到文件夹中
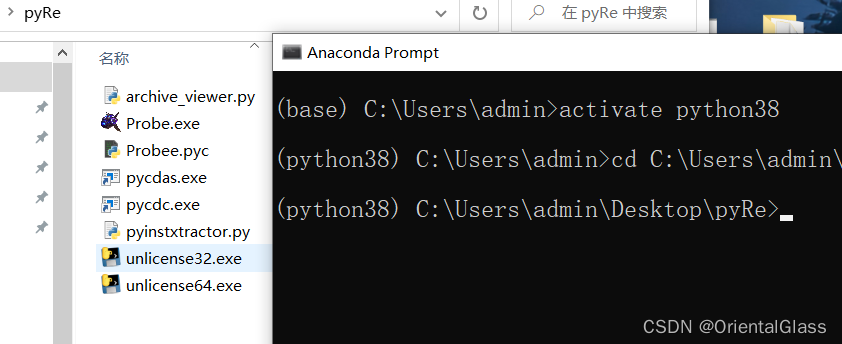
使用命令:python pyinstxtractor.py Probe.exe
然后会输出Probe.exe_extracted文件夹,打开后可以找到Probee.pyc
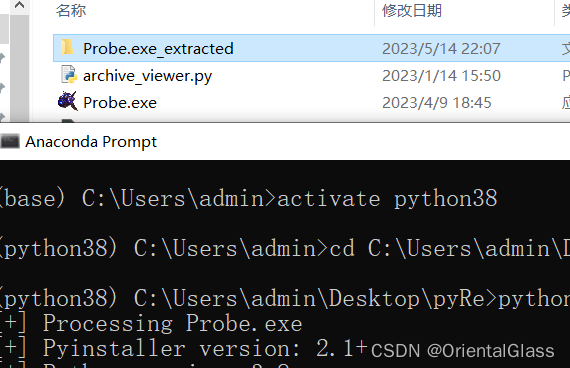
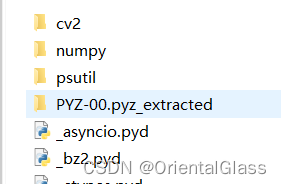
不过关键在于其中的PYZ-00.pyz_extracted文件夹,里面有一个ch.pyc
3. 反编译
分别用pycdc输出Probee.pyc和ch.pyc的反编译代码
①Probee.pyc:
# Source Generated with Decompyle++
# File: Probee.pyc (Python 3.8)

from cv2 import imread, imshow, namedWindow, WINDOW_NORMAL, FONT_HERSHEY_SIMPLEX, getTickCount, getTickFrequency, putText, LINE_AA, waitKey, getTextSize, resize, moveWindow, IMREAD_UNCHANGED, destroyAllWindows
from numpy import uint8, zeros
from ch import check
Mineral = 100
Pylonnum = 0

def buildPylon():
    global Mineral, Pylonnum
    if Mineral < 100:
        warn_img = imread('source/warn1.png')
        imshow('warning', warn_img)
        return None
    None -= 100
    img1 = imread('source/warpin.png')
    namedWindow('Pylon' + str(Pylonnum), WINDOW_NORMAL)
    imshow('Pylon' + str(Pylonnum), img1)
    font = FONT_HERSHEY_SIMPLEX
    pos = (img1.shape[1] - 300, 50)
    color = (0, 0, 0)
    thickness = 2
    timer = getTickCount() + 18 * getTickFrequency()
    if getTickCount() < timer:
        img1_copy = img1.copy()
        time_left = int((timer - getTickCount()) / getTickFrequency())
        text = 'Time left: {}s'.format(time_left)
        putText(img1_copy, text, pos, font, 1, color, thickness, LINE_AA)
        imshow('Pylon' + str(Pylonnum), img1_copy)
        if waitKey(1) & 255 == ord('q'):
            pass

    img2 = imread('source/Pylon.png')
    imshow('Pylon' + str(Pylonnum), img2)
    waitKey(1)
    Pylonnum += 1


def gather():
    global Mineral
    digit_value = Mineral
    icon_img = imread('source/jingtikuang.png', IMREAD_UNCHANGED)
    icon_img = resize(icon_img, (120, 120))
    bg_img = zeros(icon_img.shape, uint8, **('dtype',))
    bg_img[(0:icon_img.shape[0], 0:icon_img.shape[1], :)] = icon_img
    digit_text = str(digit_value)
    digit_size = getTextSize(digit_text, FONT_HERSHEY_SIMPLEX, 1, 2)[0]
    digit_x = bg_img.shape[1] - digit_size[0]
    digit_y = digit_size[1] + 10
    putText(bg_img, digit_text, (digit_x, digit_y), FONT_HERSHEY_SIMPLEX, 1, (0, 0, 0), 2)
    imshow('Mineral', bg_img)
    moveWindow('Mineral', 1200, 100)
    Mineral += 5

img = imread('source/Probe.png')
(new_width, new_height) = (200, 200)
img = resize(img, (new_width, new_height))
(screen_width, screen_height) = (800, 120)
(x, y) = (600, 100)
(dx, dy) = (0, 5)
namedWindow('Probe', WINDOW_NORMAL)
imshow('Probe', img)
check(Pylonnum)
imshow('Probe', img)
if y < screen_height:
    dy = 5
if y > screen_height:
    dy = -5
x = x + dx
y = y + dy
moveWindow('Probe', x, y)
if waitKey(50) & 255 == ord('g'):
    gather()
if waitKey(50) & 255 == ord('b'):
    buildPylon()
if waitKey(50) & 255 == ord('e'):
    pass

destroyAllWindows()
②ch.pyc:
# Source Generated with Decompyle++
# File: ch.pyc (Python 3.8)

enc = [
    98,
    77,
    94,
    91,
    92,
    107,
    125,
    66,
    87,
    70,
    113,
    92,
    83,
    70,
    85,
    81,
    19,
    21,
    109,
    99,
    87,
    107,
    127,
    65,
    65,
    64,
    109,
    87,
    93,
    90,
    65,
    64,
    64,
    65,
    81,
    3,
    109,
    85,
    86,
    80,
    91,
    64,
    91,
    91,
    92,
    0,
    94,
    107,
    66,
    77,
    94,
    91,
    92,
    71]
lis = []

def check(num):
    flag = 'LitCTF{'
    if num % 2 == 0 and num % 4 == 0 and num % 6 == 0 and num % 8 == 0 and num % 12 == 0 and num % 13 == 11:
        k = str(num)
        for i in range(len(enc)):
            flag += chr(ord(k[i % len(k)]) ^ enc[i])
            lis.append(ord(k[i % len(k)]) ^ enc[i])
        flag += '}'
        imread = imread
        imshow = imshow
        namedWindow = namedWindow
        WINDOW_NORMAL = WINDOW_NORMAL
        FONT_HERSHEY_SIMPLEX = FONT_HERSHEY_SIMPLEX
        getTickCount = getTickCount
        getTickFrequency = getTickFrequency
        putText = putText
        LINE_AA = LINE_AA
        waitKey = waitKey
        getTextSize = getTextSize
        resize = resize
        moveWindow = moveWindow
        IMREAD_UNCHANGED = IMREAD_UNCHANGED
        destroyAllWindows = destroyAllWindows
        import cv2
        uint8 = uint8
        zeros = zeros
        import numpy
        img = zeros((200, 20000, 3), uint8)
        img.fill(255)
        text = flag
        font = FONT_HERSHEY_SIMPLEX
        pos = (50, 120)
        color = (0, 0, 0)
        thickness = 2
        putText(img, text, pos, font, 1, color, thickness, LINE_AA)
        imshow('flag', img)
        waitKey(0)
        destroyAllWindows()
4. 解题脚本
关键就在于Probee代码中调用了check函数,该函数定义在ch中,分析程序逻辑不难写出解题脚本
# Source Generated with Decompyle++
# File: ch.pyc (Python 3.8)

enc = [
    98,
    77,
    94,
    91,
    92,
    107,
    125,
    66,
    87,
    70,
    113,
    92,
    83,
    70,
    85,
    81,
    19,
    21,
    109,
    99,
    87,
    107,
    127,
    65,
    65,
    64,
    109,
    87,
    93,
    90,
    65,
    64,
    64,
    65,
    81,
    3,
    109,
    85,
    86,
    80,
    91,
    64,
    91,
    91,
    92,
    0,
    94,
    107,
    66,
    77,
    94,
    91,
    92,
    71]
lis = []
num=0
while True :
    flag = 'LitCTF{'
    if num % 2 == 0 and num % 4 == 0 and num % 6 == 0 and num % 8 == 0 and num % 12 == 0 and num % 13 == 11:
        k = str(num)
        for i in range(len(enc)):
            flag += chr(ord(k[i % len(k)]) ^ enc[i])
            lis.append(ord(k[i % len(k)]) ^ enc[i])
        flag += '}'
        break
    num=num+1
print(flag)
#LitCTF{Pylon_OverCharge!!_We_Must_construc7_addition4l_pylons}
四.程序和人有一个能跑就行了
参考:其他师傅的wp得到思路LitCTF RE方向 WP
1. fakeflag
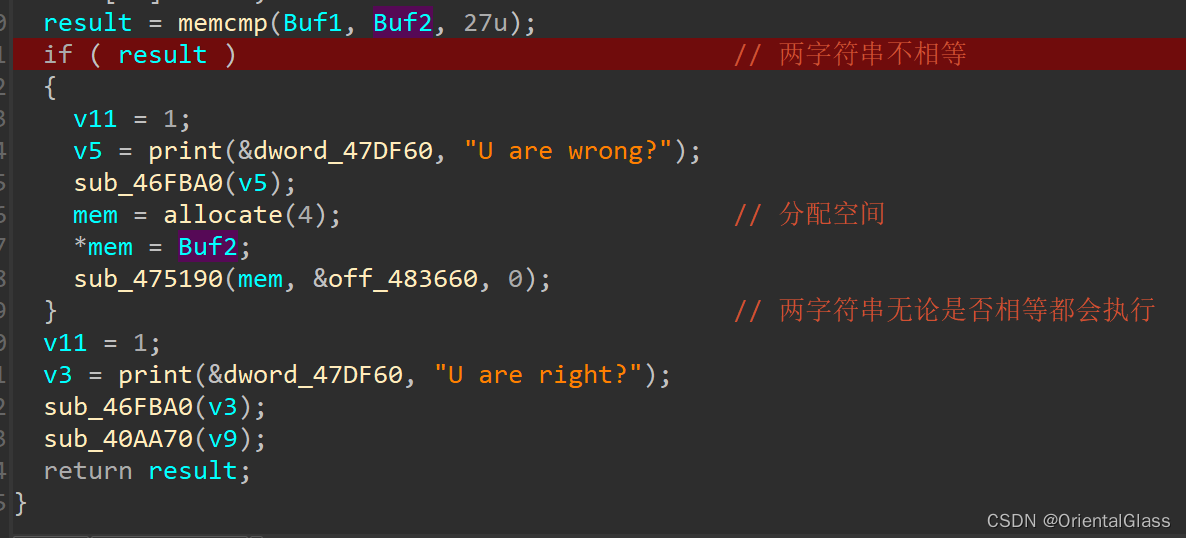
这题很显然有一个输入flag,然后进行RC4加密最后进行判断的过程

这个下面的操作就比较奇怪,无论字符串是否相等好像都会输出"U are right?"
反而是当字符串不相等时会分配一个新的指针mem用于保存Buf2(即input),然后在sub_475190函数中进行一些操作
2. 真flag
动态调试开干
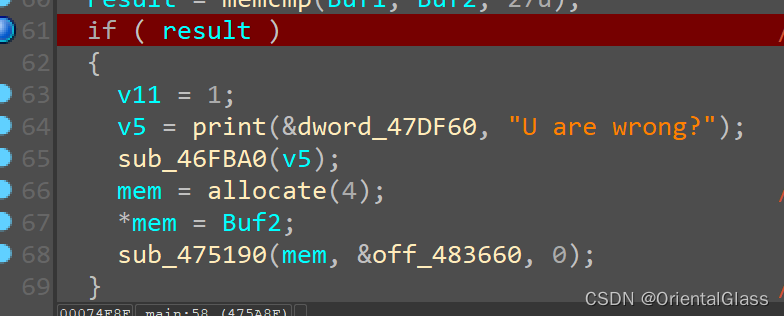
-
在if判断处下断点,随便输入字符串让程序执行到断点
-
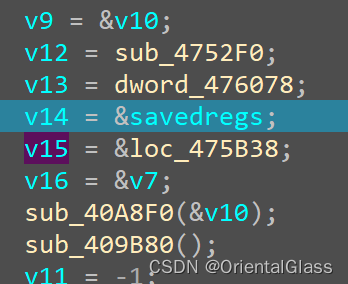
f8步过sub_475190后,跳转到一块区域

比较异或的是main函数的v15变量保存了475B38处的地址,但是我没有找到具体调用这个位置的函数(如果有佬知道希望浇一浇,上面大佬的文章说是C++异常处理,搞不太懂hhh)
3.继续跟进可以找到关键函数
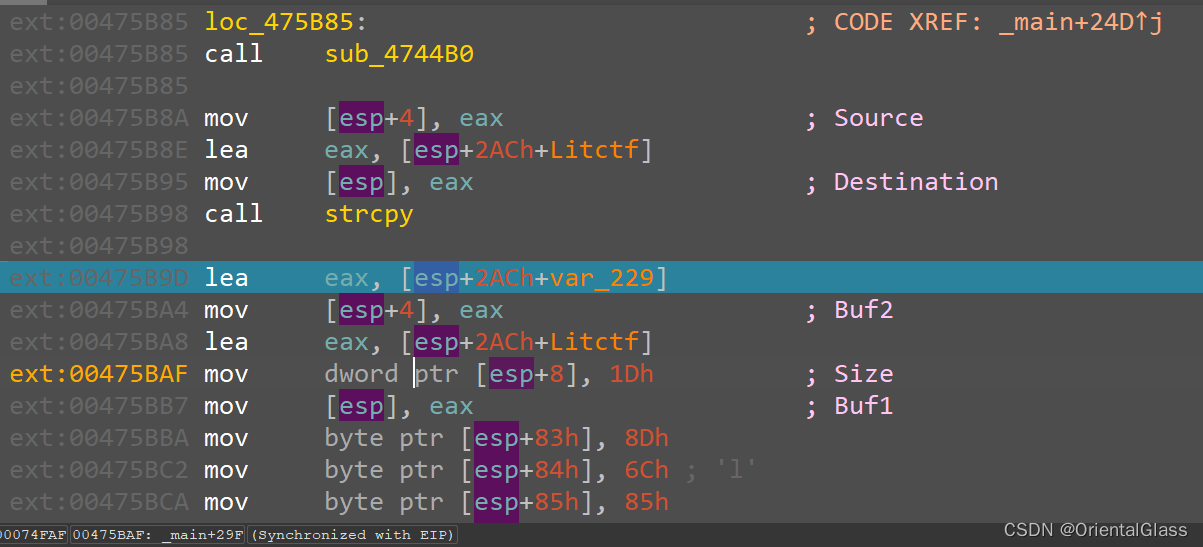
这里类似主函数执行的一段流程,这里的Buf1和主函数的略有不同,这里的数据应该就可以解得真flag了
call    sub_4744B0
.text:00475B85
.text:00475B8A mov     [esp+4], eax                    ; Source
.text:00475B8E lea     eax, [esp+2ACh+Litctf]
.text:00475B95 mov     [esp], eax                      ; Destination
.text:00475B98 call    strcpy
.text:00475B98
.text:00475B9D lea     eax, [esp+2ACh+var_229]
.text:00475BA4 mov     [esp+4], eax                    ; Buf2
.text:00475BA8 lea     eax, [esp+2ACh+Litctf]
.text:00475BAF mov     dword ptr [esp+8], 1Dh          ; Size
.text:00475BB7 mov     [esp], eax                      ; Buf1
.text:00475BBA mov     byte ptr [esp+83h], 8Dh
.text:00475BC2 mov     byte ptr [esp+84h], 6Ch ; 'l'
.text:00475BCA mov     byte ptr [esp+85h], 85h
.text:00475BD2 mov     byte ptr [esp+86h], 76h ; 'v'
.text:00475BDA mov     byte ptr [esp+87h], 32h ; '2'
.text:00475BE2 mov     byte ptr [esp+88h], 72h ; 'r'
.text:00475BEA mov     byte ptr [esp+89h], 0B7h
.text:00475BF2 mov     byte ptr [esp+8Ah], 43h ; 'C'
.text:00475BFA mov     byte ptr [esp+8Bh], 85h
.text:00475C02 mov     byte ptr [esp+8Ch], 7Bh ; '{'
.text:00475C0A mov     byte ptr [esp+8Dh], 85h
.text:00475C12 mov     byte ptr [esp+8Eh], 0DEh
.text:00475C1A mov     byte ptr [esp+8Fh], 0C1h
.text:00475C22 mov     byte ptr [esp+90h], 0FBh
.text:00475C2A mov     byte ptr [esp+91h], 2Eh ; '.'
.text:00475C32 mov     byte ptr [esp+92h], 64h ; 'd'
.text:00475C3A mov     byte ptr [esp+93h], 7
.text:00475C42 mov     byte ptr [esp+94h], 0C8h
.text:00475C4A mov     byte ptr [esp+95h], 5Fh ; '_'
.text:00475C52 mov     byte ptr [esp+96h], 9Ah
.text:00475C5A mov     byte ptr [esp+97h], 35h ; '5'
.text:00475C62 mov     byte ptr [esp+98h], 18h
.text:00475C6A mov     byte ptr [esp+99h], 0ADh
.text:00475C72 mov     byte ptr [esp+9Ah], 0B5h
.text:00475C7A mov     byte ptr [esp+9Bh], 15h
.text:00475C82 mov     byte ptr [esp+9Ch], 92h
.text:00475C8A mov     byte ptr [esp+9Dh], 0BEh
.text:00475C92 mov     byte ptr [esp+9Eh], 1Bh
.text:00475C9A mov     byte ptr [esp+9Fh], 88h
.text:00475CA2 call    memcmp
解题脚本:
from Crypto.Cipher import ARC4
arr = [0x8D, 0x6C, 0x85, 0x76, 0x32, 0x72, 0xB7, 0x43, 0x85, 0x7B, 0x85, 0xDE, 0xC1, 0xFB, 0x2E, 0x64, 0x07, 0xC8, 0x5F, 0x9A, 0x35, 0x18, 0xAD, 0xB5, 0x15, 0x92, 0xBE, 0x1B, 0x88]
arrBytes = bytes(arr)
key = b"litctf"
enc = ARC4.new(key)
flag = enc.decrypt(arrBytes)
print(flag)
五.debase64
1. encode函数
关键在于encode函数
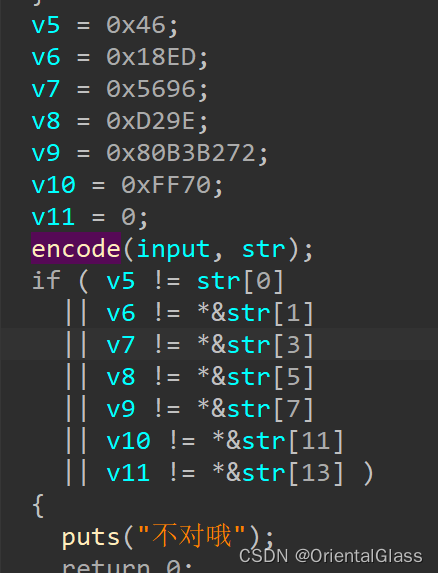
encode函数:
int __cdecl encode(unsigned __int8 *input, int str)
{
  unsigned __int8 *v2; // ebp
  unsigned __int8 *input2; // ecx
  int iii; // ebx
  int m; // eax
  int i; // edx
  unsigned __int8 *input3; // edx
  int j; // ecx
  unsigned __int8 *input4; // ecx
  int k; // ebx
  int len; // [esp+0h] [ebp-38h]
  int v13; // [esp+4h] [ebp-34h]
  unsigned int number; // [esp+Ch] [ebp-2Ch]

  if ( !*input )
    return 0;
  v2 = input + 4;
  input2 = input;
  iii = 0;
  m = 0;
  v13 = 0;
  while ( 1 )
  {
    number = 0xFFFFFFFF;
    for ( i = 0; i != 64; ++i )
    {
      while ( Base64Table[i] != *input2 )
      {
        if ( ++i == 64 )                        // 查找该字符在base表中的位置
          goto LABEL_7;
      }
      LOBYTE(number) = i;                       // 将位置赋给number
    }
LABEL_7:
    LOBYTE(i) = 0;                              // 清零
    do
    {
      while ( Base64Table[i] != input[iii + 1] )
      {
        if ( ++i == 64 )
          goto LABEL_11;
      }
      BYTE1(number) = i++;
    }
    while ( i != 64 );
LABEL_11:
    input3 = &input[iii + 2];
    for ( j = 0; j != 64; ++j )
    {
      while ( Base64Table[j] != *input3 )
      {
        if ( ++j == 64 )
          goto LABEL_15;
      }
      BYTE2(number) = j;
    }
LABEL_15:
    input4 = &input[iii + 3];
    for ( k = 0; k != 64; ++k )
    {
      while ( Base64Table[k] != *input4 )
      {
        if ( ++k == 64 )
          goto LABEL_19;
      }
      HIBYTE(number) = k;
    }
LABEL_19:                                       // number保存了四个字符在base表中的偏移值
    len = m + 1;
    *(str + m) = (4 * HIBYTE(number)) | (BYTE2(number) >> 4) & 3;
    if ( *input3 == '=' )
      return len;
    len = m + 2;
    *(str + m + 1) = (16 * BYTE2(number)) | (BYTE1(number) >> 2) & 0xF;
    if ( *input4 == 0x3D )
      return len;
    m += 3;
    input2 = v2;
    v2 += 4;
    v13 += 4;
    iii = v13;
    *(str + m - 1) = (BYTE1(number) << 6) | number & 0x3F;// 高2低6
    if ( !*(v2 - 4) )
      return m;
  }
}
2. 函数逻辑
这个函数的逻辑一开始我看的也云里雾里,询问gpt之后有点思路了
这是gpt给出的分析结果:
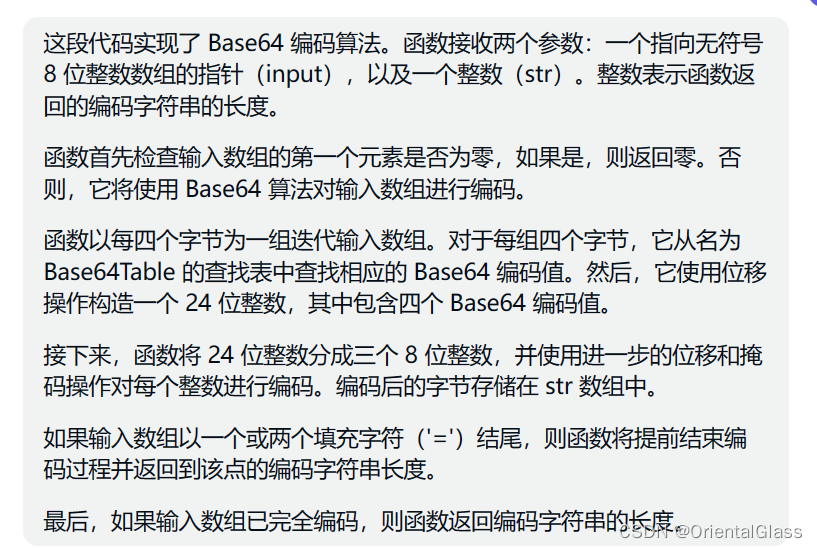
简单而言:
- 是将输入的字符串以四个为一组,在base64表中查找这组每个字符的位置
- 将四个字符的位置值分别保存在一个int类型变量的四个字节中
- 将这四个字节进行类base64编码的方式存储到str字符串中
- 这题给出了flag的md5值,以及提示最后四个字符有三个’‘=’,所以还需要爆破
- tips:程序中的HIBYTE(),BYTE2(),BYTE1(),LOBYTE()是宏函数,在ida的defs.h文件中可以找到
这里我也有介绍过:IDA常用宏定义函数
具体的功能就是分别取最高位字节~最低位字节
#define BYTEn(x, n)   (*((_BYTE*)&(x)+n))
#define WORDn(x, n)   (*((_WORD*)&(x)+n))
#define DWORDn(x, n)  (*((_DWORD*)&(x)+n))

#define LOBYTE(x)  BYTEn(x,LOW_IND(x,_BYTE))
#define LOWORD(x)  WORDn(x,LOW_IND(x,_WORD))
#define LODWORD(x) DWORDn(x,LOW_IND(x,_DWORD))
#define HIBYTE(x)  BYTEn(x,HIGH_IND(x,_BYTE))
#define HIWORD(x)  WORDn(x,HIGH_IND(x,_WORD))
#define HIDWORD(x) DWORDn(x,HIGH_IND(x,_DWORD))
#define BYTE1(x)   BYTEn(x,  1)         // byte 1 (counting from 0)
#define BYTE2(x)   BYTEn(x,  2)
3. 根据程序逻辑得到前16个字符
#include <stdio.h>
int main()
{
	unsigned char basetable[65] = "ABCDEFGHIJKLMNOPQRSTUVWXYZabcdefghijklmnopqrstuvwxyz0123456789+/";
	unsigned char str[16] = { 0 };
	str[0] = 0x46;
	*(unsigned short*)& str[1] = 0x18ED;
	*(unsigned short*)&str[3] = 0x5696;
	*(unsigned short*)&str[5] = 0xD29E;
	*(unsigned int*)&str[7] = 0x80B3B272;
	*(unsigned short*)&str[11] = 0x70;
	*&str[13] = 0;
	str[14]=0;
	unsigned char number = 0;
	for (int i = 0; i < 15; i+=3)
	{
		number = 0;
		number += str[i + 2] & 0x3f;
		printf("%c", basetable[number]);
		number = 0;
		number += str[i + 1] & 0xf;
		number <<= 2;
		number += str[i + 2] >> 6;
		printf("%c", basetable[number]);
		number = 0;
		number += str[i] & 0x3;
		number <<= 4;
		number += str[i + 1] >> 4;
		printf("%c", basetable[number]);
		number = 0;
		number += str[i] >> 2;
		printf("%c", basetable[number]);
	}
	//Y0uReallyKn0wB4sAAAA
	return 0;
}
4. 爆破后四个字符得到flag
import hashlib
 # 已知的前 16 个字符
prefix = 'Y0uReallyKn0wB4s'
 # 目标 MD5 值
target_md5 = '5a3ebb487ad0046e52db00570339aace'
 # 构造所有可能的字符串
possible_chars = '0123456789abcdefghijklmnopqrstuvwxyzABCDEFGHIJKLMNOPQRSTUVWXYZ/='
for s in possible_chars:
    for t in possible_chars:
        for u in possible_chars:
            for v in possible_chars:
                candidate = prefix + s + t + u + v
                md5 = hashlib.md5(candidate.encode()).hexdigest()
                if md5 == target_md5:
                    print("Found string:", candidate)
                    exit(0)
                    #Y0uReallyKn0wB4s3===


![[GXYCTF2019]BabyUpload1](https://img-blog.csdnimg.cn/img_convert/53399c8c116f415182edad129448e1e7.png)

