杂谈
什么是框架
应用方面:框架是整个或者部分系统的可重用设计
目的方面:框架是可被开发者定制的应用骨架
统一的舞台,不同人表演不同的节目
框架解决什么问题
框架主要解决技术整合的问题
MYBATIS
什么是Mybatis
Mybatis是一款半自动ORM持久层框架,具有较高的SQL灵活性,支持高级映射(一对一,多对多),动态SQL,延迟加载,缓存等
什么是ORM
对象关系映射(Object Relation Mapping)对象是指java对象,关系是指数据库中的关系模型,映射就是对象与关系模型之间的联系
解决的问题
- 数据库频繁的创建链接,销毁内存,造成了资源浪费,使用数据库连接池可以解决这个问题
- sql语句在代码中硬编码,sql变化可能较大,sql变化需要改变java代码
- prepareStatement向占位符传参存在硬编码,where语句不一定,修改where需要修改java代码
- 结果集存在硬编码,sql变化导致解析代码变化,系统不易维护
Mybatis与Hibernate的区别
Mybatis:
-
入门简单,即学即用,提供了数据库查询的自动对象绑定功能
-
可以进行更为细致的SQL优化,可以减少查询字段
-
缺点就是框架还是比较简陋,功能尚有缺失,虽然简化了数据绑定代码,但是整个底层数据库查询实际还是要自己写的,工作量也比较大,而且不太容易适应快速数据库修改
-
二级缓存机制不佳
Hibernate :
-
功能强大,数据库无关性好,对象关系(O/R)映射能力强
-
有更好的二级缓存机制,可以使用第三方缓存
-
缺点就是学习门槛不低,要精通门槛更高,而且怎么设计对象关系(O/R)映射,在性能和对象模型之间如何权衡取得平衡,以及怎样用好Hibernate方面需要你的经验和能力都很强才行
快速开发
引入项目依赖
	<dependencies>
        <dependency>
            <groupId>mysql</groupId>
            <artifactId>mysql-connector-java</artifactId>
            <version>5.1.10</version>
        </dependency>
        <dependency>
            <groupId>org.mybatis</groupId>
            <artifactId>mybatis</artifactId>
            <version>3.4.6</version>
        </dependency>
        <dependency>
            <groupId>org.projectlombok</groupId>
            <artifactId>lombok</artifactId>
            <version>1.18.12</version>
            <scope>provided</scope>
        </dependency>
        <dependency>
            <groupId>junit</groupId>
            <artifactId>junit</artifactId>
            <version>4.10</version>
            <scope>test</scope>
        </dependency>
    </dependencies>
创建配置文件 mybatis-config.xml
<?xml version="1.0" encoding="UTF-8" ?>
<!DOCTYPE configuration
  PUBLIC "-//mybatis.org//DTD Config 3.0//EN"
  "http://mybatis.org/dtd/mybatis-3-config.dtd">
<configuration>
  <!-- 链接数据库只需要一个属性来配置文件,就会自动解析 -->
  <properties resource="jdbc.properties" />
  <!--  设置别名,然后就可以使用别名来代替前面的路径 -->
    <typeAliases>
    <typeAlias type="com.tledu.zrz.model.User" alias="User"/>
    <typeAlias type="com.tledu.zrz.model.Address" alias="Address"/>
    </typeAliases>
  <environments default="development">
    <environment id="development">
      <transactionManager type="JDBC"/>
      <dataSource type="POOLED">
        <property name="driver" value="${driver}"/>
        <property name="url" value="${url}"/>
        <property name="username" value="${username}"/>
        <property name="password" value="${password}"/>
      </dataSource>
    </environment>
  </environments>
  <!-- 映射文件 -->
  <mappers>
    <mapper resource="org/mybatis/example/BlogMapper.xml"/>
  </mappers>
</configuration>
创建数据库配置文件
driver=com.mysql.jdbc.Driver
url=jdbc:mysql://localhost:3306/erp16?useUnicode=true&characterEncoding=UTF-8
username=root
password=root
创建对应数据库字段的实体类
package com.wzx.SSMOne.entity;

import lombok.AllArgsConstructor;
import lombok.Data;
import lombok.NoArgsConstructor;

@Data
@AllArgsConstructor
@NoArgsConstructor
public class User {
    private Integer id;
    private String username;
    private String password;
    private String nickname;
    private Integer type;
}
创建接口书写方法
package com.wzx.MybatisOne.dao;

import org.apache.ibatis.annotations.Param;
import org.apache.ibatis.annotations.Select;

import java.util.List;

public interface InterUserMapper {
//    @Select("select * from t_user where id = #{id}")
    /*@Select("select * from t_user where id = #{id}")
    User getById(int id);*/

    int add(User user);

    User getById(int id);


    List<User> getList(@Param("username") String username);


}
创建上面接口的映射文件 同名的mapper.xml
<?xml version="1.0" encoding="UTF-8" ?>
<!DOCTYPE mapper
        PUBLIC "-//mybatis.org//DTD Mapper 3.0//EN"
        "http://mybatis.org/dtd/mybatis-3-mapper.dtd">
<!--
    namespace 是用于调用的时候的映射,对应绑定的接口类
 -->

<mapper namespace="com.wzx.MybatisOne.dao.InterUserMapper">
  <insert id="add" parameterType="User" >
    <!-- 这里的#username 就等于是用 ? 的方式,等方法调用的时候,会传递一个参数,就会自动映射到username的属性上 -->
    insert into t_user (username,password,nickname) values (#{username},#{password},#{nickname})
  </insert>

  <select id="getList" resultType="User" parameterType="String">
    select * from t_user
    where username = #{username}
  </select>

  <select id="getById" parameterType="int" resultType="User">
    select * from t_user where id = #{id}
  </select>


</mapper>
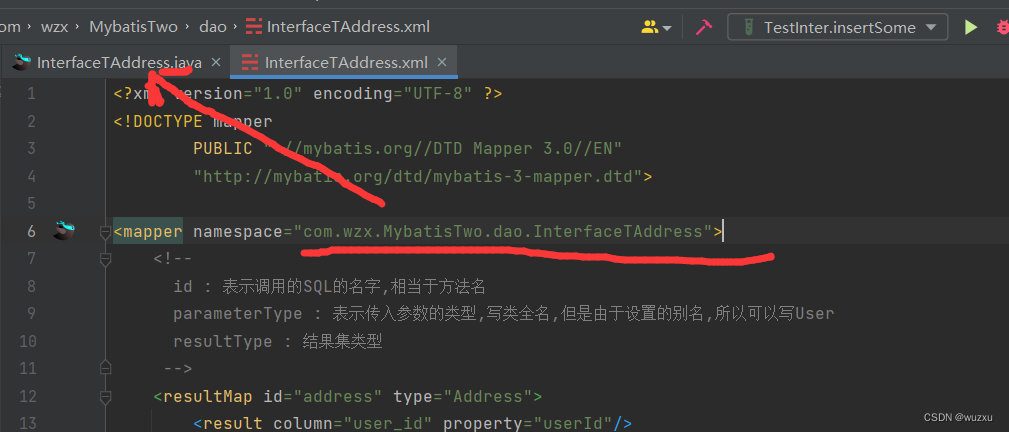
他俩的关系如图所示

测试---使用sqlSession测试
import com.wzx.MybatisOne.dao.InterUserMapper;
import com.wzx.MybatisOne.dao.User;
import org.apache.ibatis.io.Resources;
import org.apache.ibatis.session.SqlSession;
import org.apache.ibatis.session.SqlSessionFactory;
import org.apache.ibatis.session.SqlSessionFactoryBuilder;
import org.junit.After;
import org.junit.Before;
import org.junit.Test;
import org.junit.jupiter.api.AfterAll;

import java.io.IOException;
import java.io.InputStream;
import java.util.List;

public class TestInter {

    SqlSession sqlSession;
    @Before
    public void beforeSome() throws IOException {
        String resource = "mybatis-config.xml";

        //读取配置文件
        InputStream resourceAsStream = Resources.getResourceAsStream(resource);

        //获取session工厂
        SqlSessionFactory factory = new SqlSessionFactoryBuilder().build(resourceAsStream);

        //获取session
        sqlSession = factory.openSession();
    }


    @Test
    public void insertSome(){
        User user = new User();
        user.setUsername("1234");
        user.setPassword("1234");
        user.setNickname("1234");
        user.setNickname("1234");

        User byId = sqlSession.getMapper(InterUserMapper.class).getById(2);
        System.out.println(byId);

    }

    @Test
    public void insertInterfaceSome(){
        User user = new User();
        user.setUsername("1234");
        user.setPassword("1234");
        user.setNickname("1234");
        user.setNickname("1234");

        sqlSession.getMapper(InterUserMapper.class).add(user);
    }


    @Test
    public void getByName(){
        List<User> wzx = sqlSession.getMapper(InterUserMapper.class).getList("wzx");
        wzx.stream().forEach(System.out::println);
    }

    @After
    public void afterSome(){
        sqlSession.commit();
    }
}

总结:
- 引入依赖,加载依赖
- 编写全局配置文件,配置数据源
- 编写对应数据库字段的实体类
- 编写实现接口
- 编写接口的映射文件---同名
- 通过全局配置文件,创建SqlSessionFactory
- 调用sqlSession上的一系列方法
各个子标签
<properties>
一般将数据源的信息单独放在一个properties文件中,然后用这个标签引入,在下面environment标签中,就可以用${}占位符快速获取数据源的信息
<settings>
用来开启或关闭mybatis的一些特性,比如可以用<setting name="lazyLoadingEnabled" value="true"/>来开启延迟加载,可以用<settings name="cacheEnabled" value="true"/>来开启二级缓存
<typeAliases>
给实体类起别名 resultType属性要写com.yogurt.po.Student,这太长了,所以可以用别名来简化书写
<plugins>
可以用来配置mybatis的插件,比如在开发中经常需要对查询结果进行分页,就需要用到pageHelper分页插件,这些插件就是通过这个标签进行配置的
<environments>
用来配置数据源
<mappers>
用来配置mapper.xml映射文件,这些xml文件里都是SQL语句
mapper.xml的SQL语句中的占位符${}和#{}
一般会采用#{},#{}在mybatis中,最后会被解析为?,其实就是Jdbc的PreparedStatement中的?占位符,它有预编译的过程,会对输入参数进行类型解析(如果入参是String类型,设置参数时会自动加上引号),可以防止SQL注入,如果parameterType属性指定的入参类型是简单类型的话(简单类型指的是8种java原始类型再加一个String),#{}中的变量名可以任意,如果入参类型是pojo,比如是Student类那么#{name}表示取入参对象Student中的name属性,#{age}表示取age属性,这个过程是通过反射来做的,这不同于${},${}取对象的属性使用的是OGNL(Object Graph Navigation Language)表达式
而${},一般会用在模糊查询的情景,比如SELECT * FROM student WHERE name like '%${name}%';
Mapper三种开发形式
-
sqlSession执行对应语句,就是我们上面测试的那种
-
使用注解(简单sql)
-
利用接口代理(常用)
我们上面的快速入门就是使用的第一种sqlSession
使用接口代理
只需要在同目录写一个mapper接口和一个mapper映射文件即可
记住:
- mapper接口的全限定名,要和mapper.xml的namespace属性一致
- mapper接口中的方法名要和mapper.xml中的SQL标签的id一致
- mapper接口中的方法入参类型,要和mapper.xml中SQL语句的入参类型一致
- mapper接口中的方法出参类型,要和mapper.xml中SQL语句的返回值类型一致
效果如图 同名同级
同名同级
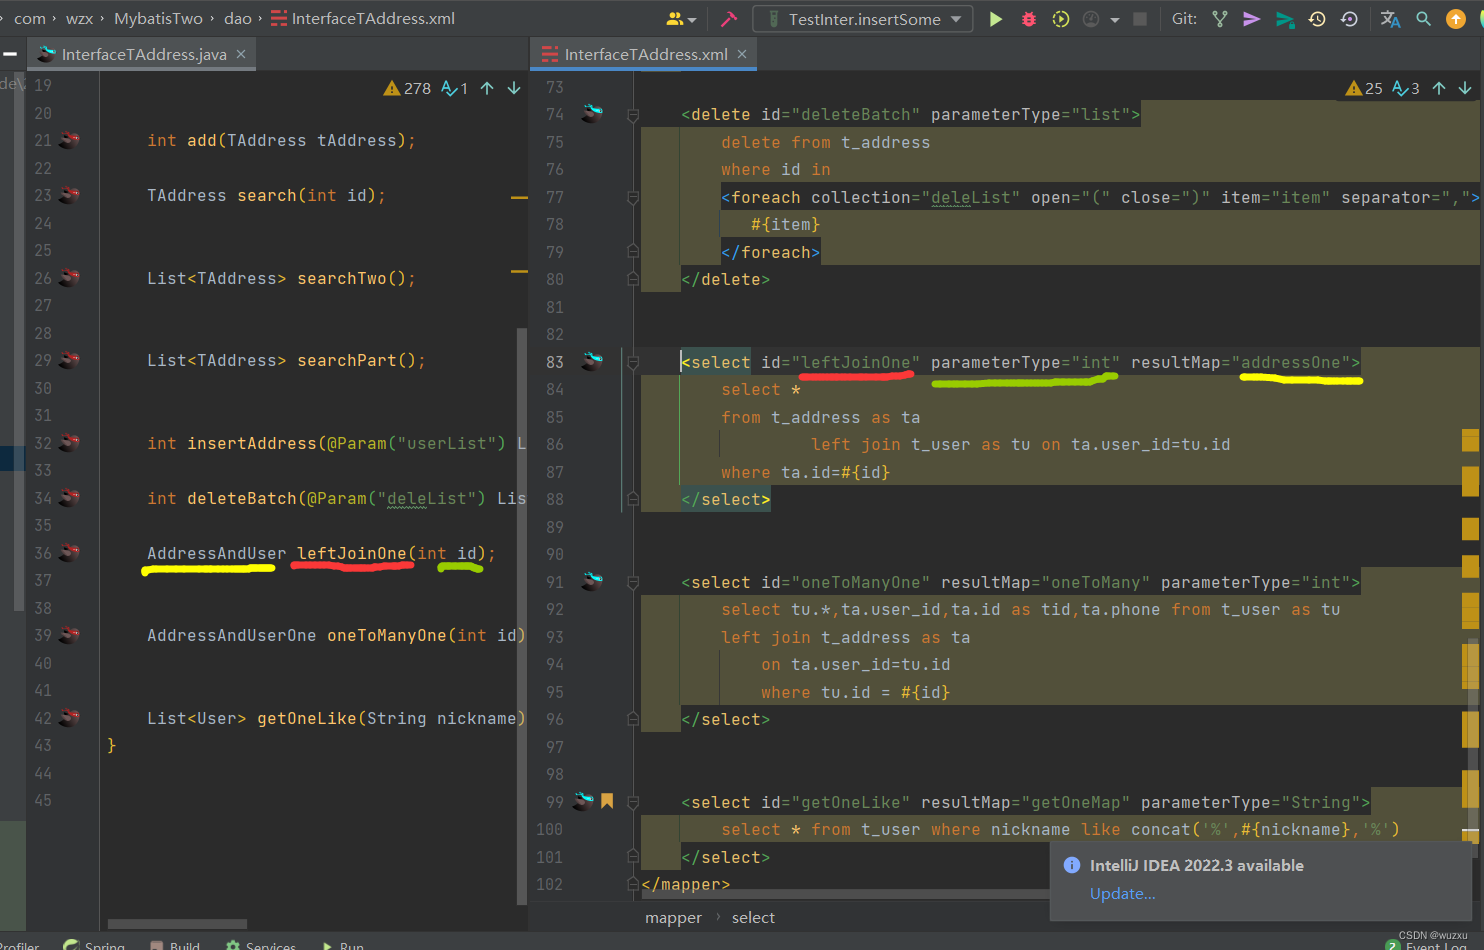
其他不变,即可测试
效果如图

使用注解
直接在方法上,使用注解定义sql
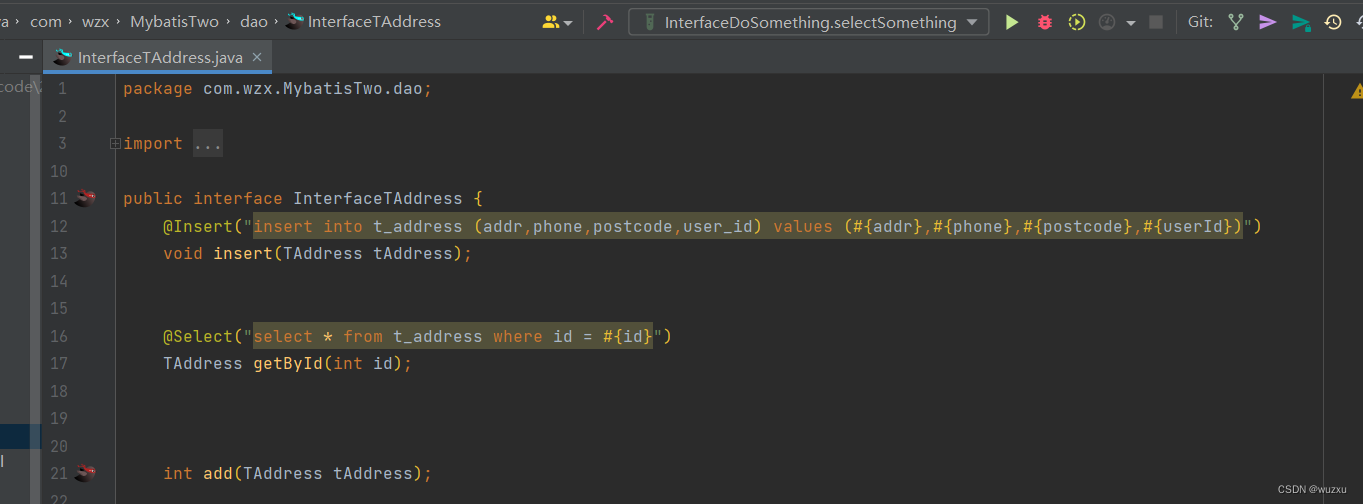
此时还需在配置文件中定义一个映射,如下图

映射指定上图中的包名,意思是映射dao包下的所有接口
其他不变,效果如图

小case
主键返回
通常我们会将数据库表的主键id设为自增。在插入一条记录时,我们不设置其主键id,而让数据库自动生成该条记录的主键id,那么在插入一条记录后,如何得到数据库自动生成的这条记录的主键id呢?有两种方式
1.使用useGeneratedKeys和keyProperty属性
<insert id="insert" parameterType="com.yogurt.po.Student" useGeneratedKeys="true" keyProperty="id">
        INSERT INTO student (name,score,age,gender) VALUES (#{name},#{score},#{age},#{gender});
    </insert>
2.使用<selectKey>子标签
<insert id="insert" parameterType="com.yogurt.po.Student">
        INSERT INTO student (name,score,age,gender) VALUES (#{name},#{score},#{age},#{gender});
        <selectKey keyProperty="id" order="AFTER" resultType="int" >
            SELECT LAST_INSERT_ID();
        </selectKey>
    </insert>
如果使用的是mysql这样的支持自增主键的数据库,可以简单的使用第一种方式;
测试代码如下
public class MapperProxyTest {
	private SqlSessionFactory sqlSessionFactory;

	@Before
	public void init() throws IOException {
		InputStream resourceAsStream = Resources.getResourceAsStream("mybatis-config.xml");
		sqlSessionFactory = new SqlSessionFactoryBuilder().build(resourceAsStream);
	}

	@Test
	public void test() {
		SqlSession sqlSession = sqlSessionFactory.openSession();
		StudentMapper mapper = sqlSession.getMapper(StudentMapper.class);
		Student student = new Student(-1, "Podman", 130, 15, 0);
		mapper.insert(student);
		sqlSession.commit();
		System.out.println(student.getId());
	}
}
批量处理
主要是动态SQL标签的使用,注意如果parameterType是List的话,则在标签体内引用这个List,只能用变量名list,如果parameterType是数组,则只能用变量名array
<select id="batchFind" resultType="student" parameterType="java.util.List">
        SELECT * FROM student
        <where>
            <if test="list != null and list.size() > 0">
                AND id in
                <foreach collection="list" item="id" open="(" separator="," close=")">
                    #{id}
                </foreach>
            </if>
        </where>
</select>
	@Test
	public void testBatchQuery() {
		SqlSession sqlSession = sqlSessionFactory.openSession();
		StudentMapper mapper = sqlSession.getMapper(StudentMapper.class);
		List<Student> students = mapper.batchFind(Arrays.asList(1, 2, 3, 7, 9));
		students.forEach(System.out::println);
	}
结果
resultMap
在声明返回值类型为实体类型之后,实体中的属性必须和查询语句中的属性对应上,但是我们在开发的过程中也难免会遇到无法对应的情况。比如说我们在进行数据库设计的时候,多个单词往往是用_连接,但是在实体类中的属性往往采用小驼峰的方式命名。这就导致字段名无法对应上,这个时候我们就需要配置resultMap来解决这个问题了
<resultMap id="userResult" type="User">
    <id column="id" property="id" />
    <result property="nickname" column="nickname" />
    <result property="schoolName" column="school_name" />
</resultMap>
动态SQL
if
<!-- 示例 -->
<select id="find" resultType="student" parameterType="student">
        SELECT * FROM student WHERE age >= 18
        <if test="name != null and name != ''">
            AND name like '%${name}%'
        </if>
</select>
choose
<!-- choose 和 when , otherwise 是配套标签
类似于java中的switch,只会选中满足条件的一个
-->
<select id="findActiveBlogLike"
     resultType="Blog">
  SELECT * FROM BLOG WHERE state = ‘ACTIVE’
  <choose>
    <when test="title != null">
      AND title like #{title}
    </when>
    <when test="author != null and author.name != null">
      AND author_name like #{author.name}
    </when>
    <otherwise>
      AND featured = 1
    </otherwise>
  </choose>
</select>
where
<where>标签只会在至少有一个子元素返回了SQL语句时,才会向SQL语句中添加WHERE,并且如果WHERE之后是以AND或OR开头,会自动将其删掉
<select id="findActiveBlogLike"
     resultType="Blog">
  SELECT * FROM BLOG
  <where>
    <if test="state != null">
         state = #{state}
    </if>
    <if test="title != null">
        AND title like #{title}
    </if>
    <if test="author != null and author.name != null">
        AND author_name like #{author.name}
    </if>
  </where>
</select>
foreach
<select id="batchFind" resultType="student" parameterType="list">
        SELECT * FROM student WHERE id in
        <foreach collection="list" item="item" open="(" separator="," close=")">
          #{item}
        </foreach>
</select>
set
 <update id="updateNickname">
        update t_user
        <set>
            <if test="nickname != null and nickname != ''">
                nickname = #{nickname},
            </if>
            <if test="username != null and username != ''">
                username = #{username},
            </if>
        </set>
        where id = #{id}
    </update>
缓存
一级缓存
默认开启,同一个SqlSesion级别共享的缓存,在一个SqlSession的生命周期内,执行2次相同的SQL查询,则第二次SQL查询会直接取缓存的数据,而不走数据库,当然,若第一次和第二次相同的SQL查询之间,执行了DML(INSERT/UPDATE/DELETE),则一级缓存会被清空,第二次查询相同SQL仍然会走数据库
一级缓存在下面情况会被清除
- 在同一个SqlSession下执行增删改操作时(不必提交),会清除一级缓存
- SqlSession提交或关闭时(关闭时会自动提交),会清除一级缓存
- 对mapper.xml中的某个CRUD标签,设置属性flushCache=true,这样会导致该MappedStatement的一级缓存,二级缓存都失效(一个CRUD标签在mybatis中会被封装成一个MappedStatement)
- 在全局配置文件中设置 <setting name="localCacheScope" value="STATEMENT"/>,这样会使一级缓存失效,二级缓存不受影响
二级缓存
默认关闭,可通过全局配置文件中的<settings name="cacheEnabled" value="true"/>开启二级缓存总开关,然后在某个具体的mapper.xml中增加<cache />,即开启了该mapper.xml的二级缓存。二级缓存是mapper级别的缓存,粒度比一级缓存大,多个SqlSession可以共享同一个mapper的二级缓存。注意开启二级缓存后,SqlSession需要提交,查询的数据才会被刷新到二级缓存当中
总结
-
在使用二级缓存的时候,需要注意配置mybatis-config.xml中 开启二级缓存
-
<setting name="cacheEnabled" value="true"/>
-
然后再mapper映射文件中使用cache标签标注开启,并对需要换成的语句添加useCache=”true”
-
在mapper的映射文件中使用<cache />,代表当前mapper是开启二级缓存的
-
在需要二级缓存的查询上增加useCache = true,代表当前查询是需要缓存的
-
并且对应封装数据的实体类需要实现Serializable 接口
-
对待缓存的数据,实现Serialization接口,代表这个数据是可序列化
-
只有当sqlSession close之后,二级缓存才能生效
-
当执行增删改操作的时候,必须执行commit()才能持久化到数据库中,同时二级缓存清空
-
session.clearCache()无法清除二级缓存,如果需要清除二级缓存,可以通过sqlSessionFactory.getConfiguration().getCache("缓存id").clear();
-
但是当我们查询语句中,执行commit() 或者是close()关闭session,都不会清空二级缓存
关联查询
1-1
在实现1对1映射的时候,可以通过association属性进行设置。在这里有三种方式
1.使用select
<resultMap id="address" type="Address">
        <id column="id" property="id" />
        <association property="user" column="user_id" javaType="User" select="com.tledu.erp.dao.IUser2Dao.selectById"/>
</resultMap>
2. 直接进行联查,在association中配置映射字段
    <resultMap id="address" type="Address" autoMapping="true">
        <id column="id" property="id" />
        <association property="user" column="user_id" javaType="User" >
              <id column="user_id" property="id" />
            <result column="school_name" property="schoolName" />
        </association>
    </resultMap>

    <select id="selectOne" resultMap="address">
        select * from t_address left join t_user tu on tu.id = t_address.user_id where t_address.id = #{id}
    </select>
autoMapping代表自动封装,如果不填写,则需要添加所有的对应关系。
这种方式的问题是,当association需要被多次引用的时候,就需要进行多次重复的配置,所以我们还有第三种方式,引用resultMap。
3.嵌套的resultType
<resultMap id="addressMap" type="Address" autoMapping="true">
        <id column="id" property="id"/>
        <association property="user" column="user_id" resultMap="userMap">
        </association>
    </resultMap>

    <resultMap id="userMap" type="User" autoMapping="true">
        <id column="user_id" property="id" />
        <result column="school_name" property="schoolName"/>
    </resultMap>

    <select id="selectOne" resultMap="addressMap">
        select t_address.id,
               addr,
               phone,
               postcode,
               user_id,
               username,
               password,
               nickname,
               age,
               sex,
               school_name
        from t_address
                 left join t_user tu on tu.id = t_address.user_id
        where t_address.id = #{id}
    </select>
1-多
也是三种
 <resultMap id="userResult" type="User" autoMapping="true">
        <id column="id" property="id"/>
        <result property="nickname" column="nickname"/>
        <result property="schoolName" column="school_name"/>
        <collection property="addressList" column="phone" ofType="Address" autoMapping="true">
            <id column="address_id" property="id" />
        </collection>
    </resultMap>


    <select id="selectById" parameterType="int" resultMap="userResult">
        select tu.id,
               username,
               password,
               nickname,
               age,
               sex,
               school_name,
               ta.id as address_id,
               addr,
               phone,
               postcode,
               user_id
        from t_user tu
                 left join t_address ta on tu.id = ta.user_id
        where tu.id = #{id}
    </select>
<resultMap id="userResult" type="User" autoMapping="true">
        <!--        <id column="id" property="id"/>-->
        <result property="nickname" column="nickname"/>
        <result property="schoolName" column="school_name"/>
        <collection property="addressList" column="phone" ofType="Address" resultMap="addressResultMap" autoMapping="true">
        </collection>
    </resultMap>

    <resultMap id="addressResultMap" type="Address" autoMapping="true">
        <id column="address_id" property="id" />
    </resultMap>


    <select id="selectById" parameterType="int" resultMap="userResult">
        select tu.id,
               username,
               password,
               nickname,
               age,
               sex,
               school_name,
               ta.id as address_id,
               addr,
               phone,
               postcode,
               user_id
        from t_user tu
                 left join t_address ta on tu.id = ta.user_id
        where tu.id = #{id}
    </select>
延迟加载
延迟加载:
就是在需要用到数据时才进行加载,不需要用到数据时就不加载数据。延迟加载也称懒加载.
延迟加载是结合关联查询进行应用的。也就是说,只在<association>和<collection> 标签上起作用
好处:
先从单表查询,需要时再从关联表去关联查询,大大提高数据库性能,因为查询单表要比关联查询多张表速度要快。
坏处:
因为只有当需要用到数据时,才会进行数据库查询,这样在大批量数据查询时,因为查询工作也要消耗时间,所以可能造成用户等待时间变长,造成用户体验下降。
配置
 <settings>
        <setting name="logImpl" value="LOG4J"/>
        <setting name="lazyLoadingEnabled" value="true"/>
        <setting name="aggressiveLazyLoading" value="false"/>
    </settings>
<!-- StudentMapper.xml -->
<resultMap id="studentExt" type="com.yogurt.po.StudentExt">
<result property="id" column="id"/>
<result property="name" column="name"/>
<result property="score" column="score"/>
<result property="age" column="age"/>
<result property="gender" column="gender"/>
<!-- 当延迟加载总开关开启时,resultMap下的association和collection标签中,若通过select属性指定嵌套查询的SQL,则其fetchType默认是lazy的,当在延迟加载总开关开启时,需要对个别的关联查询禁用延迟加载时,才有必要配置fetchType = eager -->
<!--
column用于指定用于关联查询的列
property用于指定要封装到StudentExt中的哪个属性
javaType用于指定关联查询得到的对象
select用于指定关联查询时,调用的是哪一个DQL
-->
<association property="clazz" javaType="com.yogurt.po.Clazz" column="class_id"
select="com.yogurt.mapper.ClassMapper.findById" fetchType="lazy"/>
</resultMap>
<select id="findLazy" parameterType="string" resultMap="studentExt">
SELECT * FROM student WHERE name like '%${value}%';
</select>
事务
事务的隔离级别
- 脏读
- 幻读
- 不可重复读
脏读
脏读就是指当一个事务正在访问数据,并且对数据进行了修改,而这种修改还没有提交到数据库中,这时,另外一个事务也访问 这个数据,然后使用了这个数据。
不可重复读
是指在一个事务内,多次读同一数据。在这个事务还没有结束时,另外一个事务也访问该同一数据。那么,在第一个事务中的两次读数据之间,由于第二个事务的修改,那么第一个事务两次读到的的数据可能是不一样的。这样就发生了在一个事务内两次读到的数据是不一样的,因此称为是不可重复读。
幻读
是指当事务不是独立执行时发生的一种现象,例如第一个事务对一个表中的数据进行了修改,这种修改涉及到表中的全部数据行。 同时,第二个事务也修改这个表中的数据,这种修改是向表中插入一行新数据。那么,以后就会发生操作第一个事务的用户发现表中还有没有修改的数据行,就好象 发生了幻觉一样。
事务隔离
| 脏读 | 不可重复读 | 幻读 | 说明 | |
| Read uncommitted | √ | √ | √ | 直译就是"读未提交",意思就是即使一个更新语句没有提交,但是别 的事务可以读到这个改变.这是很不安全的。允许任务读取数据库中未提交的数据更改,也称为脏读。 |
| Read committed | × | √ | √ | 直译就是"读提交",可防止脏读,意思就是语句提交以后即执行了COMMIT以后,别的事务才能读到这个改变. 只能读取到已经提交的数据。Oracle等多数数据库默认都是该级别 |
| Repeatable read | × | × | √ | 直译就是"可以重复读",这是说在同一个事务里面先后执行同一个查询语句的时候,得到的结果是一样的.在同一个事务内的查询都是事务开始时刻一致的,InnoDB默认级别。在SQL标准中,该隔离级别消除了不可重复读,但是还存在幻象读。 |
| Serializable | × | × | × | 直译就是"序列化",意思是说这个事务执行的时候不允许别的事务并发执行. 完全串行化的读,每次读都需要获得表级共享锁,读写相互都会阻塞 |
分页
插件分页
1.添加依赖
<dependency>
	<groupId>com.github.pagehelper</groupId>
	<artifactId>pagehelper</artifactId>
	<version>5.1.6</version>
</dependency>
2.配置文件配置
 <plugins>
        <plugin interceptor="com.github.pagehelper.PageInterceptor">
            <property name="helperDialect" value="mysql"/>
        </plugin>
    </plugins>
3.代码
	@Test
	public void test() {
		SqlSession sqlSession = sqlSessionFactory.openSession();
		ProductMapper mapper = sqlSession.getMapper(ProductMapper.class);
		PageHelper.startPage(1,3);
		List<Product> products = mapper.selectByExample(new ProductExample());
		products.forEach(System.out::println);
	}
4.可以通过pageInfo获取分页的相关信息
@Test
public void test() {
	SqlSession sqlSession = factory.openSession();
	PageHelper.startPage(1,3);
	ProductMapper mapper = sqlSession.getMapper(ProductMapper.class);
	List<Product> list = mapper.findAll();
	list.forEach(System.out::println);
	PageInfo<Product> pageInfo = new PageInfo<>(list);
	System.out.println(pageInfo.getTotal()); // 获得总数
	System.out.println(pageInfo.getPageSize());  // 获得总页数
}
这个pageInfo 里面有很多的属性
手动分页
配置同上
1.定义一个获取分页的实体类
package com.wzx.MybatisThree.dto;


import lombok.AllArgsConstructor;
import lombok.Data;
import lombok.NoArgsConstructor;

@Data
@AllArgsConstructor
@NoArgsConstructor
public class PageInfos {
    private int pageNums;

    private int start;

    private int pageSizes;

    public int getIndex(){
        return (this.pageNums - 1) * this.pageSizes;
    }
}
2.映射以及接口
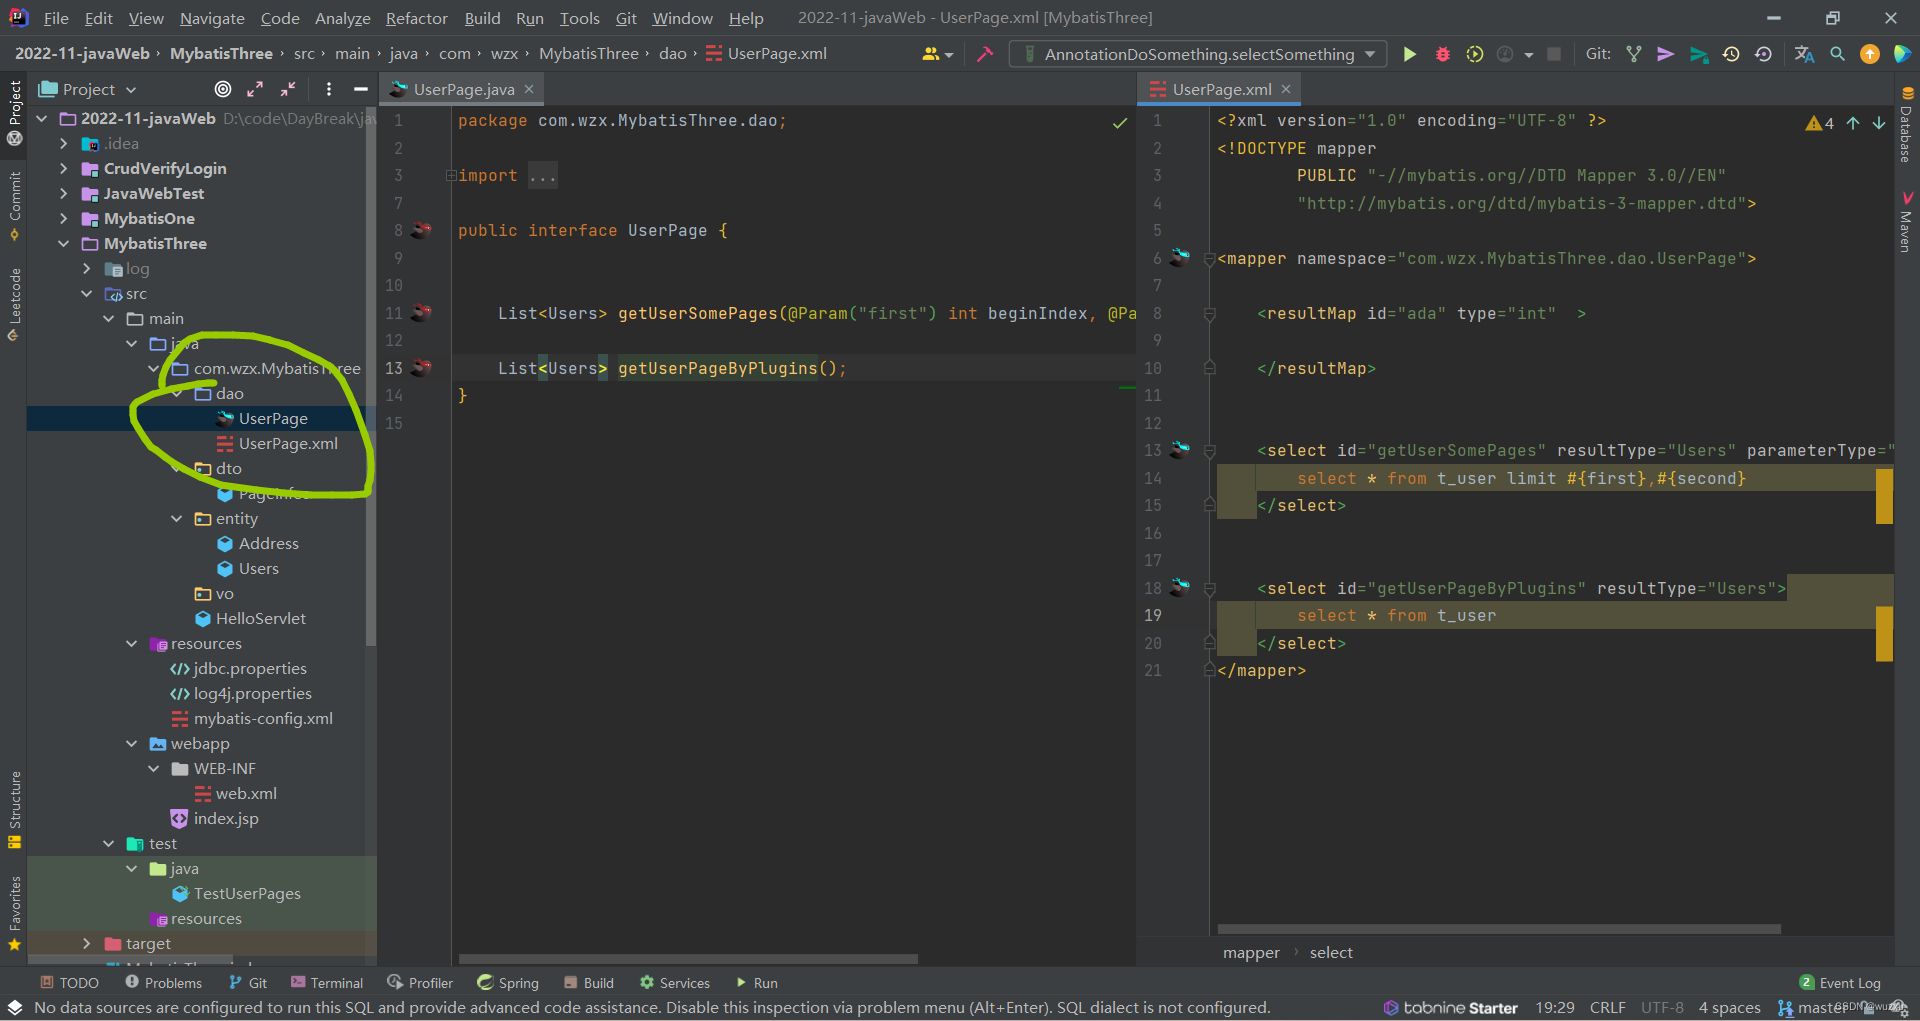
3.测试
 @Test
    public void getUserSomePages(){
        PageInfos pageInfos = new PageInfos();

        pageInfos.setPageSizes(3);
        pageInfos.setPageNums(1);

        int index = pageInfos.getIndex();

        List<Users> userSomePages = sqlSession.getMapper(UserPage.class).getUserSomePages(index, pageInfos.getPageSizes());

        userSomePages.stream().forEach(System.out::println);

    }
获取前三条数据




![[附源码]计算机毕业设计springboot体育馆场地预约管理系统](https://img-blog.csdnimg.cn/b63d789a3d6943c4a0b4e163a17acb98.png)





![[附源码]SSM计算机毕业设计影院售票系统JAVA](https://img-blog.csdnimg.cn/150b62413b6f49ffac92dc682e328585.png)



![[附源码]计算机毕业设计springboot天狗电子商城系统](https://img-blog.csdnimg.cn/b454b73450fb4945b5c3c0b8dfbb1bb9.png)