类模板语法
#include<iostream>
#include<string>
using namespace std;
//模板并不是万能的,有些特定数据类型,需要具体化方式做特殊实现
template<class NameType,class AgeType>
class person
{
public:
	person(NameType name, AgeType age)
	{
		this->m_name = name;
		this->m_age = age;
	}
	void showperson()
	{
		cout << m_age << " " << m_name;
	}
	NameType m_name;
	AgeType m_age;
};
void test01()
{
	person<string, int> p1("ppp",78);
	p1.showperson();
}
int main()
{
	test01();
	system("pause");
	return 0;
}
template<class T>
类名
类模板和函数模板区别
类模板没有自动类型推导使用方式
类模板在模板参数列表中可以有默认参数
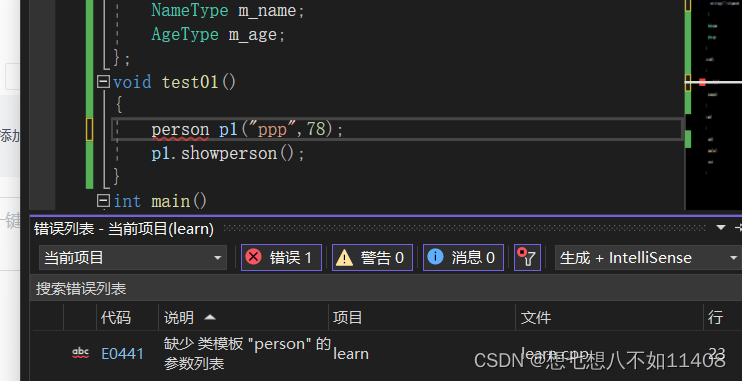
正确用法
person<string, int> p1("ppp",78);#include<iostream>
#include<string>
using namespace std;
//模板并不是万能的,有些特定数据类型,需要具体化方式做特殊实现
template<class NameType,class AgeType=int>//默认参数AgeType类型为int,
class person
{
public:
person(NameType name, AgeType age)
{
this->m_name = name;
this->m_age = age;
}
void showperson()
{
cout << this->m_age << " " << this->m_name<<endl;
}
NameType m_name;
AgeType m_age;
};
void test01()
{
person<string> p1("ppp",78);
p1.showperson();
}
int main()
{
test01();
system("pause");
return 0;
}类模板中成员函数创建时机
普通类中的成员函数一开始就可以创建
类模板中的成员函数在调用时才创建
#include<iostream>
#include<string>
using namespace std;
class person2
{
public:
	void showperson2()
	{
		cout << "person2" << endl;
	}
};
class person1
{
public:
	void showperson1()
	{
		cout << "person1" << endl;
	}
};
template<class T>
class myclass
{
public:
	T obj;
	void func1()
	{
		obj.showperson1();
	}
	void func2()
	{
		obj.showperson2();
	}
};
void test01()
{
	myclass<person1> m;
	m.func1();
	//m.func2(); 编译会出错,说明函数调用才会去创建成员函数
}
int main()
{
	test01();
	system("pause");
	return 0;
}
类模板对象做函数参数
1.指定传入类型
2.参数模板化
3.整个类模板化
#include<iostream>
#include<string>
using namespace std;
template<class T1,class T2>
class person
{
public:
	person(T1 name, T2 age)
	{
		this->m_age = age;
		this->m_name = name;
	}
	void showperson()
	{
		cout << m_name << "   " << m_age << endl;
	}
	int m_age;
	string m_name;
};
//1,指定传入类型
/*void printperson(person<string, int>& p)
{
	p.showperson();
}
void test01()
{
	person<string, int> p("mmm", 110);
	printperson(p);
}*/

//2.参数模板化
/*template<class T1, class T2>
void printperson(person<T1, T2>& p)
{
	p.showperson();
}
void test01()
{
	person<string, int> p("666", 50);
	printperson(p);
}*/
//3.整个类模板化
template <class T>
void printperson(T&p)
{
	p.showperson();
	cout << typeid(T).name() << endl;
}
void test01()
{
	person<string, int>p("sdsj", 567);
	printperson(p);

}
int main()
{
	test01();
	system("pause");
	return 0;
}
类模板与继承
当类模板碰到继承时,需要注意以下几点:
当子类继承的父类是一个类模板时,子类在声明的时候,要指出父类中T的类型
如果不指定,编译器无法给子类分配内存
如果想灵活的指定出父类中T的类型,子类也需要变成类模板
#include<iostream>
#include<string>
using namespace std;
template<class T>
class Base
{
	T m;
};
class Son :public Base<int>//必须要知道父类中T的数据类型才能继承给子类
{

};
void test01()
{
	Son s1;
}
//如果想灵活指定父类中的T类型,子类也需要变类模板
template<class T1,class T2>
class Son2 :public Base<T2>
{
public:
	T1 obj;
};
void test02()
{
	Son2<int,char> s2;
}
int main()
{
	test01();
	test02();
	system("pause");
	return 0;
}
类模板成员函数类外实现
#include<iostream>
#include<string>
using namespace std;
template<class T1,class T2>
class person
{
public:
	person(T1 name, T2 age);
	/* {
		this->m_name = name;
		this->m_age = age;
	}*/
	void showperson();
	/*{
		cout << m_name << " " << m_age << endl;
	}*/

	T1 m_name;
	T2 m_age;
};
template<class T1, class T2>
person<T1, T2>::person(T1 name, T2 age)
{
		this->m_name = name;
		this->m_age = age;
}
template<class T1, class T2>
void person<T1, T2>:: showperson()
{
	cout << m_name << " " << m_age << endl;
}
void test01()
{
	person<string, int> p("slkd", 20);

}
int main()
{
	test01();
	system("pause");
	return 0;
}
类模板分文件编写
类模板分文件编写会出现一些问题
解决方案1:直接包含源文件
person.cpp
#pragma once
#include<iostream>
#include<string>
using namespace std;
#include"person.h"

template<class T1, class T2>
person<T1, T2>::person(T1 name, T2 age)
{
	this->m_name = name;
	this->m_age = age;
}
template<class T1, class T2>
void person<T1, T2>::showperson()
{
	cout << m_name << " " << m_age << endl;
}
person.h
#pragma once
#include<iostream>
#include<string>
using namespace std;
template<class T1, class T2>
class person
{
public:
	person(T1 name, T2 age);
	/* {
		this->m_name = name;
		this->m_age = age;
	}*/
	void showperson();
	/*{
		cout << m_name << " " << m_age << endl;
	}*/

	T1 m_name;
	T2 m_age;
};
主文件里
#include<iostream>
#include<string>
//第一种解决方式直接包含源文件
//#include"person.cpp"
//第二种解决方式(常用)
//将.h和.cpp中的内容写到一起,将后缀名改为.hpp
#include"person.hpp"
using namespace std;
//#include"person.h"  用这个会出错
//
void test01()
{
	person<string, int> p("slkd", 20);
	p.showperson();
}
int main()
{
	test01();
	system("pause");
	return 0;
}
解决方案2:将.h和.cpp中的内容写到一起,将后缀名改为.hpp
person.hpp
#pragma once
#include<iostream>
#include<string>
using namespace std;
template<class T1, class T2>
class person
{
public:
	person(T1 name, T2 age);
	/* {
		this->m_name = name;
		this->m_age = age;
	}*/
	void showperson();
	/*{
		cout << m_name << " " << m_age << endl;
	}*/

	T1 m_name;
	T2 m_age;
};

template<class T1, class T2>
person<T1, T2>::person(T1 name, T2 age)
{
	this->m_name = name;
	this->m_age = age;
}
template<class T1, class T2>
void person<T1, T2>::showperson()
{
	cout << m_name << " " << m_age << endl;
}
主文件其实不变
#include<iostream>
#include<string>
//第一种解决方式直接包含源文件
//#include"person.cpp"
//第二种解决方式(常用)
//将.h和.cpp中的内容写到一起,将后缀名改为.hpp
#include"person.hpp"
using namespace std;
//#include"person.h"  用这个会出错
//
void test01()
{
	person<string, int> p("slkd", 20);
	p.showperson();
}
int main()
{
	test01();
	system("pause");
	return 0;
}