核心知识点
核心配置文件
映射文件概述
Dao层实现与代理开发实现
自动映射与自定义映射
参数传递与返回值
动态SQL
注解开发
缓存机制
总结
核心配置文件【mybatis-config.xml】
MyBatis 的配置文件包含了会深深影响 MyBatis 行为的设置和属性信息。
- 位置:resources下
-
名称:推荐使用mybatis-config.xml
-
示例代码
<?xml version="1.0" encoding="UTF-8" ?> <!DOCTYPE configuration PUBLIC "-//mybatis.org//DTD Config 3.0//EN" "http://mybatis.org/dtd/mybatis-3-config.dtd"> <configuration> <environments default="development"> <environment id="development"> <transactionManager type="JDBC"/> <dataSource type="POOLED"> <!-- mysql8版本--> <!-- <property name="driver" value="com.mysql.cj.jdbc.Driver"/>--> <!-- <property name="url" value="jdbc:mysql://localhost:3306/db220106?serverTimezone=UTC"/>--> <!-- mysql5版本--> <property name="driver" value="com.mysql.jdbc.Driver"/> <property name="url" value="jdbc:mysql://localhost:3306/db220106"/> <property name="username" value="root"/> <property name="password" value="root"/> </dataSource> </environment> </environments> <!-- 设置映射文件路径--> <mappers> <mapper resource="mapper/EmployeeMapper.xml"/> </mappers> </configuration>-
transactionManager(事务管理器)
- JDBC:这个配置就是直接使用了JDBC 的提交和回滚设置,它依赖于从数据源得到的连接来管理事务作用域。
- MANAGED:这个配置几乎没做什么。它从来不提交或回滚一个连接,而是让容器来管理事务的整个生命周期
-
dataSource(数据源)
- UNPOOLED:这个数据源的实现只是每次被请求时打开和关闭连接。
- POOLED:这种数据源的实现利用“池”的概念将 JDBC 连接对象组织起来。
- JNDI:这个数据源的实现是为了能在如 EJB 或应用服务器这类容器中使用,容器可以集中或在外部配置数据源,然后放置一个 JNDI 上下文的引用。
-
settings子标签
-
作用:这是 MyBatis 中极为重要的调整设置,它们会改变 MyBatis 的运行时行为。
-
mapUnderscoreToCamelCase属性:是否开启驼峰命名自动映射,默认值false,如设置true会自动将
字段a_col与aCol属性自动映射
- 注意:只能将字母相同的字段与属性自动映射
-
-
mapper(映射文件)
该标签的作用是加载映射的,一般使用相对路径加载映射文件。
<!-- 设置映射文件路径--> <mappers> <mapper resource="mapper/EmployeeMapper.xml"/> </mappers> -
typeAliases(类型别名)
类型别名可为 Java 类型设置一个缩写名字
<typeAliases>
   <!-- 为指定类型定义别名-->
       <typeAlias type="com.atguigu.mybatis.pojo.Employee" alias="employee"
       </typeAlias>
   <!-- 为指定包下所有的类定义别名 默认将类名作为别名,不区分大小写【推荐使用小写字母】-->
        <package name="com.atguigu.mybatis.pojo"/>
</typeAliases>
Mybatis自定义别名
别名 类型 _int int integer或int Integer string String list或arraylist ArrayList map或hashmap HashMap
-
映射文件概述
MyBatis 的真正强大在于它的语句映射,如果拿它跟具有相同功能的 JDBC 代码进行对比,你会立即发现省掉了将近 95% 的代码。注意:mapper中的namespace要求与接口的全类名一致。
编写User实体:
public class User {
	private int id;
	private String username;
	private String password;
    //省略get个set方法
}
编写UserMapper映射文件:
<?xml version="1.0" encoding="UTF-8" ?>
<!DOCTYPE mapper
	PUBLIC "-//mybatis.org//DTD Mapper 3.0//EN"
	"http://mybatis.org/dtd/mybatis-3-mapper.dtd">
<mapper namespace="userMapper">  //命名空间可以随意如果不使用代理开发
	<select id="findAll" resultType="com.me.domain.User">
		select * from User
	</select>

    <update id="update" parameterType="com.me.domain.User">
        update user set username=#{username},password=#{password} where id=#{id}
    </update>

    <delete id="delete" parameterType="java.lang.Integer">
        delete from user where id=#{id}
    </delete>

</mapper>
编写测试代码:
//加载核心配置文件
InputStream resourceAsStream = Resources.getResourceAsStream("SqlMapConfig.xml");
//获得sqlSession工厂对象
SqlSessionFactory sqlSessionFactory = new
                           SqlSessionFactoryBuilder().build(resourceAsStream);
//获得sqlSession对象
SqlSession sqlSession = sqlSessionFactory.openSession();
//执行sql语句
//int update = sqlSession.update("userMapper.update", user);
//int delete = sqlSession.delete("userMapper.delete",3);
//sqlSession.insert("userMapper.add", user);
List<User> userList = sqlSession.selectList("userMapper.findAll");

//提交事务
sqlSession.commit()
//打印结果
System.out.println(userList);
//释放资源
sqlSession.close();
-
映射文件子标签
- insert标签:定义添加SQL
- delete标签:定义删除SQL
- update标签:定义修改SQL
- select标签:定义查询SQL
- sql标签:定义可重用的SQL语句块
- cache标签:设置当前命名空间的缓存配置
- cache-ref标签:设置其他命名空间的缓存配置
- **resultMap标签:**描述如何从数据库结果集中加载对象。resultType解决不了的问题,交个resultMap。
在映射文件中使用parameterType属性指定要插入的数据类型;Sql语句中使用#{实体属性名}方式引用实体中的属性值;插入操作使用的API是sqlSession.insert(“命名空间.id”,实体对象); 插入操作涉及数据库数据变化,所以要使用sqlSession对象显示的提交事务,即sqlSession.commit() ;
Dao层实现与代理开发实现
传统开发方式
注意:这里的userMapper映射文件的命名空间取名可以随意!
编写UserDao接口(有时候也叫做UserMapper)
public interface UserDao {
    List<User> findAll() throws IOException;
}
编写UserDaoImpl实现
public class UserDaoImpl implements UserDao {
    public List<User> findAll() throws IOException {
        InputStream resourceAsStream =
                    Resources.getResourceAsStream("SqlMapConfig.xml");
        SqlSessionFactory sqlSessionFactory = new
                    SqlSessionFactoryBuilder().build(resourceAsStream);
        SqlSession sqlSession = sqlSessionFactory.openSession();
        List<User> userList = sqlSession.selectList("userMapper.findAll");//命名空间.id
        sqlSession.close();
        return userList;
    }
}
测试传统方式
@Test
public void testTraditionDao() throws IOException {
    UserDao userDao = new UserDaoImpl();
    List<User> all = userDao.findAll();
    System.out.println(all);
}
代理开发
代理开发方式介绍
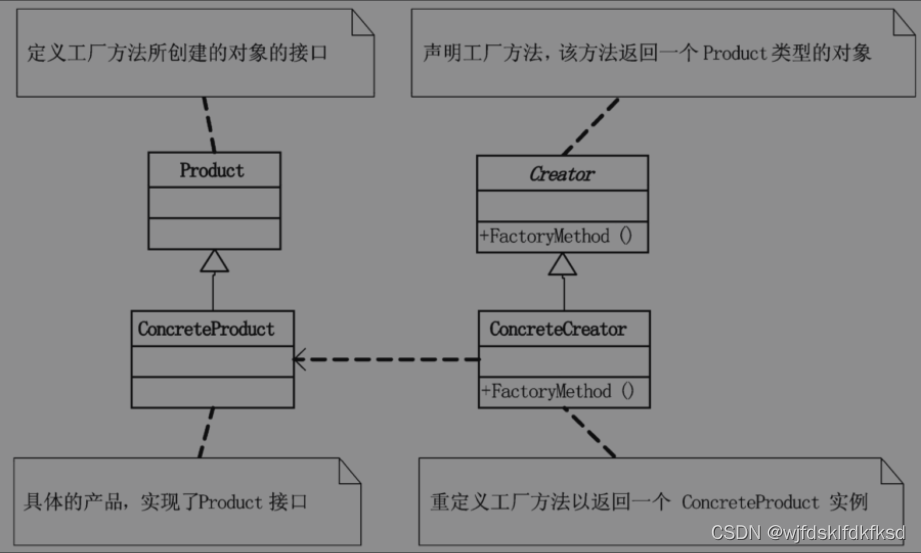
采用 Mybatis 的代理开发方式实现 DAO 层的开发,这种方式是我们后面进入企业的主流。Mapper 接口开发方法只需要程序员编写Mapper 接口(相当于Dao 接口)不需要编写实现类UserDaoImpl,由Mybatis 框架根据接口定义创建接口的动态代理对象,代理对象的方法体同上边Dao接口实现类方法。
Mapper 接口开发需要遵循以下规范:
1) Mapper.xml文件中的namespace与mapper接口(DAO接口)的全限定名相同
2) Mapper接口方法名和Mapper.xml中定义的每个statement的id相同
3) Mapper接口方法的输入参数类型和mapper.xml中定义的每个sql的parameterType的类型相同
4) Mapper接口方法的输出参数类型和mapper.xml中定义的每个sql的resultType的类型相同
![[外链图片转存失败,源站可能有防盗链机制,建议将图片保存下来直接上传(img-uGgRZi7o-1683272033345)(.\imgs\图1.png)]](https://img-blog.csdnimg.cn/d70a7d51c3ed4d14b15d200e31d62862.png)
注意:上图UserDao写错了,应该改成UserMapper;user和int是配置中缩写的别名。
测试代理方式
@Test
public void testProxyDao() throws IOException {
    InputStream resourceAsStream = Resources.getResourceAsStream("SqlMapConfig.xml");
    SqlSessionFactory sqlSessionFactory = new SqlSessionFactoryBuilder().build(resourceAsStream);
    SqlSession sqlSession = sqlSessionFactory.openSession();
    //获得MyBatis框架生成的UserMapper接口的实现类,只需要传入接口自动获取代理实现
    UserMapper userMapperImpl = sqlSession.getMapper(UserMapper.class);
    User user = userMapperImpl.findById(1);
    System.out.println(user);
    sqlSession.close();
}
参数传递
#与$区别
-
【#】底层执行SQL语句的对象,使用PreparedStatementd,预编译SQL,入参使用占位符方式,防止SQL注入安全隐患,相对比较安全。#使用场景,sql占位符位置均可以使用#
-
【 】底层执行 S Q L 语句的对象使用 ∗ ∗ S t a t e m e n t ∗ ∗ 对象,未解决 S Q L 注入安全隐患,相对不安全。 】底层执行SQL语句的对象使用**Statement**对象,未解决SQL注入安全隐患,相对不安全。 】底层执行SQL语句的对象使用∗∗Statement∗∗对象,未解决SQL注入安全隐患,相对不安全。使用场景,#解决不了的参数传递问题,均可以交给$处理【如:form 动态化表名】。
/** * 测试$使用场景 */ public List<Employee> selectEmpByDynamitTable(@Param("tblName") String tblName);<select id="selectEmpByDynamitTable" resultType="employee"> SELECT id, last_name, email, salary FROM ${tblName} </select>
自动与自定义映射
自动映射【resultType】
自定义映射【resultMap】
- 自动映射【resultType】:指的是自动将表中的字段与类中的属性进行关联映射
- 自动映射解决不了两类问题
- 多表连接查询时,需要返回多张表的结果集
- 单表查询时,不支持驼峰式自动映射【不想为字段定义别名】
- 自动映射解决不了两类问题
- 自定义映射【resultMap】:自动映射解决不了问题,交给自定义映射
- 注意:resultType与resultMap只能同时使用一个
查询单行数据返回单个对象
/**
 * 通过id获取员工信息
 */
public Employee selectEmpById(int empId);
<select id="selectEmpById" resultType="employee">
    SELECT
        id,
        last_name,
        email,
        salary
    FROM
        tbl_employee
    WHERE
        id=#{empId}
</select>
查询多行数据返回对象的集合
/**
 * 查询所有员工信息
 */
public List<Employee> selectAllEmps();
<select id="selectAllEmps" resultType="employee">
    SELECT
        id,
        last_name,
        email,
        salary
    FROM
        tbl_employee
</select>
- 注意:如果返回的是集合,那应该设置为集合包含的类型,而不是集合本身的类型。
查询单行数据返回Map集合
-
Map<String key,Object value>
- 字段作为Map的key,查询结果作为Map的Value
-
示例代码
/**
 * 查询单行数据返回Map集合
 * @return
 */
public Map<String,Object> selectEmpReturnMap(int empId);
<!-- 查询单行数据返回Map集合--> <select id="selectEmpReturnMap" resultType="map"> SELECT id, last_name, email, salary FROM tbl_employee WHERE id=#{empId} </select>
查询多行数据返回Map集合
-
Map<Integer key,Employee value>
- 对象的id作为key
- 对象作为value
-
示例代码
/** * 查询多行数据返回Map * Map<Integer,Object> * Map<Integer,Employee> * 对象Id作为:key * 对象作为:value * @return */ @MapKey("id") public Map<Integer,Employee> selectEmpsReturnMap();<select id="selectEmpsReturnMap" resultType="map"> SELECT id, last_name, email, salary FROM tbl_employee </select>
级联一对一查询
用户表和订单表的关系为,一个用户有多个订单,一个订单只从属于一个用户一对一查询的需求:查询一个订单,与此同时查询出该订单所属的用户。对应的sql语句:select * from orders o,user u where o.uid=u.id
创建Order和User实体:
public class Order {
    private int id;
    private Date ordertime;
    private double total;
    //代表当前订单从属于哪一个客户
    private User user;
}

public class User {
    private int id;
    private String username;
    private String password;
    private Date birthday;
}
创建OrderMapper接口:
public interface OrderMapper {
    List<Order> findAll();
}
配置OrderMapper.xml:
<mapper namespace="com.itheima.mapper.OrderMapper">
    <resultMap id="orderMap" type="com.itheima.domain.Order">
        <result property="id" column="id"></result>
    	<result property="ordertime" column="ordertime"></result>
    	<result property="total" column="total"></result>

        <result column="uid" property="user.id"></result>
        <result column="username" property="user.username"></result>
        <result column="password" property="user.password"></result>
        <result column="birthday" property="user.birthday"></result>
    </resultMap>

    <select id="findAll" resultMap="orderMap">
        select * from orders o,user u where o.uid=u.id
    </select>

</mapper>
其中还可以配置如下:
<resultMap id="orderMap" type="com.itheima.domain.Order">
    <result property="id" column="id"></result>
    <result property="ordertime" column="ordertime"></result>
    <result property="total" column="total"></result>

    <association property="user" javaType="com.itheima.domain.User">
        <result column="uid" property="id"></result>
        <result column="username" property="username"></result>
        <result column="password" property="password"></result>
        <result column="birthday" property="birthday"></result>
    </association>

</resultMap>
测试:
OrderMapper mapper = sqlSession.getMapper(OrderMapper.class);
List<Order> all = mapper.findAll();
for(Order order : all){
    System.out.println(order);
}
级联一对多查询
用户表和订单表的关系为,一个用户有多个订单,一个订单只从属于一个用户一对多查询的需求:查询一个用户,与此同时查询出该用户具有的订单。对应的sql语句:select *,o.id oid from user u left join orders o on u.id=o.uid;
修改User实体:
public class Order {
    private int id;
    private Date ordertime;
    private double total;
    //代表当前订单从属于哪一个客户
    private User user;
}
public class User {
    private int id;
    private String username;
    private String password;
    private Date birthday;
    //代表当前用户具备哪些订单
    private List<Order> orderList;
}
创建UserMapper接口:
public interface UserMapper {
    List<User> findAll();
}
配置UserMapper.xml:
<mapper namespace="com.itheima.mapper.UserMapper">
    <resultMap id="userMap" type="com.itheima.domain.User">
        <result column="id" property="id"></result>
        <result column="username" property="username"></result>
        <result column="password" property="password"></result>
        <result column="birthday" property="birthday"></result>

        <collection property="orderList" ofType="com.itheima.domain.Order">
            <result column="oid" property="id"></result>
            <result column="ordertime" property="ordertime"></result>
            <result column="total" property="total"></result>
        </collection>

    </resultMap>
    <select id="findAll" resultMap="userMap">
        select *,o.id oid from user u left join orders o on u.id=o.uid
    </select>
</mapper>
测试:
UserMapper mapper = sqlSession.getMapper(UserMapper.class);
List<User> all = mapper.findAll();
for(User user : all){
    System.out.println(user.getUsername());
    List<Order> orderList = user.getOrderList();
    for(Order order : orderList){
        System.out.println(order);
    }
    System.out.println("----------------------------------");
}
MyBatis多表配置方式:
一对一配置:使用做配置
一对多配置:使用+做配置
多对多配置:使用+做配置
ResultMap相关标签及属性
-
resultMap标签:自定义映射标签
- id属性:定义唯一标识
- type属性:设置映射类型
-
resultMap子标签
- id标签:定义主键字段与属性关联关系
- result标签:定义非主键字段与属性关联关系
- column属性:定义表中字段名称
- property属性:定义类中属性名称
- association标签:定义一对一的关联关系
- property:定义关联关系属性
- javaType:定义关联关系属性的类型
- select:设置分步查询SQL全路径
- colunm:设置分步查询SQL中需要参数
- fetchType:设置局部延迟加载【懒加载】是否开启
- collection标签:定义一对多的关联关系
- property:定义一对一关联关系属性
- ofType:定义一对一关联关系属性类型
- fetchType:设置局部延迟加载【懒加载】是否开启
动态SQL
常用标签
-
if标签:用于完成简单的判断
-
where标签:用于解决where关键字及where后第一个and或or的问题
-
trim标签: 可以在条件判断完的SQL语句前后添加或者去掉指定的字符
-
prefix: 添加前缀
-
prefixOverrides: 去掉前缀
-
suffix: 添加后缀
-
suffixOverrides: 去掉后缀
-
-
set标签:主要用于解决set关键字及多出一个【,】问题
-
choose标签:类似java中if-else【switch-case】结构
-
foreach标签:类似java中for循环
- collection: 要迭代的集合
- item: 当前从集合中迭代出的元素
- separator: 元素与元素之间的分隔符
- open: 开始字符
- close:结束字符
-
sql标签:提取可重用SQL片段
<?xml version="1.0" encoding="UTF-8" ?>
<!DOCTYPE mapper
        PUBLIC "-//mybatis.org//DTD Mapper 3.0//EN"
        "http://mybatis.org/dtd/mybatis-3-mapper.dtd">

<mapper namespace="com.atguigu.mybatis.mapper.EmployeeMapper">
    <sql id="emp_col">
        id,
        last_name,
        email,
        salary
    </sql>
    <sql id="select_employee">
        select
            id,
            last_name,
            email,
            salary
        from
            tbl_employee
    </sql>
<!-- 按条件查询员工信息【条件不确定】-->
    <select id="selectEmpByOpr" resultType="employee">
        <include refid="select_employee"></include>
        <where>
            <if test="id != null">
               and id = #{id}
            </if>
            <if test="lastName != null">
                and last_name = #{lastName}
            </if>
            <if test="email != null">
                and email = #{email}
            </if>
            <if test="salary != null">
                and salary = #{salary}
            </if>
        </where>
    </select>

    <select id="selectEmpByOprTrim" resultType="employee">
        <include refid="select_employee"></include>
        <trim prefix="where" suffixOverrides="and">
            <if test="id != null">
                id = #{id} and
            </if>
            <if test="lastName != null">
                last_name = #{lastName} and
            </if>
            <if test="email != null">
                email = #{email} and
            </if>
            <if test="salary != null">
                salary = #{salary}
            </if>
        </trim>
    </select>

    <update id="updateEmpByOpr">
        update
            tbl_employee
        <set>
            <if test="lastName != null">
                last_name=#{lastName},
            </if>
            <if test="email != null">
                email=#{email},
            </if>
            <if test="salary != null">
                salary=#{salary}
            </if>
        </set>
        where
            id = #{id}
    </update>

    <select id="selectEmpByOneOpr" resultType="employee">
        select
            <include refid="emp_col"></include>
        from
            tbl_employee
        <where>
            <choose>
                <when test="id != null">
                    id = #{id}
                </when>
                <when test="lastName != null">
                    last_name = #{lastName}
                </when>
                <when test="email != null">
                    email = #{email}
                </when>
                <when test="salary != null">
                    salary = #{salary}
                </when>
                <otherwise>
                    1=1
                </otherwise>
            </choose>
        </where>
    </select>

    <select id="selectEmpByIds" resultType="employee">
        select
            id,
            last_name,
            email,
            salary
        from
            tbl_employee
        <where>
            id in(
            <foreach collection="ids" item="id" separator=",">
                #{id}
            </foreach>
            )
        </where>

    </select>

    <insert id="batchInsertEmp">
        INSERT INTO
            tbl_employee(last_name,email,salary)
        VALUES
            <foreach collection="employees" item="emp" separator=",">
                (#{emp.lastName},#{emp.email},#{emp.salary})
            </foreach>
    </insert>
</mapper>
Mybatis中分步查询
-
为什么使用分步查询【分步查询优势】?
- 将多表连接查询,改为【分步单表查询】,从而提高程序运行效率
-
示例代码
-
一对一
/** * 通过员工id获取员工信息及员工所属的部门信息【分步查询】 1. 先通过员工id获取员工信息【id、last_name、email、salary、dept_id】 2. 再通过部门id获取部门信息【dept_id、dept_name】 */ public Employee selectEmpAndDeptByEmpIdAssociationStep(int empId);<select id="selectEmpAndDeptByEmpIdAssociationStep" resultMap="empAndDeptResultMapAssocationStep"> select id, last_name, email, salary, dept_id from tbl_employee where id=#{empId} </select>/** * 通过部门id获取部门信息 */ public Dept selectDeptByDeptId(int deptId);<select id="selectDeptByDeptId" resultType="dept"> select dept_id, dept_name from tbl_dept where dept_id=#{deptId} </select>
-
-
一对多
/**
 * 通过部门id获取部门信息,及部门所属员工信息【分步查询】
        1. 通过部门id获取部门信息
        2. 通过部门id获取员工信息
 */
public Dept selectDeptAndEmpByDeptIdStep(int deptId);
<!-- 通过部门id获取部门信息,及部门所属员工信息【分步查询】--> <!-- 1. 通过部门id获取部门信息--> <!-- 2. 通过部门id获取员工信息--> <select id="selectDeptAndEmpByDeptIdStep" resultMap="deptAndEmpResultMapStep"> select dept_id, dept_name from tbl_dept where dept_id=#{deptId} </select>/** * 通过部门Id获取员工信息 * @param deptId * @return */ public List<Employee> selectEmpByDeptId(int deptId);<select id="selectEmpByDeptId" resultType="employee"> select id, last_name, email, salary, dept_id from tbl_employee where dept_id=#{deptId} </select>
Mybatis延迟加载【懒加载】
-
需要时加载,不需要暂时不加载
-
优势:提升程序运行效率
-
语法
-
全局设置
<!-- 开启延迟加载 --> <setting name="lazyLoadingEnabled" value="true"/> <!-- 设置加载的数据是按需加载3.4.2及以后的版本该步骤可省略--> <setting name="aggressiveLazyLoading" value="false"/> -
局部设置
-
fetchType
- eager:关闭局部延迟加载
- lazy:开启局部延迟加载
-
示例代码
<association property="dept"          select="com.atguigu.mybatis.mapper.DeptMapper.selectDeptByDeptId"
            column="dept_id"
            fetchType="eager">
</association>
-
-
扩展
-
如果分步查询时,需要传递给调用的查询中多个参数,则需要将多个参数封装成
Map来进行传递,语法如下**: {k1=v1, k2=v2…}**
Mybatis中的缓存概述
-
一级缓存
-
二级缓存
-
第三方缓存
Mybatis缓存机制之一级缓存
-
概述:一级缓存【本地缓存(Local Cache)或SqlSession级别缓存】
-
特点
- 一级缓存默认开启
- 不能关闭
- 可以清空
-
缓存原理
- 第一次获取数据时,先从数据库中加载数据,将数据缓存至Mybatis一级缓存中【缓存底层实现原理Map,key:hashCode+查询的SqlId+编写的sql查询语句+参数】
- 以后再次获取数据时,先从一级缓存中获取,如未获取到数据,再从数据库中获取数据。
-
一级缓存五种失效情况
-
不同的SqlSession对应不同的一级缓存
-
同一个SqlSession但是查询条件不同
-
同一个SqlSession两次查询期间执行了任何一次增删改操作
- 清空一级缓存
- 同一个SqlSession两次查询期间手动清空了缓存
- sqlSession.clearCache()
- 同一个SqlSession两次查询期间提交了事务
- sqlSession.commit()
-
Mybatis缓存机制之二级缓存
-
二级缓存【second level cache】概述
- 二级缓存【全局作用域缓存】
- SqlSessionFactory级别缓存
-
二级缓存特点
- 二级缓存默认关闭,需要开启才能使用
- 二级缓存需要提交sqlSession或关闭sqlSession时,才会缓存。
-
二级缓存使用的步骤:
① 全局配置文件中开启二级缓存
② 需要使用二级缓存的映射文件处使用cache配置缓存
③ 注意:POJO需要实现Serializable接口
④ 关闭sqlSession或提交sqlSession时,将数据缓存到二级缓存
-
二级缓存底层原理
- 第一次获取数据时,先从数据库中获取数据,将数据缓存至一级缓存;当提交或关闭SqlSession时,将数据缓存至二级缓存
- 以后再次获取数据时,先从一级缓存中获取数据,如一级缓存没有指定数据,再去二级缓存中获取数据。如二级缓存也没有指定数据时,需要去数据库中获取数据,…
-
二级缓存相关属性
- eviction=“FIFO”:缓存清除【回收】策略。
- LRU – 最近最少使用的:移除最长时间不被使用的对象。
- FIFO – 先进先出:按对象进入缓存的顺序来移除它们。
- flushInterval:刷新间隔,单位毫秒
- size:引用数目,正整数
- readOnly:只读,true/false
- eviction=“FIFO”:缓存清除【回收】策略。
-
二级缓存的失效情况
- 在两次查询之间,执行增删改操作,会同时清空一级缓存和二级缓存
- sqlSession.clearCache():只是用来清除一级缓存。
MyBatis的常用注解
这几年来注解开发越来越流行,Mybatis也可以使用注解开发方式,这样我们就可以减少编写Mapper
映射文件了。
@Insert:实现新增
@Update:实现更新
@Delete:实现删除
@Select:实现查询
@Result:实现结果集封装
@Results:可以与@Result 一起使用,封装多个结果集
@One:实现一对一结果集封装
@Many:实现一对多结果集封装
修改MyBatis的核心配置文件,我们使用了注解替代的映射文件,所以我们只需要加载使用了注解的Mapper接口即可:
<mappers>
    <!--扫描使用注解的类-->
    <mapper class="com.itheima.mapper.UserMapper"></mapper>
</mappers>
或者指定扫描包含映射关系的接口所在的包也可以
<mappers>
    <!--扫描使用注解的类所在的包-->
    <package name="com.itheima.mapper"></package>
</mappers>
一些注解开发的代码:
public interface UserMapper {
    @Select("select * from user")
    @Results({
            @Result(id = true,property = "id",column = "id"),
            @Result(property = "username",column = "username"),
            @Result(property = "password",column = "password"),
            @Result(property = "birthday",column = "birthday"),
            @Result(property = "orderList",column = "id",
                    javaType = List.class,
                    many = @Many(select = "com.itheima.mapper.OrderMapper.findByUid"))
    })
    List<User> findAllUserAndOrder();
}

public interface OrderMapper {
    @Select("select * from orders where uid=#{uid}")
    List<Order> findByUid(int uid);

}