文章目录
- Swiper总结
- 概述
- 使用
- 简单使用
- 自动切换
- 分页器样式
- 切换效果
- 预览
- 视差效果
- 延迟加载
- 自适应高度
- 放大缩小
- 案例
- tab切换
- 引导页
Swiper总结
概述
Swiper是纯javascript打造的滑动特效插件,面向手机、平板电脑等移动终端。
Swiper能实现触屏焦点图、触屏Tab切换、触屏轮播图切换等常用效果。
Swiper开源、免费、稳定、使用简单、功能强大,是架构移动终端网站的重要选择
Swiper官网
使用
更多样式查看
简单使用
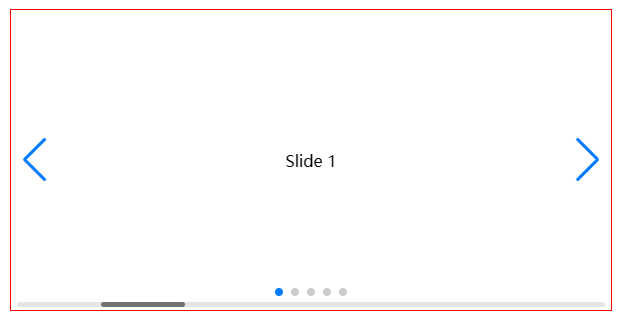
<!DOCTYPE html>
<html lang="en">
  <head>
    <meta charset="UTF-8" />
    <meta http-equiv="X-UA-Compatible" content="IE=edge" />
    <meta name="viewport" content="width=device-width, initial-scale=1.0" />
    <title>Swiper</title>
    <link rel="stylesheet" href="./swiper/swiper-bundle.min.css" />
    <style>
      * {
        padding: 0;
        margin: 0;
      }
      .swiper {
        width: 600px;
        height: 300px;
        border: 1px solid red;
        margin: 50px auto;
      }
      .swiper-slide {
        display: flex;
        justify-content: center;
        align-items: center;
      }
    </style>
  </head>
  <body>
    <div class="swiper" id="mySwiper">
      <div class="swiper-wrapper">
        <div class="swiper-slide">Slide 1</div>
        <div class="swiper-slide">Slide 2</div>
        <div class="swiper-slide">Slide 3</div>
        <div class="swiper-slide">Slide 4</div>
        <div class="swiper-slide">Slide 5</div>
      </div>

      <!-- 前进后退按钮 -->
      <div class="swiper-button-next"></div>
      <div class="swiper-button-prev"></div>

      <!-- 分页器 -->
      <div class="swiper-pagination"></div>

      <!-- 滚动条 -->
      <div class="swiper-scrollbar"></div>
    </div>
    <script src="./swiper/swiper-bundle.min.js"></script>
    <script>
      var swiper = new Swiper("#mySwiper", {
        // 方向
        direction: "horizontal",
        // 是否循环
        loop: true,
        // 前进后退按钮
        navigation: {
          nextEl: ".swiper-button-next",
          prevEl: ".swiper-button-prev",
        },
        // 分页器
        pagination: {
          el: ".swiper-pagination",
        },
        // 滚动条
        scrollbar: {
          el: ".swiper-scrollbar",
        },
      });
    </script>
  </body>
</html>
自动切换
var mySwiper = new Swiper('.swiper', {
    // 开启自动切换
    autoplay:true
});
var mySwiper = new Swiper('.swiper', {
    // 等同于上面
    autoplay: {
        delay: 3000,
        stopOnLastSlide: false,
        disableOnInteraction: true,
    },
});
分页器样式
动态子弹
var swiper = new Swiper(".mySwiper", {
    pagination: {
        el: ".swiper-pagination",
        dynamicBullets: true,
    },
});

进度条
var swiper = new Swiper(".mySwiper", {
    pagination: {
        el: ".swiper-pagination",
        type: "progressbar",
    }
});

数字
var swiper = new Swiper(".mySwiper", {
    pagination: {
        el: ".swiper-pagination",
        type: "fraction",
    }
});

自定义
<!DOCTYPE html>
<html lang="en">
  <head>
    <meta charset="UTF-8" />
    <meta http-equiv="X-UA-Compatible" content="IE=edge" />
    <meta name="viewport" content="width=device-width, initial-scale=1.0" />
    <title>Swiper</title>
    <link rel="stylesheet" href="./swiper/swiper-bundle.min.css" />
    <style>
      * {
        padding: 0;
        margin: 0;
      }
      .swiper {
        width: 600px;
        height: 300px;
        border: 1px solid red;
        margin: 50px auto;
      }
      .swiper-slide {
        display: flex;
        justify-content: center;
        align-items: center;
      }
      .swiper-pagination-bullet {
        width: 20px;
        height: 20px;
        text-align: center;
        line-height: 20px;
        font-size: 12px;
        color: #000;
        opacity: 1;
        background: rgba(0, 0, 0, 0.2);
      }
      .swiper-pagination-bullet-active {
        color: #fff;
        background: #007aff;
      }
    </style>
  </head>
  <body>
    <div class="swiper" id="mySwiper">
      <div class="swiper-wrapper">
        <div class="swiper-slide">Slide 1</div>
        <div class="swiper-slide">Slide 2</div>
        <div class="swiper-slide">Slide 3</div>
        <div class="swiper-slide">Slide 4</div>
        <div class="swiper-slide">Slide 5</div>
      </div>

      <!-- 前进后退按钮 -->
      <div class="swiper-button-next"></div>
      <div class="swiper-button-prev"></div>

      <!-- 分页器 -->
      <div class="swiper-pagination"></div>
    </div>
    <script src="./swiper/swiper-bundle.min.js"></script>
    <script>
      var swiper = new Swiper("#mySwiper", {
        // 前进后退按钮
        navigation: {
          nextEl: ".swiper-button-next",
          prevEl: ".swiper-button-prev",
        },
        // 分页器
        pagination: {
          el: ".swiper-pagination",
          clickable: true,
          renderBullet: function (index, className) {
            return '<span class="' + className + '">' + (index + 1) + "</span>";
          },
        },
      });
    </script>
  </body>
</html>
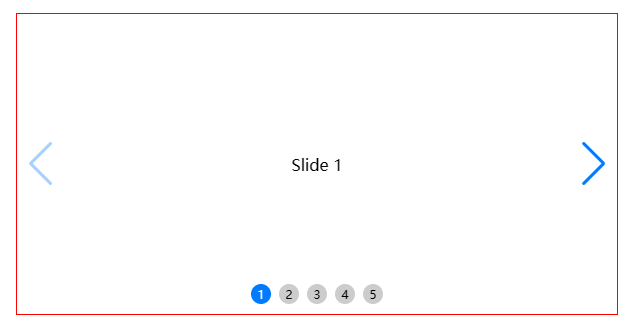
切换效果
淡入
var swiper = new Swiper(".mySwiper", {
    spaceBetween: 30,
    effect: "fade",
    navigation: {
        nextEl: ".swiper-button-next",
        prevEl: ".swiper-button-prev",
    },
    pagination: {
        el: ".swiper-pagination",
        clickable: true,
    },
});
方块
var swiper = new Swiper(".mySwiper", {
    effect: "cube",
    grabCursor: true,
    cubeEffect: {
        shadow: true,
        slideShadows: true,
        shadowOffset: 20,
        shadowScale: 0.94,
    },
    pagination: {
        el: ".swiper-pagination",
    },
});
3D流
var swiper = new Swiper(".mySwiper", {
    effect: "coverflow",
    grabCursor: true,
    centeredSlides: true,
    slidesPerView: "auto",
    coverflowEffect: {
        rotate: 50,
        stretch: 0,
        depth: 100,
        modifier: 1,
        slideShadows: true,
    },
    pagination: {
        el: ".swiper-pagination",
    },
});
3D翻转
var swiper = new Swiper(".mySwiper", {
    effect: "flip",
    grabCursor: true,
    pagination: {
        el: ".swiper-pagination",
    },
    navigation: {
        nextEl: ".swiper-button-next",
        prevEl: ".swiper-button-prev",
    },
});
卡片式
var swiper = new Swiper(".mySwiper", {
    effect: "cards",
    grabCursor: true,
});
预览
var swiper = new Swiper(".mySwiper", {
    // 同时显示数量
    slidesPerView: 3,
    // 是否居中,true表示居中,false表示居左
    centeredSlides: false,
    // 页面间距
    spaceBetween: 30,
    pagination: {
        el: ".swiper-pagination",
        type: "fraction",
    },
    navigation: {
        nextEl: ".swiper-button-next",
        prevEl: ".swiper-button-prev",
    },
});
视差效果
data-swiper-parallax属性控制元素位移,单位为px何百分比。data-swiper-parallax-opacity属性控制元素透明度,必须设置位移。data-swiper-parallax-scale属性控制元素缩放,必须设置位移。data-swiper-parallax-duration属性控制视差动画时长。
<!DOCTYPE html>
<html lang="en">
	<head>
		<meta charset="utf-8" />
		<title>Swiper demo</title>
		<meta name="viewport" content="width=device-width, initial-scale=1, minimum-scale=1, maximum-scale=1" />
		<link rel="stylesheet" href="../swiper-bundle.min.css" />
		<style>
			html,
			body {
				position: relative;
				height: 100%;
			}

			body {
				background: #eee;
				font-family: Helvetica Neue, Helvetica, Arial, sans-serif;
				font-size: 14px;
				color: #000;
				margin: 0;
				padding: 0;
			}

			.swiper {
				width: 100%;
				height: 100%;
				background: #000;
			}

			.swiper-slide {
				font-size: 18px;
				color: #fff;
				-webkit-box-sizing: border-box;
				box-sizing: border-box;
				padding: 40px 60px;
			}

			.parallax-bg {
				position: absolute;
				left: 0;
				top: 0;
				width: 130%;
				height: 100%;
				-webkit-background-size: cover;
				background-size: cover;
				background-position: center;
			}

			.swiper-slide .title {
				font-size: 41px;
				font-weight: 300;
			}

			.swiper-slide .subtitle {
				font-size: 21px;
			}

			.swiper-slide .text {
				font-size: 14px;
				max-width: 400px;
				line-height: 1.3;
			}
		</style>
	</head>

	<body>
		<!-- Swiper -->

		<div style="--swiper-navigation-color: #fff; --swiper-pagination-color: #fff" class="swiper mySwiper">
			<div class="parallax-bg" style="
          background-image: url(./images/nature-1.jpg);
        " data-swiper-parallax="-23%"></div>
			<div class="swiper-wrapper">
				<div class="swiper-slide">
					<div class="text" data-swiper-parallax="-100">
						<p> 啊啊啊啊啊 </p>
					</div>
				</div>
				<div class="swiper-slide">
					<div class="text" data-swiper-parallax="-300" data-swiper-parallax-duration="3000">
						<p> 拜拜拜拜 </p>
					</div>
				</div>
				<div class="swiper-slide">
					<div class="text" data-swiper-parallax="-600" data-swiper-parallax-duration="6000">
						<p> 匆匆匆匆 </p>
					</div>
				</div>
				<div class="swiper-slide">
					<div data-swiper-parallax="0" data-swiper-parallax-opacity="0.1"
						data-swiper-parallax-duration="6000">透明度变化</div>
				</div>
			</div>
			<div class="swiper-button-next"></div>
			<div class="swiper-button-prev"></div>
			<div class="swiper-pagination"></div>
		</div>

		<!-- Swiper JS -->
		<script src="../swiper-bundle.min.js"></script>

		<!-- Initialize Swiper -->
		<script>
			var swiper = new Swiper(".mySwiper", {
				// 切换速度,默认300
				speed: 600,
				// 开启视差效果
				parallax: true,
				pagination: {
					el: ".swiper-pagination",
					clickable: true,
				},
				navigation: {
					nextEl: ".swiper-button-next",
					prevEl: ".swiper-button-prev",
				},
			});
		</script>
	</body>
</html>
延迟加载
- 图片延迟加载:需要将图片img标签的src改写成data-src,并且增加类名swiper-lazy。
- 背景图延迟加载:载体增加属性data-background,并且增加类名swiper-lazy。
<div class="swiper">
    <div class="swiper-wrapper">
        <!-- 延迟加载图片的结构 -->
        <div class="swiper-slide">
            <!-- 延迟加载图片 -->
            <img data-src="path/to/picture-1.jpg" class="swiper-lazy">
            <!-- 加载进度条 -->
            <div class="swiper-lazy-preloader swiper-lazy-preloader-white"></div>
        </div>

        <!-- 延迟加载背景图的结构 -->
        <div class="swiper-slide">
             <!-- 延迟加载背景图片 -->
            <div data-background="path/to/picture-2.jpg" class="swiper-lazy">
                <div class="swiper-lazy-preloader"></div>
            </div>
        </div>
    </div>
</div>
var swiper = new Swiper(".mySwiper", {
    // 开启延迟加载
    lazy: true,
    pagination: {
        el: ".swiper-pagination",
        clickable: true,
    },
    navigation: {
        nextEl: ".swiper-button-next",
        prevEl: ".swiper-button-prev",
    },
});
自适应高度
自动高度。设置为 true 时,wrapper 和container 会随着当前slide 的高度而发生变化。
var swiper = new Swiper('.swiper', {
    autoHeight: true, //高度随内容变化
});
放大缩小
<div class="swiper mySwiper">
    <div class="swiper-wrapper">
        <div class="swiper-slide">
            <div class="swiper-zoom-container">
                <img src="./images/nature-1.jpg" />
            </div>
        </div>
        <div class="swiper-slide">
            <div class="swiper-zoom-container">
                <img src="./images/nature-2.jpg" />
            </div>
        </div>
        <div class="swiper-slide">
            <div class="swiper-zoom-container">
                <img src="./images/nature-3.jpg" />
            </div>
        </div>
    </div>
</div>
var swiper = new Swiper(".mySwiper", {
    // 开启缩放
    zoom: true
});
案例
tab切换

<!DOCTYPE html>
<html lang="en">
  <head>
    <meta charset="UTF-8" />
    <meta http-equiv="X-UA-Compatible" content="IE=edge" />
    <meta name="viewport" content="width=device-width, initial-scale=1.0" />
    <title>tab切换</title>
    <link rel="stylesheet" href="./swiper/swiper-bundle.min.css" />
    <style>
      * {
        padding: 0;
        margin: 0;
        box-sizing: border-box;
        -webkit-tap-highlight-color: transparent;
      }
      a {
        text-decoration: none;
        color: #333;
      }
      .tab-container {
        width: 500px;
        border: 1px solid black;
        margin: 100px auto;
      }
      .tab-header {
        display: flex;
        justify-content: space-around;
        line-height: 50px;
      }
      .tab-label-active {
        color: #409eff;
        border-bottom: 2px solid #409eff;
      }
      .tab-content {
        height: 200px;
        line-height: 200px;
        text-align: center;
      }
    </style>
  </head>
  <body>
    <div class="tab-container">
      <div class="tab-header">
        <a
          href="javascript:;"
          class="tab-label tab-label-active"
          data-index="0">
          西游记
        </a>
        <a href="javascript:;" class="tab-label" data-index="1">水浒传</a>
        <a href="javascript:;" class="tab-label" data-index="2">三国演义</a>
      </div>
      <div class="swiper tab-content">
        <div class="swiper-wrapper">
          <div class="swiper-slide">西游记内容</div>
          <div class="swiper-slide">水浒传内容</div>
          <div class="swiper-slide">三国演义内容</div>
        </div>
      </div>
    </div>
    <script src="./swiper/swiper-bundle.min.js"></script>
    <script>
      let tabHeader = document.querySelector(".tab-header");
      let tabLabels = document.querySelectorAll(".tab-label");

      const tabSwiper = new Swiper(".swiper", {
        on: {
          slideChangeTransitionEnd: function () {
            for (let item of tabLabels) {
              item.classList.remove("tab-label-active");
            }
            tabLabels[this.activeIndex].classList.add("tab-label-active");
          },
        },
      });
      tabHeader.addEventListener("click", (e) => {
        let el = e.target;
        if (
          el.nodeName.toLowerCase() === "a" &&
          el.classList.contains("tab-label")
        ) {
          tabSwiper.slideTo(el.dataset.index);
        }
      });
    </script>
  </body>
</html>
引导页

<!DOCTYPE html>
<html lang="en">
	<head>
		<meta charset="UTF-8" />
		<meta name="viewport" content="width=device-width, initial-scale=1.0" />
		<title>页面滑动切换</title>
		<link rel="stylesheet" href="./swiper-bundle.min.css" />
		<style>
			* {
				padding: 0;
				margin: 0;
			}

			.swiper-container {
				width: 100vw;
				height: 100vh;
			}

			.swiper-slide {
				overflow: hidden;
				position: relative;
				display: flex;
				justify-content: center;
			}

			.logistics-slide {
				background-color: #57cfe1;
			}

			.purchase-slide {
				background-color: #fe8e34;
			}

			.logistics-text,
			.purchase-text {
				position: absolute;
				width: 214px;
				opacity: 0;
				transition: all 1s 0.5s;
			}

			.logistics-text-active,
			.purchase-text-active {
				opacity: 1;
			}

			.logistics-text {
				top: 50px;
			}

			.purchase-text {
				bottom: 40px;
			}

			.logistics-phone,
			.logistics-person,
			.purchase-phone,
			.purchase-person {
				position: absolute;
				width: 180px;
				transition: all 0.5s;
			}

			.logistics-phone {
				bottom: 0;
				transform: translate3d(-1000px, 0, 0);
			}

			.logistics-phone-active {
				transform: translate3d(-70px, 0, 0);
			}

			.logistics-person {
				bottom: 0;
				transform: translate3d(1000px, 0, 0);
			}

			.logistics-person-active {
				transform: translate3d(70px, 0, 0);
			}

			.purchase-person {
				top: 50px;
				transform: translate3d(-70px, -1000px, 0);
			}

			.purchase-person-active {
				top: 50px;
				transform: translate3d(-70px, 0, 0);
			}

			.purchase-phone {
				top: 120px;
				transform: translate3d(70px, 1000px, 0);
			}

			.purchase-phone-active {
				top: 120px;
				transform: translate3d(70px, 0, 0);
			}
		</style>
	</head>
	<body>
		<div class="swiper-container">
			<div class="swiper-wrapper">
				<div class="swiper-slide logistics-slide">
					<img src="./images/logistics-phone.png" alt="" class="logistics-phone" id="logistics-phone" />
					<img src="./images/logistics-person.png" alt="" class="logistics-person" id="logistics-person" />
					<img src="./images/logistics-text.png" alt="" class="logistics-text" id="logistics-text" />
				</div>
				<div class="swiper-slide purchase-slide">
					<img src="./images/purchase-phone.png" alt="" class="purchase-phone" id="purchase-phone" />
					<img src="./images/purchase-person.png" alt="" class="purchase-person" id="purchase-person" />
					<img src="./images/purchase-text.png" alt="" class="purchase-text" id="purchase-text" />
				</div>
			</div>
			<!-- 如果需要分页器 -->
			<div class="swiper-pagination"></div>
		</div>

		<script src="./swiper-bundle.min.js"></script>
		<script>
			const classNames = [
				['logistics-phone', 'logistics-person', 'logistics-text'],
				['purchase-phone', 'purchase-person', 'purchase-text']
			];

			new Swiper('.swiper-container', {
				direction: 'horizontal',
				pagination: {
					el: '.swiper-pagination',
					clickable: true
				},
				mousewheel: true,
				on: {
					init() {
						// 在初始化时触发一次 slideChangeTransitionEnd 事件
						this.emit('slideChangeTransitionEnd');
					},
					slideChangeTransitionEnd() {
						for (const id of classNames[this.activeIndex]) {
							const $el = document.getElementById(id);
							$el.classList.add(`${id}-active`);
						}

						if (typeof this.previousIndex !== 'undefined') {
							for (const id of classNames[this.previousIndex]) {
								const $el = document.getElementById(id);
								$el.classList.remove(`${id}-active`);
							}
						}
					}
				}
			});
		</script>
	</body>
</html>


