文章目录
- 第一章 征程
- 第二章-主进程与渲染进程
- 第三章-H5拖拽读取本地文件
- 第四章-快捷键注册及复制粘贴
- 第五章-渲染进程调用主进程模块
- 第六章-菜单模块
- 第七章-渲染进程与主进程间的通信
- 第八章-渲染进程与渲染进程间的通信
- 第九章-管理应用程序文件及url的加载方式
- 第十章-系统对话框模块
第一章 征程
前言
如果你是第一次接触Electron,你应该先去官网了解看看,通过官方提供的一个快速启动程序,立即看看Electron是如何运转的。
克隆示例项目的仓库
$ git clone https://github.com/electron/electron-quick-start
进入这个仓库
$ cd electron-quick-start
安装依赖并运行
$ npm install && npm start
如果你对Electron有所了解,请直接使用electron-vue进行快速开发
开始
现在,让我们一起从头到尾构建并了解Electron
//创建目录
$ mkdir electron-test
//进入
$ cd electron-test
//创建UI界面文
$ touch index.html
//创建主进程文件**
$ touch main.js
//创建package.json
$ npm init
//安装依赖
$ npm i electron --save
<!DOCTYPE html>
<html lang="en">
<head>
    <meta charset="UTF-8">
    <meta name="viewport" content="width=device-width, initial-scale=1.0">
    <meta http-equiv="X-UA-Compatible" content="ie=edge">
    <title>test</title>
</head>
<body>
    hello world
</body>
</html>
//main.js
//主进程

//引入electron模块
var electron =require('electron');

//nodejs中的path模块
var path=require('path');

//创建electron引用     控制应用生命周期的模块
var app=electron.app;

//创建electron BrowserWindow的引用          窗口相关的模块
var BrowserWindow=electron.BrowserWindow;

//变量 保存对应用窗口的引用
var mainWindow=null;

function createWindow(){
    //创建BrowserWindow的实例 赋值给mainWindow打开窗口
    mainWindow=new BrowserWindow({width:800,height:600,webPreferences: {
        nodeIntegration: true
    }});

    mainWindow.loadFile(path.join('index.html'));
    //开启渲染进程中的调试模式
    mainWindow.webContents.openDevTools();

    mainWindow.on('closed',()=>{
        mainWindow=null;
    })

}

app.on('ready',createWindow)


// 当所有的窗口被关闭后退出应用   Quit when all windows are closed.
app.on('window-all-closed', () => {
    // On OS X it is common for applications and their menu bar
    // to stay active until the user quits explicitly with Cmd + Q

    // 对于OS X系统,应用和相应的菜单栏会一直激活直到用户通过Cmd + Q显式退出
    if (process.platform !== 'darwin') {
      app.quit();
    }
  });

//macos
app.on('activate', () => {
// 对于OS X系统,当dock图标被点击后会重新创建一个app窗口,并且不会有其他
    if (mainWindow === null) {
        createWindow();
    }
});
//package.json
{
...
  //新增npm指令
  "scripts": {
    +"start": "electron ."
  },
 ...
}
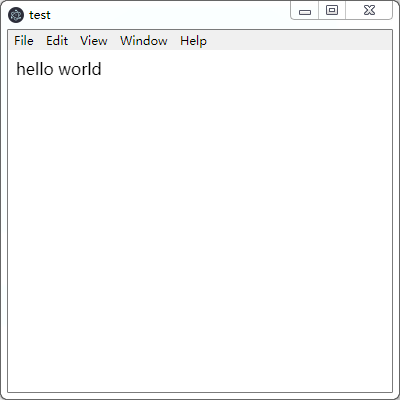
启动
npm start
结果
第二章-主进程与渲染进程
我们需要先明白,主进程和渲染进程是什么?
主进程
Electron使用前端技术作为APP的GUI,可以把它当做一个小型的Chrome内核浏览器,在package.json文件中的main键值就是主进程文件,主进程只有一个!
渲染进程
依赖于chrome内核的多进程架构,我们可以在Electron的每个页面使用自己的线程,这些线程称为渲染进程与在普通浏览器不同的是,在每个页面中,我们可以使用Node.js的API,可以在一定程度上与操作系统进行交互根据上面的说法,我们马上尝试一下两个练习:
- 打开APP的时候启动两个窗口
- 利用nodejs获取package.json的内容
1、准备两个页面
//index.html
<!DOCTYPE html>
<html lang="en">
<head>
    <meta charset="UTF-8">
    <meta name="viewport" content="width=device-width, initial-scale=1.0">
    <meta http-equiv="X-UA-Compatible" content="ie=edge">
    <title>test</title>
</head>
<body>
    <div class="main">
        hello world peter
    </div>
    <script src="render/index.js"></script>
</body>
</html>
//new.html
<!DOCTYPE html>
<html lang="en">
<head>
    <meta charset="UTF-8">
    <meta name="viewport" content="width=device-width, initial-scale=1.0">
    <meta http-equiv="X-UA-Compatible" content="ie=edge">
    <title>新页面</title>
</head>
<body>
    <div class="main">
        hello world envas
    </div>
</body>
</html>
2、主进程配置窗口的参数,加载页面
//主进程

//引入electron模块
var electron =require('electron');

//nodejs中的path模块
var path=require('path');

//创建electron引用     控制应用生命周期的模块
var app=electron.app;

//创建electron BrowserWindow的引用          窗口相关的模块
var BrowserWindow=electron.BrowserWindow;

//变量 保存对应用窗口的引用

var mainWindow=null;
var newWindow=null;


function createWindow(){
    //创建BrowserWindow的实例 赋值给mainWindow打开窗口
    mainWindow=new BrowserWindow({width:800,height:600,webPreferences: {
        nodeIntegration: true
    }});
    //创建BrowserWindow的实例 赋值给newWindow打开窗口
    newWindow=new BrowserWindow({width:200,height:200,webPreferences: {
        nodeIntegration: false
    }});
    mainWindow.loadFile(path.join('index.html'));
    newWindow.loadFile(path.join('new.html'));

    //开启渲染进程中的调试模式
    // mainWindow.webContents.openDevTools();

    mainWindow.on('closed',()=>{
        mainWindow=null;
    })
    newWindow.on('closed',()=>{
        newWindow=null
    })
}

app.on('ready',createWindow)


// 当所有的窗口被关闭后退出应用   Quit when all windows are closed.
app.on('window-all-closed', () => {
    // On OS X it is common for applications and their menu bar
    // to stay active until the user quits explicitly with Cmd + Q

    // 对于OS X系统,应用和相应的菜单栏会一直激活直到用户通过Cmd + Q显式退出
    if (process.platform !== 'darwin') {
      app.quit();
    }
  });

//macos
app.on('activate', () => {
// 对于OS X系统,当dock图标被点击后会重新创建一个app窗口,并且不会有其他
    if (mainWindow === null) {
        createWindow();
    }
});
3、利用fs模块读取文件信息,并输出到页面中
//index.js
// nodejs中的fs模块
let fs = require('fs')

// 读取package.json的内容并输出到页面中
fs.readFile('package.json',(err,data) => {
  if(!err){
    var main = document.querySelector('.main')
    main.innerHTML = main.innerHTML + data
  }
})
启动
npm start

第三章-H5拖拽读取本地文件
拖拽文件
如何实现拖拽效果?
通过H5的拖拽API获取文件路径,再使用Node.js读取文件内容,并输出到指定区域内
- 拖拽事件API
以下是实例代码
// nodejs中的fs模块
var fs=require('fs');

// 获取body
var content=document.getElementsByTagName('body')[0]

//取消H5拖拽事件默认行为
content.ondragenter=content.ondragover=content.ondragleave=function(){
    return false; /*阻止默认行为*/
}

// 监听拖拽事件ondrop(松手)时读取文件内容,并输出到页面中
content.ondrop=function(e){
    //阻止默认行为
    e.preventDefault();
    // 打印拖拽的文件
    console.log(e.dataTransfer.files[0]);
    var path=e.dataTransfer.files[0].path;
    fs.readFile(path,'utf-8',(err,data)=>{
        if(err){
            console.log(err);
            return false;
        }
        content.innerHTML=data;
    })
}
启动
npm start
扩展
考虑一下如何拖拽.exe文件,后自动打开该软件。
第四章-快捷键注册及复制粘贴
系统快捷键(globalShortcut)
进程:主进程
globalShortcut 模块可以在操作系统中注册/注销全局快捷键, 以便可以为操作定制各种快捷键。但只能在主进程中使用
globalShortcut主要接收两个参数,分别为注册的快捷键和回调函数
//main.js
//引入electron模块
var electron =require('electron');

//nodejs中的path模块
var path=require('path');

//创建electron引用     控制应用生命周期的模块
var app=electron.app;

//创建electron BrowserWindow的引用          窗口相关的模块
var BrowserWindow=electron.BrowserWindow;

// 调用全局快捷键注册模块
var globalShortcut = electron.globalShortcut

//变量 保存对应用窗口的引用

var mainWindow=null;

function createWindow(){
    //创建BrowserWindow的实例 赋值给mainWindow打开窗口
    mainWindow=new BrowserWindow({width:800,height:600,webPreferences: {
        nodeIntegration: true
    }});

    mainWindow.loadURL(path.join('file:',__dirname,'index.html'));

    //开启渲染进程中的调试模式
    // mainWindow.webContents.openDevTools();

    console.log(path.join('file:',__dirname,'index.html'));

    mainWindow.on('closed',()=>{
        mainWindow=null;
    })

    const ret = globalShortcut.register('CommandOrControl+X', () => {
        console.log('CommandOrControl+X is pressed')
    })
    if (!ret) {
        console.log('registration failed')
    }
    // 检查快捷键是否注册成功
    console.log(globalShortcut.isRegistered('CommandOrControl+X'))
}

app.on('ready',createWindow)


// 当所有的窗口被关闭后退出应用   Quit when all windows are closed.
app.on('window-all-closed', () => {
    // On OS X it is common for applications and their menu bar
    // to stay active until the user quits explicitly with Cmd + Q

    // 对于OS X系统,应用和相应的菜单栏会一直激活直到用户通过Cmd + Q显式退出
    if (process.platform !== 'darwin') {
      app.quit();
    }
  });

//macos
app.on('activate', () => {
// 对于OS X系统,当dock图标被点击后会重新创建一个app窗口,并且不会有其他
    if (mainWindow === null) {
        createWindow();
    }
});
复制粘贴板(clipboard)
进程:主进程,渲染进程
以下是完整实例
//index.html
<!DOCTYPE html>
<html lang="en">
<head>
    <meta charset="UTF-8">
    <meta name="viewport" content="width=device-width, initial-scale=1.0">
    <meta http-equiv="X-UA-Compatible" content="ie=edge">
    <title>electron</title>
    <style>

    </style>
</head>
<body>
    <div>
        <span id="paste">粘贴</span>
        <input id='copyInput' type="text" placeholder='已复制! 请在这里执行粘贴'>
    </div>
    <script src="render/index.js"></script>
</body>
</html>
//index.js
//创建Electron并引用复制模块
const { clipboard } = require('electron')

//提前复制好一段文本
clipboard.writeText('Example String')

let copyInput = document.querySelector('#copyInput')
let paste = document.querySelector('#paste')

//监听事件 并将复制内容输出到对应的DOM元素中
paste.addEventListener('click', function() {
    if (copyInput.value !== '') copyInput.value = ''
    copyInput.value = clipboard.readText()
})
启动
npm start
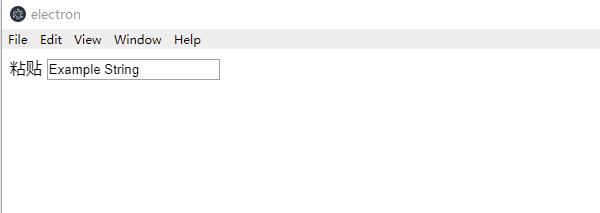
点击粘贴即可获取复制的内容
clipboard提供了不止复制粘贴文本的方法,还包括html、图片等许多方法
第五章-渲染进程调用主进程模块
渲染进程调用主进程模块(remote)
进程:渲染进程
remote模块帮助我们在渲染进程中调用主进程的模块。根据官方的说法,remote模块返回的对象(函数),是一个远程对象(函数),它不是简单的在渲染进程中创建一个新的对象实例,而是通知到主进程创建新的对象,随后发送到渲染进程,这种机制保证了主进程与渲染进程共用一个对象(内存),同步了进程消息。
1、在渲染进程通过调用remote模块获取BrowserWindow对象打开新的窗口加载新的页面
//index.js
//nodejs的path模块
const path = require('path')

//获取dom
const item = document.querySelector('#openWindow')

//通过Electron的remote模块引用BrowserWindow模块
const { BrowserWindow } = require('electron').remote

//监听点击事件
item.addEventListener('click', () => {
  let win = new BrowserWindow({ width: 400, height: 400 })
  var file = path.join('file:///', __dirname, 'new.html')
  win.loadURL(file)
  win.on('closed', function() {
    win = null
  })
})
启动
npm start
扩展
remote是怎么实现远程对象数据传递的?官方解释类似于 Java 的RMI 。
第六章-菜单模块
菜单模块(Menu)
进程:主进程
Menu 可以两种菜单分别是原生应用菜单和上下文菜单,如下所示
接下来我来演示一个原生应用菜单
//在渲染进程调用Menu模块
const {Menu}=require('electron').remote;

//定义菜单
var template=[
    {

        label:'文件',
        submenu:[
            {
                label:'新建文件',
                // 注册快捷键
                accelerator:'ctrl+n',
                // 点击触发回调
                click:function(){
                    console.log('ctrl+n');
                }
            },
            {
                label:'新建窗口',
                click:function(){
                    console.log('new window');
                }
            }
        ]
    },
    {
        label:'编辑',
        submenu:[
            {
                label:'复制11',
                //使用内置角色
                role:'copy'
            },
            {
                label:'截切',
                role:'cut'
            }
        ]
    }
]

var menu = Menu.buildFromTemplate(template);
Menu.setApplicationMenu(menu);

//右键菜单事件
window.addEventListener('contextmenu',function(e){
    //阻止当前窗口默认事件
    e.preventDefault();

    //在当前窗口点击右键的时候弹出  定义的菜单模板
    menu.popup({window:remote.getCurrentWindow()})

},false)
启动
npm start
接下来你自己实现一个上下文菜单吧,参考这份菜单模板配置参数等相关信息
第七章-渲染进程与主进程间的通信
渲染进程与主进程的通信模块(ipcMain,ipcRenderer)
ipcMain:主进程
从主进程到渲染进程的异步通信。
ipcRenderer: 渲染进程
从渲染器进程到主进程的异步通信。
下面是一个完整的代码实例
//index.html
<!DOCTYPE html>
<html lang="en">
<head>
    <meta charset="UTF-8">
    <meta name="viewport" content="width=device-width, initial-scale=1.0">
    <meta http-equiv="X-UA-Compatible" content="ie=edge">
    <title>Document</title>
</head>
<body>
  <div>
      <button class="sendMain">发送一条异步消息到主进程</button>
      <button class="sendMainSync">发送一条同步消息到主进程</button>
      <script src="./renderer/ipcRenderer.js"></script>
  </div>
</body>
</html>
//ipcRenderer.js
// 渲染进程下的通信模块
const {ipcRenderer} = require('electron')

// 获取DOM
const sendMain = document.querySelector('.sendMain')
const sendMainSync = document.querySelector('.sendMainSync')

// 向主进程发送名为sendMain的异步信息
sendMain.addEventListener('click', function() {
    ipcRenderer.send('sendMain','this is a sync news')
})

// 监听主进程对sendMain事件的异步返回结果
ipcRenderer.on('replay', function(event,arg) {
    alert(arg)
})

// 向主进程发送名为sendMainSync的同步信息
sendMainSync.addEventListener('click', function() {
    // 同步信息可直接获取返回结果
    var retunValue = ipcRenderer.sendSync('sendMainSync','this is a news')
    alert(retunValue)
})
// ipcMain.js
// 主进程通信模块
const {ipcMain} = require('electron')

// 监听sendMain事件下的异步信息
ipcMain.on('sendMain', function(event, data) {
    event.reply('replay',data+'主进程接收到的异步信息')
})

// 监听sendMainSync事件下的同步信息
ipcMain.on('sendMainSync', function(event, data) {
    // 同步信息直接返回结果
    event.returnValue = data+'主进程接收到的同步信息'
})
启动:
npm start
第八章-渲染进程与渲染进程间的通信
渲染进程与渲染进程的通信(webContents)
渲染以及控制 web 页面
进程:主进程
在主进程与渲染进程一文中,我提到依赖于chrome内核的多进程架构,我们可以在Electron的每个页面使用自己的线程,于是我们可能出现这样一种需求。我们需要在多个页面中进行通信,从前端的角度来讲,我们可以使用localStorage,来保存会话。但是本文将以Electron的方式来解决这个问题:
1、首先我们会在渲染进程中利用ipcRenderer发送消息到主进程中
//openWindow.js

// 渲染进程下的通信模块
const { ipcRenderer } = require('electron')

// 获取DOM
const sendNews = document.querySelector('.sendNews')

// 渲染进程向主进程openWindow事件
sendNews.addEventListener('click', function() {
    var news = Math.random();
    ipcRenderer.send('openWindow',news);
})

// 监听新页面传递回来的toIndex事件
ipcRenderer.on('toIndex', function(event,data) {
    alert('新页面传递过来的信息'+data)
})
2、紧接着,在主进程中,通过ipcMain模块监听到渲染进程发来的消息,再利用BrowserWindow创建窗口,最后就是本文的重点,使用webContents属性监听窗口创建完成后,将消息发送到新的窗口利用webContents发送的消息中还包含了BrowserWindow.getFocusedWindow().id传递的当前窗口的指针id。
这一做法的目的,是为了新窗口在接收到信息的同时,获取到发送消息的窗口的对象BrowserWindow对象
// ipcMain.js
// 主进程通信模块
const {ipcMain,BrowserWindow} = require('electron')
const path = require('path')
let win = null

// 监听openWindow事件下的异步信息
ipcMain.on('openWindow', function(event, data) {
    // 通过getFocusedWindow静态方法 获取当前焦点窗口的指针ID
    let winId =  BrowserWindow.getFocusedWindow().id
    // 配置窗口
    win = new BrowserWindow({
        width:400,
        height:600,
        webPreferences:{
            nodeIntegration: true
        }
    })
    // 加载页面
    win.loadURL(path.join('file:',__dirname,'../news.html'));
    /*
    窗口加载完毕后(did-finish-load)发送toNews消息
    发送的内容分别为,index页面发送的消息及index页面的窗口Id
    */
    win.webContents.on('did-finish-load', function() {
        win.webContents.send('toNews',data,winId)
    })
})
3、在新的窗口,通过ipcRenderer监听webContents发送来的toNews事件消息
利用BrowserWindow.fromId(winId)我们可以获取原窗口BrowserWindow对象,再次调用webContents.send往原窗口,发送消息,通过这样的方式,就完成了渲染进程间的通信:
const { ipcRenderer } = require('electron')
const { BrowserWindow } = require('electron').remote

ipcRenderer.on('toNews',function(event,data,winId) {
        alert(`该消息${data}由${winId}窗口传递的`)
        // 通过winId  返回 该窗口BrowserWindow的对象
        var firstWin = BrowserWindow.fromId(winId);
        // 通过webContents向该窗口传递信息
        firstWin.webContents.send('toIndex','this is news');
})
启动:
npm start
从上文代码示例,我们可以知道渲染进程间的通信关键在于webContents。webContents 是 EventEmitter 的一个实例, 负责渲染和控制网页, 是 BrowserWindow 对象的一个属性
扩展
文章本来到这里就应该结束了,最近发现了关于webContents的一些其他用法,直接上代码了
ipcMain.on('open-music-file', (event) => {
    dialog.showOpenDialog({
      properties: ['openFile','multiSelections'],
      filters: [
        { name: 'Music', extensions: ['mp3'] }
      ]
    },(filesPath) => {
      if(filesPath) {
        event.sender.send('selected-file', filesPath);
      }
    })
  })
从以上代码中可以看到,我使用ipcMain监听渲染进程一个名为open-music-file的事件,通过dialog模块打开文件对话框,当选中文件后,我设置在dialog.showOpenDialog的回调函数就可以获取选中的文件路径,接下来就是重点,我使用了ipcMain回调函数中的event对象触发了selected-file事件传递了文件路径信息。重点就是:event.sender会返回webContents对象,所以event.sender.send可以出发对应地渲染进程的事件监听
第九章-管理应用程序文件及url的加载方式
管理文件及url(shell)
使用默认应用程序管理文件和 URL。
进程:主进程、渲染进程
shell模块支持在主进程与渲染进程中一同使用,通过它,我们可以完成不少实用的功能,它的用法非常简单,以下将通过代码实例将它的主要功能展示出来
1、配置一个菜单,包含所有shell的功能
// menu.js
const { Menu,shell,BrowserWindow } = require('electron')
const path = require('path')

// 在本地浏览器加载url
function openWeb(url) {
    shell.openExternal(url)
}
// 在webview标签中加载url
function openWebview(url) {
    // 获取当前窗口
    var win = BrowserWindow.getFocusedWindow();
    // 利用webContents发送信息给当前窗口
    win.webContents.send('openWebview',url);
}
// 打开当前目录
function opendirname (fullPath) {
    shell.showItemInFolder(fullPath)
}
// 打开文件
function openfile (fullPath) {
    shell.openItem(fullPath)
}
// 删掉文件
function deletefile (fullPath) {
    shell.moveItemToTrash(fullPath)
}

//菜单配置
const template = [
    {
        label: 'shell主要功能',
        submenu: [
            {
                label: 'web',
                click:function(){
                    console.log('x')
                    openWeb('https://www.github.com')
                }
            },
            {
                type: 'separator'
            },
            {
                label: 'webview',
                click:function(){
                    openWebview('https://www.github.com')
                }
            },
            {
                type: 'separator'
            },
            {
                label: 'dir',
                click:function(){
                    opendirname(__dirname)
                }
            },
            {
                type: 'separator'
            },
            {
                label: 'file',
                click:function(){
                    let file = path.join(path.resolve(),'news.html')
                    openfile(file)
                }
            },
            {
                type: 'separator'
            },
            {
                label: 'deletefile',
                click:function(){
                    let file = path.join(path.resolve(),'news.html')
                    deletefile(file)
                }
            },
            {
                type: 'separator'
            },
            {
                label: 'beep',
                click:function(){
                    // 播放声音
                    shell.beep()
                }
            }
        ]
    },
]

let m = Menu.buildFromTemplate(template)
Menu.setApplicationMenu(m)
electron的更新迭代貌似还是比较频繁,截止笔者使用的版本是5.0.1,在这个版本中,如果想使用webview标签,我们还需在主进程声明一下,否则将无法加载…
问题描述:electron/electron#18145
// main.js
...
function createWindow(){
  ...
        webPreferences: {
            // 开启node
            nodeIntegration: true,
            // 新增允许使用webview标签
            webviewTag: true
        },
  ...
}
…
启动:
npm start
shell的所有功能都已经配置在菜单中了,它的使用非常简单!
第十章-系统对话框模块
系统对话框(dialog)
进程:主进程
electron已升级为7.0以上版本,所以的dialog的API都新增了Promise功能,我将用一个最简单的例子演示
// 7.0以下版本
const option = {
    type: 'info',
    title: '信息',
    message: '这是一条信息对话框',
    buttons: ['yes','no']
}
dialog.showMessageBox(option,function (index) {
    alert(index)
})
// 7.0版本 新增promise用法
const option = {
    type: 'info',
    title: '信息',
    message: '这是一条信息对话框',
    buttons: ['yes','no']
}
dialog.showMessageBox(option).then((result) {
    alert(result)
})
Electron为我们提供了桌面端的提示对话框形式,下面让我们共同了解一下
下面是一个完整的代码实例
//index.html
<!DOCTYPE html>
<html lang="en">
<head>
    <meta charset="UTF-8">
    <meta name="viewport" content="width=device-width, initial-scale=1.0">
    <meta http-equiv="X-UA-Compatible" content="ie=edge">
    <title>Document</title>
</head>
<body>
  <div>
      <button class="errBox">错误提示对话框</button>
      <button class="infoBox">信息提示对话框</button>
      <button class="dirBox">打开目录对话框</button>
      <button class="saveBox">保存文件对话框</button>
      <script src="./renderer/dialog.js"></script>
  </div>
</body>
</html>
// dialog.js
// dialog本身是主进程的模块,这里为了方便我通过渲染进程的remote模块调用,原因后面讲
const { dialog,BrowserWindow } = require('electron').remote
const errBox = document.querySelector('.errBox')
const dirBox = document.querySelector('.dirBox')
const infoBox = document.querySelector('.infoBox')
const saveBox = document.querySelector('.saveBox')

errBox.addEventListener('click', function() {
    dialog.showErrorBox('错误提示','这是一条错误信息')
})

infoBox.addEventListener('click', function() {
    const option = {
        type: 'info',
        title: '信息',
        message: '这是一条信息对话框',
        buttons: ['yes','no']
    }
    dialog.showMessageBox(option,function (index) {
        // index是你选择按钮的索引
        alert(index)
    })
})

dirBox.addEventListener('click', function() {
    let windows = BrowserWindow.getFocusedWindow()
    dialog.showOpenDialog(windows,{
        // 允许选择文件及文件夹
        properties: ['openFile','openDirectory']
    },function(filePaths) {
        // 弹出你所选择的文件或文件夹的路径
        alert(filePaths)
    })
})

saveBox.addEventListener('click', function() {
    const options = {
        title: '保存图片',
        // 可以指定可显示文件的数组类型
        filters: [
          { name: 'Images', extensions: ['jpg', 'png', 'gif'] }
        ],
        // 保存文件默认名
        defaultPath: __filename
      }
    dialog.showSaveDialog(options, function (filename) {
        // 保存文件所在路径
        alert(filename)
    })
})
启动:
npm start
dialog模块的使用非常简单,它的参数配置也十分丰富,足够满足我们的需求,一般来说dialog都会放在主进程来使用,通过渲染进程与主进程间的通信我们可以实现复杂的交互。
