一、捕获本地媒体流getUserMedia
1.index.html
<!DOCTYPE html>
<html lang="en">
<head>
    <meta charset="UTF-8">
    <meta name="viewport" content="width=device-width, initial-scale=1.0">
    <meta http-equiv="X-UA-Compatible" content="ie=edge">
    <title>Document</title>
</head>
<body>
    <div>
        <button id="start">开始录制</button>
        <button id="stop">停止录制</button>
    </div>
    <div>
        <video autoplay controls id="stream"></video>
    </div>
    <script>
        // 只获取视频
        let constraints = {audio: false, video: true};
        let startBtn = document.getElementById('start')
        let stopBtn = document.getElementById('stop')
        let video = document.getElementById('stream')
        startBtn.onclick = function() {
            navigator.getUserMedia(constraints, function(stream) {
                video.srcObject = stream;
                window.stream = stream;
            }, function(err) {
                console.log(err)
            })
        }
        stopBtn.onclick = function() {
            video.pause();
        }
    </script>
</body>
</html>部署本地服务器后,chrome中访问192.168.11.129:9050会报错:navigator.getUserMedia is not a function。原因是,Chrome 47以后,getUserMedia API只能允许来自“安全可信”的客户端的视频音频请求,如HTTPS和本地的Localhost。所以将访问地址改成localhost:9050即可。
二、同网页示例
例子来源:https://codelabs.developers.google.com/codelabs/webrtc-web/#4
1.index.html
<!DOCTYPE html>
<html>
<head>
<title>Realtime communication with WebRTC</title>
<style>
body {
font-family: sans-serif;
}
video {
max-width: 100%;
width: 320px;
}
</style>
</head>
<body>
<h1>Realtime communication with WebRTC</h1>
<video id="localVideo" autoplay playsinline></video>
<video id="remoteVideo" autoplay playsinline></video>
<div>
<button id="startButton">开始</button>
<button id="callButton">调用</button>
<button id="hangupButton">挂断</button>
</div>
<!-- 适配各浏览器 API 不统一的脚本 -->
<script src="https://webrtc.github.io/adapter/adapter-latest.js"></script>
</script>
</body>
</html>2.main.js
'use strict';
//log
function trace(text) {
text = text.trim();
const now = (window.performance.now() / 1000).toFixed(3);
console.log(now, text);
}
// 设置两个video,分别显示本地视频流和远端视频流
const localVideo = document.getElementById('localVideo');
const remoteVideo = document.getElementById('remoteVideo');
localVideo.addEventListener('loadedmetadata', logVideoLoaded);
remoteVideo.addEventListener('loadedmetadata', logVideoLoaded);
remoteVideo.addEventListener('onresize', logResizedVideo);
function logVideoLoaded(event) {
const video = event.target;
trace(`${video.id} videoWidth: ${video.videoWidth}px, ` +
`videoHeight: ${video.videoHeight}px.`);
}
function logResizedVideo(event) {
logVideoLoaded(event);
if (startTime) {
const elapsedTime = window.performance.now() - startTime;
startTime = null;
trace(`Setup time: ${elapsedTime.toFixed(3)}ms.`);
}
}
let startTime = null;
let localStream;
let remoteStream;
// 建立两个对等连接对象,分表代表本地和远端
let localPeerConnection;
let remotePeerConnection;
const startButton = document.getElementById('startButton');
const callButton = document.getElementById('callButton');
const hangupButton = document.getElementById('hangupButton');
callButton.disabled = true;
hangupButton.disabled = true;
startButton.addEventListener('click', startAction);
callButton.addEventListener('click', callAction);
hangupButton.addEventListener('click', hangupAction);
// 传输视频,不传输音频
const mediaStreamConstraints = {
video: true,
audio: false
};
//开始事件,采集摄像头到本地
function startAction() {
startButton.disabled = true;
navigator.getUserMedia(mediaStreamConstraints, gotLocalMediaStream, handleLocalMediaStreamError)
trace('Requesting local stream.');
}
function gotLocalMediaStream(mediaStream) {
localVideo.srcObject = mediaStream;
localStream = mediaStream;
trace('Received local stream.');
callButton.disabled = false;
}
function handleLocalMediaStreamError(error) {
trace(`navigator.getUserMedia error: ${error.toString()}.`);
}
// 设置只交换视频
const offerOptions = {
offerToReceiveVideo: 1,
};
// 创建对等连接
function callAction() {
callButton.disabled = true;
hangupButton.disabled = false;
trace('Starting call.');
startTime = window.performance.now();
const videoTracks = localStream.getVideoTracks();
const audioTracks = localStream.getAudioTracks();
if (videoTracks.length > 0) {
trace(`Using video device: ${videoTracks[0].label}.`);
}
if (audioTracks.length > 0) {
trace(`Using audio device: ${audioTracks[0].label}.`);
}
// 服务器配置
  const servers = null;
  localPeerConnection = new RTCPeerConnection(servers);
trace('Created local peer connection object localPeerConnection.');
localPeerConnection.addEventListener('icecandidate', handleConnection);
localPeerConnection.addEventListener('iceconnectionstatechange', handleConnectionChange);
remotePeerConnection = new RTCPeerConnection(servers);
trace('Created remote peer connection object remotePeerConnection.');
remotePeerConnection.addEventListener('icecandidate', handleConnection);
remotePeerConnection.addEventListener('iceconnectionstatechange', handleConnectionChange);
remotePeerConnection.addEventListener('addstream', gotRemoteMediaStream);
localPeerConnection.addStream(localStream);
trace('Added local stream to localPeerConnection.');
trace('localPeerConnection createOffer start.');
localPeerConnection.createOffer(offerOptions)
.then(createdOffer).catch(setSessionDescriptionError);
}
function getOtherPeer(peerConnection) {
return (peerConnection === localPeerConnection) ?
remotePeerConnection : localPeerConnection;
}
function getPeerName(peerConnection) {
return (peerConnection === localPeerConnection) ?
'localPeerConnection' : 'remotePeerConnection';
}
function handleConnection(event) {
const peerConnection = event.target;
const iceCandidate = event.candidate;
if (iceCandidate) {
const newIceCandidate = new RTCIceCandidate(iceCandidate);
const otherPeer = getOtherPeer(peerConnection);
otherPeer.addIceCandidate(newIceCandidate)
.then(() => {
handleConnectionSuccess(peerConnection);
}).catch((error) => {
handleConnectionFailure(peerConnection, error);
});
trace(`${getPeerName(peerConnection)} ICE candidate:\n` +
`${event.candidate.candidate}.`);
}
}
function handleConnectionSuccess(peerConnection) {
trace(`${getPeerName(peerConnection)} addIceCandidate success.`);
};
function handleConnectionFailure(peerConnection, error) {
trace(`${getPeerName(peerConnection)} failed to add ICE Candidate:\n`+
`${error.toString()}.`);
}
function handleConnectionChange(event) {
const peerConnection = event.target;
console.log('ICE state change event: ', event);
trace(`${getPeerName(peerConnection)} ICE state: ` +
`${peerConnection.iceConnectionState}.`);
}
function gotRemoteMediaStream(event) {
const mediaStream = event.stream;
remoteVideo.srcObject = mediaStream;
remoteStream = mediaStream;
trace('Remote peer connection received remote stream.');
}
function createdOffer(description) {
trace(`Offer from localPeerConnection:\n${description.sdp}`);
trace('localPeerConnection setLocalDescription start.');
localPeerConnection.setLocalDescription(description)
.then(() => {
setLocalDescriptionSuccess(localPeerConnection);
}).catch(setSessionDescriptionError);
trace('remotePeerConnection setRemoteDescription start.');
remotePeerConnection.setRemoteDescription(description)
.then(() => {
setRemoteDescriptionSuccess(remotePeerConnection);
}).catch(setSessionDescriptionError);
trace('remotePeerConnection createAnswer start.');
remotePeerConnection.createAnswer()
.then(createdAnswer)
.catch(setSessionDescriptionError);
}
function createdAnswer(description) {
trace(`Answer from remotePeerConnection:\n${description.sdp}.`);
trace('remotePeerConnection setLocalDescription start.');
remotePeerConnection.setLocalDescription(description)
.then(() => {
setLocalDescriptionSuccess(remotePeerConnection);
}).catch(setSessionDescriptionError);
trace('localPeerConnection setRemoteDescription start.');
localPeerConnection.setRemoteDescription(description)
.then(() => {
setRemoteDescriptionSuccess(localPeerConnection);
}).catch(setSessionDescriptionError);
}
function setSessionDescriptionError(error) {
trace(`Failed to create session description: ${error.toString()}.`);
}
function setLocalDescriptionSuccess(peerConnection) {
setDescriptionSuccess(peerConnection, 'setLocalDescription');
}
function setRemoteDescriptionSuccess(peerConnection) {
setDescriptionSuccess(peerConnection, 'setRemoteDescription');
}
function setDescriptionSuccess(peerConnection, functionName) {
const peerName = getPeerName(peerConnection);
trace(`${peerName} ${functionName} complete.`);
}
//断掉
function hangupAction() {
localPeerConnection.close();
remotePeerConnection.close();
localPeerConnection = null;
remotePeerConnection = null;
hangupButton.disabled = true;
callButton.disabled = false;
trace('Ending call.');
}【学习地址】:FFmpeg/WebRTC/RTMP/NDK/Android音视频流媒体高级开发
【文章福利】:免费领取更多音视频学习资料包、大厂面试题、技术视频和学习路线图,资料包括(C/C++,Linux,FFmpeg webRTC rtmp hls rtsp ffplay srs 等等)有需要的可以点击1079654574加群领取哦~

3.源码分析
点击开始,触发startAction没什么好说的。点击调用,直接看callAction: (1)首先使用new RTCPeerConnection创建了两个connection
const servers = null;
localPeerConnection = new RTCPeerConnection(servers);servers在这个例子中并没有用,是用来配置STUN and TURN s服务器的,先忽略。
(2)添加事件侦听,先忽略
//也可以使用onicecandidate这种写法
addEventListener('icecandidate', handleConnection);
addEventListener('iceconnectionstatechange', handleConnectionChange);
(3)然后就是addStream和createOffer
localPeerConnection.addStream(localStream);
trace('Added local stream to localPeerConnection.');
trace('localPeerConnection createOffer start.');
localPeerConnection.createOffer(offerOptions)
.then(createdOffer).catch(setSessionDescriptionError);其中createOffer需要一个Options
// 设置只交换视频
const offerOptions = {
  offerToReceiveVideo: 1,
};
这里我的理解是,createOffer为了产生SDP描述,要先使用addStream把视频流加载进去才能解析。
-
A创建一个RTCPeerConnection对象。
-
A使用RTCPeerConnection .createOffer()方法产生一个offer(一个SDP会话描述)。
-
A用生成的offer调用setLocalDescription(),设置成自己的本地会话描述。
-
A将offer通过信令机制发送给B。
-
B用A的offer调用setRemoteDescription(),设置成自己的远端会话描述,以便他的RTCPeerConnection知道A的设置。
-
B调用createAnswer()生成answer
-
B通过调用setLocalDescription()将其answer设置为本地会话描述。
-
B然后使用信令机制将他的answer发回给A。
-
A使用setRemoteDescription()将B的应答设置为远端会话描述。
上述过程可以在源码createOffer和createAnser中看到。
(4)icecandidate事件 参考
https://developer.mozilla.org/zh-CN/docs/Web/API/RTCPeerConnection/icecandidate_event
当 RTCPeerConnection通过RTCPeerConnection.setLocalDescription() (en-US)方法更改本地描述之后,该RTCPeerConnection会抛出icecandidate事件。该事件的监听器需要将更改后的描述信息传送给远端RTCPeerConnection,以更新远端的备选源。
意思就是setLocalDescription被调用后,触发icecandidate事件,这一点可以在示例的console中得到验证。
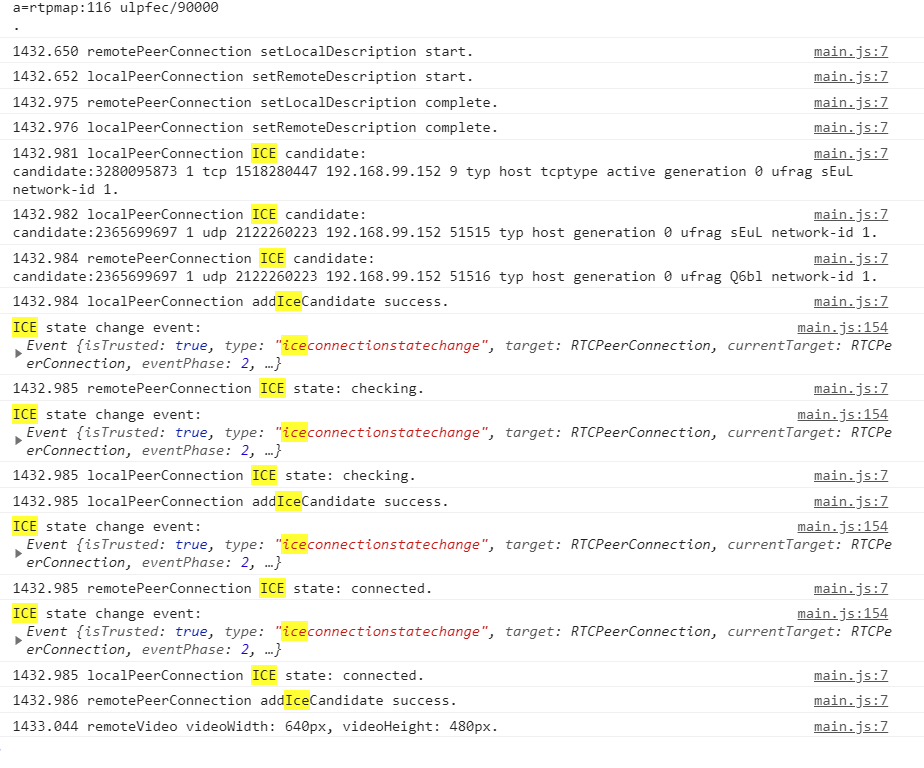
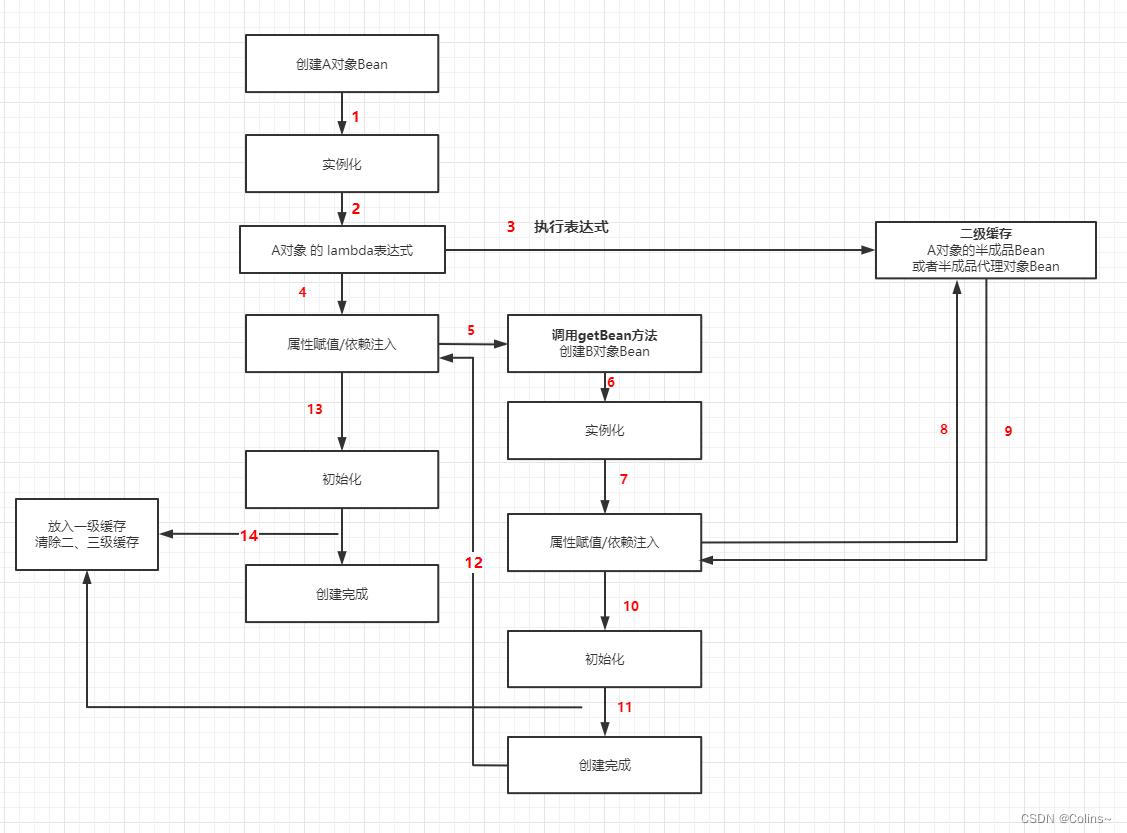
4.来张流程图,转自https://segmentfault.com/a/1190000037513346

(5)addTrack,addTransceiver addStream() 已过时,官方不推荐使用.将一个MediaStream音频或视频的本地源,添加到WebRTC对等连接流对象中。官方推荐我们使用另外一个方法addTrack
remotePeerConnection.ontrack = function(evt) {
const mediaStream = evt.streams[0];
remoteVideo.srcObject = mediaStream;
remoteStream = mediaStream;
trace('Remote peer connection received remote stream.');
}
localStream.getTracks().forEach(track => {
localPeerConnection.addTrack(track, localStream);
// localPeerConnection.addTransceiver(track, {streams: [localStream]}); // 这个也可以
});如果你是做音视频聊天相关的产品,那么addTrack 刚好能满足你的需求,毕竟需要使用到用户的摄像头、麦克风(浏览器会询问用户是否授权)。但是你只想建立音视频轨道,并不需要使用摄像头、麦克风,那我们应该怎么去做呢?
addTransceiver创建一个新的RTCRtpTransceiver并将其添加到与关联的收发器集中RTCPeerConnection。每个收发器都代表一个双向流,并带有RTCRtpSender和RTCRtpReceiver。
let rtcTransceiver = RTCPeerConnection .addTransceiver(trackOrKind,init);(a)trackOrKind: MediaStreamTrack以与所述收发器相关联,或者一个DOMString被用作kind接收器的的track。这里视频轨道就传"video",音频轨道就传"audio" (b)init: 可选参数。如下:
-
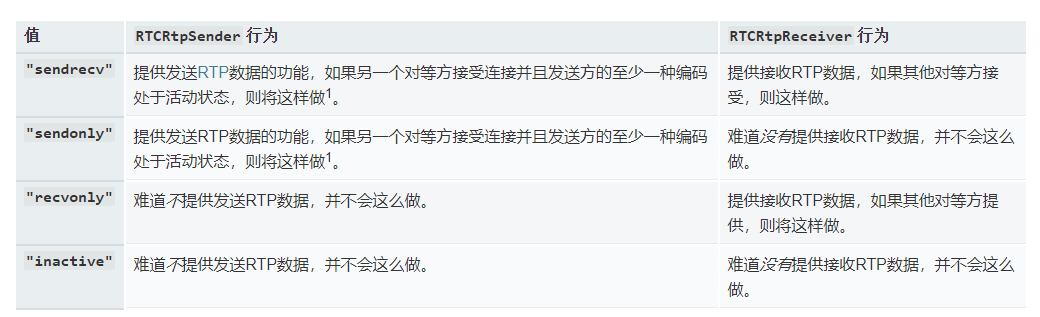
direction:收发器的首选方向性。此值用于初始化新RTCRtpTransceiver对象的*RTCRtpTransceiver.direction属性。
-
sendEncodings:从中发送RTP媒体时允许的编码列表RTCRtpSender。每个条目都是类型RTCRtpEncodingParameters。
-
streams: MediaStream要添加到收发器的对象列表RTCRtpReceiver;当远程对等方RTCPeerConnection的track事件发生时,这些是将由该事件指定的流。
举个例子: 添加一个单向的音视频流收发器
            this.rtcPeerConnection.addTransceiver("video", {
                direction: "recvonly"
            });
            this.rtcPeerConnection.addTransceiver("audio", {
                direction: "recvonly"
            });
上述代码只会接收对端发过来的音视频流,不会将自己的音视频流传输给对端。direction:
三、网络1V1示例
源码参见https://github.com/wuyawei/webrtc-stream
这个例子不再是同一个网页,所以需要借助socket.io通讯。 房间相关逻辑暂时忽略,看一下创建offer部分:
socket.on('apply', data => { // 你点同意的地方
    ...
    this.$confirm(data.self + ' 向你请求视频通话, 是否同意?', '提示', {
        confirmButtonText: '同意',
        cancelButtonText: '拒绝',
        type: 'warning'
    }).then(async () => {
        await this.createP2P(data); // 同意之后创建自己的 peer 等待对方的 offer
        ... // 这里不发 offer
    })
    ...
});
socket.on('reply', async data =>{ // 对方知道你点了同意的地方
    switch (data.type) {
        case '1': // 只有这里发 offer
            await this.createP2P(data); // 对方同意之后创建自己的 peer
            this.createOffer(data); // 并给对方发送 offer
            break;
        ...
    }
});
本例采取的是呼叫方发送 Offer,这个地方一定得注意,只要有一方创建 Offer 就可以了,因为一旦连接就是双向的。
和微信等视频通话一样,双方都需要进行媒体流输出,因为你们都要看见对方。所以这里和之前本地对等连接的区别就是都需要给自己的 RTCPeerConnection 实例添加媒体流,然后连接后各自都能拿到对方的视频流。在 初始化 RTCPeerConnection 时,记得加上 onicecandidate 函数,用以给对方发送 ICE 候选。
async createP2P(data) {
    this.loading = true; // loading动画
    this.loadingText = '正在建立通话连接';
    await this.createMedia(data);
},
async createMedia(data) {
    ... // 获取并将本地流赋值给 video  同之前
    this.initPeer(data); // 获取到媒体流后,调用函数初始化 RTCPeerConnection
},
initPeer(data) {
    // 创建输出端 PeerConnection
    ...
    this.peer.addStream(this.localstream); // 都需要添加本地流
    this.peer.onicecandidate = (event) => {
    // 监听ICE候选信息 如果收集到,就发送给对方
        if (event.candidate) { // 发送 ICE 候选
            socket.emit('1v1ICE',
            {account: data.self, self: this.account, sdp: event.candidate});
        }
    };
    this.peer.onaddstream = (event) => {
    // 监听是否有媒体流接入,如果有就赋值给 rtcB 的 src,改变相应loading状态,赋值省略
        this.isToPeer = true;
        this.loading = false;
        ...
    };
}
createOffer 等信息交换和之前一样,只是需要通过 Socket 转发给对应的客户端。然后各自接收到消息后分别采取对应的措施。
socket.on('1v1answer', (data) =>{ // 接收到 answer
this.onAnswer(data);
});
socket.on('1v1ICE', (data) =>{ // 接收到 ICE
this.onIce(data);
});
socket.on('1v1offer', (data) =>{ // 接收到 offer
this.onOffer(data);
});
async createOffer(data) { // 创建并发送 offer
try {
// 创建offer
let offer = await this.peer.createOffer(this.offerOption);
// 呼叫端设置本地 offer 描述
await this.peer.setLocalDescription(offer);
// 给对方发送 offer
socket.emit('1v1offer', {account: data.self, self: this.account, sdp: offer});
} catch (e) {
console.log('createOffer: ', e);
}
},
async onOffer(data) { // 接收offer并发送 answer
try {
// 接收端设置远程 offer 描述
await this.peer.setRemoteDescription(data.sdp);
// 接收端创建 answer
let answer = await this.peer.createAnswer();
// 接收端设置本地 answer 描述
await this.peer.setLocalDescription(answer);
// 给对方发送 answer
socket.emit('1v1answer', {account: data.self, self: this.account, sdp: answer});
} catch (e) {
console.log('onOffer: ', e);
}
},
async onAnswer(data) { // 接收answer
try {
await this.peer.setRemoteDescription(data.sdp); // 呼叫端设置远程 answer 描述
} catch (e) {
console.log('onAnswer: ', e);
}
},
async onIce(data) { // 接收 ICE 候选
try {
await this.peer.addIceCandidate(data.sdp); // 设置远程 ICE
} catch (e) {
console.log('onAnswer: ', e);
}
}挂断的思路依然是将各自的 peer 关闭,但是这里挂断方还需要借助 Socket 告诉对方,你已经挂电话了,不然对方还在痴痴地等。
hangup() { // 挂断通话 并做相应处理 对方收到消息后一样需要关闭连接
    socket.emit('1v1hangup', {account: this.isCall, self: this.account});
    this.peer.close();
    this.peer = null;
    this.isToPeer = false;
    this.isCall = false;
}

![[附源码]Python计算机毕业设计SSM旅游服务平台(程序+LW)](https://img-blog.csdnimg.cn/5b4520792b5b4f1ea078020044404ccd.png)