文章目录
- ML@sklearn@ML流程Part2@数据划分@KFold折叠交叉验证
- Model evaluation
- 数据划分
- sklearn中的模型评估
- demo
- K-fold cross-validation🎈
- K-fold
- eg
- eg
- eg:KFold@K-fold cross-validation
- ShuffleSplit
- eg
- 小结
- Stratified Shuffle Split
- eg
- eg
- demo
ML@sklearn@ML流程Part2@数据划分@KFold折叠交叉验证
Model evaluation
数据划分
-
数据划分数据集X 标签集y 训练集X_train X[train_index]y[train_index]测试集y_train X[test_index]y[test_index] -
在机器学习中,我们通常会将数据集分成自变量和目标变量两部分。
自变量是一组用于预测目标变量的变量,也被称为特征或输入。自变量通常是一个矩阵,其中每一行表示一个样本,每一列表示一个特征。
目标变量是我们需要预测的变量,也被称为输出。目标变量通常是一个向量,其中每个元素对应一个样本的输出值。
例如,在回归问题中,自变量通常是一个包含多个特征的矩阵,例如房屋的面积、卧室数量、地理位置等等;而目标变量通常是一个表示房屋价格的向量,其中每个元素对应一个房屋的价格。
在监督学习中,我们通常会将数据集分成训练集和测试集,其中训练集用于训练模型,测试集用于评估模型的性能。训练集中包含自变量和目标变量,而测试集中只包含自变量,我们需要使用训练好的模型对测试集进行预测,并将预测结果与测试集中的目标变量进行比较,以评估模型的性能。
需要注意的是,自变量和目标变量的数量和类型取决于具体的问题和数据集,不同的问题可能需要不同数量和类型的自变量和目标变量。
-
Training, validation, and test data sets - Wikipedia
-
In machine learning, a common task is the study and construction of algorithms that can learn from and make predictions on data. Such algorithms function by making data-driven predictions or decisions, through building a mathematical model from input data. These input data used to build the model are usually divided into multiple data sets. In particular, three data sets are commonly used in different stages of the creation of the model:
- training, validation, and test sets.
-
The model is initially fit on a training data set, which is a set of examples used to fit the parameters (e.g. weights of connections between neurons in artificial neural networks) of the model .The model (e.g. a naive Bayes classifier) is trained on the training data set using a supervised learning method, for example using optimization methods such as gradient descent or stochastic gradient descent. In practice, the training data set often consists of pairs of an input vector (or scalar) and the corresponding output vector (or scalar), where the answer key is commonly denoted as the target (or label). The current model is run with the training data set and produces a result, which is then compared with the target, for each input vector in the training data set. Based on the result of the comparison and the specific learning algorithm being used, the parameters of the model are adjusted. The model fitting can include both variable selection and parameter estimation.
-
Successively, the fitted model is used to predict the responses for the observations in a second data set called the validation data set. The validation data set provides an unbiased evaluation of a model fit on the training data set while tuning the model’s hyperparameters (e.g. the number of hidden units—layers and layer widths—in a neural network ). Validation datasets can be used for regularization by early stopping (stopping training when the error on the validation data set increases, as this is a sign of over-fitting to the training data set). This simple procedure is complicated in practice by the fact that the validation dataset’s error may fluctuate during training, producing multiple local minima. This complication has led to the creation of many ad-hoc rules for deciding when over-fitting has truly begun.
-
Finally, the test data set is a data set used to provide an unbiased evaluation of a final model fit on the training data set. If the data in the test data set has never been used in training (for example in cross-validation), the test data set is also called a holdout data set. The term “validation set” is sometimes used instead of “test set” in some literature (e.g., if the original data set was partitioned into only two subsets, the test set might be referred to as the validation set).
-
Deciding the sizes and strategies for data set division in training, test and validation sets is very dependent on the problem and data available.
sklearn中的模型评估
- Fitting a model to some data does not entail that it will predict well on unseen data.
- This needs to be directly evaluated. We have just seen the
train_test_splithelper that splits a dataset into train and test sets, butscikit-learnprovides many other tools for model evaluation, in particular for cross-validation. - We here briefly show how to perform a 5-fold cross-validation procedure, using the
cross_validatehelper.- Note that it is also possible to manually iterate over the folds, use different data splitting strategies, and use custom scoring functions.
- Please refer to our User Guide for more details:
demo
-
from sklearn.datasets import make_regression from sklearn.linear_model import LinearRegression from sklearn.model_selection import cross_validate X, y = make_regression(n_samples=1000, noise=50,random_state=0) # 默认维数维100 # X.shape,y.shape=1000,100 lr = LinearRegression() result = cross_validate(lr, X, y) # defaults to 5-fold CV result['test_score'] # r_squared score is high because dataset is easy result = cross_validate(lr, X, y, cv=5, return_train_score=True) for v in result.items(): print(v) # print(result)-
0.9736842105263158 ('fit_time', array([0.01099563, 0.00600886, 0.00399899, 0.00663686, 0.00399613])) ('score_time', array([0.00099921, 0.0009954 , 0.00100064, 0. , 0.00100303])) ('test_score', array([0.90468242, 0.8604173 , 0.89786489, 0.9145173 , 0.89278255])) ('train_score', array([0.92046141, 0.92835467, 0.92186638, 0.91778192, 0.92238646])) -
如果设置
noise=0,重新运行,结果形如 -
('fit_time', array([0.00899696, 0.00603986, 0.00499964, 0.07801867, 0.0049994 ])) ('score_time', array([0.00099921, 0. , 0.0010035 , 0.00197124, 0.00100207])) ('test_score', array([1., 1., 1., 1., 1.])) ('train_score', array([1., 1., 1., 1., 1.])) -
在人工回归数据集中,
noise参数用于控制目标变量中噪声的强度。具体来说,当我们生成一个人工回归数据集时,我们会按照一定的规则生成自变量X和因变量y,其中y的值是根据某种函数关系计算出来的。如果noise参数为0,则生成的y值完全符合这种函数关系,没有任何随机噪声。而当noise参数大于0时,生成的y值会受到一定程度的随机噪声的影响。在Scikit-learn中,
noise参数的值被解释为生成的数据集中目标变量(即y)的标准差。具体来说,当noise参数为0时,生成的数据集中目标变量的标准差为0,即所有的目标变量值完全符合函数关系;而当noise参数不为0时,生成的数据集中目标变量的标准差将会大于0,即目标变量值不再完全符合函数关系,而是受到一定程度的随机噪声的影响。需要注意的是,
noise参数只影响生成的数据集中目标变量的随机噪声,而不影响自变量。因此,当我们生成人工回归数据集时,如果需要使数据集更加真实,可以增加noise参数的值;反之,如果需要使数据集更加规律,可以将noise参数设置为较小的值或者0。
-
-
这段代码使用了Scikit-learn库中的
make_regression函数生成一个包含1000个样本的回归数据集,并使用线性回归模型对数据集进行拟合和评估。 -
具体来说,这段代码的功能如下:
- 从Scikit-learn库中导入
make_regression函数、LinearRegression模型和cross_validate函数。 - 使用
make_regression函数生成一个包含1000个样本的回归数据集,其中n_samples=1000表示数据集中包含1000个样本,random_state=0表示使用相同的随机种子生成数据集,以确保结果的可重复性。 - 创建一个线性回归模型,并将其赋值给变量
lr。 - 使用
cross_validate函数对线性回归模型进行交叉验证,其中X和y分别表示数据集的自变量和因变量,result保存了交叉验证的结果。 - 输出交叉验证的测试集得分,其中
result['test_score']表示测试集得分,因为数据集比较简单,所以得分比较高,通常使用R平方作为评估指标。
- 从Scikit-learn库中导入
K-fold cross-validation🎈
-
K折交叉验证(K-fold cross-validation)是一种常用的数据集划分和模型验证技术,可以用于评估机器学习模型的性能和进行模型的选择和调优。
-
K折交叉验证的基本思想是将数据集分成K个子集(一般是均等划分),然后使用其中K-1个子集作为训练集,余下的1个子集作为验证集,进行模型的训练和验证,重复K次,每次使用不同的验证集,最终将K次验证的结果进行平均或加权平均,得到最终的性能指标。
-
K折交叉验证的优点在于:
- 可以充分利用数据集中的信息,避免过拟合或欠拟合的问题。
- 可以对模型的性能进行更准确的评估,减小评估误差。
- 可以在有限的数据集中,扩大训练集的规模,提高模型的泛化能力。
K-fold
- sklearn.model_selection.KFold — scikit-learn documentation
- Cross-validation: evaluating estimator performance — scikit-learn documentation
- 以下代码演示了KFold是怎么工作的
eg
-
import numpy as np from sklearn.model_selection import KFold X = np.array([[1, 2], [3, 4], [1, 2], [3, 4]]) y = np.array([1, 2, 3, 4]) kf = KFold(n_splits=2) n=kf.get_n_splits(X) print(n) print(kf) for i, (train_index, test_index) in enumerate(kf.split(X)): print(f"Fold {i}:") print(f" Train: index={train_index}") print(f" Test: index={test_index}")-
2
KFold(n_splits=2, random_state=None, shuffle=False)
Fold 0:
  Train: index=[2 3]
  Test:  index=[0 1]
Fold 1:
  Train: index=[0 1]
  Test:  index=[2 3]
-
-
这段代码使用了Scikit-learn库中的
KFold类进行K折交叉验证。具体流程如下: -
首先,创建一个包含4个样本的数据集
X和对应的标签y,其中X是一个二维数组- 每行表示一个样本,每列表示一个特征。
- 然后,创建一个
KFold对象kf,并将数据集X传递给它。
-
在
KFold对象中,设置n_splits=2,表示将数据集划分为2个子集。- 调用
get_n_splits方法可以获取子集的数量。
- 调用
-
接下来,使用
kf.split(X)方法对数据集进行划分,并遍历划分的结果。- 划分操作只需要划分和分组索引即可,访问数据的时候根据分好的索引去访问即可
- 在每个折叠中,
KFold类返回一个元组(train_index, test_index),其中train_index表示用于训练的样本索引,test_index表示用于测试的样本索引。 - 🎈将kf.split(X)抽取的所有
test_index合并起来(并排序),得到的序列相当于range(len(X))
-
在循环中,使用
enumerate函数获取当前折叠的索引i,并输出训练集和测试集的索引。具体来说,将train_index和test_index打印出来,其中train_index和test_index分别表示当前折叠中用于训练和测试的样本索引。-
# 根据分组好的索引,作数据划分: # 根据索引划分数据集 X_train, X_test = X[train_index], X[test_index] # 根据索引划分标签 y_train, y_test = y[train_index], y[test_index]- 得益于numpy数组的元素访问方式,相关语句十分简洁
-
train_index和test_index是由某种交叉验证方法(如K折交叉验证)生成的索引数组,用于将数据集X和标签集y划分为训练集和测试集。(数据集和标签集的划分使用的索引序列是对应一致的)
-
在这个例子中,X和y是原始数据集和标签集,train_index和test_index是由K折交叉验证方法生成的索引数组。
-
-
可以看到,数据集被划分为了两个折叠,每个折叠中训练集和测试集的索引是不同的。也可以通过
KFold对象的其他属性和方法来控制交叉验证的方式,如设置随机种子、进行分层抽样等。
eg
-
X=np.random.randint(5,size=(12,3)) y=np.random.choice(100,size=len(X)) X,y kf2 = KFold(n_splits=3) n=kf2.get_n_splits(X) print(n) print(kf2) for i, (train_index, test_index) in enumerate(kf2.split(X)): print(f"Fold {i}:") print(f" Train: index={train_index}") print(f" Test: index={test_index}") merge=np.concatenate((train_index,test_index)) merge_sort=merge merge_sort.sort() print(f'{merge_sort=}')-
3
KFold(n_splits=3, random_state=None, shuffle=False)
Fold 0:
  Train: index=[ 4  5  6  7  8  9 10 11]
  Test:  index=[0 1 2 3]
merge_sort=array([ 0,  1,  2,  3,  4,  5,  6,  7,  8,  9, 10, 11])
Fold 1:
  Train: index=[ 0  1  2  3  8  9 10 11]
  Test:  index=[4 5 6 7]
merge_sort=array([ 0,  1,  2,  3,  4,  5,  6,  7,  8,  9, 10, 11])
Fold 2:
  Train: index=[0 1 2 3 4 5 6 7]
  Test:  index=[ 8  9 10 11]
merge_sort=array([ 0,  1,  2,  3,  4,  5,  6,  7,  8,  9, 10, 11])
-
-
再看下shuffle参数的效果(随机打乱顺序索引,然后分组)
-
kf2 = KFold(n_splits=3,shuffle=True) n=kf2.get_n_splits(X) print(n) print(kf2) for i, (train_index, test_index) in enumerate(kf2.split(X)): print(f"Fold {i}:") print(f" Train: index={train_index}") print(f" Test: index={test_index}") merge=np.concatenate((train_index,test_index)) merge_sort=merge merge_sort.sort() print(f'{merge_sort=}')-
3
KFold(n_splits=3, random_state=None, shuffle=True)
Fold 0:
  Train: index=[ 3  4  5  6  7  8  9 11]
  Test:  index=[ 0  1  2 10]
merge_sort=array([ 0,  1,  2,  3,  4,  5,  6,  7,  8,  9, 10, 11])
Fold 1:
  Train: index=[ 0  1  2  5  6  8 10 11]
  Test:  index=[3 4 7 9]
merge_sort=array([ 0,  1,  2,  3,  4,  5,  6,  7,  8,  9, 10, 11])
Fold 2:
  Train: index=[ 0  1  2  3  4  7  9 10]
  Test:  index=[ 5  6  8 11]
merge_sort=array([ 0,  1,  2,  3,  4,  5,  6,  7,  8,  9, 10, 11])
-
-
eg:KFold@K-fold cross-validation
-
下面的代码演示了如何使用Scikit-learn库中的
KFold类进行K折交叉验证:-
from sklearn.datasets import make_classification
from sklearn.linear_model import LogisticRegression
from sklearn.model_selection import KFold
from sklearn.metrics import accuracy_score

X, y = make_classification(n_samples=1000, random_state=0)
kf = KFold(n_splits=5, shuffle=True)

for train_index, test_index in kf.split(X):
    X_train, X_test = X[train_index], X[test_index]
    y_train, y_test = y[train_index], y[test_index]
    lr = LogisticRegression()
    lr.fit(X_train, y_train)
    y_pred = lr.predict(X_test)

    acc = accuracy_score(y_test, y_pred)
    print("Accuracy: {:.2f}".format(acc))
-
-
这段代码使用Scikit-learn库生成一个二分类数据集,并使用Logistic回归模型进行分类。然后使用K折交叉验证方法来评估模型的性能。具体过程如下:
- 使用
make_classification函数生成一个包含1000个样本的二分类数据集,其中特征数为默认值(20),类别数为2,随机状态为0。 - 使用
KFold函数将数据集分成5个互斥的子集,每个子集都可以作为训练集和测试集的一部分。 - 对于每个子集,将其作为测试集,余下的数据作为训练集。
- 在训练集上训练一个Logistic回归模型。
- 在测试集上预测模型的输出,并使用
accuracy_score函数计算预测的准确率。 - 打印每次交叉验证的准确率。
- 最终输出5次交叉验证的准确率均值和标准差。
这段代码展示了如何使用K折交叉验证方法来评估Logistic回归模型的性能,并计算模型的准确率。
- 使用
-
可以根据具体情况选择合适的K值和验证指标来进行模型评估。
ShuffleSplit
-
sklearn.model_selection.ShuffleSplit — scikit-learn documentation
-
Random permutation cross-validator随机排列交叉验证器
Yields indices to split data into training and test sets.
Note: contrary to other cross-validation strategies, random splits do not guarantee that all folds will be different, although this is still very likely for sizeable datasets.
此交叉验证器将数据拆分为训练集和测试集的索引。
-
注意:与其他交叉验证策略不同,随机拆分不能保证所有的fold都是不同的,尽管对于大型数据集来说这种情况仍然是很可能发生的。
-
Cross-validation: evaluating estimator performance — scikit-learn documentation
eg
-
from sklearn.model_selection import ShuffleSplit X = np.arange(8) # X = np.arange(12,24)#生成12个数,12~23 ss = ShuffleSplit(n_splits=5, test_size=0.25, random_state=0) # ShuffleSplit仅划分索引,而不是数据样本本身 for train_index, test_index in ss.split(X): print("%s %s" % (train_index, test_index))- 这段代码首先使用
np.arange函数生成一个包含8个数的数组X,然后创建一个ShuffleSplit对象ss,将数据集分成5个不同的训练集和测试集,测试集的大小设置为25%,随机种子设置为0。 - 然后,我们使用ss的
split方法对数据集进行随机拆分,将每个fold的训练集和测试集索引分别存储在train_index和test_index变量中,并输出这两个变量。
- 这段代码首先使用
-
Here is a visualization of the cross-validation behavior. Note that
ShuffleSplitis not affected by classes or groups.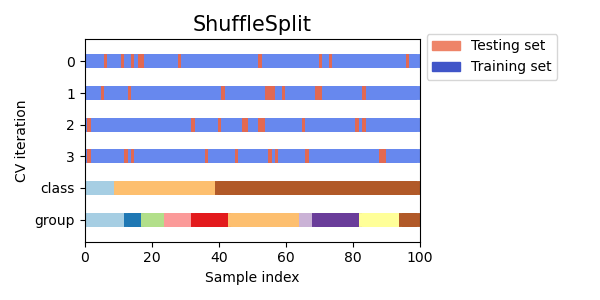
-
ShuffleSplitis thus a good alternative toKFoldcross validation that allows a finer control on the number of iterations and the proportion of samples on each side of the train / test split. -
请注意,ShuffleSplit不受类别或组的影响。因此,ShuffleSplit是KFold交叉验证的一个很好的替代方法,它允许对迭代次数和训练/测试拆分的样本比例进行更精细的控制。
-
对比于KFold
-
from sklearn.model_selection import KFold X = np.arange(8) kf = KFold(n_splits=5) for train_index, test_index in kf.split(X): print("%s %s" % (train_index, test_index))-
[2 3 4 5 6 7] [0 1]
[0 1 4 5 6 7] [2 3]
[0 1 2 3 6 7] [4 5]
[0 1 2 3 4 5 7] [6]
[0 1 2 3 4 5 6] [7]
-
-
根据KFold的定义,如果希望对n个数据做k折叠,那么每一个fold包含的样本数 n k \frac{n}{k} kn
- 在sklearn中,可能向上取整,也可能向下取整
-
如果把
np.arange(8)改为np.arange(10),此时5折叠可以整除10/5=2-
那么每个fold包含2个数据
-
[2 3 4 5 6 7 8 9] [0 1]
[0 1 4 5 6 7 8 9] [2 3]
[0 1 2 3 6 7 8 9] [4 5]
[0 1 2 3 4 5 8 9] [6 7]
[0 1 2 3 4 5 6 7] [8 9]
-
-
上述例子的KFold没有使用
shuffle=True参数打乱顺序是为了放便观察 -
通常建议使用
shuffle=True,不容易受到数据集样本顺序的影响!
-
小结
- 从上面的直观对比中可以看出,
ShuffleSplit参数可以接收n_splits和test_set两个相对独立的参数 - 我们可以对同一个数据集做
n_splits次划分,同时每次划分中test_size不受n_splits的影响 - 而对于KFold,
n_splits往往就决定了test_size的值为1/n_splits
Stratified Shuffle Split
-
sklearn.model_selection.StratifiedShuffleSplit — scikit-learn documentation
-
Cross-validation: evaluating estimator performance — scikit-learn documentation
-
StratifiedShuffleSplitis a variation of ShuffleSplit, which returns stratified splits, i.e which creates splits by preserving the same percentage for each target class as in the complete set. -
Stratified ShuffleSplit cross-validator
Provides train/test indices to split data in train/test sets.
This cross-validation object is a merge of StratifiedKFold and ShuffleSplit, which returns stratified randomized folds. The folds are made by preserving the percentage of samples for each class.
Note: like the ShuffleSplit strategy, stratified random splits do not guarantee that all folds will be different, although this is still very likely for sizeable datasets.
StratifiedShuffleSplit是一种交叉验证生成器,它通过创建分层的随机拆分来提供训练/测试索引,用于将数据集分成训练集和测试集。这个交叉验证对象是
StratifiedKFold和ShuffleSplit的合并,它返回分层的随机折叠。这些折叠是通过保留每个类别样本的百分比来构建的。需要注意的是:与
ShuffleSplit策略一样,分层随机拆分并不能保证所有折叠都是不同的,尽管对于规模较大的数据集,这仍然是非常可能的。 -
StratifiedShuffleSplit是ShuffleSplit的一种变体,它通过保留与完整数据集相同的每个目标类别的百分比来创建分层的拆分。ShuffleSplit是一种简单的交叉验证策略,它将数据集随机分成训练集和测试集,不考虑目标变量的类别分布。另一方面,
StratifiedShuffleSplit在创建拆分时考虑目标变量的类别分布。它确保在每个拆分中保留每个类别的样本百分比,这在处理不平衡数据集时非常重要。 -
因此,当你处理不平衡数据集并且想要确保每个拆分中的相同类别分布时,
StratifiedShuffleSplit是一种非常有用的交叉验证策略。 -
StratifiedShuffleSplit是scikit-learn库中的一个交叉验证生成器,它可以将数据集随机分成训练集和测试集,并且保持每个类别在训练集和测试集中的比例相等。 -
这个方法适用于分类问题中类别不平衡的数据集,可以确保训练集和测试集中的每个类别的样本数量都大致相同。
StratifiedShuffleSplit的创建方法如下:
-
from sklearn.model_selection import StratifiedShuffleSplit sss = StratifiedShuffleSplit(n_splits=5, test_size=0.2, random_state=42) -
在这个示例中,我们创建了一个
StratifiedShuffleSplit对象sss,其中n_splits参数指定了划分折数,test_size参数指定了测试集占比,random_state参数指定了随机种子,用于控制随机性。 -
然后,我们可以使用
split方法对数据集进行划分,将每个fold的训练集和测试集索引分别存储在train_index和test_index变量中。
eg
以下是一个使用StratifiedShuffleSplit对数据集进行交叉验证的示例代码:
-
from sklearn.datasets import load_iris from sklearn.model_selection import StratifiedShuffleSplit iris = load_iris() X, y = iris.data, iris.target sss = StratifiedShuffleSplit(n_splits=5, test_size=0.2, random_state=42) for train_index, test_index in sss.split(X, y): print("%s %s" % (train_index, test_index)) -
在这个示例中,我们首先加载了
iris数据集,然后将数据集划分成训练集和测试集。我们使用StratifiedShuffleSplit方法将数据集分成5个不同的训练集和测试集,并将每个fold的训练集和测试集索引分别存储在train_index和test_index变量中。由于iris数据集是一个分类问题,因此我们使用StratifiedShuffleSplit保持了每个类别在训练集和测试集中的比例相等。
eg
-
下面这个例子更加详细的描述了这一点
import numpy as np from sklearn.model_selection import StratifiedShuffleSplit #使用随机生成数据测试 rng=np.random.default_rng() rng.integers(20,size=(12,2)) # 样本总数为12,二分类,标签为0,1,两种样本比例为1:2 n=12 n0,n1=1*n//3,2*n//3 #随机的为这些模拟样本分配标签(因为这里不涉及到训练,所以随机分配标签不影响效果,在数据集划分的阶段,不用关心样本和标签的关联规律,如果是要训练,通常是不能随机给样本特征分配标签) y=[0]*n0+[1]*n1 y=np.array(y) rng.shuffle(y) #下面一种方式采用概率的方式生成标签,但是即使样本总数n可以被3整除,生成的数组也不保证数量是1:2 # y = rng.choice([0, 1], size=12, replace=True, p=[1/3, 2/3]) # count=np.unique(y,return_counts=True) # print(count) #为例放便验证,这里将标签数组和样本索引打印出来 print(np.vstack([y,range(n)])) #构造分层随机拆分对象,指定做独立的5次划分,每次划分,测试集的样本数量占总样本数量n的20% #而StratifiedShuffleSplit会保持各个类别在测试集和训练集上的比例 # 是两种独立的约束(例如0类样和1类样本比例在数据集中为1:2,那么在训练集和测试集中依然保持(或接近)1:2) sss = StratifiedShuffleSplit(n_splits=5, test_size=0.2, random_state=0) # print(sss) #打印这5次 for i, (train_index, test_index) in enumerate(sss.split(X, y)): print(f"Fold {i}:") print(f" Train: index={train_index}") print(f" Test: index={test_index}") print(np.vstack((test_index, y[test_index]))) -
[[ 1  1  0  1  1  1  0  0  1  1  0  1]
 [ 0  1  2  3  4  5  6  7  8  9 10 11]]
Fold 0:
  Train: index=[ 3 10  6  9  5  7  8  1  0]
  Test:  index=[ 2 11  4]
[[ 2 11  4]
 [ 0  1  1]]
Fold 1:
  Train: index=[ 4  2  9  0  7 11  5  3  6]
  Test:  index=[10  1  8]
[[10  1  8]
 [ 0  1  1]]
Fold 2:
  Train: index=[ 6  9  2 11  7  4  3  8  5]
  Test:  index=[ 1  0 10]
[[ 1  0 10]
 [ 1  1  0]]
Fold 3:
  Train: index=[10  8  6  3 11  4  1  7  5]
  Test:  index=[0 2 9]
[[0 2 9]
 [1 0 1]]
Fold 4:
  Train: index=[ 7  2  0  6 11  1  5  3  9]
  Test:  index=[ 8  4 10]
[[ 8  4 10]
 [ 1  1  0]]
demo
-
import numpy as np
from sklearn.datasets import load_iris
from sklearn.ensemble import RandomForestClassifier
from sklearn.linear_model import LinearRegression
from sklearn.model_selection import KFold, cross_val_score
from sklearn.svm import SVC
from sklearn.tree import DecisionTreeClassifier
from sklearn.datasets import load_iris
from sklearn.model_selection import ShuffleSplit, cross_val_score
from sklearn.tree import DecisionTreeClassifier

##

# 加载iris(鸢尾花)数据集
X, y = load_iris(return_X_y=True)

#! 定义5折交叉验证
kf = KFold(
    n_splits=5,
    shuffle=True,
    random_state=42,
)

# 使用线性回归模型进行训练和测试
model = LinearRegression()
# model=RandomForestClassifier()

scores_cv = []
# 这里split参数可以是X也可以是y,因为只需要划分样本的索引,所以两者都可以
for train_index, test_index in kf.split(y):
    X_train, X_test = X[train_index], X[test_index]
    y_train, y_test = y[train_index], y[test_index]
    model.fit(X_train, y_train)
    score = model.score(X_test, y_test)
    scores_cv.append(score)
    print("Score:", score)
mean_score = np.mean(scores_cv)
print(f"{mean_score=}")
##
#!使用cross_val_score
#构造cv器的时候不需要传入数据集
ss_cv = ShuffleSplit(n_splits=3, test_size=0.2, random_state=42)
kf_cv=KFold(n_splits=3,shuffle=True,random_state=42)
scores = cross_val_score(
    model,
    X,
    y,
    #cv=5,
    #cv=ss_cv,
    cv=kf_cv,
    verbose=3,
)
#cv取整数时,采用的非随机化的kfold方法划分,不是很可靠
#cv建议选用随机化的(StratifiedShuffleSplit最为高级)
#cv取kfold对象时,我们可以选择shuffle=True,使得所有样本都能够参与训练集/测试集
print("Scores:", scores)
print("Mean score:", scores.mean())


##

# 使用决策树模型进行交叉验证,并对数据集进行随机化操作
model = DecisionTreeClassifier()
ss_cv = ShuffleSplit(n_splits=3, test_size=0.2, random_state=42)

print("cv: ", ss_cv)

# ssr=ss_cv.split(X,y)
# for train_index,test_index in ssr:
#     train_index,test_index=np.array(train_index),np.array(test_index)
#     print(train_index.shape,test_index.shape)

scores = cross_val_score(model, X, y, cv=ss_cv, verbose=True)
print("Scores:", scores)
print("Mean score:", scores.mean())