资料
- AWS::CloudFormation::CustomResource
cfn-responsemodule
自定义资源的逻辑
cloudformation只能对aws service进行部署和配置,但是用户可能需要使用第三方产品,此时需要通过自定义资源将其纳入到cloudformation的管理中。通过编写自定义逻辑,可以在每次对堆栈进行创建/更新/删除操作时,执行自定义逻辑。
可以使用 AWS::CloudFormation::CustomResource 或 Custom::MyCustomResourceTypeName 资源类型在模板中定义自定义资源
自定义资源执行的任何操作都涉及到以下三方:
- template developer,请求发送者,在cfn模板中指定令牌和参数
- custom resource provider,请求处理者,对应令牌中指定的资源,处理来自cfn的请求,
- cloudformation,监听cfn堆栈操作,发送请求并等待响应
令牌实际上就是指定cfn请求发送的位置(可以是sns或lambda),服务令牌不能跨region
这里有一个创建eks oidc的cfn自定义资源示例,https://github.com/bambooengineering/example-eks-oidc-iam-cloudformation/blob/master/oidc-provider.yaml,在ServiceToken字段指定了lambda函数的arn。当创建改自定义资源时,cfn会将请求发送到对应的ClusterOIDCURLFunction函数进行处理。
Resources:
  ClusterOIDCURL:
    Type: Custom::ClusterOIDCURL
    Properties:
      ServiceToken: !GetAtt ClusterOIDCURLFunction.Arn
      ClusterName: !Ref EKSClusterName
cfn请求中包括的字段有
{
   "RequestType" : "Create",
   "ResponseURL" : "http://pre-signed-S3-url-for-response",
   "StackId" : "arn:aws:cloudformation:us-west-2:123456789012:stack/stack-name/guid",
   "RequestId" : "unique id for this create request",
   "ResourceType" : "Custom::TestResource",
   "LogicalResourceId" : "MyTestResource",
   "ResourceProperties" : {
      "Name" : "Value",
      "List" : [ "1", "2", "3" ]
   }
}
请求处理者(provider)会向s3 presign url返回响应(success或failed),具体形式是将json文件通过url上传。自定义资源所有的输出数据都存储在s3预签名位置。在cfn响应中可以包含的字段。
{
   "Status" : "SUCCESS",
   "PhysicalResourceId" : "TestResource1",
   "StackId" : "xxxxxxx",
   "RequestId" : "unique id for this create request",
   "LogicalResourceId" : "MyTestResource",
   "Data" : {
      "OutputName1" : "Value1",
      "OutputName2" : "Value2",
   }
}
测试自定义资源
使用cfn模板创建lambda
仿照上面的例子,在cfn模板中通过zipfile方式创建自定义lambda函数
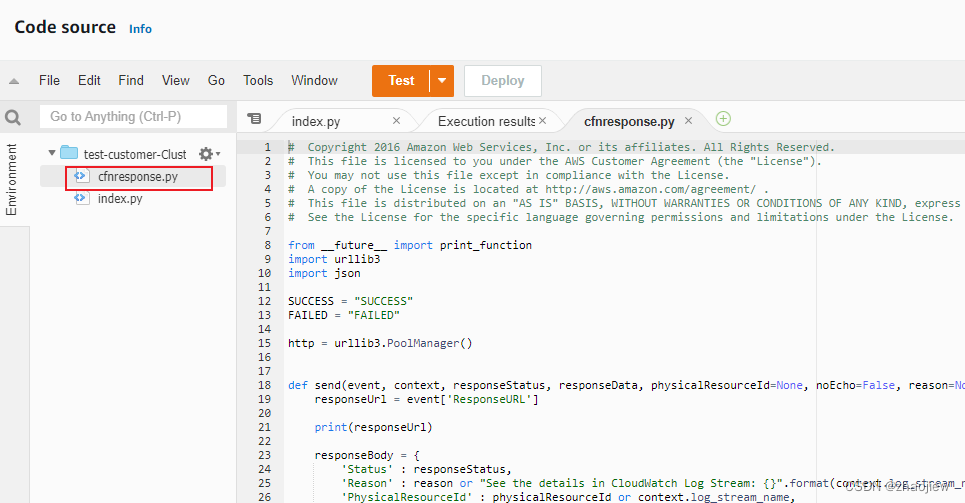
查看cfnresponse函数的内容如下,只有一个send函数,实际上就是构造http请求,向ResponseURL发送响应信息
from __future__ import print_function
import urllib3
import json
SUCCESS = "SUCCESS"
FAILED = "FAILED"
http = urllib3.PoolManager()
def send(event, context, responseStatus, responseData, physicalResourceId=None, noEcho=False, reason=None):
    responseUrl = event['ResponseURL']
    print(responseUrl)
    responseBody = {
        'Status' : responseStatus,
        'Reason' : reason or "See the details in CloudWatch Log Stream: {}".format(context.log_stream_name),
        'PhysicalResourceId' : physicalResourceId or context.log_stream_name,
        'StackId' : event['StackId'],
        'RequestId' : event['RequestId'],
        'LogicalResourceId' : event['LogicalResourceId'],
        'NoEcho' : noEcho,
        'Data' : responseData
    }
    json_responseBody = json.dumps(responseBody)
    print("Response body:")
    print(json_responseBody)
    headers = {
        'content-type' : '',
        'content-length' : str(len(json_responseBody))
    }
    try:
        response = http.request('PUT', responseUrl, headers=headers, body=json_responseBody)
        print("Status code:", response.status)
    except Exception as e:
        print("send(..) failed executing http.request(..):", e)
从lambda函数的日志中可以看到,预签名url的格式为https://cloudformation-custom-resource-response-cnnorth1.s3.cn-north-1.amazonaws.com.cn,表明改s3桶是专用的无法在用户账号下看到。
手动创建lambda
为了便于观察触发和处理的细节,手动创建lambda函数
创建lambda函数,当然也可以在cfn和自定义资源一同创建。发现找不到cfnresponse的模块,通过cfn创建zip方式会自动将该包导入
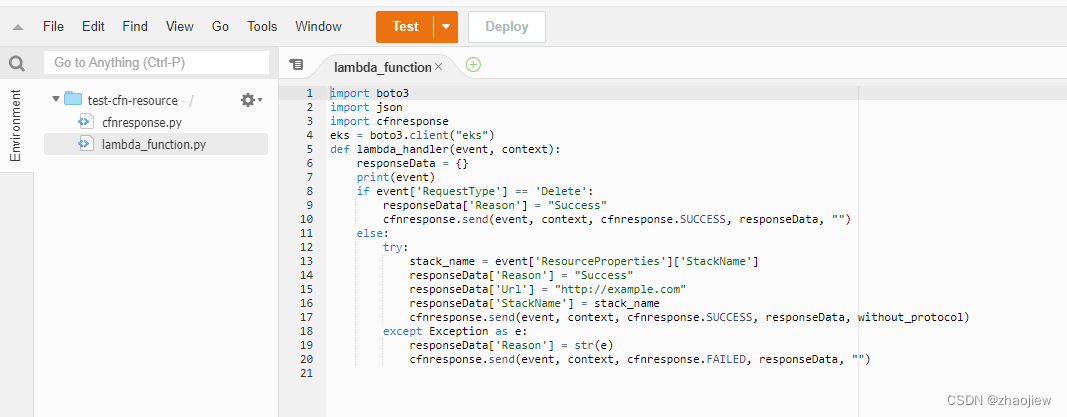
手动创建该函数,在控制台增加cfnresponse.py文件,执行时出现以下错误
Calling the invoke API action failed with this message: Lambda was not able to unzip the file
原因如下
The
cfn-responsemodule is available only when you use theZipFileproperty to write your source code. It isn’t available for source code that’s stored in Amazon S3 buckets. For code in buckets, you must write your own functions to send responses.
import boto3
import json
import cfnresponse
eks = boto3.client("eks")
def lambda_handler(event, context):
    responseData = {}
    print(event)
    if event['RequestType'] == 'Delete':
        responseData['Reason'] = "Success"
        cfnresponse.send(event, context, cfnresponse.SUCCESS, responseData, "")
    else:
        try:
            stack_name = event['ResourceProperties']['StackName']
            responseData['Reason'] = "Success"
            responseData['Url'] = "http://example.com"
            responseData['StackName'] = stack_name
            cfnresponse.send(event, context, cfnresponse.SUCCESS, responseData)
        except Exception as e:
            responseData['Reason'] = str(e)
            cfnresponse.send(event, context, cfnresponse.FAILED, responseData, "")
重新将两个文件打包后上传到lambda中
在cfn模板中指定函数arn,集请求要发送的地址
MyCustomResource:
  Type: AWS::CloudFormation::CustomResource
  Properties:
    ServiceToken: !Sub 'arn:aws-cn:lambda:${AWS::Region}:${AWS::AccountId}:function:test-cfn-resource'
    StackName: !Ref NetworkStackName
部署堆栈,在lambda日志中查看事件
请求信息
{
    "RequestType": "Create",
    "ServiceToken": "arn:aws-cn:lambda:cn-north-1:xxxxxxxxxxxx:function:test-cfn-resource",
    "ResponseURL": "https://cloudformation-custom-resource-response-cnnorth1.s3.cn-north-1.amazonaws.com.cn/arn/xxxxx",
    "StackId": "arn:aws-cn:cloudformation:cn-north-1:xxxxxxxxxxxx:stack/test-customer/fee6cbb0-6fb7-11ed-93da-0205553bff1a",
    "RequestId": "ac23fe12-8021-49e8-89fc-9a361751b076",
    "LogicalResourceId": "MyCustomResource",
    "ResourceType": "AWS::CloudFormation::CustomResource",
    "ResourceProperties": {
        "ServiceToken": "arn:aws-cn:lambda:cn-north-1:xxxxxxxxxxxx:function:test-cfn-resource",
        "StackName": "test-customer"
    }
}
响应信息
{
    "Status": "SUCCESS",
    "Reason": "See the details in CloudWatch Log Stream: 2022/11/29/[$LATEST]b611058c186e4694b60aeb4ac8a7d4b2",
    "PhysicalResourceId": "2022/11/29/[$LATEST]b611058c186e4694b60aeb4ac8a7d4b2",
    "StackId": "arn:aws-cn:cloudformation:cn-north-1:xxxxxxxxxxxx:stack/test-customer/db6b7940-6fb9-11ed-80a8-0eeb4c1e70a4",
    "RequestId": "d75e9cff-8ab4-493a-9a26-c50a00d86f8f",
    "LogicalResourceId": "MyCustomResource",
    "NoEcho": false,
    "Data": {
        "Reason": "Success",
        "Url": "http://example.com",
        "StackName": "test-customer"
    }
}
堆栈创建成功
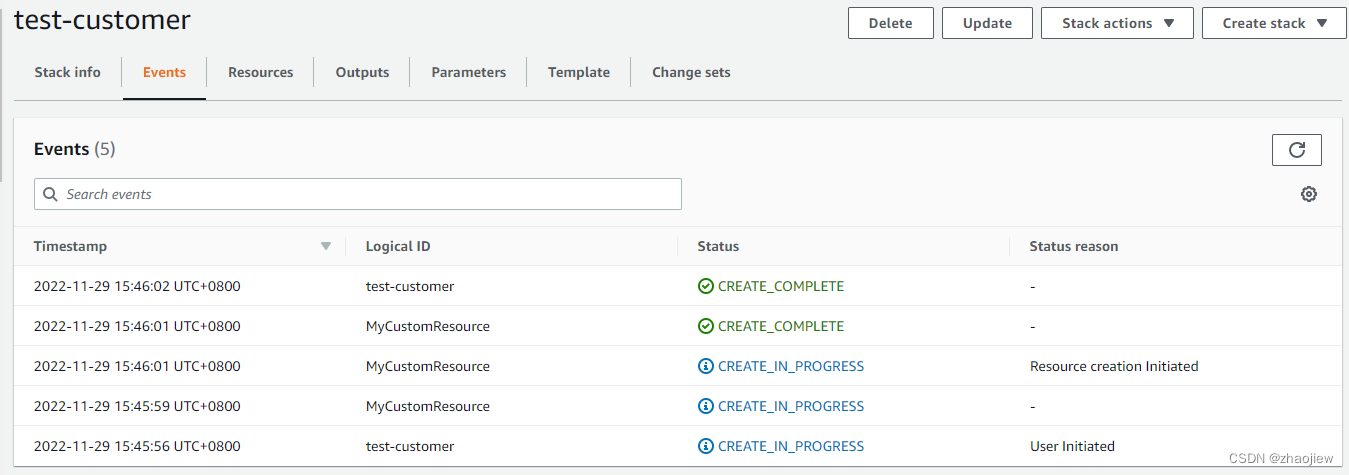
通过以上逻辑我们可以知道,通过创建自定义资源例如lambda函数,我们能够通过代码的方式对cfn模板的请求和响应进行处理,如果需要集成第三方产品,只需要在lambda函数中调用即可
此外请求有时间限制(1小时)
The provider must respond to the S3 bucket with either a
SUCCESSorFAILEDresult within one hour. After one hour, the request times out
关于自定义资源的参考文档
相关错误和解决
如何删除 CloudFormation 中卡在 DELETE_FAILED 状态或 DELETE_IN_PROGRESS 状态的 Lambda 支持的自定义资源?
卡在DELETE_FAILED可能是由于lambda函数缺少处理删除资源的逻辑
卡在DELETE_IN_PROGRESS,可能原因同上,但是由于landa请求处理的时间为1小时,该错误只能手动向cfn发送成功信号
在lambda函数的日志中获取以下参数,将信息存储到s3 presin url桶中(如果成功删除,这一步是lambda返回响应后cfn帮我们完成的)
$ curl -H 'Content-Type: ''' -X PUT -d '{
    "Status": "SUCCESS",
    "PhysicalResourceId": "test-CloudWatchtrigger-1URTEVUHSKSKDFF",
    "StackId": "arn:aws:cloudformation:us-east-1:111122223333:stack/awsexamplecloudformation/33ad60e0-5f25-11e9-a734-0aa6b80efab2
  ",
    "RequestId": "e2fc8f5c-0391-4a65-a645-7c695646739",
    "LogicalResourceId": "CloudWatchtrigger"
  }' 'https://cloudformation-custom-resource-response-useast1.s3.us-east-1.amazonaws.com/arn%3Aaws%3Acloudformation%3Aus-east-1%3A111122223333%3Astack/awsexamplecloudformation/33ad60e0-5f25-11e9-a734-0aa6b80efab2%7CMyCustomResource%7Ce2fc8f5c-0391-4a65-a645-7c695646739?X-Amz-Algorithm=AWS4-HMAC-SHA256&X-Amz-Date=20170313T0212304Z&X-Amz-SignedHeaders=host&X-Amz-Expires=7200&X-Amz-Credential=QWERTYUIOLASDFGBHNZCV%2F20190415%2Fus-east-1%2Fs3%2Faws4_request&X-Amz-Signature=dgvg36bh23mk44nj454bjb54689bg43r8v011uerehiubrjrug5689ghg94hb
  '


![[oeasy]python0022_ python虚拟机_反编译_cpu架构_二进制字节码_汇编语言](https://img-blog.csdnimg.cn/img_convert/ed53e6b51005e95514adaf4525ce37d3.png)
