Mybatis-Plus
mybatis plus概述
Mybatis Plus (opens new window)简称 MP,它是一个MyBatis 的增加工具,在 MyBatis 的基础上只做增强不做改变,为简化开发、提高效率而生。
- Mybatis Plus官网:https://baomidou.com/
优点:
- 无侵入
- 只做增强,不做改变;
- 引入它不会对现有工程产生影响
- 损耗小
- 启动即会自动注入基本 CRUD(增删改查),性能基本无损耗,直接面向对象操作:
- 强大的 CRUD 操作
- 内置通用 Mapper、通用 Service
- 仅仅通过少量配置即可实现单表大部分 CRUD 操作
- 更有强大的条件构造器,满足各类使用需求
- 支持 Lambda 形式调用
- 通过Lambda表达式,方便的编写各类查询条件,无需再担心字段写错。
- 支持主键自动生成
- 支持多达 4 种主键策略(内含分布式唯一 ID 生成器 - Sequence)
- 可自由配置,完美解决主键问题
- 支持 ActiveRecord 模式
- 支持 ActiveRecord 形式调用,实体类只需继承 Model 类即可进行强大的 CRUD 操作
- 支持自定义全局通操作
- 支持全局通用方法注入(write once、use anywhere)
- 内置代码生成器
- 采用代码或者 Maven 插件可快速生成 Mapper 、 Model 、 Service 、 Controller 层代码
- 支持模板引擎,更有超多自定义配置
- 内置分页插件
- 基于 MyBatis 物理分页,开发者无需关心具体操作,配置好插件之后,写分页等同于普通 List 查询
- 分页插件支持多种数据库
- 支持 MySQL、MariaDB、Oracle、DB2、H2、HSQL、SQLite、Postgre、SQLServer 等多种数据库
- 内置性能分析插件
- 可输出 SQL 语句以及其执行时间,建议开发测试时启用该功能,能快速揪出慢查询
- 内置全局拦截插件
- 提供全表 delete 、 update 操作智能分析阻断,也可自定义拦截规则,预防误操作
mybatis plus入门
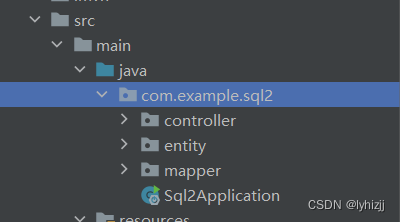
一、项目结构

二、项目实施
1、创建SpringBoot模板,并导入依赖
<?xml version="1.0" encoding="UTF-8"?>
<project xmlns="http://maven.apache.org/POM/4.0.0" xmlns:xsi="http://www.w3.org/2001/XMLSchema-instance"
         xsi:schemaLocation="http://maven.apache.org/POM/4.0.0 https://maven.apache.org/xsd/maven-4.0.0.xsd">
    <modelVersion>4.0.0</modelVersion>
    <!--依赖父亲maven-->
    <parent>
        <groupId>org.springframework.boot</groupId>
        <artifactId>spring-boot-starter-parent</artifactId>
        <version>2.7.11</version>
        <relativePath/> <!-- lookup parent from repository -->
    </parent>
    <groupId>com.etime</groupId>
    <artifactId>day0423</artifactId>
    <version>0.0.1-SNAPSHOT</version>
    <name>day0423</name>
    <description>Demo project for Spring Boot</description>
    <properties>
        <java.version>1.8</java.version>
    </properties>
    <dependencies>
        <!--在SpringBoot在引入web,由启动器 (starter) 完成-->
        <dependency>
            <groupId>org.springframework.boot</groupId>
            <artifactId>spring-boot-starter-web</artifactId>
        </dependency>

        <dependency>
            <groupId>org.springframework.boot</groupId>
            <artifactId>spring-boot-starter-test</artifactId>
            <scope>test</scope>
        </dependency>

        <!--引入Lombok-->
        <dependency>
            <groupId>org.projectlombok</groupId>
            <artifactId>lombok</artifactId>
            <version>1.18.16</version>
        </dependency>
        <!--数据库相关-->
        <dependency>
            <groupId>mysql</groupId>
            <artifactId>mysql-connector-java</artifactId>
            <version>5.1.47</version>
            <scope>runtime</scope>
        </dependency>
        <!--单元测试相关-->
        <dependency>
            <groupId>junit</groupId>
            <artifactId>junit</artifactId>
            <version>4.12</version>
            <scope>test</scope>
        </dependency>
        <!--引入热部署-->
        <dependency>
            <groupId>org.springframework.boot</groupId>
            <artifactId>spring-boot-devtools</artifactId>
        </dependency>

        <!-- 导入Mybatis-Plus依赖-->
        <dependency>
            <groupId>com.baomidou</groupId>
            <artifactId>mybatis-plus-boot-starter</artifactId>
            <version>3.5.1</version>
        </dependency>
    </dependencies>

    <!--构建插件-->
    <build>
        <plugins>
            <plugin>
                <groupId>org.springframework.boot</groupId>
                <artifactId>spring-boot-maven-plugin</artifactId>
            </plugin>
        </plugins>
    </build>

</project>
2、实体类
package com.etime.day0423.pojo;

import lombok.AllArgsConstructor;
import lombok.Data;
import lombok.NoArgsConstructor;

import java.util.Date;

@NoArgsConstructor
@AllArgsConstructor
@Data
public class Student {

    private int sid;
    private String sname;
    private int cid;
}
3、在SpringBoot配置文件application.yml中配置数据库相关信息
server:
  port: 8888
spring:
  devtools:
    restart:
      enabled: true
      additional-exclude: "src/main/java"
      exclude: "static/**"
  datasource:
    username: "root"
    password: "root"
    driver-class-name: "com.mysql.jdbc.Driver"
    url: "jdbc:mysql://localhost:3306/db_418"
4、在数据持久层创建StudentMapper.java接口
package com.etime.day0423.mapper;

import com.baomidou.mybatisplus.core.mapper.BaseMapper;
import com.etime.day0423.pojo.Student;
import org.springframework.stereotype.Repository;
//
@Repository
/*
    BaseMapper<Student>:继承父接口,并指定类型
 */
public interface StudentMapper extends BaseMapper<Student> {

}
5、创建StudentService.java接口
package com.etime.day0423.service;

import com.etime.day0423.pojo.Student;

import java.util.List;

public interface StudentService {
    List<Student> getAllStudent();
}
6、在业务逻辑层创建接口StudentService.java的实现类并实现方法
package com.etime.day0423.service.impl;

import com.etime.day0423.mapper.StudentMapper;
import com.etime.day0423.pojo.Student;
import com.etime.day0423.service.StudentService;
import org.springframework.beans.factory.annotation.Autowired;
import org.springframework.stereotype.Service;

import java.util.List;

@Service("studentService")
public class StudentServiceImpl implements StudentService {
    @Autowired
    private StudentMapper studentMapper;
    @Override
    public List<Student> getAllStudent() {
        List<Student> list = studentMapper.selectList(null);
        return list;
    }
}
7、在控制层创建StudentController.java类并编写测试方法
package com.etime.day0423.controller;

import com.etime.day0423.pojo.Student;;
import com.etime.day0423.service.StudentService;
import org.springframework.beans.factory.annotation.Autowired;
import org.springframework.web.bind.annotation.*;

import java.util.ArrayList;
import java.util.List;

@RestController
public class StudentController {

    @Autowired
    private StudentService studentService;
    @GetMapping("/student")
    public List<Student> getAllStudent() {
        List<Student> list = studentService.getAllStudent();
        return list;
    }

}
8、在SpringBoot启动类中加入mapper的扫描
package com.etime.day0423;

import org.mybatis.spring.annotation.MapperScan;
import org.springframework.boot.SpringApplication;
import org.springframework.boot.autoconfigure.SpringBootApplication;
// 扫描Mapper接口,生成接口实现类的对象
@MapperScan("com.etime.day0423.mapper")
@SpringBootApplication
public class Day0423Application {

    public static void main(String[] args) {
        SpringApplication.run(Day0423Application.class, args);
    }

}
9、测试

mybatis plus打印SQL
1、在SpringBoot配置文件中,配置日志打印
mybatis-plus:
  configuration:
    log-impl: org.apache.ibatis.logging.stdout.StdOutImpl
2、测试

mybatis plus用户实体类配置的注解
一、注解介绍
1、@TableName
- 使用场景:数据库表名与实体类不对应时
- 描述:该实体类在数据库表中的表名是@TableName中的名字
2、@TableId
- 使用场景:实体类属性名与数据表的主键名不一致
- 在mybatis plus中默认作为主键属性名为“id”,不是则用该注解
- 描述:实体类中属性是作为主键时,@TableId中的名称是数据表的主键名
3、@TableField
- 使用场景:实体类属性名与数据表的列名不一致
- 描述:@TableField名称是数据表的列名
二、代码示例
1、实体类
package com.etime.day0423.pojo;

import com.baomidou.mybatisplus.annotation.TableField;
import com.baomidou.mybatisplus.annotation.TableId;
import com.baomidou.mybatisplus.annotation.TableName;
import lombok.AllArgsConstructor;
import lombok.Data;
import lombok.NoArgsConstructor;

import java.util.Date;

@NoArgsConstructor
@AllArgsConstructor
@Data
@TableName("student")
public class Stu {
    @TableId("sid")
    private int stuId;
    @TableField("sname")
    private String stuName;
    @TableField("cid")
    private int classesId;
}
2、测试

mybatis plus实现增删改查
一、增删改查
1、实体类
- 注意如果要进行与主键相关的操作,一定要进行实体类的主键属性进行操作
- mybatis plus中的实体类中默认是主键的属性名是 id,若不是需要使用@TableId注解
package com.etime.day0423.pojo;

import com.baomidou.mybatisplus.annotation.TableField;
import com.baomidou.mybatisplus.annotation.TableId;
import com.baomidou.mybatisplus.annotation.TableName;
import lombok.AllArgsConstructor;
import lombok.Data;
import lombok.NoArgsConstructor;

import java.util.Date;

@NoArgsConstructor
@AllArgsConstructor
@Data
public class Student {

    @TableId("sid")
    private int sid;
    private String sname;
    private int cid;
}
2、在持久层创建接口StudentMapper.java
package com.etime.day0423.mapper;

import com.baomidou.mybatisplus.core.mapper.BaseMapper;
import com.etime.day0423.pojo.Student;
import org.springframework.stereotype.Repository;
//
@Repository
/*
    BaseMapper<Student>:继承父接口,并指定类型
 */
public interface StudentMapper extends BaseMapper<Student> {

}
3、在业务逻辑层接口StudentService.java中编写方法
package com.etime.day0423.service;

import com.etime.day0423.pojo.Student;

import java.util.List;

public interface StudentService {
    int addStudent(Student student);
    int deleteStudent(int sid);
    int updateStudent(Student student);
    List<Student> getAllStudent();
}
4、在业务逻辑层实现接口StudentService的方法
package com.etime.day0423.controller;

import com.etime.day0423.pojo.Student;;
import com.etime.day0423.service.StudentService;
import org.springframework.beans.factory.annotation.Autowired;
import org.springframework.web.bind.annotation.*;

import java.util.List;

@RestController
public class StudentController {


    @Autowired
    private StudentService studentService;
    @GetMapping("/student")
    public List<Student> getAllStudent() {
        List<Student> list = studentService.getAllStudent();
        return list;
    }

    @PostMapping("/student")
    public boolean addStudent(Student student){
        return studentService.addStudent(student) != 0 ? true:false;
    }

    @DeleteMapping("/student/{sid}")
    public boolean deleteStudent(@PathVariable("sid") int sid){
        return studentService.deleteStudent(sid) != 0 ? true:false;
    }
    @PutMapping("/student")
    public boolean updateStudent(Student student){
        return studentService.updateStudent(student) != 0 ? true:false;
    }

}
二、分页查询
- 使用MyBatis-Plus内置的分页插件,需要配置相关内容,创建配置类MybatisPlusConfig.java完成配置
1、配置类MybatisPlusConfig.java完成配置
- 新建一个包叫util,在其中创建MybatisPlusConfig.java
package com.etime.day0423.util;

import com.baomidou.mybatisplus.annotation.DbType;
import com.baomidou.mybatisplus.extension.plugins.MybatisPlusInterceptor;
import com.baomidou.mybatisplus.extension.plugins.inner.PaginationInnerInterceptor;
import org.springframework.context.annotation.Bean;

public class MybatisPlusConfig {
    @Bean
    public MybatisPlusInterceptor paginationInterceptor(){
        MybatisPlusInterceptor interceptor = new MybatisPlusInterceptor();
        // 指定数据库类型为 MySQL
        interceptor.addInnerInterceptor(new PaginationInnerInterceptor(DbType.MYSQL));
        return interceptor;
    }
}
2、在接口StudentService中添加方法
Page<Student> getStudentByPage(int currentPage,int size);
3、为接口StudentService实现类,实现方法
@Override
public Page<Student> getStudentByPage(int currentPage,int size) {
    Page<Student> page = new Page<>(currentPage,size);
    return studentMapper.selectPage(page,null);
}
4、在控制层编写测试方法
@GetMapping("/student/page")
public Page<Student> getStudentByPage(int currentPage,int size){
    return studentService.getStudentByPage(currentPage,size);
}
5、测试
- 注意控制层方法参数与请求地址中的参数名

三、条件查询且分页
- MyBatis-Plus内置的查询器,可以帮助我们来做各种各样的条件查询

1、在接口StudentService中添加方法
Page<Student> getStudentBySname(String sname, int current, int size);
2、为接口StudentService实现类,实现方法
@Override
public Page<Student> getStudentBySname(String sname, int current, int size) {
    QueryWrapper<Student> wrapper = new QueryWrapper<>();
    wrapper.like("sname",sname);
    Page<Student> page = new Page<>(current,size);
    return studentMapper.selectPage(page,wrapper);
}
3、在控制层编写测试方法
@GetMapping("/student/like")
public Page<Student> getStudentByName(String sname,int currentPage,int size){
    return studentService.getStudentBySname(sname,currentPage,size);
}
4、测试

mybatis plus前后端分离开发整合
-
注意记得将Controller加上跨域注解哦
-
@CrossOrigin
-
-
后端代码在前面我们已经写好,前端只需调用即可。
<!DOCTYPE html>
<html lang="en">
<head>
<meta charset="UTF-8">
<meta http-equiv="X-UA-Compatible" content="IE=edge">
<meta name="viewport" content="width=device-width, initial-scale=1.0">
<title>index</title>
<script src="js/vue.global.js"></script>
<script src="js/axios.min.js"></script>
</head>
<body>
<div id="app">
<form style="width:500px;margin:auto;text-align:center;">
学生姓名: <input type="text" v-model="sname">
<input type="button" value="搜索" @click="getStudentBySname(1)">
</form><br>
<table border="1" cellspacing="0" cellpadding="0" align="center" width="500">
<tr>
<th>学号</th>
<th>姓名</th>
<th>班级编号</th>
<th>操作</th>
</tr>
<tr v-for="(stu,index) in students">
<td>{{stu.sid}}</td>
<td>{{stu.sname}}</td>
<td>{{stu.cid}}</td>
<td>
<a href="javaScript:void(0)" @click="deleteStudent(stu.sid)">删除</a>
<a href="javaScript:void(0)" @click="updateStudent(stu.sid)">编辑</a>
</td>
</tr>
</table>
<div style="width: 500px;margin: auto;">
<a href="javaScript:void(0)" @click="getStudentBySname(1)">首页</a>
<a href="javaScript:void(0)" @click="getStudentBySname(prePage)">上一页</a>
{{pageNum}}/{{pageTotal}}
<a href="javaScript:void(0)" @click="getStudentBySname(nextPage)">下一页</a>
<a href="javaScript:void(0)" @click="getStudentBySname(pageTotal)">尾页</a>
</div>
</div>
<script>
const vueApp = Vue.createApp({
data() {
return {
students:"",
pageNum:"",
pageTotal:"",
prePage:"",
nextPage:"",
size:3,
sname:"",
}
},
methods: {
getStudentByPage(page){
axios({
url:"http://localhost:8888/student/page?currentPage="+page+"&size=3",
method:"get",
}).then(resp =>{
console.log(resp.data);
this.students = resp.data.records;
this.pageNum = resp.data.current;
this.pageTotal = resp.data.pages;
if(this.pageNum == 1){
this.prePage = 1;
}else {
this.prePage = this.pageNum - 1;
}
if(this.nextPage == this.pageTotal){
this.nextPage = this.pageTotal;
}else {
this.nextPage = this.pageNum + 1;
}
});
},
getStudentBySname(page) {
console.log("page = "+page);
let content = new URLSearchParams();
content.append("currentPage", page);
content.append("size", this.size);
content.append("sname", this.sname);
axios({
url: "http://localhost:8888/student/like",
method: "get",
params: content
}).then(resp => {
console.log(resp.data);
this.students = resp.data.records;
this.pageNum = resp.data.current;
this.pageTotal = resp.data.pages;
if(this.pageNum == 1){
this.prePage = 1;
}else {
this.prePage = this.pageNum - 1;
}
console.log("prePage = "+this.prePage);
if(this.nextPage == this.pageTotal){
this.nextPage = this.pageTotal;
}else {
this.nextPage = this.pageNum + 1;
}
console.log("nextPage = " + this.nextPage);
});
},
deleteStudent(sid){
if(confirm("确定删除吗?")){
axios({
url:"http://localhost:8888/student/"+sid,
method:"delete",
}).then(resp =>{
if(resp.data){
alert("删除成功");
this.getStudentBySname(this.pageNum);
}else{
alert("删除失败");
}
});
}
}
},
created() {
this.getStudentByPage(1);
},
});
vueApp.mount("#app");
</script>
</body>
</html>


