目录
- 项目介绍
- 所用技术与开发环境
- 所用技术
- 开发环境
- 项目各种安装
- 升级 gcc
- 安装 jsoncpp
- 安装 cpp-httplib
- 安装boost库
- 安装与测试 ctemplate
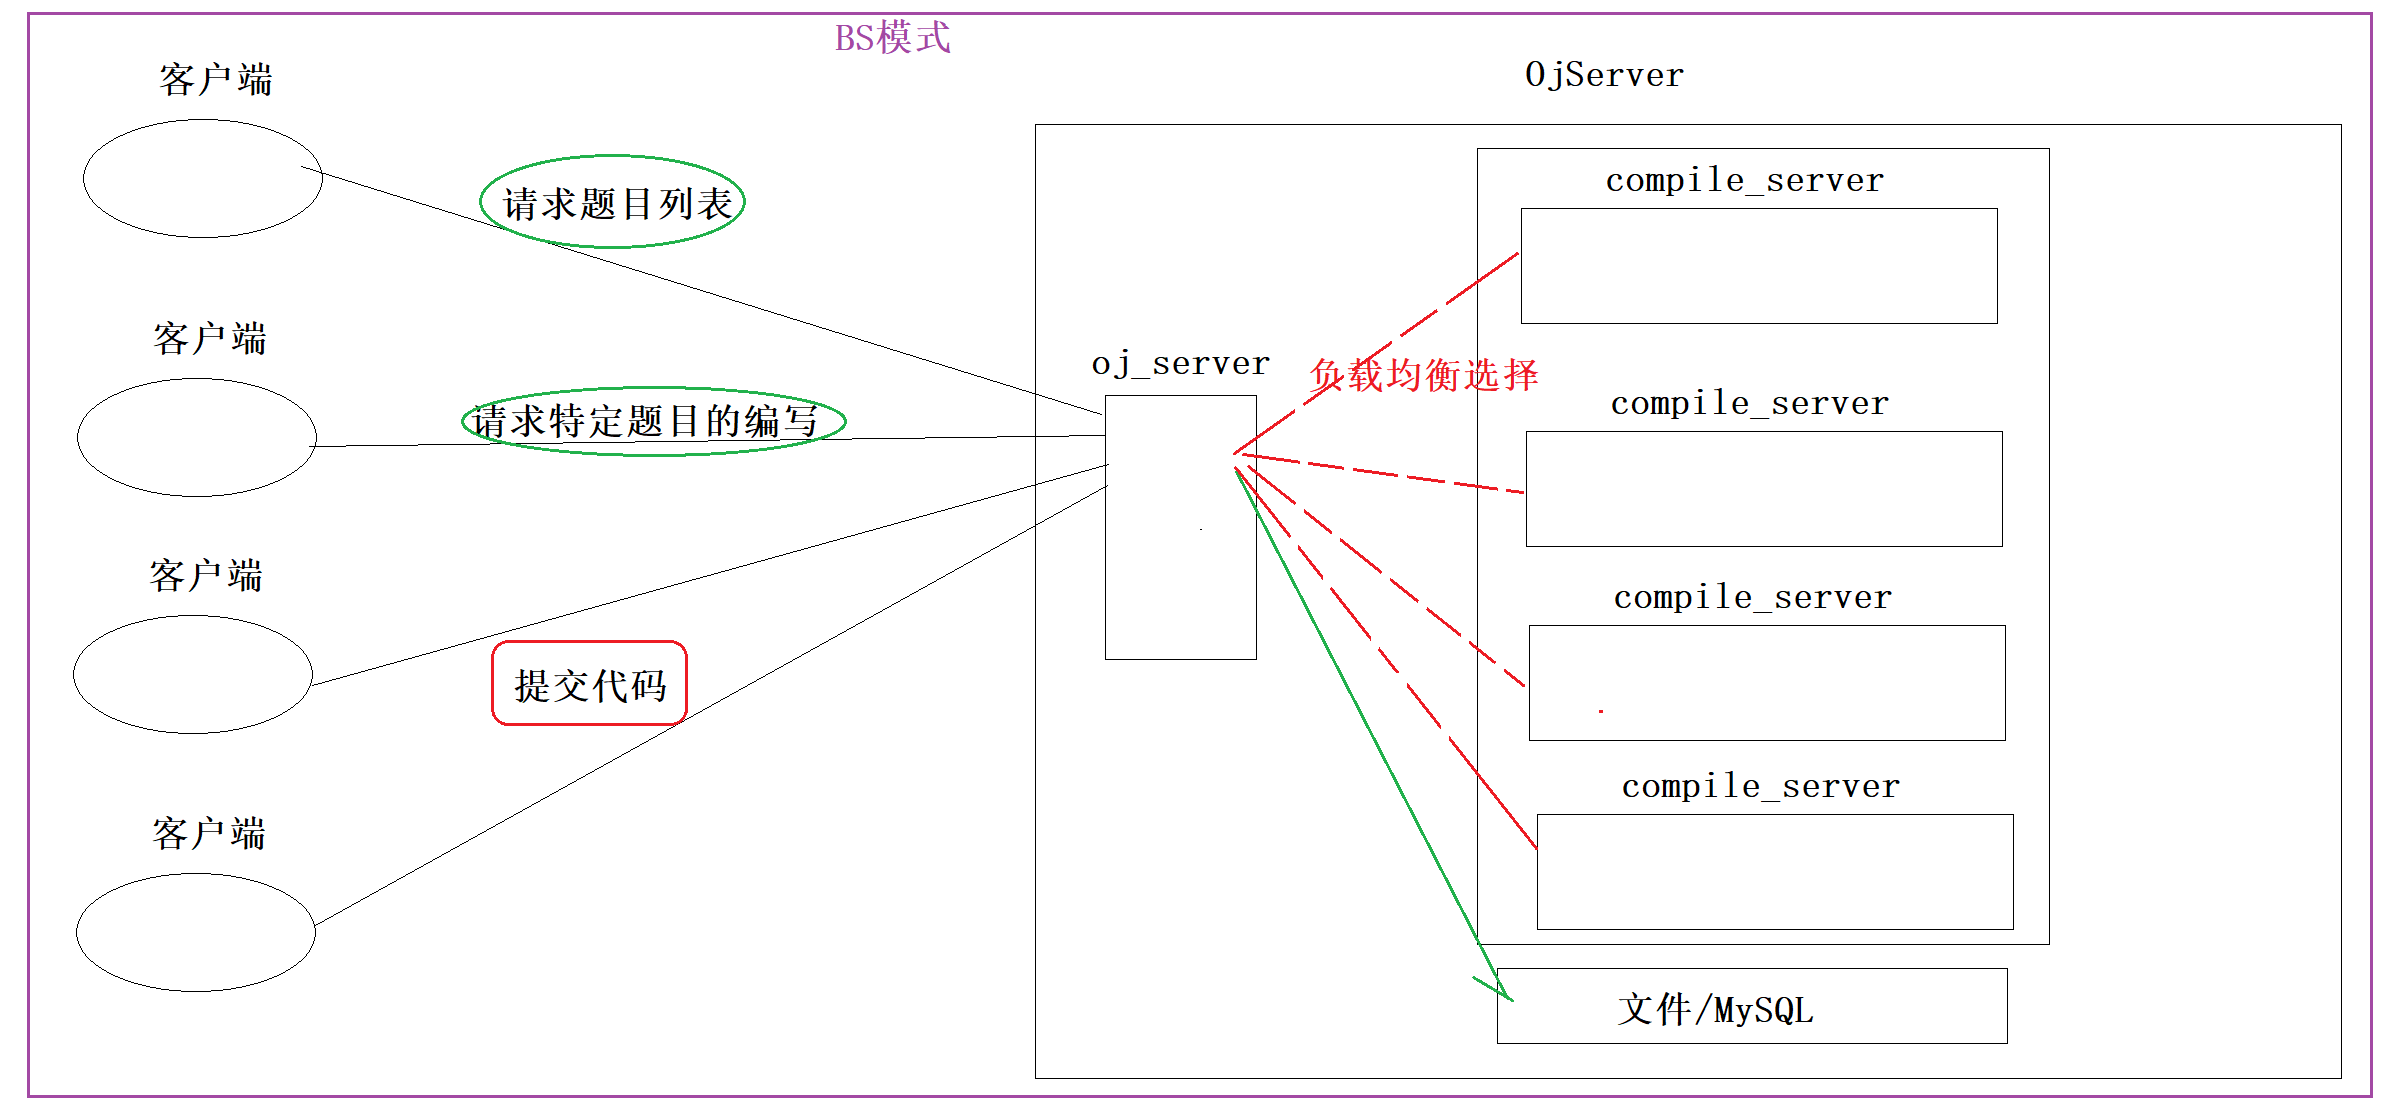
- 项目宏观结构
- 总体文件目录
- comm : 公共模块
- compile_run_server:编译和运行
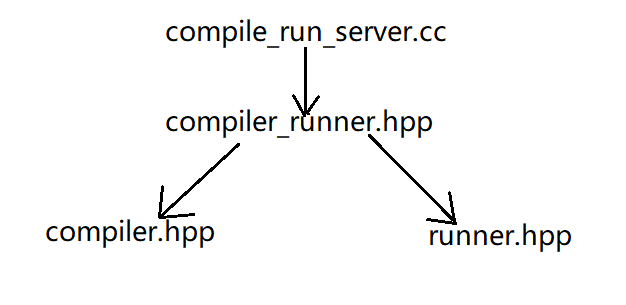
- compiler.hpp编译
- runner.hpp 运行
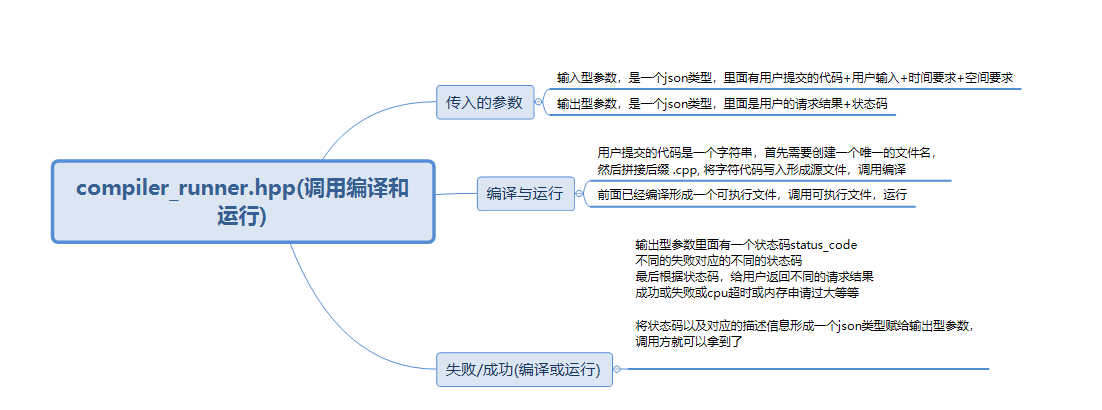
- compiler_runner.hpp调用编译和运行
- compile_run_server.cc
- temp_files 存放临时文件
- oj_server
- oj_server.cc
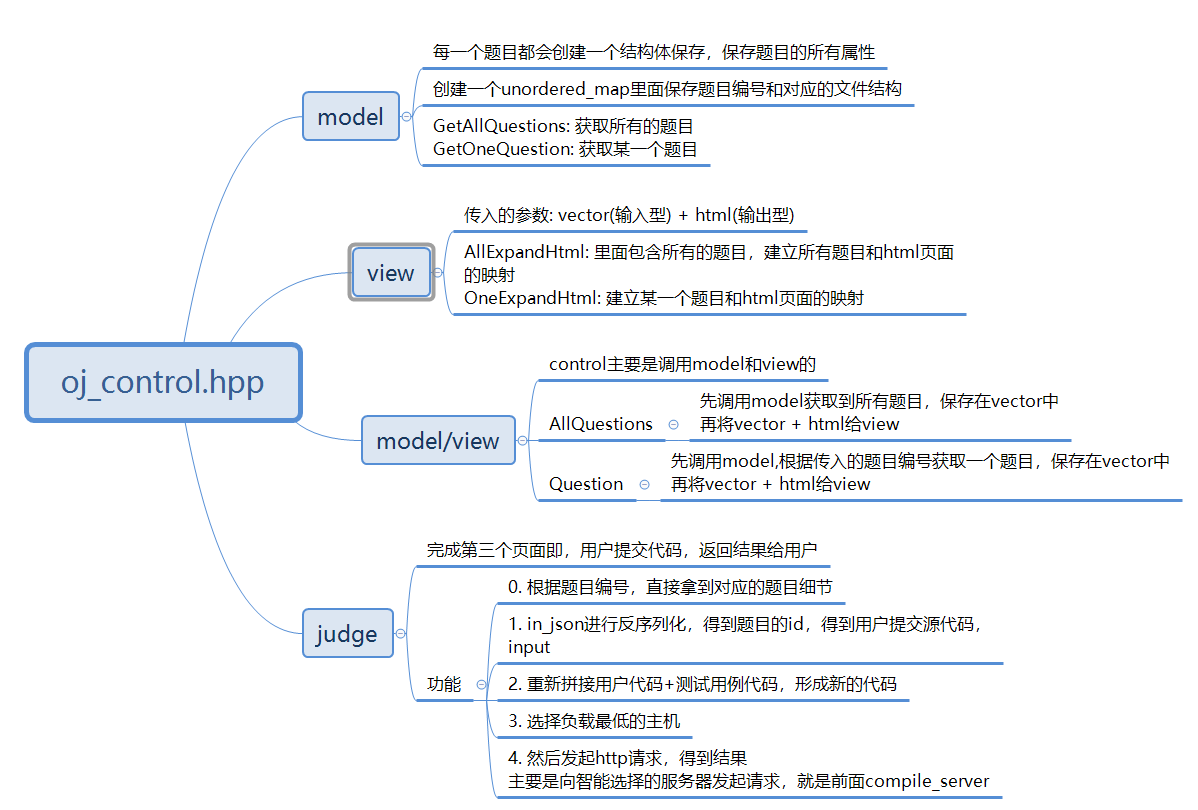
- MVC
- 其它文件
- makefile
项目介绍
此项目只实现类似 leetcode 的题目列表+在线编程功能;
此项目核心是三个模块:
- comm : 公共模块
- compile_server : 编译与运行模块
- oj_server : 获取题目列表,查看题目编写题目界面,负载均衡,其他功能
所用技术与开发环境
所用技术
- C++ STL 标准库
- Boost 准标准库(字符串切割)
- cpp-httplib 第三方开源网络库
- ctemplate 第三方开源前端网页渲染库
- jsoncpp 第三方开源序列化、反序列化库
- 负载均衡设计
- 多进程、多线程
- MySQL C connect
- Ace前端在线编辑器
- html/css/js/jquery/ajax
开发环境
- Centos 7 云服务器
- vscode
- Mysql Workbench
项目各种安装
升级 gcc
因为cpp-httplib 用老的编译器,要么编译不通过,要么直接运行报错,所以需要升级
// 查看 gcc 版本
gcc -v
//安装scl
$ sudo yum install centos-release-scl scl-utils-build
//安装新版本gcc,这里也可以把7换成8或者9,也可以都安装
$ sudo yum install -y devtoolset-7-gcc devtoolset-7-gcc-c++
// 查看安装
$ ls /opt/rh/

//启动: 注意:命令行启动只能在本会话有效
$ scl enable devtoolset-7 bash

// 如果想每次登陆的时候,都是较新的gcc,需要把上面的命令添加到你的~/.bash_profile中
// 打印查看:  ~/.bash_profile
$ cat ~/.bash_profile

/**********我查看的内容******************
# .bash_profile
# Get the aliases and functions
if [ -f ~/.bashrc ]; then
. ~/.bashrc
fi
# User specific environment and startup programs
PATH=$PATH:$HOME/.local/bin:$HOME/bin
export PATH
**************************************/

// #添加下面的命令在里面,每次启动的时候,都会执行这个scl命令(看自己的gcc版本,数字自己改7 或 8 或 9)
scl enable devtoolset-7 bash
安装 jsoncpp
$ sudo yum install -y jsoncpp-devel
安装 cpp-httplib
最新的cpp-httplib在使用的时候,如果gcc不是特别新的话有可能会有运行时错误的问题
我的下载:cpp-httplib 0.7.15
下载zip安装包,上传到服务器即可

v0.7.15版本链接: https://gitee.com/yuanfeng1897/cpp-httplib/tree/v0.7.15

解压后里面有一个 httplib.h,把httplib.h拷贝到我们的项目中,包含头文件和命名空间后可以直接使用

//使用文档: https://gitee.com/yuanfeng1897/cpp-httplib/tree/v0.7.15
安装boost库
$ sudo yum install -y boost-devel
安装与测试 ctemplate
https://hub.fastgit.xyz/OlafvdSpek/ctemplate
下载zip安装包,上传到服务器即可

解压后得到一个 这样的 ctemplate-master 文件
进入执行下面命令:
$ ./autogen.sh
$ ./configure
$ make //编译
$ make install //安装到系统中

注意: gcc版本, 如果安装报错,注意使用sudo

还有就是在使用时: 可能存在链接报错,找不到ctemplate-masterd动态库位置
// 查看自己配置文件
ls /etc/ld.so.conf.d/ -l
// 创建一个自己的配置文件
sudo touch  /etc/ld.so.conf.d/my.conf
// 打开自己创建的配置文件
sudo vim /etc/ld.so.conf.d/my.conf
// 将ctemplate-masterd动态库的路径写入里面
/home/sz/third_party/ctemplate-master/.libs
// 加载一下,使其生效
sudo idconfig
// 使用示例:
int main()
{
    // 要渲染的html页面,文件所在路径
    std::string html = "./text.html";
    // 1.建立ctemplate参数目录结构 [相当于创建一个可以存储kv结构的对象,对象名字是text]
    ctemplate::TemplateDictionary root("test");
    // 向结构中添加你要替换的数据,kv的
    root.SetValue("information", "测试ctemplate");

    // 2.获取被渲染对象
    ctemplate::Template *tpl = ctemplate::Template::GetTemplate(html,\
ctemplate::DO_NOT_STRIP); //DO_NOT_STRIP:保持html网页原貌

    //3.开始渲染,返回新的网页结果到out_html
    std::string out_html;
    tpl->Expand(&out_html, &root);

    // std::cout << "原本html是:" << std::endl;
    // std::cout << html << std::endl;
    std::cout << "渲染的带参html是:" << std::endl;
    std::cout << out_html << std::endl;

    return 0;
}
渲染前:
<!DOCTYPE html>
<html lang="en">

<head>
    <meta charset="UTF-8">
    <meta http-equiv="X-UA-Compatible" content="IE=edge">
    <meta name="viewport" content="width=device-width, initial-scale=1.0">
    <title>Document</title>
</head>

<body>
    <!--渲染参数,会被我们C++代码中的数据替换, information就是上面SetValue("information", "测试ctemplate")代码中的
information::测试ctemplate中的内容替换-->
    <p>{{information}}</p>
    <p>{{information}}</p>
    <p>{{information}}</p>
    <p>{{information}}</p>
</body>

</html>
渲染后:
<!DOCTYPE html>
<html lang="en">

<head>
    <meta charset="UTF-8">
    <meta http-equiv="X-UA-Compatible" content="IE=edge">
    <meta name="viewport" content="width=device-width, initial-scale=1.0">
    <title>Document</title>
</head>

<body>
    <!--渲染参数,会被我们C++代码中的数据替换, information就是上面SetValue("information", "测试ctemplate")代码中的
information::测试ctemplate中的内容替换-->
    <p>{{测试ctemplate}}</p>
    <p>{{测试ctemplate}}</p>
    <p>{{测试ctemplate}}</p>
    <p>{{测试ctemplate}}</p>
</body>
项目宏观结构
总体文件目录
[sz@VM-8-9-centos LinuxProject]$ tree
.
|-- common
|   |-- httplib.h
|   |-- log.hpp
|   `-- util.hpp
|-- compile_run_server
|   |-- compiler.hpp
|   |-- compiler_runner.hpp
|   |-- compile_run_server.cc
|   |-- makefile
|   |-- runner.hpp
|   `-- temp_files
|-- makefile
|-- oj_server
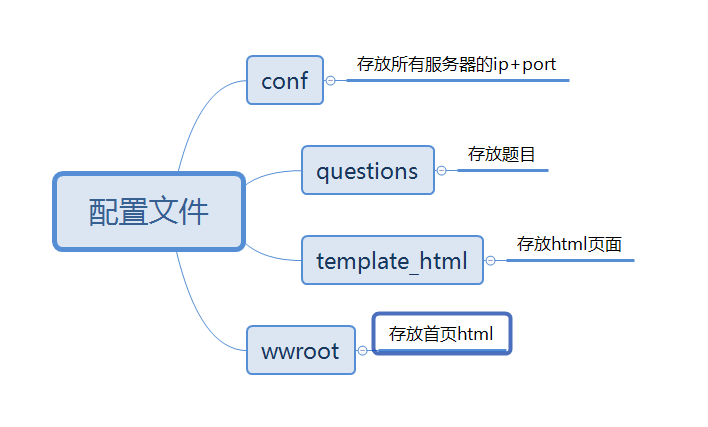
|   |-- conf
|   |   `-- service_machine.conf
|   |-- makefile
|   |-- oj_controlcopy.hpp
|   |-- oj_control.hpp
|   |-- oj_model.hpp
|   |-- oj_server.cc
|   |-- oj_view.hpp
|   |-- questions
|   |   |-- 1
|   |   |   |-- desc.txt
|   |   |   |-- header.cpp
|   |   |   `-- tail.cpp
|   |   |-- 2
|   |   |   |-- desc.txt
|   |   |   |-- header.cpp
|   |   |   `-- tail.cpp
|   |   `-- questions.list
|   |-- template_html
|   |   |-- all_questions.html
|   |   `-- one_question.html
|   `-- wwwroot
|       `-- index.html
|-- ReadMe.md
|-- text
|-- text.cc
`-- text.html

10 directories, 30 files
comm : 公共模块
httplib.h :  第三方开源网络库
log.hpp   :  日志,主要用于打印信息
util.hpp  : 工具类
   包含:
       时间工具类: 获得秒时间戳 、 获得毫秒时间戳
       对文件路径操作: 添加文件后缀(如: .cpp / .exe / .stdin / .stdout / .stderr)
       对文件操作: 对文件读写,判断是否存在,获取唯一的文件名
 	   对字符串的操作: 主要是使用boost库对字符串切割(切割ip和port)
compile_run_server:编译和运行
compiler.hpp编译

runner.hpp 运行

compiler_runner.hpp调用编译和运行
compile_run_server.cc

temp_files 存放临时文件
保存编译和运行产生的临时文件
oj_server
oj_server.cc

oj_server.cc 会有三个路由功能
1. 获取首页,首页是一个题目列表,里面有很多题目,和leetcode题目列表一样
2. 但我们选择好题目列表中大的一个题目后,点击,进入题目的编辑页面
3. 在编辑好题目后,需要提交,后台服务器会编译这份代码,并将结果显示给用户,提交代码后的页面

M: Model,通常是和数据交互的模块,比如,对题库进行增删改查(文件版,MySQL)
V: view, 通常是拿到数据之后,要进行构建网页,渲染网页内容,展示给用户的(浏览器)
C: control, 控制器,就是我们的核心业务逻辑
MVC
其它文件
makefile
.PHONY:all
all:
	cd compile_run_server;\
	make;\
	cd -;\
	cd oj_server;\
	make;\
	cd -;
.PHONY:procedure
procedure:
	mkdir -p procedure/compile_run_server;\
	mkdir -p procedure/oj_server;\
	cd compile_run_server;\
	cp -rf `ls | grep -v ".hpp" | grep -v ".cc" | xargs` ../procedure/compile_run_server;\
	cd -;\
	cd oj_server;\
	cp -rf `ls | grep -v ".hpp" | grep -v ".cc" | xargs` ../procedure/oj_server;\
	cd -;
.PHONY:clean
clean:
	cd compile_run_server;\
	make clean;\
	cd -;\
	cd oj_server;\
	make clean;\
	cd -;\
	rm -rf procedure;
