目录
一、首先加载库
二、设置编码规范
三、去除GPIO口警告
四、进行详细编程
五、程序源码
GPIO(General Purpose I/O Ports)意思为通用输入/输出端口,通过它们可以输出高低电平或者通过它们读入引脚的状态(是高电平或是低电平)。
树莓派对于GPIO的操作主要基于RPi.GPIO库,这个库是树莓派系统自带的。
一、首先加载库
import RPi.GPIO as GPIO二、设置编码规范
GPIO.setmode(mode),mode常用的参数有两个值,GPIO.BOARD和GPIO.BCM。注意全是大写。
1)BOARD: 从左到右,从上到下:左边基数,右边偶数:1-40。是告诉程序按物理位置找GPIO头(或者叫channel),优点就是方便找。
2)BCM:编号侧重 CPU 寄存器,根据 BCM2835 的 GPIO 寄存器编号,按GPIO号,优点就是方便程序在不同的树莓派版本上跑。
3)wpi: 编号侧重实现逻辑,把扩展 GPIO 端口从 0 开始编号,这种编号方便编程。这个库的开发语言是C语言,我们一般用python,所以一般用不到
具体原理图如下:
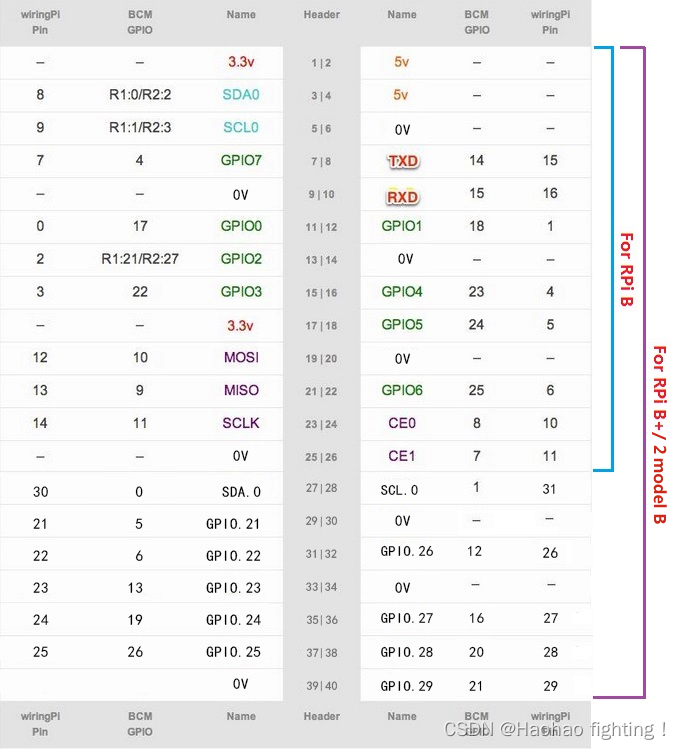
如果我们想看自己板子的GPIO口的原理图的话,我们有以下办法:
1-“gpio -v”看下我们树莓派内置的版本。
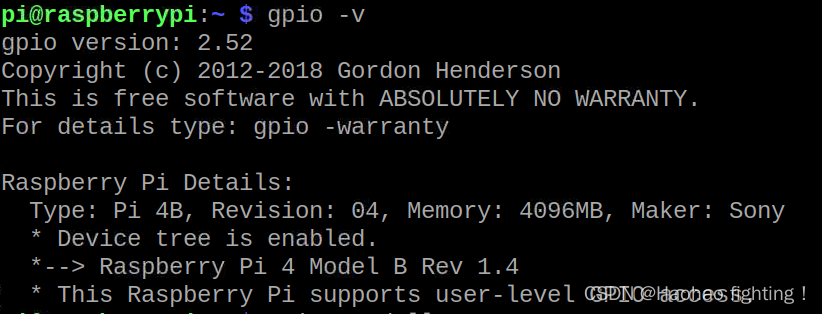
2-输入“gpio readall”查看我们接口编号的定义。
这里就不做截图,我们可以输入命令自己去看。
三、去除GPIO口警告
GPIO.setwarnings(False)这一步倒是可有可无,如果不加的话,我们在调试的过程中可能会遇到一个警告,警告的内容大体如下:
RuntimeWarning: This channel is already in use, continuing anyway. Use GPIO.setwarnings(False) to disable warnings.
出现这个警告并不影响程序的执行,主要是因为检测到12号管脚被占用了。我们也可以通过代码禁掉这个警告。
四、进行详细编程
首先是设置GPIO口的输出模式 ,再创建两个PWM实例,p_R和p_G。
下面是PWM波中常用的几个函数:
创建一个 PWM 实例:
p = GPIO.PWM(channel, frequency),参数为:GPIO口、频率。启用 PWM:
p.start(dc) # dc 代表占空比(范围:0.0 <= dc >= 100.0)更改频率:
p.ChangeFrequency(freq) # freq 为设置的新频率,单位为 Hz更改占空比:
p.ChangeDutyCycle(dc) # 范围:0.0 <= dc >= 100.0停止 PWM:
p.stop()注意,如果实例中的变量“p”超出范围,也会导致 PWM 停止。
五、程序源码
实现目的:颜色识别和GPIO口交互 与前面那篇博文相结合,上一篇博文链接:
opencv--可选颜色物体追踪函数_Haohao fighting!的博客-CSDN博客
这次设置编码规范应用的是BCM编码规范,我们通过更改redLed的值来改变GPIO口的引脚,我们在板子上连接的是GPIO口21.所以redLed的值就是21.(BCM编码规范中,板子上的管脚编号是多少我们就让redLed的值是多少)
#!/usr/bin/env python2
# -*- coding: utf-8 -*-

# import the necessary packages
from __future__ import print_function
from imutils.video import VideoStream
import argparse
import imutils
import time
import cv2
import RPi.GPIO as GPIO

# initialize GPIO
redLed = 21
GPIO.setmode(GPIO.BCM)
GPIO.setwarnings(False)
GPIO.setup(redLed, GPIO.OUT)

# construct the argument parse and parse the arguments
ap = argparse.ArgumentParser()
ap.add_argument("-p", "--picamera", type=int, default=-1,
	help="whether or not the Raspberry Pi camera should be used")
args = vars(ap.parse_args())

# initialize the video stream and allow the camera sensor to warmup
print("[INFO] waiting for camera to warmup...")
vs = VideoStream(usePiCamera=args["picamera"] > 0).start()
time.sleep(2.0)

# define the lower and upper boundaries of the object
# to be detected in the HSV color space
colorLower = (24, 100, 100)
colorUpper = (44, 255, 255)

# Start with LED off
print("\n Starting..... ==> Press 'q' to quit Program \n")
GPIO.output(redLed, GPIO.LOW)
ledOn = False

# loop over the frames from the video stream
while True:
	# grab the next frame from the video stream, Invert 180o, resize the
	# frame, and convert it to the HSV color space
	frame = vs.read()
	frame = imutils.resize(frame, width=500)
	frame = imutils.rotate(frame, angle=0)
	hsv = cv2.cvtColor(frame, cv2.COLOR_BGR2HSV)

	# construct a mask for the obect color, then perform
	# a series of dilations and erosions to remove any small
	# blobs left in the mask
	mask = cv2.inRange(hsv, colorLower, colorUpper)
	mask = cv2.erode(mask, None, iterations=2)
	mask = cv2.dilate(mask, None, iterations=2)

	# find contours in the mask and initialize the current
	# (x, y) center of the object
	cnts = cv2.findContours(mask.copy(), cv2.RETR_EXTERNAL,
		cv2.CHAIN_APPROX_SIMPLE)
	cnts = cnts[0] if imutils.is_cv2() else cnts[1]
	center = None

	# only proceed if at least one contour was found
	if len(cnts) > 0:
		# find the largest contour in the mask, then use
		# it to compute the minimum enclosing circle and
		# centroid
		c = max(cnts, key=cv2.contourArea)
		((x, y), radius) = cv2.minEnclosingCircle(c)
		M = cv2.moments(c)
		center = (int(M["m10"] / M["m00"]), int(M["m01"] / M["m00"]))

		# only proceed if the radius meets a minimum size
		if radius > 10:
			# draw the circle and centroid on the frame,
			# then update the list of tracked points
			cv2.circle(frame, (int(x), int(y)), int(radius),
				(0, 255, 255), 2)
			cv2.circle(frame, center, 5, (0, 0, 255), -1)

			# if the led is not already on, turn the LED on
			if not ledOn:
				GPIO.output(redLed, GPIO.HIGH)
				ledOn = True

	# if the object is not detected, turn the LED off
	elif ledOn:
		GPIO.output(redLed, GPIO.LOW)
		ledOn = False

	# show the frame to our screen
	cv2.imshow("Frame", frame)
	key = cv2.waitKey(1) & 0xFF

	# if the 'q' key is pressed, stop the loop
	if key == ord("q"):
		break

# do a bit of cleanup
print("\n Exiting Program and cleanup stuff \n")
GPIO.cleanup()
cv2.destroyAllWindows()
vs.stop()


