ROS–URDF集成Gazebo仿真小车
实现流程:
需要编写封装惯性矩阵算法的 xacro 文件

为机器人模型中的每一个 link 添加 collision 和 inertial 标签,并且重置颜色属性

在 launch 文件中启动 gazebo 并添加机器人模型
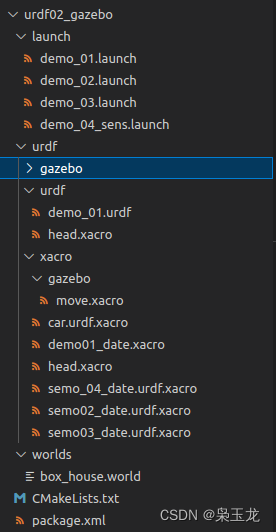
工作目录
1.编写封装惯性矩阵算法的 head.xacro 文件
<robot name="base" xmlns:xacro="http://wiki.ros.org/xacro">
    <!-- Macro for inertia matrix -->
    <xacro:macro name="sphere_inertial_matrix" params="m r">
        <inertial>
            <mass value="${m}" />
            <inertia ixx="${2*m*r*r/5}" ixy="0" ixz="0"
                iyy="${2*m*r*r/5}" iyz="0"
                izz="${2*m*r*r/5}" />
        </inertial>
    </xacro:macro>

    <xacro:macro name="cylinder_inertial_matrix" params="m r h">
        <inertial>
            <mass value="${m}" />
            <inertia ixx="${m*(3*r*r+h*h)/12}" ixy = "0" ixz = "0"
                iyy="${m*(3*r*r+h*h)/12}" iyz = "0"
                izz="${m*r*r/2}" />
        </inertial>
    </xacro:macro>

    <xacro:macro name="Box_inertial_matrix" params="m l w h">
       <inertial>
               <mass value="${m}" />
               <inertia ixx="${m*(h*h + l*l)/12}" ixy = "0" ixz = "0"
                   iyy="${m*(w*w + l*l)/12}" iyz= "0"
                   izz="${m*(w*w + h*h)/12}" />
       </inertial>
   </xacro:macro>
</robot>
2.底盘 :semo02_date.urdf.xacro 文件
<!--
    使用 xacro 优化 URDF 版的小车底盘实现:

    实现思路:
    1.将一些常量、变量封装为 xacro:property
      比如:PI 值、小车底盘半径、离地间距、车轮半径、宽度 ....
    2.使用 宏 封装驱动轮以及支撑轮实现,调用相关宏生成驱动轮与支撑轮

-->
<!-- 根标签,必须声明 xmlns:xacro -->
<robot name="my_base" xmlns:xacro="http://www.ros.org/wiki/xacro">
    <!-- 封装变量、常量 -->
    <!-- PI 值设置精度需要高一些,否则后续车轮翻转量计算时,可能会出现肉眼不能察觉的车轮倾斜,从而导致模型抖动 -->
    <xacro:property name="PI" value="3.1415926"/>
    <!-- 宏:黑色设置 -->
    <material name="black">
        <color rgba="0.0 0.0 0.0 1.0" />
    </material>
    <!-- 底盘属性 -->
    <xacro:property name="base_footprint_radius" value="0.001" /> <!-- base_footprint 半径  -->
    <xacro:property name="base_link_radius" value="0.1" /> <!-- base_link 半径 -->
    <xacro:property name="base_link_length" value="0.08" /> <!-- base_link 长 -->
    <xacro:property name="earth_space" value="0.015" /> <!-- 离地间距 -->
    <xacro:property name="base_link_m" value="0.5" /> <!-- 质量  -->

    <!-- 底盘 -->
    <link name="base_footprint">
      <visual>
        <geometry>
          <sphere radius="${base_footprint_radius}" />
        </geometry>
      </visual>
    </link>

    <link name="base_link">
      <visual>
        <geometry>
          <cylinder radius="${base_link_radius}" length="${base_link_length}" />
        </geometry>
        <origin xyz="0 0 0" rpy="0 0 0" />
        <material name="yellow">
          <color rgba="0.5 0.3 0.0 0.5" />
        </material>
      </visual>
      <collision>
        <geometry>
          <cylinder radius="${base_link_radius}" length="${base_link_length}" />
        </geometry>
        <origin xyz="0 0 0" rpy="0 0 0" />
      </collision>
      <xacro:cylinder_inertial_matrix m="${base_link_m}" r="${base_link_radius}" h="${base_link_length}" />

    </link>


    <joint name="base_link2base_footprint" type="fixed">
      <parent link="base_footprint" />
      <child link="base_link" />
      <origin xyz="0 0 ${earth_space + base_link_length / 2 }" />
    </joint>
    <gazebo reference="base_link">
        <material>Gazebo/Yellow</material>
    </gazebo>

    <!-- 驱动轮 -->
    <!-- 驱动轮属性 -->
    <xacro:property name="wheel_radius" value="0.0325" /><!-- 半径 -->
    <xacro:property name="wheel_length" value="0.015" /><!-- 宽度 -->
    <xacro:property name="wheel_m" value="0.05" /> <!-- 质量  -->

    <!-- 驱动轮宏实现 -->
    <xacro:macro name="add_wheels" params="name flag">
      <link name="${name}_wheel">
        <visual>
          <geometry>
            <cylinder radius="${wheel_radius}" length="${wheel_length}" />
          </geometry>
          <origin xyz="0.0 0.0 0.0" rpy="${PI / 2} 0.0 0.0" />
          <material name="black" />
        </visual>
        <collision>
          <geometry>
            <cylinder radius="${wheel_radius}" length="${wheel_length}" />
          </geometry>
          <origin xyz="0.0 0.0 0.0" rpy="${PI / 2} 0.0 0.0" />
        </collision>
        <xacro:cylinder_inertial_matrix m="${wheel_m}" r="${wheel_radius}" h="${wheel_length}" />

      </link>

      <joint name="${name}_wheel2base_link" type="continuous">
        <parent link="base_link" />
        <child link="${name}_wheel" />
        <origin xyz="0 ${flag * base_link_radius} ${-(earth_space + base_link_length / 2 - wheel_radius) }" />
        <axis xyz="0 1 0" />
      </joint>

      <gazebo reference="${name}_wheel">
        <material>Gazebo/Red</material>
      </gazebo>

    </xacro:macro>
    <xacro:add_wheels name="left" flag="1" />
    <xacro:add_wheels name="right" flag="-1" />
    <!-- 支撑轮 -->
    <!-- 支撑轮属性 -->
    <xacro:property name="support_wheel_radius" value="0.0075" /> <!-- 支撑轮半径 -->
    <xacro:property name="support_wheel_m" value="0.03" /> <!-- 质量  -->

    <!-- 支撑轮宏 -->
    <xacro:macro name="add_support_wheel" params="name flag" >
      <link name="${name}_wheel">
        <visual>
            <geometry>
                <sphere radius="${support_wheel_radius}" />
            </geometry>
            <origin xyz="0 0 0" rpy="0 0 0" />
            <material name="black" />
        </visual>
        <collision>
            <geometry>
                <sphere radius="${support_wheel_radius}" />
            </geometry>
            <origin xyz="0 0 0" rpy="0 0 0" />
        </collision>
        <xacro:sphere_inertial_matrix m="${support_wheel_m}" r="${support_wheel_radius}" />
      </link>

      <joint name="${name}_wheel2base_link" type="continuous">
          <parent link="base_link" />
          <child link="${name}_wheel" />
          <origin xyz="${flag * (base_link_radius - support_wheel_radius)} 0 ${-(base_link_length / 2 + earth_space / 2)}" />
          <axis xyz="1 1 1" />
      </joint>
      <gazebo reference="${name}_wheel">
        <material>Gazebo/Red</material>
      </gazebo>
    </xacro:macro>

    <xacro:add_support_wheel name="front" flag="1" />
    <xacro:add_support_wheel name="back" flag="-1" />


</robot>
3:摄像头::semo03_date.urdf.xacro 文件
<!-- 摄像头相关的 xacro 文件 -->
<robot name="my_camera" xmlns:xacro="http://wiki.ros.org/xacro">
    <!-- 摄像头属性 -->
    <xacro:property name="camera_length" value="0.01" /> <!-- 摄像头长度(x) -->
    <xacro:property name="camera_width" value="0.025" /> <!-- 摄像头宽度(y) -->
    <xacro:property name="camera_height" value="0.025" /> <!-- 摄像头高度(z) -->
    <xacro:property name="camera_x" value="0.08" /> <!-- 摄像头安装的x坐标 -->
    <xacro:property name="camera_y" value="0.0" /> <!-- 摄像头安装的y坐标 -->
    <xacro:property name="camera_z" value="${base_link_length / 2 + camera_height / 2}" /> <!-- 摄像头安装的z坐标:底盘高度 / 2 + 摄像头高度 / 2  -->

    <xacro:property name="camera_m" value="0.01" /> <!-- 摄像头质量 -->

    <!-- 摄像头关节以及link -->
    <link name="camera">
        <visual>
            <geometry>
                <box size="${camera_length} ${camera_width} ${camera_height}" />
            </geometry>
            <origin xyz="0.0 0.0 0.0" rpy="0.0 0.0 0.0" />
            <material name="black" />
        </visual>
        <collision>
            <geometry>
                <box size="${camera_length} ${camera_width} ${camera_height}" />
            </geometry>
            <origin xyz="0.0 0.0 0.0" rpy="0.0 0.0 0.0" />
        </collision>
        <xacro:Box_inertial_matrix m="${camera_m}" l="${camera_length}" w="${camera_width}" h="${camera_height}" />
    </link>

    <joint name="camera2base_link" type="fixed">
        <parent link="base_link" />
        <child link="camera" />
        <origin xyz="${camera_x} ${camera_y} ${camera_z}" />
    </joint>
    <gazebo reference="camera">
        <material>Gazebo/Blue</material>
    </gazebo>
</robot>
4:雷达:semo_04_date.urdf.xacro文件
<!--
    小车底盘添加雷达
-->
<robot name="my_laser" xmlns:xacro="http://wiki.ros.org/xacro">

    <!-- 雷达支架 -->
    <xacro:property name="support_length" value="0.15" /> <!-- 支架长度 -->
    <xacro:property name="support_radius" value="0.01" /> <!-- 支架半径 -->
    <xacro:property name="support_x" value="0.0" /> <!-- 支架安装的x坐标 -->
    <xacro:property name="support_y" value="0.0" /> <!-- 支架安装的y坐标 -->
    <xacro:property name="support_z" value="${base_link_length / 2 + support_length / 2}" /> <!-- 支架安装的z坐标:底盘高度 / 2 + 支架高度 / 2  -->

    <xacro:property name="support_m" value="0.02" /> <!-- 支架质量 -->

    <link name="support">
        <visual>
            <geometry>
                <cylinder radius="${support_radius}" length="${support_length}" />
            </geometry>
            <origin xyz="0.0 0.0 0.0" rpy="0.0 0.0 0.0" />
            <material name="red">
                <color rgba="0.8 0.2 0.0 0.8" />
            </material>
        </visual>

        <collision>
            <geometry>
                <cylinder radius="${support_radius}" length="${support_length}" />
            </geometry>
            <origin xyz="0.0 0.0 0.0" rpy="0.0 0.0 0.0" />
        </collision>

        <xacro:cylinder_inertial_matrix m="${support_m}" r="${support_radius}" h="${support_length}" />

    </link>

    <joint name="support2base_link" type="fixed">
        <parent link="base_link" />
        <child link="support" />
        <origin xyz="${support_x} ${support_y} ${support_z}" />
    </joint>

    <gazebo reference="support">
        <material>Gazebo/White</material>
    </gazebo>

    <!-- 雷达属性 -->
    <xacro:property name="laser_length" value="0.05" /> <!-- 雷达长度 -->
    <xacro:property name="laser_radius" value="0.03" /> <!-- 雷达半径 -->
    <xacro:property name="laser_x" value="0.0" /> <!-- 雷达安装的x坐标 -->
    <xacro:property name="laser_y" value="0.0" /> <!-- 雷达安装的y坐标 -->
    <xacro:property name="laser_z" value="${support_length / 2 + laser_length / 2}" /> <!-- 雷达安装的z坐标:支架高度 / 2 + 雷达高度 / 2  -->

    <xacro:property name="laser_m" value="0.1" /> <!-- 雷达质量 -->

    <!-- 雷达关节以及link -->
    <link name="laser">
        <visual>
            <geometry>
                <cylinder radius="${laser_radius}" length="${laser_length}" />
            </geometry>
            <origin xyz="0.0 0.0 0.0" rpy="0.0 0.0 0.0" />
            <material name="black" />
        </visual>
        <collision>
            <geometry>
                <cylinder radius="${laser_radius}" length="${laser_length}" />
            </geometry>
            <origin xyz="0.0 0.0 0.0" rpy="0.0 0.0 0.0" />
        </collision>
        <xacro:cylinder_inertial_matrix m="${laser_m}" r="${laser_radius}" h="${laser_length}" />
    </link>

    <joint name="laser2support" type="fixed">
        <parent link="support" />
        <child link="laser" />
        <origin xyz="${laser_x} ${laser_y} ${laser_z}" />
    </joint>
    <gazebo reference="laser">
        <material>Gazebo/Black</material>
    </gazebo>
</robot>
5:创建运动控制实现系统:move.xacro
<robot name="my_car_move" xmlns:xacro="http://wiki.ros.org/xacro">

    <!-- 传动实现:用于连接控制器与关节 -->
    <xacro:macro name="joint_trans" params="joint_name">
        <!-- Transmission is important to link the joints and the controller -->
        <transmission name="${joint_name}_trans">
            <type>transmission_interface/SimpleTransmission</type>
            <joint name="${joint_name}">
                <hardwareInterface>hardware_interface/VelocityJointInterface</hardwareInterface>
            </joint>
            <actuator name="${joint_name}_motor">
                <hardwareInterface>hardware_interface/VelocityJointInterface</hardwareInterface>
                <mechanicalReduction>1</mechanicalReduction>
            </actuator>
        </transmission>
    </xacro:macro>

    <!-- 每一个驱动轮都需要配置传动装置 -->
    <xacro:joint_trans joint_name="left_wheel2base_link" />
    <xacro:joint_trans joint_name="right_wheel2base_link" />

    <!-- 控制器 -->
    <gazebo>
        <plugin name="differential_drive_controller" filename="libgazebo_ros_diff_drive.so">
            <rosDebugLevel>Debug</rosDebugLevel>
            <publishWheelTF>true</publishWheelTF>
            <robotNamespace>/</robotNamespace>
            <publishTf>1</publishTf>
            <publishWheelJointState>true</publishWheelJointState>
            <alwaysOn>true</alwaysOn>
            <updateRate>100.0</updateRate>
            <legacyMode>true</legacyMode>
            <leftJoint>left_wheel2base_link</leftJoint> <!-- 左轮 -->
            <rightJoint>right_wheel2base_link</rightJoint> <!-- 右轮 -->
            <wheelSeparation>${base_link_radius * 2}</wheelSeparation> <!-- 车轮间距 -->
            <wheelDiameter>${wheel_radius * 2}</wheelDiameter> <!-- 车轮直径 -->
            <broadcastTF>1</broadcastTF>
            <wheelTorque>30</wheelTorque>
            <wheelAcceleration>1.8</wheelAcceleration>
            <commandTopic>cmd_vel</commandTopic> <!-- 运动控制话题 -->
            <odometryFrame>odom</odometryFrame> <!-- 里程计坐标系 -->
            <odometryTopic>odom</odometryTopic> <!-- 里程计话题 -->
            <robotBaseFrame>base_footprint</robotBaseFrame> <!-- 根坐标系 -->
        </plugin>
    </gazebo>

</robot>
6:组合底盘、摄像头与雷达的 car.urdf.xacro 文件
<!-- 组合小车底盘与摄像头与雷达 -->
<robot name="my_car_camera" xmlns:xacro="http://wiki.ros.org/xacro">
    <xacro:include filename="head.xacro" />
    <xacro:include filename="semo02_date.urdf.xacro" />
    <xacro:include filename="semo03_date.urdf.xacro" />
    <xacro:include filename="semo_04_date.urdf.xacro" />
<!-- 运动控制 -->
    <xacro:include filename="gazebo/move.xacro" />
</robot>
7:创建demo_03.launch文件
<launch>

    <!-- 将 Urdf 文件的内容加载到参数服务器 -->
    <param name="robot_description" command="$(find xacro)/xacro  $(find urdf02_gazebo)/urdf/xacro/car.urdf.xacro" />

    <!-- 启动 gazebo -->
    <include file="$(find gazebo_ros)/launch/empty_world.launch" >
        <arg name="world_name" value="$(find urdf02_gazebo)/worlds/box_house.world"/>
    </include>

    <!-- 在 gazebo 中显示机器人模型 -->
    <node pkg="gazebo_ros" type="spawn_model" name="model" args="-urdf -model mycar -param robot_description"  />
</launch>
8:下载box_house.world文件
下载地址:https://github.com/zx595306686/sim_demo
9:创建rviz控制demo_04_sens.launch
<launch>

    <node pkg="rviz" type="rviz" name="rviz" args="-d $(find urdlee)/config/showmycar.rviz" />
    <node pkg="joint_state_publisher" type="joint_state_publisher" name="joint_state_publisher" output="screen" />
    <node pkg="robot_state_publisher" type="robot_state_publisher" name="robot_state_publisher" output="screen" />


</launch>
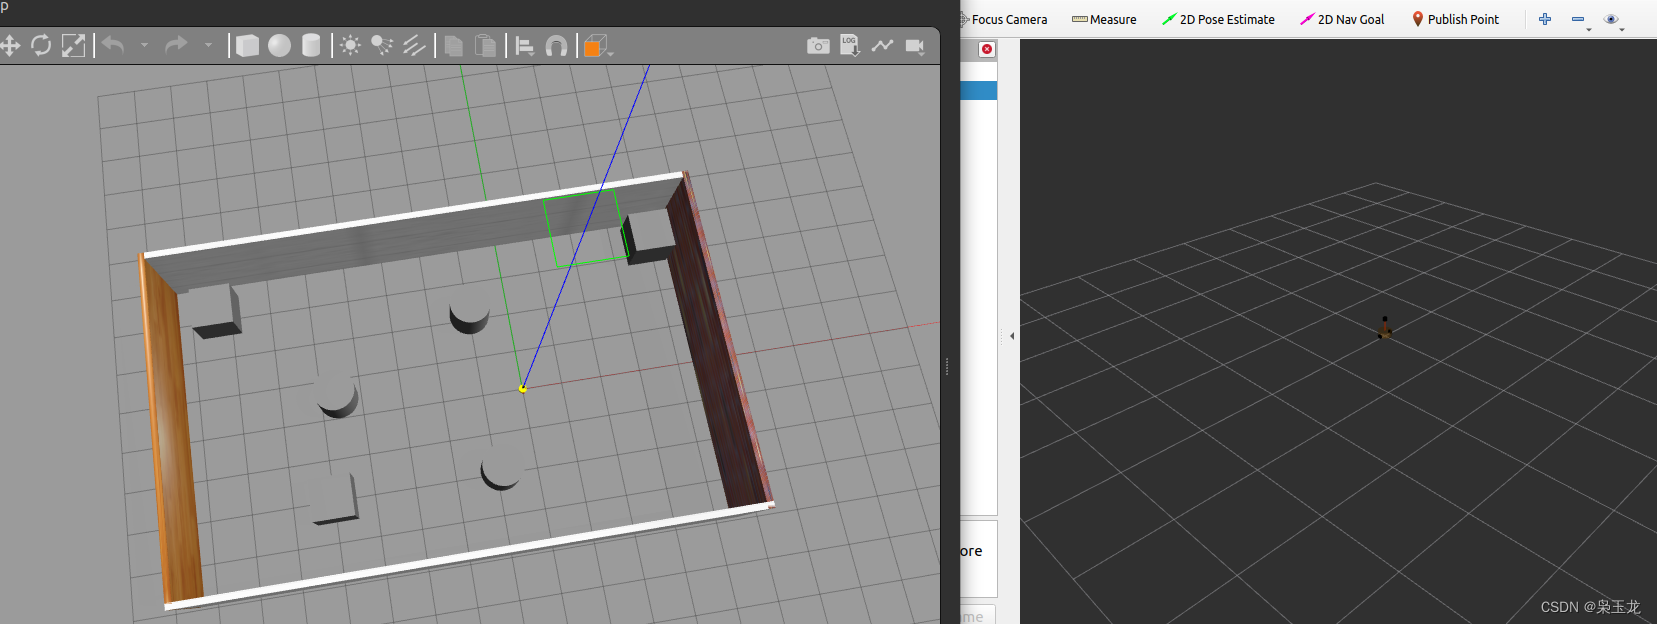
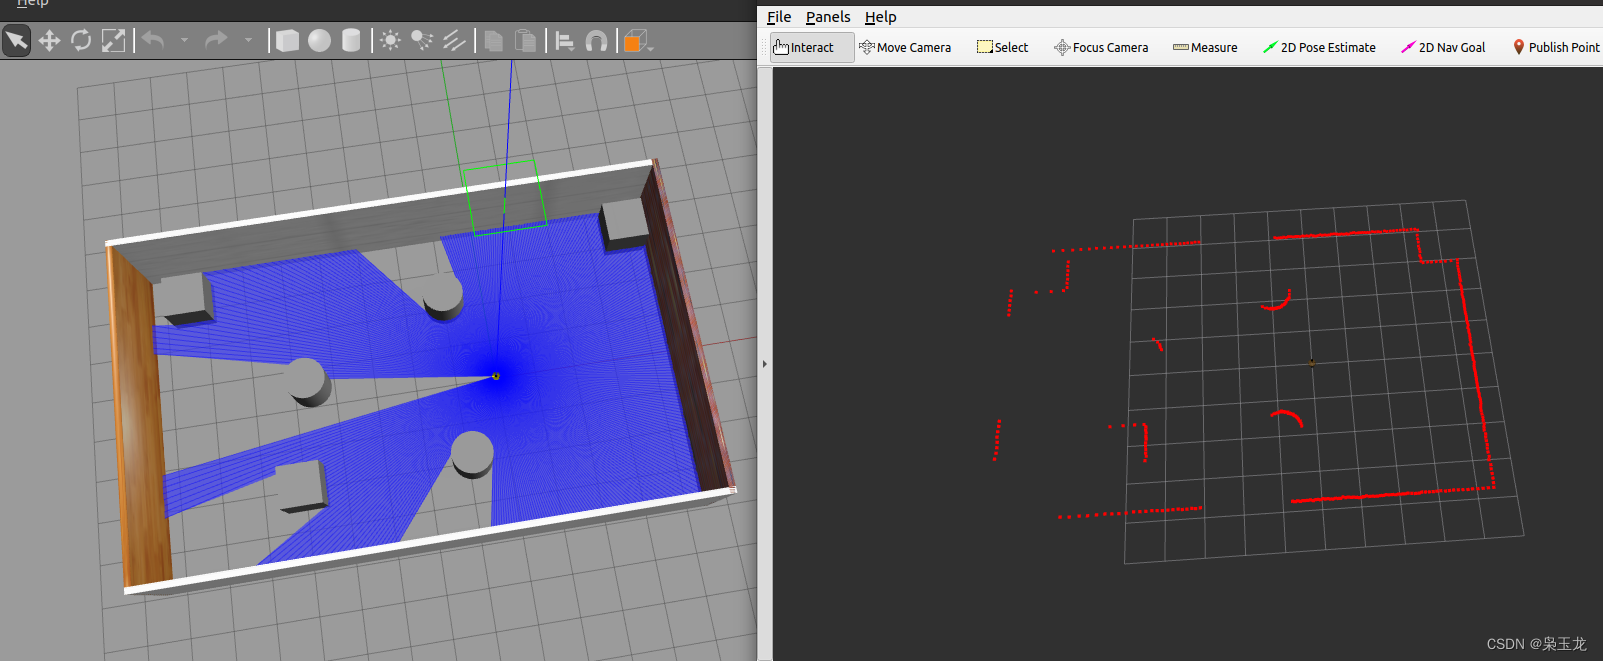
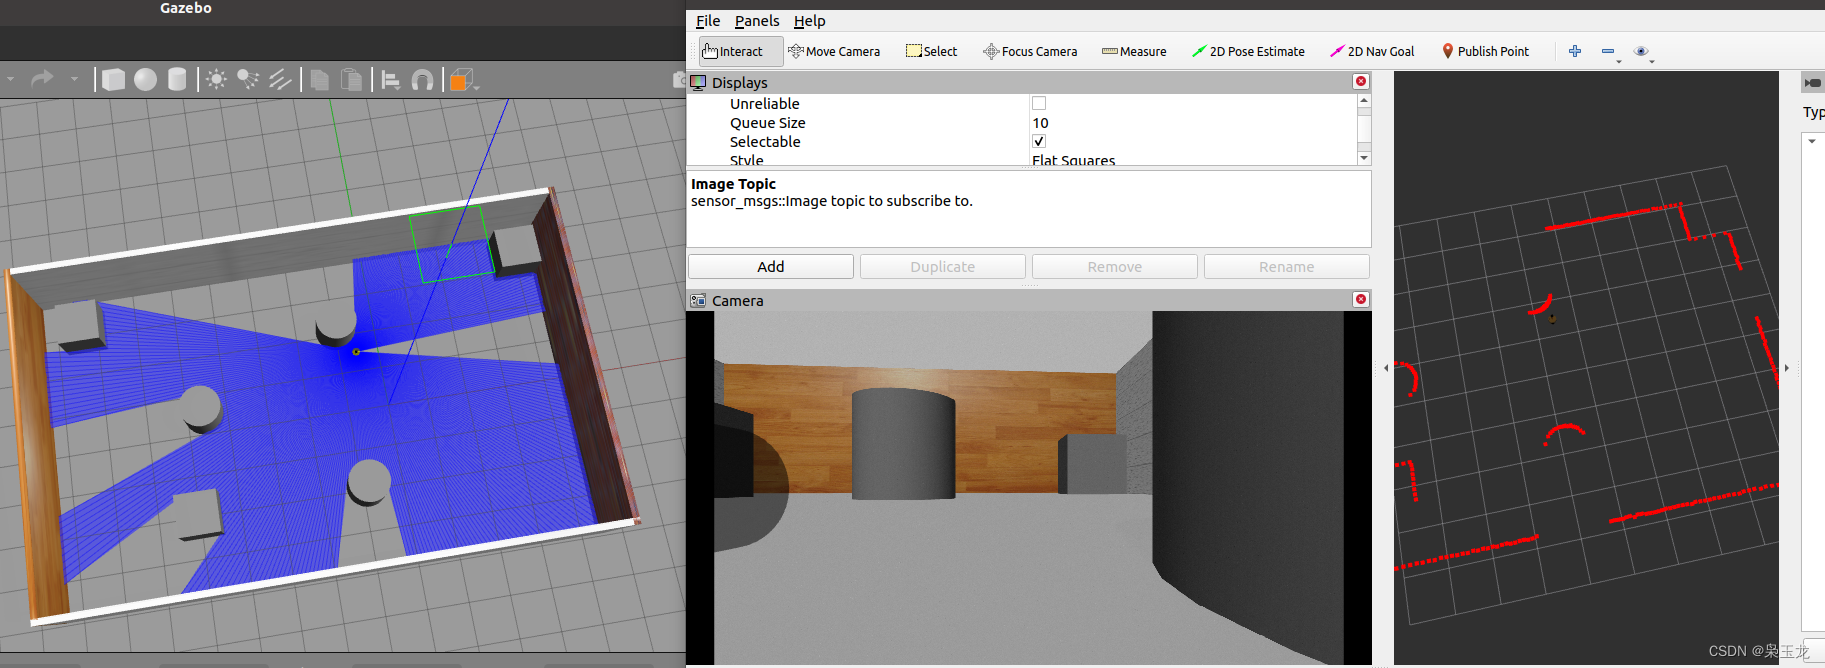
命令运行
source ./devel/setup.bash
roslaunch urdf02_gazebo demo_03.launch
roslaunch urdf02_gazebo demo_04_sens.launch
rosrun teleop_twist_keyboard teleop_twist_keyboard.py
](https://img-blog.csdnimg.cn/e2543e1bc1f348f48d9e6077ac725475.jpeg)