WPF系列-绘图和动画
- 1、WPF绘图
- 1.1 直线
- 1.2 矩形
- 1.3 椭圆
- 1.4 路径
1、WPF绘图
这里将从静态图像绘制入手,进而学习动画效果制作。WPF 拥有自己的一套图形 API ,使用这套 API 不但可以轻松地绘制出精美的图形,还可以方便地对图形进行滤镜、变形等效果。WPF 绘制出的图形为矢量图,图片放大或缩小不会出现锯齿现象。引用别人 WPF 绘制的图像,直接把 XAML 代码拿来用即可。
WPF 的基本图形包括以下几个(均为 Shape 类的派生类):
- Line: 直线段,可以设置笔触(Stroke)。
- Rectangle: 矩形,既有笔触,还可以填充背景色(Fill)。
- Ellipse: 椭圆,长宽相等的则为圆,既有笔触又有填充。
- Polygon: 多边形,有多条直线段围成的闭合区域,既有笔触又有填充。
- Polyline: (不闭合)折线,由多条首位相接的直线段组成。
- Path: (闭合区域)路径,基本图像中功能最强大的,可以有若干直线、圆弧、贝塞尔曲线组成。
1.1 直线
直线是最简单的图形,由起点(X1,Y1)和终点(X2,Y2)两个点坐标构成,通过设置 X1 和 Y1 的属性值,可以设置直线的起点,通过设置 X2 和 Y2 的属性值,可以设置直线的终点坐标,控制不同直线的起点和终点坐标,可以实现直线的平行、交错等效果。Stroke(笔触)属性的数据类型就是 Brush (画刷) ,凡是 Brush 的派生类均可以给该属性赋值,当然使用渐变色画刷还可以画出渐变效果的直线,Line 的部分属性设置还可以将直线变成虚线(StrokeDashArray)或者控制线段起点(StrokeStartLineCap)终点(StrokeEndLineCap)形状。下面我们看下这些属性实现的效果。
<Window x:Class="LSCX_WPFSerial._12.LineUI"
        xmlns="http://schemas.microsoft.com/winfx/2006/xaml/presentation"
        xmlns:x="http://schemas.microsoft.com/winfx/2006/xaml"
        xmlns:d="http://schemas.microsoft.com/expression/blend/2008"
        xmlns:mc="http://schemas.openxmlformats.org/markup-compatibility/2006"
        xmlns:local="clr-namespace:LSCX_WPFSerial._12"
        mc:Ignorable="d"
        Title="LineUI" Height="260" Width="280">
    <Grid>
        <Line X1="20" Y1="20" X2="260" Y2="20" Stroke="Black" StrokeThickness="10"/>
        <Line X1="20" Y1="40" X2="260" Y2="40" Stroke="Red" StrokeThickness="8"/>
        <Line X1="20" Y1="60" X2="260" Y2="60" Stroke="Bisque" StrokeThickness="6"/>
        <Line X1="20" Y1="80" X2="260" Y2="80" Stroke="Aqua" StrokeThickness="4"/>
        <Line X1="20" Y1="100" X2="260" Y2="100" Stroke="Purple" StrokeThickness="2"/>
        <Line X1="20" Y1="120" X2="260" Y2="120" Stroke="Red" StrokeDashArray="3" StrokeThickness="1"/>
        <Line X1="20" Y1="140" X2="260" Y2="140" Stroke="Red" StrokeDashArray="5" StrokeThickness="1"/>
        <Line X1="20" Y1="180" X2="260" Y2="180" Stroke="Coral" StrokeEndLineCap="Triangle" StrokeThickness="8"/>
        <Line X1="20" Y1="200" X2="260" Y2="200" Stroke="Coral" StrokeEndLineCap="Round" StrokeThickness="8"/>
        <Line X1="20" Y1="220" X2="260" Y2="220" StrokeEndLineCap="Round" StrokeThickness="8">
            <Line.Stroke>
                <LinearGradientBrush EndPoint="0,0.5" StartPoint="1,0.5">
                    <GradientStop Color="Red" Offset="0"/>
                    <GradientStop Offset="1" />
                </LinearGradientBrush>
            </Line.Stroke>
        </Line>
        <Line X1="20" Y1="240" X2="260" Y2="240" StrokeEndLineCap="Round" StrokeThickness="8">
            <Line.Stroke>
                <LinearGradientBrush EndPoint="0,0.5" StartPoint="1,0.5">
                    <GradientStop Color="Red" Offset="0"/>
                    <GradientStop Color="Purple" Offset="1" />
                </LinearGradientBrush>
            </Line.Stroke>
        </Line>
    </Grid>
</Window>
实现效果如下所示:
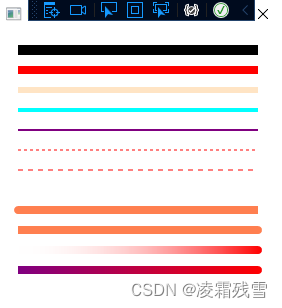 这里我们使用绘图的容器是 Grid ,常用的布局容器主要是 Canvas 和 Grid 。
1.2 矩形
矩形由笔触(Stroke)即边线 和填充( Fill ) 构成。 Stroke 属性的设置与 Line —样,Fill 属性的数据类型是 Brush。 Brush 是个抽象类, 所以不可直接使用 Brush 类的实例为 Fill 属性陚值,必须使用 Brush 派生类的实例进行陚值。 WPF 的绘图系统包含非常丰富的 Brush 类型, 常用的有:
SolidColorBrush: 实心画刷。 在 XAML 中可以使用颜色名称字符串( 如 Red、 Blue) 直接赋值。
LinearGradientBrush: 线性渐变画刷。 色彩沿设定的直线方向、 按设定的变化点进行渐变。
RadialGradientBrush: 径向渐变画刷。 色彩沿半径的方向、 按设定的变化点进行渐变, 形成圆形填充。
ImageBrush: 使用图片( Image) 作为填充内容。
DrawingBrush: 使用矢量图( Vector ) 和位图( Bitmap) 作为填充内容。
VisualBrush: WPF 中 的 每 个 控 件 都 是 由 FrameworkElement 类 派 生 来 的 , 而FrameworkElement 又是由 Visual 类派牛.来的。 Visual 意为“ 可视” 之意, 每个控件的可视化形象就可以通过 Visual 类的方法获得。 获得这个可视化的形象后, 我们可以用这个形象进行填充。下面我们来使用这些属性画一些矩形,并使用不同的填充。
<Window x:Class="LSCX_WPFSerial._12.Rectangle"
        xmlns="http://schemas.microsoft.com/winfx/2006/xaml/presentation"
        xmlns:x="http://schemas.microsoft.com/winfx/2006/xaml"
        xmlns:d="http://schemas.microsoft.com/expression/blend/2008"
        xmlns:mc="http://schemas.openxmlformats.org/markup-compatibility/2006"
        xmlns:local="clr-namespace:LSCX_WPFSerial._12"
        mc:Ignorable="d"
        Title="Rectangle" Height="450" Width="800">
    <Grid Margin="10">
        <Grid.RowDefinitions>
            <RowDefinition Height="160"/>
            <RowDefinition Height="10"/>
            <RowDefinition Height="160"/>
        </Grid.RowDefinitions>
        <Grid.ColumnDefinitions>
            <ColumnDefinition Width="180"/>
            <ColumnDefinition Width="10"/>
            <ColumnDefinition Width="180"/>
            <ColumnDefinition Width="10"/>
            <ColumnDefinition Width="180"/>
        </Grid.ColumnDefinitions>
        <!--纯色填充-->
        <Rectangle Stroke="Red" Fill="LightBlue"/>
        <!--线性渐变色填充-->
        <Rectangle Grid.Column="2" Grid.Row="0">
            <Rectangle.Fill>
                <LinearGradientBrush StartPoint="0,0" EndPoint="1,1">
                    <GradientStop Color="#ffbf7f" Offset="0"/>
                    <GradientStop Color="#ffcc99" Offset="0.25"/>
                    <GradientStop Color="#ffdbb7" Offset="0.5"/>
                    <GradientStop Color="#ffead6" Offset="1"/>
                </LinearGradientBrush>

            </Rectangle.Fill>
        </Rectangle>
        <!--径向渐变色填充-->
        <Rectangle Grid.Column="4" Grid.Row="0">
            <Rectangle.Fill>
                <!--默认填充的起点坐标 0,0 终点坐标 1,1 所以可以直接省略 StartPoint="0,0" EndPoint="1,1"-->
                <RadialGradientBrush>
                    <GradientStop Color="#ffbf7f" Offset="0"/>
                    <GradientStop Color="#ffcc99" Offset="0.25"/>
                    <GradientStop Color="#ffdbb7" Offset="0.5"/>
                    <GradientStop Color="#ffead6" Offset="1"/>
                </RadialGradientBrush>

            </Rectangle.Fill>
        </Rectangle>

        <!--图片填充-->
        <Rectangle Grid.Column="0" Grid.Row="2">
            <Rectangle.Fill>
                <ImageBrush ImageSource="/Images/黑.jpg" TileMode="Tile" Stretch="Uniform"/>
            </Rectangle.Fill>
        </Rectangle>

        <!--矢量图填充-->
        <Rectangle Grid.Column="2" Grid.Row="2">
            <Rectangle.Fill>
                <DrawingBrush Viewport="0,0,0.2,0.2" TileMode="Tile">
                    <DrawingBrush.Drawing>
                        <GeometryDrawing Brush="LightBlue">
                            <GeometryDrawing.Geometry>
                                <EllipseGeometry RadiusX="15" RadiusY="15"/>
                            </GeometryDrawing.Geometry>
                        </GeometryDrawing>
                    </DrawingBrush.Drawing>
                </DrawingBrush>
            </Rectangle.Fill>
        </Rectangle>

        <!--线性渐变填充边线-->
        <Rectangle Grid.Column="4" Grid.Row="2" StrokeThickness="10">
            <Rectangle.Stroke>
                <LinearGradientBrush>
                    <GradientStop Color="#ffbf7f" Offset="0.3"/>
                    <GradientStop Color="#ffead6" Offset="1"/>
                </LinearGradientBrush>

            </Rectangle.Stroke>
        </Rectangle>
    </Grid>
</Window>
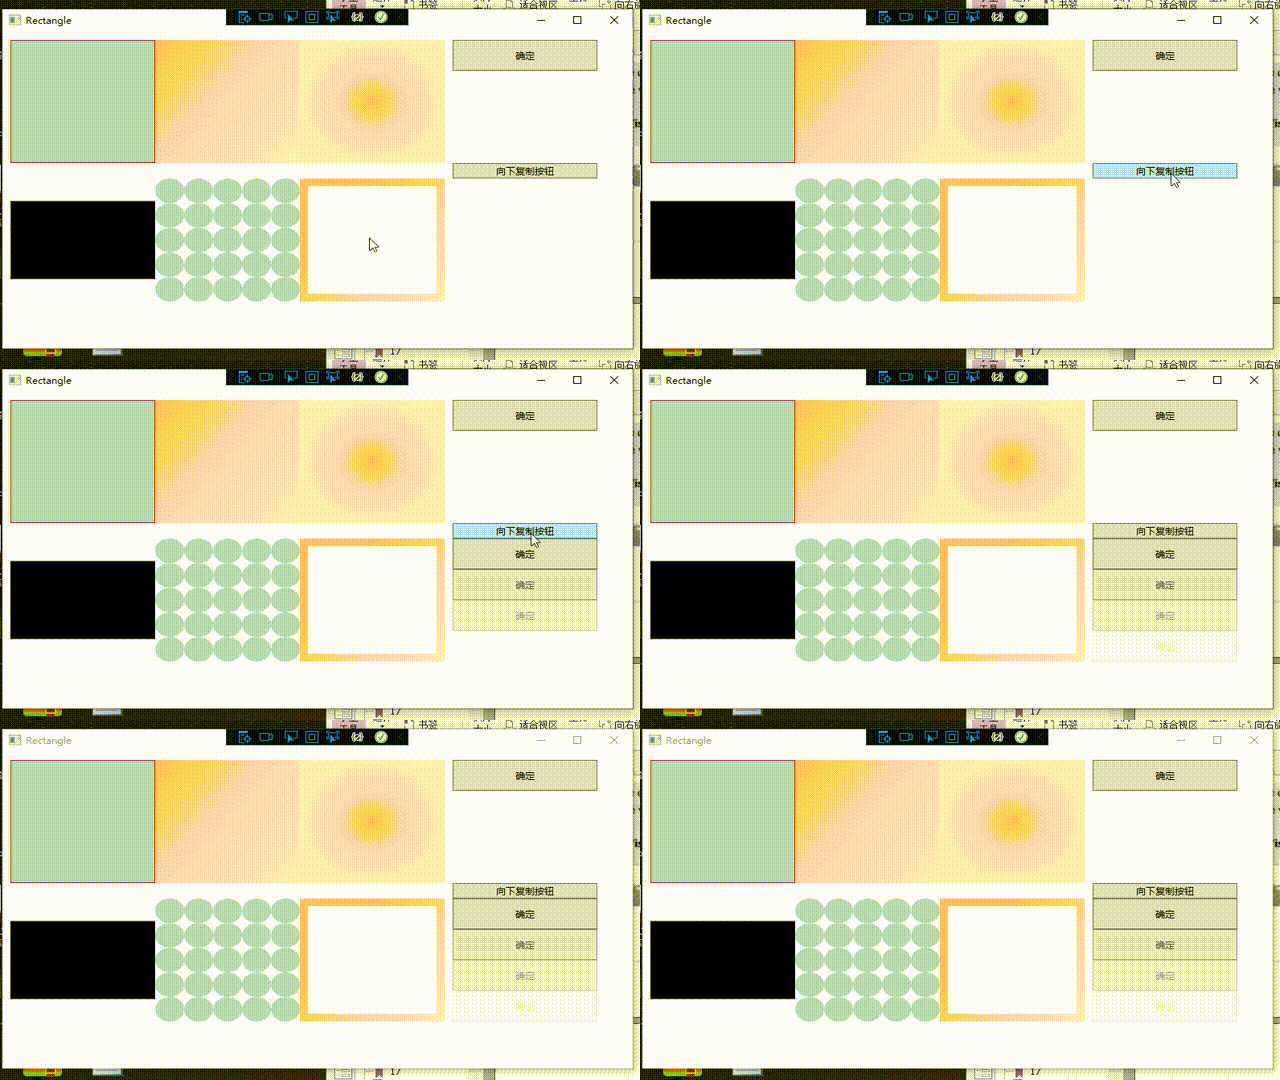
效果如下所示:
 接下来,我们看一下使用 VisualBrush 的例子,这里我们用 Button 作为目标控件为案例实现。 XAML 代码如下:
 <!--VisualBrush按钮实例-->
        <StackPanel x:Name="stackpanelTop" Background="White" Grid.Column="4">
            <Button x:Name="btn_Top" Content="确定" Height="40"/>
        </StackPanel>
        <Button Content="向下复制按钮" Grid.Column="4" Grid.Row="1"  Click="CloneVisual"/>
        <StackPanel x:Name="stackpanelBottom" Grid.Row="2" Grid.Column="4" Orientation="Vertical" Background="White"/>
实现后效果如下:
1.3 椭圆
椭圆作为一种常见的图像,使用方法与矩形基本一致,只是图像形状上的差别,下面以绘制一个球体为例子,球体轮廓是圆形的,让椭圆变成圆的方式是 width=Height,球体的阴影效果我们使用径向渐变实现。XAML 代码如下:
<Window x:Class="LSCX_WPFSerial._12.EllipseUI"
        xmlns="http://schemas.microsoft.com/winfx/2006/xaml/presentation"
        xmlns:x="http://schemas.microsoft.com/winfx/2006/xaml"
        xmlns:d="http://schemas.microsoft.com/expression/blend/2008"
        xmlns:mc="http://schemas.openxmlformats.org/markup-compatibility/2006"
        xmlns:local="clr-namespace:LSCX_WPFSerial._12"
        mc:Ignorable="d"
        Title="EllipseUI" Height="450" Width="800">
    <Grid>
        <Ellipse Stroke="Gray" Width="200" Height="200" Cursor="Hand" ToolTip="Ball">
            <Ellipse.Fill>
                <RadialGradientBrush GradientOrigin="0.2,0.8" RadiusX="0.75" RadiusY="0.75">
                    <RadialGradientBrush.RelativeTransform>
                        <TransformGroup>
                            <RotateTransform Angle="90" CenterX="0.5" CenterY="0.5"/>
                        </TransformGroup>
                    </RadialGradientBrush.RelativeTransform>
                    <GradientStop Color="#FFFFFFFF" Offset="0"/>
                    <GradientStop Color="#FF444444" Offset="0.66"/>
                    <GradientStop Color="#FF999999" Offset="1"/>
                </RadialGradientBrush>
            </Ellipse.Fill>
        </Ellipse>
    </Grid>
</Window>
显示效果如下:

我们来分析下这个元的实现过程,我们先只是用径向填充看一下效果
 <Ellipse Stroke="Gray" Width="140" Height="140" Cursor="Hand" ToolTip="Ball">
            <Ellipse.Fill>
                <RadialGradientBrush>
                    <GradientStop Color="#FFFFFFFF" Offset="0"/>
                    <GradientStop Color="#FF444444" Offset="0.66"/>
                    <GradientStop Color="#FF999999" Offset="1"/>
                </RadialGradientBrush>
            </Ellipse.Fill>
        </Ellipse>

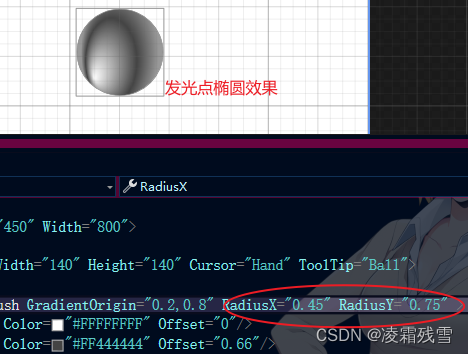
我们得到的是一个类似点光源的发光效果,那么怎么实现球体效果,就需要增加阴影和径向填充的中心位置,即发光点的位置。这里是通过 RadialGradientBrush GradientOrigin=“0.2,0.8” RadiusX=“0.75” RadiusY=“0.75” 来实现,GradientOrigin 属性就是控制发光点的位置,他以左上角为原点,通过坐标点来控制发光点出现的位置,坐标值范围是0-1,GradientOrigin=“0.2,0.8” 就表示 发光点位于x轴 0.2 位置,y轴0.8 位置。RadiusX=“0.75” RadiusY=“0.75” 则是用来控制发光点辐射的范围,RadiusX= RadiusY 表示发光区域为圆形区域,当不相时则为椭圆形区域,0.75 表示覆盖区域占整个圆的 75% 。而剩下的区域就形成了 **阴影的效果 **。如下所示:


发光点旋转角度是通过下马这个属性值来实现,CenterX=0.5 CenterY=“0.5” 表示旋转中心位于圆心位置,坐标参考也是左上角为原点位置,旋转是按照顺时针旋转,旋转90度。把原本位于左下角的发光点旋转90度后变换到左上角了。
  <RadialGradientBrush.RelativeTransform>
                        <TransformGroup>
                            <RotateTransform Angle="90" CenterX="0.5" CenterY="0.5"/>
                        </TransformGroup>
                    </RadialGradientBrush.RelativeTransform>
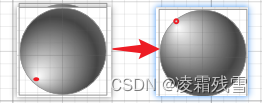
以上就是对椭圆的具体分析了,相信大家对部分属性的理解也会更加深刻一些。
1.4 路径
路径可以说是WPF 绘图中最强大的工具了,用这一个就可以实现所有类型的图形,通过直线、圆弧、贝塞尔曲线组合实现。路径的一个重要属性就是 Data ,Data 的数据类型是 Geometry (几何图形)我们使用这一属性对线段进行拼接形成复杂的图形。
Data 语法有两种形式:
- 标签式标准语法;
- 用于绘制几何图形的 路径标记语法;
Geometry 是抽象类,不能直接使用,我们需要使用他的子类作为 Data 的数据源。Geometry 的常用子类:
- LineGeometry : 直线几何图形
- RectangleGeometry :矩形几何图形
- EillpseGeometry :椭圆几何图形
- PathGeometry :路径几何图形
- StreamGeometry :PathGeometry 的代替品,轻量级,不支持 Binding和动画等。
- CombinedGeometry:由多个基本几何图形联合在一起形成单个几何图形。
- GeometryGroup:由多个基本几何图形组合在一起,形成几何图形组。
下面我们看下各种图形的实现吧,XAML代码如下:
<Window x:Class="LSCX_WPFSerial._12.PathUI"
        xmlns="http://schemas.microsoft.com/winfx/2006/xaml/presentation"
        xmlns:x="http://schemas.microsoft.com/winfx/2006/xaml"
        xmlns:d="http://schemas.microsoft.com/expression/blend/2008"
        xmlns:mc="http://schemas.openxmlformats.org/markup-compatibility/2006"
        xmlns:local="clr-namespace:LSCX_WPFSerial._12"
        mc:Ignorable="d"
        Title="PathUI" Height="540" Width="800">
    <Grid>
        <Grid.ColumnDefinitions>
            <ColumnDefinition Width="260"/>
            <ColumnDefinition Width="260"/>
        </Grid.ColumnDefinitions>
        <Grid.RowDefinitions>
            <RowDefinition Height="260"/>
            <RowDefinition Height="260"/>
        </Grid.RowDefinitions>

        <!--直线几何图形-->
        <Path Stroke="Red" StrokeThickness="5" Grid.Column="0" Grid.Row="0">
            <Path.Data>
                <LineGeometry StartPoint="10,10" EndPoint="150,150"/>
            </Path.Data>
        </Path>
        <!--矩形几何图形 RadiusX、Y 设置矩阵圆角信息-->
        <Path Stroke="Green" StrokeThickness="5" Grid.Column="1" Grid.Row="0">
            <Path.Data>
                <RectangleGeometry Rect="10,10,150,150" RadiusX="10" RadiusY="10"/>
            </Path.Data>
        </Path>
        <!--椭圆几何图形-->
        <Path Stroke="Black" Fill="Black" Grid.Column="0" Grid.Row="1">
            <Path.Data>
                <EllipseGeometry Center="80,80" RadiusX="60" RadiusY="60"/>
            </Path.Data>
        </Path>
        <!--Path 自定义路径-->
        <Path Stroke="Yellow" Fill="Orange" Grid.Column="1" Grid.Row="1">
            <Path.Data>
                <PathGeometry>
                    <!--<PathGeometry.Figures>-->
                        <!--PathFigure是PathGeometry 默认内容属性如果没有限制采用默认则可省略不写-->
                    <PathFigure StartPoint="25,140" IsClosed="False">
                        <!--<PathFigure.Segments>-->
                            <!--Segments是 PathFigure 默认内容属性可省略不写-->
                            <LineSegment Point="20,40"/>
                            <LineSegment Point="40,110"/>
                            <LineSegment Point="50,20"/>
                            <LineSegment Point="80,110"/>
                            <LineSegment Point="110,20"/>
                            <LineSegment Point="120,110"/>
                            <LineSegment Point="140,40"/>
                            <LineSegment Point="135,140"/>
                        <!--</PathFigure.Segments>-->
                    </PathFigure>
                    <!--</PathGeometry.Figures>-->
                </PathGeometry>
            </Path.Data>
        </Path>
    </Grid>
</Window>
效果如下图所示:
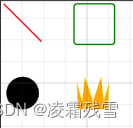
其中最复杂的就算是 Path 的使用了,但 Path 却也是最为核心重要的,接下来我们就终点来看一下 Path。
对Path 的标签语言进行分析后发现核心部分就是下面这部分:
    <PathFigure >
<!--各种线段实现 -->
</PathFigure>
那么我们来分析一下这个各种线段的实现部分,我们先看下有哪些线段:
- LineSegment : 直线段
- ArcSegment : 圆弧段
- BezierSegment: 三次方贝塞尔曲线段(默认的贝塞尔曲线就是三次曲线)
- QuadraticSegment: 二次方贝塞尔曲线段
- PolyLineSegment:多直线段
- PolyBezierSegment:多三次方贝塞尔曲线段
- PolyQuadraticBezierSegment:多二次方贝塞尔曲线段
使用注意的一点就是这些线段是没有起点的,起点的位置是上一个线段的终点位置,所以第一个线段的起点就是图形起点,位于 PathFigure 的 StartPoint 。LineSegment 最为简单,最先实现 ,具体实例 XAML代码如下:
  <Path Stroke="Green" Grid.Column="2" Grid.Row="0" Fill="LightGreen" StrokeThickness="3">
            <Path.Data>
                <PathGeometry>
                    <PathFigure IsClosed="True" StartPoint="0,0">
                        <LineSegment Point="150,0"/>
                        <LineSegment Point="150,30"/>
                        <LineSegment Point="90,30"/>
                        <LineSegment Point="90,60"/>
                        <LineSegment Point="150,60"/>
                        <LineSegment Point="150,90"/>
                        <LineSegment Point="90,90"/>
                        <LineSegment Point="90,120"/>
                        <LineSegment Point="150,120"/>
                        <LineSegment Point="150,150"/>
                        <LineSegment Point="0,150"/>
                        <LineSegment Point="0,120"/>
                        <LineSegment Point="60,120"/>
                        <LineSegment Point="60,90"/>
                        <LineSegment Point="0,90"/>
                        <LineSegment Point="0,60"/>
                        <LineSegment Point="60,60"/>
                        <LineSegment Point="60,30"/>
                        <LineSegment Point="0,30"/>
                    </PathFigure>
                </PathGeometry>
            </Path.Data>
        </Path>
代码效果如下:
 ArcSegment 用来绘制圆弧,point 属性用来指明圆弧的连接终点:圆弧截取自椭圆,Size 属性即为完整椭圆的的横轴半径和纵轴半径: SweepDirection 属性指明圆弧是按照顺时针还是逆时针方向。如果椭圆上的两个点位置不对称,那么这两个点之间的圆弧会分成大弧和小弧;IsLaegeArc 属性用来说明是否使用大弧来连接。RotationAngle 属性用来指明圆弧与母圆弧的旋转角度。
 接下来先简单地画一个三次方的贝塞尔曲线,具体实例 XAML代码如下:
<Path Stroke="Red" StrokeThickness="6" Margin="30" Grid.Column="2" Grid.Row="1">
            <Path.Data>
                <PathGeometry>
                    <PathFigure StartPoint="0,0">
                        <BezierSegment Point1="200,0" Point2="60,300"
                        	Point3="400,300"/>
                    </PathFigure>
                </PathGeometry>
            </Path.Data>
        </Path>
 其中p1 和 p2 是控制点,p0 和 p3 为曲线的起点和终点。而二次方和三次方贝塞尔曲线类似,只不过控制点变成了一个,XAML代码如下:
 <Path Stroke="Green" StrokeThickness="6" Margin="30" Grid.Column="2" Grid.Row="1">
            <Path.Data>
                <PathGeometry>
                    <PathFigure StartPoint="100,100">
                        <QuadraticBezierSegment Point1="200,-100" Point2="200,300"/>
                    </PathFigure>
                </PathGeometry>
            </Path.Data>
        </Path>
 接下来就是使用 GeometryGroup 将多个贝塞尔曲线组合在一起 形成更复杂的图形,XAML代码如下:
  <Path Stroke="Black" Fill="LightBlue" StrokeThickness="1" Grid.Column="3" Grid.Row="0">
            <Path.Data>
                <GeometryGroup>
                    <PathGeometry>
                        <PathFigure StartPoint="0,0">
                            <BezierSegment Point1="250,0" Point2="50,200" Point3 ="300,200"/>
                        </PathFigure>
                    </PathGeometry>

                    <PathGeometry>
                        <PathFigure StartPoint="0,0">
                            <BezierSegment Point1="230,0" Point2="50,200" Point3 ="300,200"/>
                        </PathFigure>
                    </PathGeometry>

                    <PathGeometry>
                        <PathFigure StartPoint="0,0">
                            <BezierSegment Point1="210,0" Point2="50,200" Point3 ="300,200"/>
                        </PathFigure>
                    </PathGeometry>

                    <PathGeometry>
                        <PathFigure StartPoint="0,0">
                            <BezierSegment Point1="190,0" Point2="50,200" Point3 ="300,200"/>
                        </PathFigure>
                    </PathGeometry>

                    <PathGeometry>
                        <PathFigure StartPoint="0,0">
                            <BezierSegment Point1="170,0" Point2="50,200" Point3 ="300,200"/>
                        </PathFigure>
                    </PathGeometry>

                    <PathGeometry>
                        <PathFigure StartPoint="0,0">
                            <BezierSegment Point1="150,0" Point2="50,200" Point3 ="300,200"/>
                        </PathFigure>
                    </PathGeometry>

                    <PathGeometry>
                        <PathFigure StartPoint="0,0">
                            <BezierSegment Point1="130,0" Point2="50,200" Point3 ="300,200"/>
                        </PathFigure>
                    </PathGeometry>

                </GeometryGroup>
            </Path.Data>
        </Path>
实现效果如下:


