二八佳人体似酥,腰间仗剑斩愚夫。虽然不见人头落,暗里教君骨髓枯。
上一章简单介绍了SpringBoot 实现 Web 版本控制 (四十),如果没有看过,请观看上一章
关于消息中间件 RabbitMQ, 可以看老蝴蝶之前的文章: https://blog.csdn.net/yjltx1234csdn/category_12130444.html
创建一个 普通的 Spring Boot Web 项目
整合 RabbitMQ
pom.xml 添加依赖
    <parent>
        <groupId>org.springframework.boot</groupId>
        <artifactId>spring-boot-starter-parent</artifactId>
        <version>2.2.11.RELEASE</version>
    </parent>


    <dependencies>
        <dependency>
            <groupId>org.springframework.boot</groupId>
            <artifactId>spring-boot-starter-web</artifactId>
        </dependency>
        <!--引入 amqp 即rabbitmq 的依赖-->
        <dependency>
            <groupId>org.springframework.boot</groupId>
            <artifactId>spring-boot-starter-amqp</artifactId>
        </dependency>
        <dependency>
            <groupId>org.projectlombok</groupId>
            <artifactId>lombok</artifactId>
        </dependency>
        <!--RabbitMQ 依赖-->
        <dependency>
            <groupId>org.springframework.amqp</groupId>
            <artifactId>spring-rabbit-test</artifactId>
        </dependency>

    </dependencies>
application.yml 配置文件配置
#配置服务器端相应消息
server:
  port: 8088
  servlet:
    context-path: /Server
#配置rabbitmq的相关信息
spring:
  rabbitmq:
    host: 127.0.0.1  # 配置主机
    port: 5672  # 配置端口
    virtual-host: yjl   # 配置虚拟主机
    username: guest   # 配置用户名
    password: guest  # 配置密码
    connection-timeout: 15000
    # 配置回调
    publisher-confirm-type: correlated
#配置rabbit 队列,交换器,路由等相关信息
rabbit:
  fanout:
    exchange: fanout_logs
    queue1: debug_console
    queue2: debug_file
    queue3: debug_db
  direct:
    exchange: direct_logs
    queue1: debug_console
    queue2: debug_file
    queue3: debug_db
  topic:
    exchange: topic_logs
    queue1: topic_log_console
    queue2: topic_log_file
  ttl:
    x_exchange: x
    queue_a: QA
    queue_b: QB
    queue_c: QC
    y_dead_exchange: y
    y_dead_queue_d: QD
    delayed_exchange: delayed_exchange2
    delayed_queue: delayed.queue
    delayed_routing_key: delayed_routing
  confirm:
    # 确认
    exchange: confirm_exchange_1
    queue: confirm_queue
    routing-key: key1
    backup_exchange: backup_exchange
    backup_queue: backup_queue
    warn_queue: warn_queue
项目结构
项目结构如下:
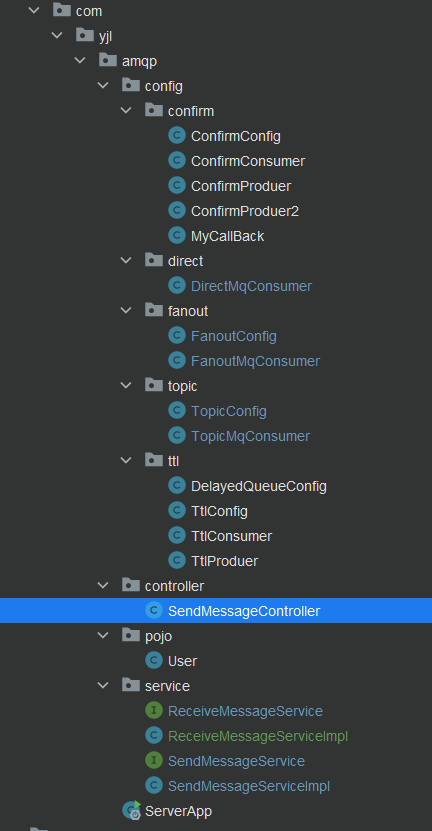
SendMessageService 为 生产者发送消息的接口服务。
RecieveMessageService 为 消费者接收到消息后,进行的业务操作流程。
SendMessageController 为生产者创建消息的 Controller 入口。
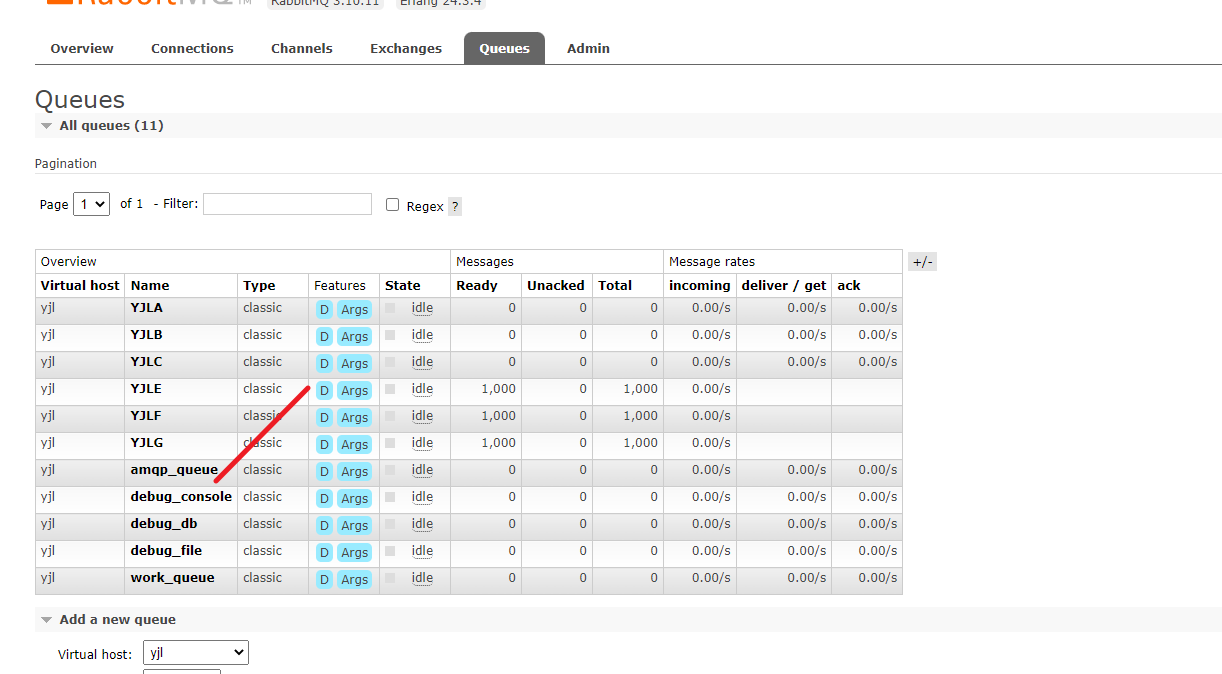
创建队列
手动在 RabbitMQ 上创建一个队列 debug_console, 如果不存在的话。
简单的生产者发送消息
    @Resource
    private SendMessageService sendMessageService;

    @RequestMapping("/queue")
    public String queue() {
        Integer randNum = (int) (Math.random() * 1000 + 1);
        sendMessageService.sendQueue(randNum);
        return "存储到队列中的数据是:" + randNum;

    }

    @RequestMapping("/work")
    public String work() {
        sendMessageService.sendWork();
        return "批量生成循环数字";
    }
往队列发送消息, 使用 RabbitTemplate rabbitTemplate (与 RedisTemplate, JdbcTemplate 形似)
SendMessageServiceImpl.java
@Service
public class SendMessageServiceImpl implements SendMessageService {

    @Resource
    private RabbitTemplate rabbitTemplate;

    @Value("${rabbit.direct.queue1}")
    private String queueName;


    // 最普通的.
    @Override
    public void sendQueue(Integer randNum) {
        // 只发送一条消息
        rabbitTemplate.convertAndSend(queueName, String.valueOf(randNum));
    }


    @Override
    public void sendWork() {
        for (int i = 0; i < 10; i++) {
            // 发送多条消息
            rabbitTemplate.convertAndSend(queueName, "第" + i + "条消息,消息内容是:" + i);
        }
    }
}
队列消息消费
ReceiveMessageServiceImpl.java
    @Override
    public void handlerMessage(String message) {
        log.info(">>>> 获取到消息 {},开始进行业务处理",message);
        // 接下来,就是具体的业务去处理这些消息了.
    }
@Component
@Slf4j
public class DirectMqConsumer {

    @Resource
    private ReceiveMessageService receiveMessageService;


    @RabbitListener(bindings = {
            @QueueBinding(
                    value = @Queue("${rabbit.direct.queue1}"),
                    exchange = @Exchange(type = "direct", name = "${rabbit.direct.exchange}"),
                    key = {"debug", "info", "warn", "error"}
            )
    })
    public void fanoutQueueConsumerConsole(String message) {
        log.info("控制台打印输出:" + message);
        receiveMessageService.handlerMessage("控制台打印输出 direct:" + message);
    }
}
验证
访问网址: http://localhost:8088/Server/send/queue

访问网址: http://localhost:8088/Server/send/work
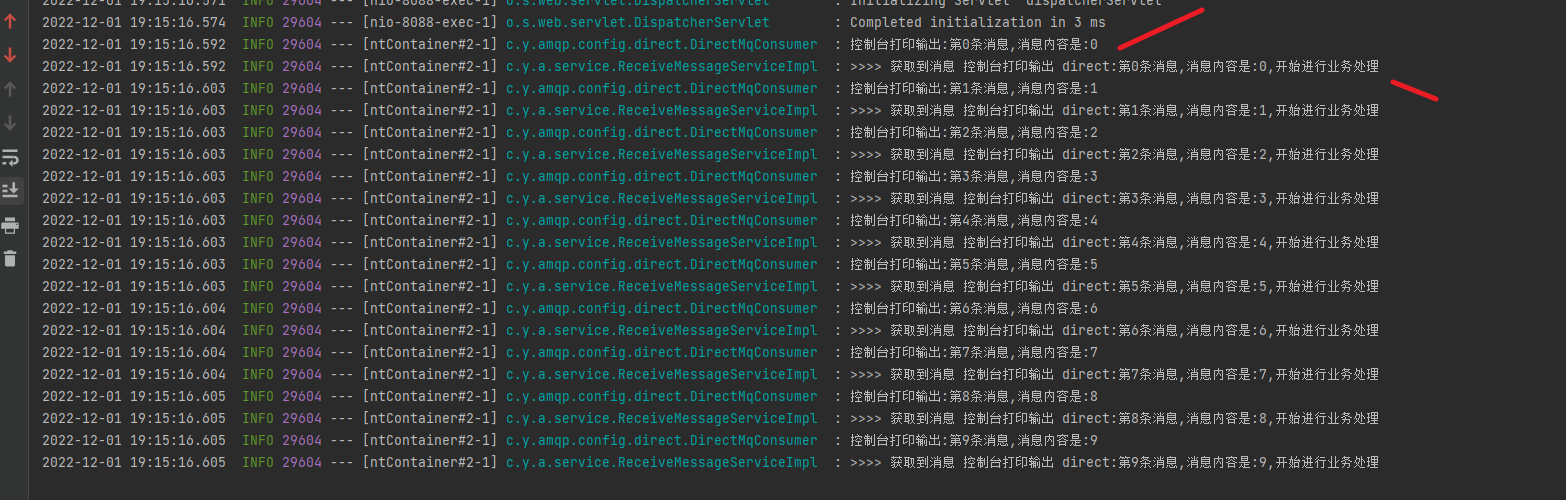
普通的消息异步处理是完成了。 但重要的,应该是 Fanout, Direct 和 Topic 的主题处理.
Fanout 交换机消息配置
创建交换机,队列并绑定 FanoutConfig
package com.yjl.amqp.config.fanout;

import org.springframework.amqp.core.Binding;
import org.springframework.amqp.core.BindingBuilder;
import org.springframework.amqp.core.FanoutExchange;
import org.springframework.amqp.core.Queue;
import org.springframework.beans.factory.annotation.Qualifier;
import org.springframework.beans.factory.annotation.Value;
import org.springframework.context.annotation.Bean;
import org.springframework.stereotype.Component;

/**
 * Fanout 形式的 生产
 *
 * @author yuejianli
 * @date 2022-11-22
 */
@Component
public class FanoutConfig {

    @Value("${rabbit.fanout.queue1}")
    private String queue1;
    @Value("${rabbit.fanout.queue2}")
    private String queue2;

    @Value("${rabbit.fanout.exchange}")
    private String exchange;


    // 构建队列 Bean 和 Exchange Bean
    @Bean(value = "fanout_queue1")
    public Queue queue1() {
        return new Queue(queue1);
    }

    @Bean(value = "fanout_queue2")
    public Queue queue2() {
        return new Queue(queue2);
    }

    @Bean(value = "fanout_exchange")
    FanoutExchange fanoutExchange() {
        return new FanoutExchange(exchange);
    }


    //进行绑定
    @Bean
    Binding bindingFanoutExchange1(@Qualifier("fanout_queue1") Queue queue,
                                   @Qualifier("fanout_exchange") FanoutExchange fanoutExchange) {
        return BindingBuilder.bind(queue).to(fanoutExchange);
    }

    @Bean
    Binding bindingFanoutExchange2(@Qualifier("fanout_queue2") Queue queue,
                                   @Qualifier("fanout_exchange") FanoutExchange fanoutExchange) {
        return BindingBuilder.bind(queue).to(fanoutExchange);
    }

}
监听队列 FanoutMqConsumer
也可以使用 RabbitListener 进行绑定
package com.yjl.amqp.config.fanout;

import com.yjl.amqp.service.ReceiveMessageService;
import lombok.extern.slf4j.Slf4j;
import org.springframework.amqp.rabbit.annotation.Exchange;
import org.springframework.amqp.rabbit.annotation.Queue;
import org.springframework.amqp.rabbit.annotation.QueueBinding;
import org.springframework.amqp.rabbit.annotation.RabbitListener;
import org.springframework.stereotype.Component;

import javax.annotation.Resource;

/**
 * fanout 的消费
 *
 * @author yuejianli
 * @date 2022-11-22
 */
@Component
@Slf4j
public class FanoutMqConsumer {

    @Resource
    private ReceiveMessageService receiveMessageService;


    @RabbitListener(queues = {"${rabbit.fanout.queue1}", "${rabbit.fanout.queue2}"})
    public void fanoutQueueConsumer1An2(String message) {
        log.info("队列 fanout:" + message);
        receiveMessageService.handlerMessage("第一个消费者和第二个消费者获取消息 fanout:" + message);
    }

    // 也可以通过 RabbitListener 进行配置
    @RabbitListener(bindings = {
            @QueueBinding(
                    value = @Queue("${rabbit.fanout.queue3}"),
                    exchange = @Exchange(type = "fanout", name = "${rabbit.fanout.exchange}"),
                    key = {}
            )
    })
    public void fanoutQueueConsumer3(String message) {
        log.info("第三个消费者获取消息 fanout:" + message);
        receiveMessageService.handlerMessage("第三个消费者获取消息 fanout:" + message);
    }
}
发送消息
SendMessageController.java
    @RequestMapping("/fanout")
    public String fanout() {
        sendMessageService.fanout();
        return "fanout生成消息";
    }
SendMessageServiceImpl.java
    @Override
    public void fanout() {
        for (int i = 1; i <= 5; i++) {
            rabbitTemplate.convertAndSend(fanoutExchange, "", "fanout 发送消息:" + i);
        }
    }
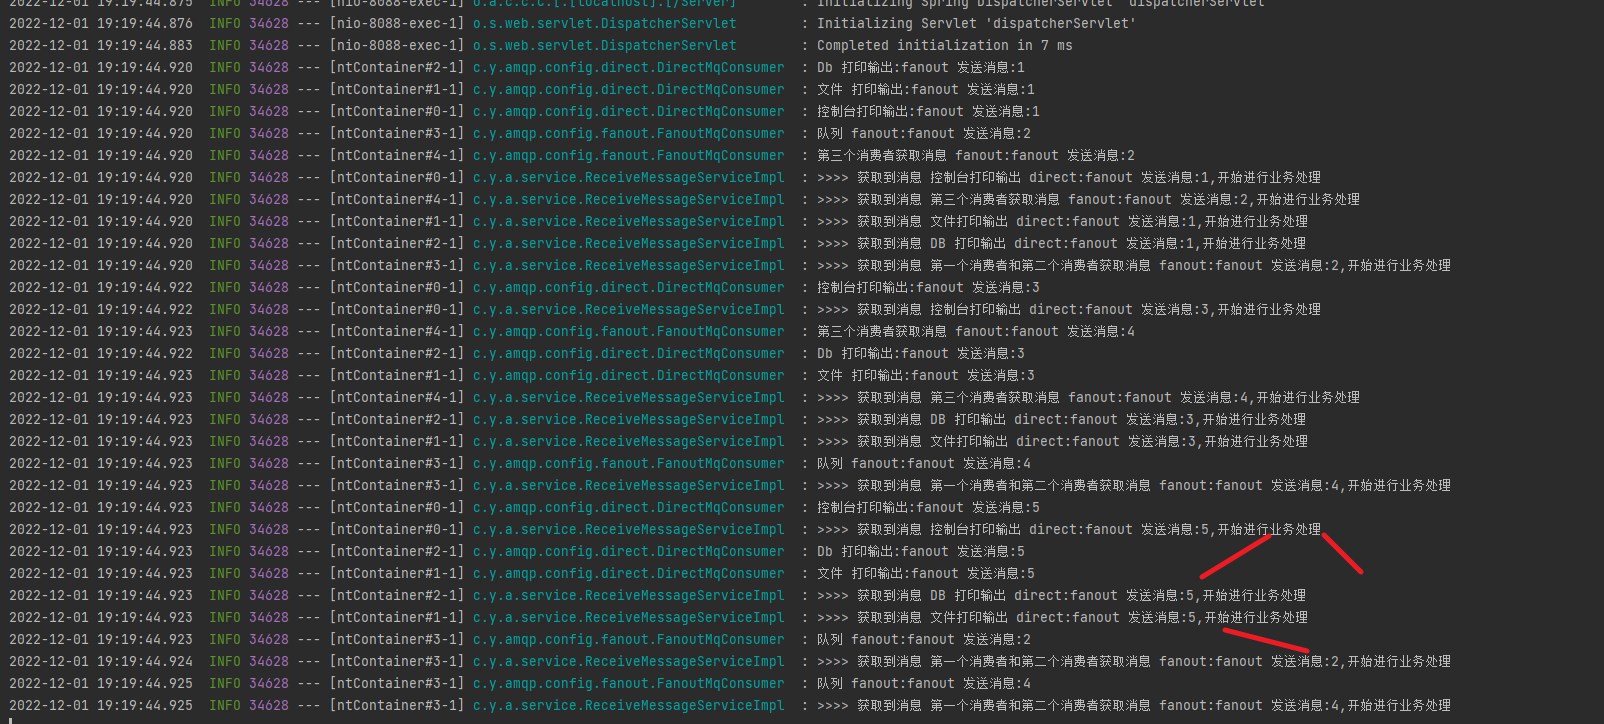
验证
输入网址: http://localhost:8088/Server/send/fanout
Direct 交换机消息配置
通过注解绑定和消费队列消息 DirectMqConsumer
ackage com.yjl.amqp.config.direct;

import com.yjl.amqp.service.ReceiveMessageService;
import lombok.extern.slf4j.Slf4j;
import org.springframework.amqp.rabbit.annotation.Exchange;
import org.springframework.amqp.rabbit.annotation.Queue;
import org.springframework.amqp.rabbit.annotation.QueueBinding;
import org.springframework.amqp.rabbit.annotation.RabbitListener;
import org.springframework.stereotype.Component;

import javax.annotation.Resource;

/**
 * 用途描述
 *
 * @author yuejianli
 * @date 2022-11-22
 */
@Component
@Slf4j
public class DirectMqConsumer {

    @Resource
    private ReceiveMessageService receiveMessageService;


    @RabbitListener(bindings = {
            @QueueBinding(
                    value = @Queue("${rabbit.direct.queue1}"),
                    exchange = @Exchange(type = "direct", name = "${rabbit.direct.exchange}"),
                    key = {"debug", "info", "warn", "error"}
            )
    })
    public void fanoutQueueConsumerConsole(String message) {
        log.info("控制台打印输出:" + message);
        receiveMessageService.handlerMessage("控制台打印输出 direct:" + message);
    }


    @RabbitListener(bindings = {
            @QueueBinding(
                    value = @Queue("${rabbit.direct.queue2}"),
                    exchange = @Exchange(type = "direct", name = "${rabbit.direct.exchange}"),
                    key = {"info", "warn", "error"}
            )
    })
    public void fanoutQueueConsumerFile(String message) {
        log.info("文件 打印输出:" + message);
        receiveMessageService.handlerMessage("文件打印输出 direct:" + message);
    }

    @RabbitListener(bindings = {
            @QueueBinding(
                    value = @Queue("${rabbit.direct.queue3}"),
                    exchange = @Exchange(type = "direct", name = "${rabbit.direct.exchange}"),
                    key = {"warn", "error"}
            )
    })
    public void fanoutQueueConsumerDb(String message) {
        log.info("Db 打印输出:" + message);
        receiveMessageService.handlerMessage("DB 打印输出 direct:" + message);
    }

}
发送消息
SendMessageController.java
  @RequestMapping("/direct")
    public String direct() {
        sendMessageService.direct();
        return "direct 生成消息";
    }
SendMessageServiceImpl.java
     @Override
    public void direct() {
        rabbitTemplate.convertAndSend(directExchange, "debug", "debug 消息");
        rabbitTemplate.convertAndSend(directExchange, "info", "info 消息");
        rabbitTemplate.convertAndSend(directExchange, "warn", "warn 消息");
        rabbitTemplate.convertAndSend(directExchange, "error", "error 消息");
    }
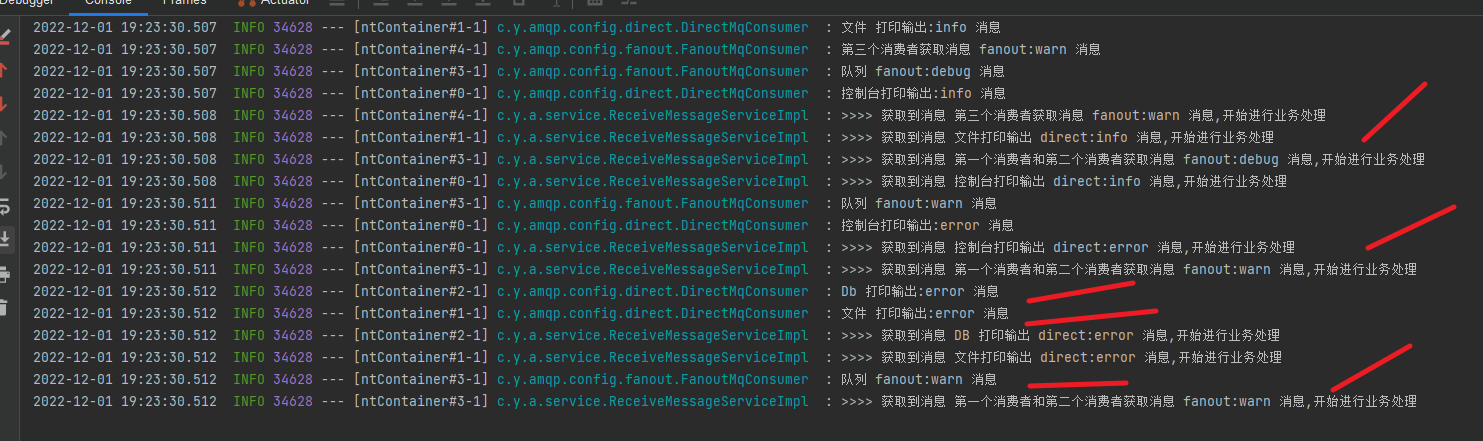
验证
输入网址: http://localhost:8088/Server/send/direct
Topic 交换机消息配置
创建交换机,队列并绑定 TopicConfig
package com.yjl.amqp.config.topic;

import org.springframework.amqp.core.*;
import org.springframework.beans.factory.annotation.Qualifier;
import org.springframework.beans.factory.annotation.Value;
import org.springframework.context.annotation.Bean;
import org.springframework.stereotype.Component;

/**
 * Topic 形式的 生产
 *
 * @author yuejianli
 * @date 2022-11-22
 */
@Component
public class TopicConfig {

    @Value("${rabbit.topic.queue1}")
    private String queue1;

    @Value("${rabbit.topic.exchange}")
    private String exchange;


    // 构建队列 Bean 和 Exchange Bean
    @Bean(value = "topic_queue1")
    public Queue queue1() {
        return new Queue(queue1);
    }

    @Bean(value = "topic_exchange")
    TopicExchange topicExchange() {
        return new TopicExchange(exchange);
    }


    //进行绑定
    @Bean
    Binding bindingTopicExchange(@Qualifier("topic_queue1") Queue queue,
                                 @Qualifier("topic_exchange") TopicExchange topicExchange) {
        return BindingBuilder.bind(queue).to(topicExchange)
                .with("*.orange.*");
    }

}
监听队列 TopicMqConsumer
package com.yjl.amqp.config.topic;

import com.yjl.amqp.service.ReceiveMessageService;
import lombok.extern.slf4j.Slf4j;
import org.springframework.amqp.rabbit.annotation.Exchange;
import org.springframework.amqp.rabbit.annotation.Queue;
import org.springframework.amqp.rabbit.annotation.QueueBinding;
import org.springframework.amqp.rabbit.annotation.RabbitListener;
import org.springframework.stereotype.Component;

import javax.annotation.Resource;

/**
 * topic 的队列配置
 *
 * @author yuejianli
 * @date 2022-11-22
 */
@Component
@Slf4j
public class TopicMqConsumer {

    @Resource
    private ReceiveMessageService receiveMessageService;

    @RabbitListener(queues = {"${rabbit.topic.queue1}"})
    public void fanoutQueueConsumer1An2(String message) {
        log.info("队列 topic:" + message);
        receiveMessageService.handlerMessage("console topic:" + message);
    }


    @RabbitListener(bindings = {
            @QueueBinding(
                    value = @Queue("${rabbit.topic.queue2}"),
                    exchange = @Exchange(type = "topic", name = "${rabbit.topic.exchange}"),
                    key = {"lazy.#", "*.*.rabbit"}
            )
    })
    public void fanoutQueueConsumerConsole(String message) {
        log.info("file topic:" + message);
        receiveMessageService.handlerMessage("file topic:" + message);
    }
}
发送消息
SendMessageController.java
   @RequestMapping("/topic")
    public String topic() {
        sendMessageService.topic();
        return "topic 生成消息";
    }
SendMessageServiceImpl.java
  @Override
    public void topic() {

        Map<String, String> messageMap = new HashMap<>();

        messageMap.put("quick.orange.rabbit", "被队列 Q1Q2 接收到");
        messageMap.put("lazy.orange.elephant", "被队列 Q1Q2 接收到");

        messageMap.put("quick.orange.fox", "被队列 Q1 接收到");
        messageMap.put("lazy.brown.fox", "被队列 Q2 接收到");
        messageMap.put("info", "一个 info 消息3 ");

        messageMap.put("lazy.pink.rabbit", "虽然满足两个绑定但只被队列 Q2 接收一次");
        messageMap.put("quick.brown.fox", "不匹配任何绑定不会被任何队列接收到会被丢弃");
        messageMap.put("quick.orange.male.rabbit", "是四个单词不匹配任何绑定会被丢弃");

        messageMap.put("lazy.orange.male.rabbit", "是四个单词但匹配 Q2");

        messageMap.forEach((routingKey, message) -> {
            try {

                rabbitTemplate.convertAndSend(topicExchange, routingKey,
                        message);
            } catch (Exception e) {
                e.printStackTrace();
            }
        });
    }
验证
输入网址: http://localhost:8088/Server/send/topic
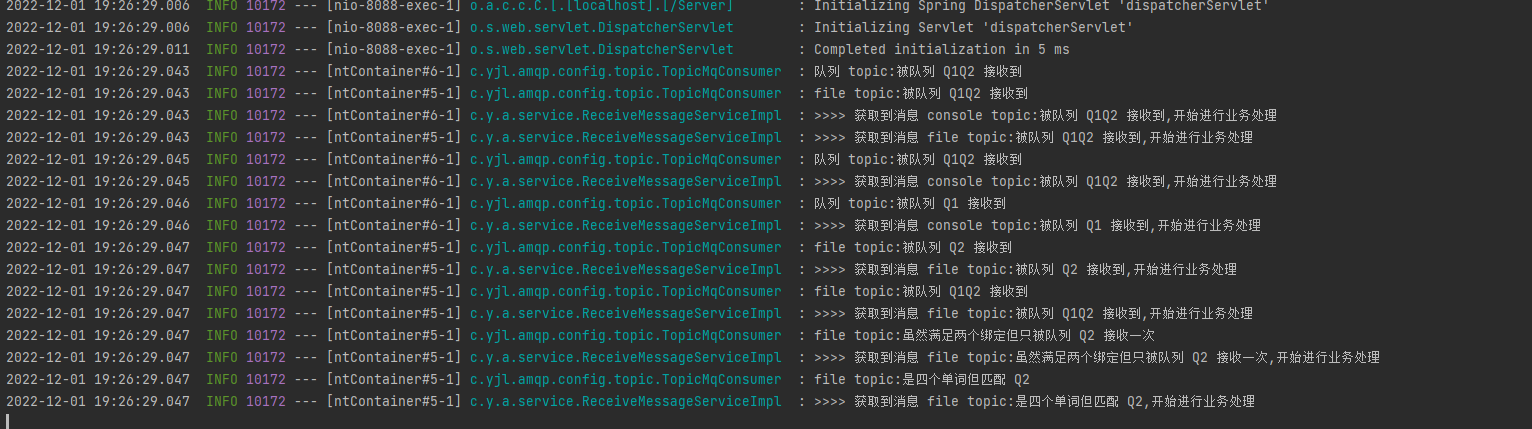
这是 RabbitMQ 异步处理消息的常见用法。


![[Gitops--1]GitOps环境准备](https://img-blog.csdnimg.cn/92ab2f02fad146948d9e0eda8a2675c2.png)