一、简介
你可能已经看到人工智能生成的图像有所增加,这是因为潜在扩散模型的兴起。简单来说,稳定扩散是一种深度学习模型,它可以在给定文本提示的情况下生成图像。

从上图可以看出,我们可以传递文本提示,如“一只戴帽子的狗”,一个稳定的扩散模型可以生成一个代表文本的图像。太神奇了!
二、使用python扩散器库
与任何 python 库一样,我们需要遵循某些安装步骤才能运行它,以下是这些步骤的概要。
- 接受许可证 — 在使用模型之前,您需要转到此处并使用您的拥抱面部帐户登录,然后接受模型许可证以下载和使用权重。
- 令牌生成 — 如果这是您第一次使用拥抱面孔库,这听起来可能是一个奇怪的步骤。您需要转到此处并生成令牌(最好具有写入访问权限)以下载模型。

3. 安装拥抱面部集线器库并登录 — 生成令牌后,复制它。首先,我们将使用以下代码下载拥抱面部集线器库。
注意 — 要使用代码正确呈现此内容,建议您在此处阅读。
!pip install huggingface-hub==0.10.1然后使用以下代码,运行后将出现一个小部件,粘贴新生成的令牌并单击登录。
from huggingface_hub import notebook_login
notebook_login()
4. 我配置了扩散器和转换器库 — 完成此过程后,使用以下代码安装依赖项。这将下载最新版本的扩散器和变压器库。
!pip install -qq -U diffusers transformers就是这样,现在我们准备使用扩散器库了。
三、运行稳定扩散——高水平管道
第一步是从扩散器库中导入。StableDiffusionPipeline
from diffusers import StableDiffusionPipeline下一步是初始化管道以生成映像。首次运行以下命令时,它会将模型从拥抱面模型中心下载到本地计算机。您将需要一台 GPU 计算机才能运行此代码。
pipe = StableDiffusionPipeline.from_pretrained('CompVis/stable-diffusion-v1-4').to('cuda')现在让我们传递文本提示并生成图像。
# Initialize a prompt
prompt = "a dog wearing hat"
# Pass the prompt in the pipeline
pipe(prompt).images[0]
四、了解稳定扩散的核心组成部分
如上所示的扩散模型可以生成高质量的图像。稳定扩散模型是一种特殊的扩散模型,称为潜在扩散模型。他们在本文中首次提出了具有潜在扩散模型的高分辨率图像合成。原始扩散模型往往会消耗更多的内存,因此创建了潜在扩散模型,可以在称为空间的低维空间中进行扩散过程。在高层次上,扩散模型是机器学习模型,它们被逐步训练为随机高斯噪声,以获得结果,即。在 中,模型被训练为在较低维度上执行相同的过程。Latentdenoiseimagelatent diffusion
潜在扩散有三个主要组成部分——
- 文本编码器,在本例中为 CLIP 文本编码器
- 自动编码器,在本例中为变分自动编码器,也称为VAE
- 一个U-Net
让我们深入了解这些组件中的每一个,并了解它们在扩散过程中的用途。我将尝试解释这些组件的方式是在以下三个阶段讨论它们 -
- 基础知识:组件中的内容和组件的内容 — 这是理解“整个游戏”的自上而下学习方法的重要且关键部分
- 使用代码进行🤗更深入的解释。— 这部分将提供更多关于模型使用代码生成的内容的更多理解
- 它们在稳定扩散管道中的作用是什么 — 这将围绕该组件如何适应稳定扩散过程建立您的直觉。这将有助于您对扩散过程的直觉
五、剪辑文本编码器
5.1 基础知识 — 组件的进出是什么?
CLIP(对比语言 - 图像预训练)文本编码器将文本作为输入,并生成在潜在空间中接近的文本嵌入,就像通过CLIP模型对图像进行编码一样。

5.2 使用代码进行🤗更深入的解释
任何机器学习模型都无法理解文本数据。对于任何理解文本数据的模型,我们需要将此文本转换为包含文本含义的数字,称为 .将文本转换为数字的过程可以分为两部分 -
1。分词器 - 将每个单词分解为子单词,然后使用查找表将它们转换为数字
2。Token_To_Embedding编码器 - 将这些数字子词转换为包含该文本表示形式的表示形式embeddings
让我们通过代码看一下。我们将从导入相关工件开始。
注意 — 要使用代码正确呈现此内容,建议您在此处阅读。
import torch, logging
## disable warnings
logging.disable(logging.WARNING)
## Import the CLIP artifacts
from transformers import CLIPTextModel, CLIPTokenizer
## Initiating tokenizer and encoder.
tokenizer = CLIPTokenizer.from_pretrained("openai/clip-vit-large-patch14", torch_dtype=torch.float16)
text_encoder = CLIPTextModel.from_pretrained("openai/clip-vit-large-patch14", torch_dtype=torch.float16).to("cuda")
让我们初始化一个提示并将其标记化。
prompt = ["a dog wearing hat"]
tok =tokenizer(prompt, padding="max_length", max_length=tokenizer.model_max_length, truncation=True, return_tensors="pt")
print(tok.input_ids.shape)
tok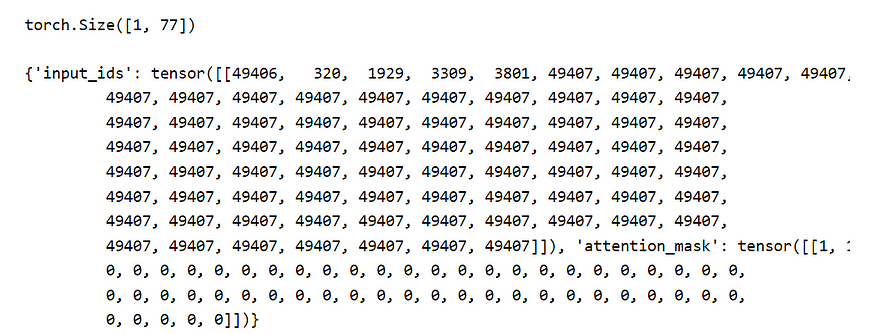
A 以字典 -
1 的形式返回两个对象。 - 一个大小为 1x77 的张量作为一个提示被传递并填充到 77 最大长度。 是开始标记,是给予单词“a”,单词狗,单词wearing,单词帽子的标记,并且是文本标记的结尾,重复直到填充长度为77。
2. - 表示嵌入值并表示填充。tokenizerinput_ids4940632019293309380149407attention_mask10
for token in list(tok.input_ids[0,:7]):
    print(f"{token}:{tokenizer.convert_ids_to_tokens(int(token))}")
所以,让我们看看 哪 获取分词器生成的并将它们转换为嵌入 -Token_To_Embedding Encoderinput_ids
emb = text_encoder(tok.input_ids.to("cuda"))[0].half()
print(f"Shape of embedding : {emb.shape}")
emb
正如我们在上面看到的,大小为 1x77 的每个标记化输入现在已转换为 1x77x768 形状嵌入。因此,每个单词都表示在768维空间中。
5.3 它们在稳定扩散管道中的作用是什么
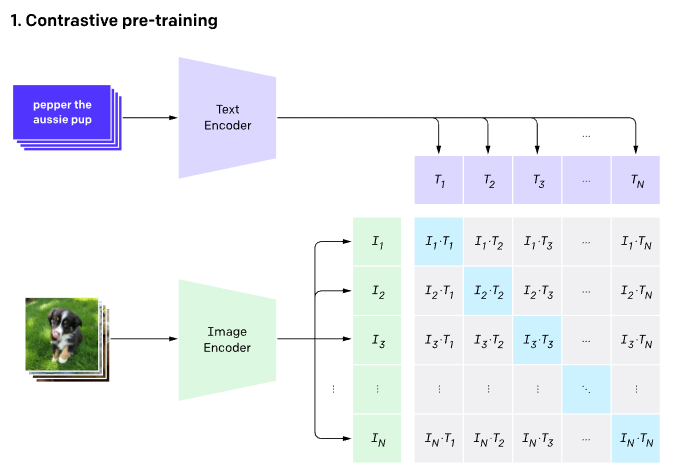
稳定扩散仅使用 CLIP 训练编码器将文本转换为嵌入。这成为U-net的输入之一。在高级别上,CLIP 使用图像编码器和文本编码器来创建在潜在空间中相似的嵌入。这种相似性更准确地定义为对比目标。有关如何训练 CLIP 的更多信息,请参阅此 Open AI 博客。
六、VAE——变分自动编码器
6.1 基础知识——组件进出什么?
自动编码器包含两部分 -
1. 将图像作为输入并将其转换为低维潜在表示
2. 获取潜在表示并将其转换回 imageEncoderDecoder

正如我们在上面看到的,编码器就像一个压缩器,将图像压缩到较低的维度,解码器从压缩版本重新创建原始图像。
注意: 编码器-解码器压缩-解压缩不是无损的。
6.2 使用代码进行🤗更深入的解释
让我们从代码开始了解VAE。我们将从导入所需的库和一些辅助函数开始。
## To import an image from a URL
from fastdownload import FastDownload
## Imaging  library
from PIL import Image
from torchvision import transforms as tfms
## Basic libraries
import numpy as np
import matplotlib.pyplot as plt
%matplotlib inline
## Loading a VAE model
from diffusers import AutoencoderKL
vae = AutoencoderKL.from_pretrained("CompVis/stable-diffusion-v1-4", subfolder="vae", torch_dtype=torch.float16).to("cuda")
def load_image(p):
   '''
   Function to load images from a defined path
   '''
    return Image.open(p).convert('RGB').resize((512,512))
def pil_to_latents(image):
    '''
    Function to convert image to latents
    '''
    init_image = tfms.ToTensor()(image).unsqueeze(0) * 2.0 - 1.0
    init_image = init_image.to(device="cuda", dtype=torch.float16)
    init_latent_dist = vae.encode(init_image).latent_dist.sample() * 0.18215
    return init_latent_dist
def latents_to_pil(latents):
    '''
    Function to convert latents to images
    '''
    latents = (1 / 0.18215) * latents
    with torch.no_grad():
        image = vae.decode(latents).sample

    image = (image / 2 + 0.5).clamp(0, 1)
    image = image.detach().cpu().permute(0, 2, 3, 1).numpy()
    images = (image * 255).round().astype("uint8")
    pil_images = [Image.fromarray(image) for image in images]
    return pil_images
让我们从互联网上下载一张图片。
p = FastDownload().download('https://lafeber.com/pet-birds/wp-content/uploads/2018/06/Scarlet-Macaw-2.jpg')
img = load_image(p)
print(f"Dimension of this image: {np.array(img).shape}")
img
现在让我们使用 VAE 编码器压缩该图像,我们将使用辅助函数.pil_to_latents
latent_img = pil_to_latents(img)
print(f"Dimension of this latent representation: {latent_img.shape}")![]()
正如我们所看到的,VAE 如何将 3 x 512 x 512 尺寸的图像压缩为 4 x 64 x 64 的图像。压缩比为 48 倍!让我们可视化这四个潜在表征通道。
fig, axs = plt.subplots(1, 4, figsize=(16, 4))
for c in range(4):
    axs[c].imshow(latent_img[0][c].detach().cpu(), cmap='Greys')
理论上,这种潜在表示应该捕获有关原始图像的大量信息。让我们在这个表示上使用解码器来看看我们得到了什么。为此,我们将使用辅助函数。latents_to_pil
decoded_img = latents_to_pil(latent_img)
decoded_img[0]
从上图中可以看出,VAE解码器能够从48倍压缩的潜在表示中恢复原始图像。这太令人印象深刻了!
注意: 如果你仔细观察解码的图像,它与原始图像不同,注意眼睛周围的差异。这就是VAE编码器/解码器不是无损压缩的原因。
6.3 它们在稳定扩散管道中的作用是什么
无需VAE组件即可实现稳定的扩散,但我们使用VAE的原因是为了减少生成高分辨率图像的计算时间。潜在扩散模型可以在VAE编码器产生的潜在空间中进行扩散,一旦我们有了扩散过程产生的预期潜在输出,我们就可以使用VAE解码器将它们转换回高分辨率图像。为了更好地了解变化自动编码器及其训练方式,请阅读Irhum Shafkat的博客。
七、U-Net模型
7.1 基础知识 — 组件的进出是什么?
U-Net 模型采用两个输入 -1。 或 - 噪声潜伏是VAE编码器(如果提供初始图像)产生的具有附加噪声的潜在扰动,或者如果我们想要仅根据文本描述
创建随机新图像,则可以采用纯噪声输入 2. - 由输入文本提示生成的基于 CLIP 的嵌入Noisy latentNoiseText embeddings
U-Net模型的输出是输入噪声潜伏包含的预测噪声残差。换句话说,它预测从嘈杂的潜在中减去的噪声,以返回原始的去噪潜在。

7.2 使用代码进行🤗更深入的解释
让我们开始通过代码查看 U-Net。我们将首先导入所需的库并启动我们的 U-Net 模型。
from diffusers import UNet2DConditionModel, LMSDiscreteScheduler
## Initializing a scheduler
scheduler = LMSDiscreteScheduler(beta_start=0.00085, beta_end=0.012, beta_schedule="scaled_linear", num_train_timesteps=1000)
## Setting number of sampling steps
scheduler.set_timesteps(51)
## Initializing the U-Net model
unet = UNet2DConditionModel.from_pretrained("CompVis/stable-diffusion-v1-4", subfolder="unet", torch_dtype=torch.float16).to("cuda") 正如您可能已经从上面的代码中注意到的那样,我们不仅导入了.a的目的是确定在扩散过程中的给定步骤中向潜伏物添加多少噪声。让我们可视化调度函数unetschedulerschedular

扩散过程遵循此采样计划,我们从高噪声开始,然后逐渐对图像进行去噪。让我们可视化这个过程 -
noise = torch.randn_like(latent_img) # Random noise
fig, axs = plt.subplots(2, 3, figsize=(16, 12))
for c, sampling_step in enumerate(range(0,51,10)):
    encoded_and_noised = scheduler.add_noise(latent_img, noise, timesteps=torch.tensor([scheduler.timesteps[sampling_step]]))
    axs[c//3][c%3].imshow(latents_to_pil(encoded_and_noised)[0])
    axs[c//3][c%3].set_title(f"Step - {sampling_step}")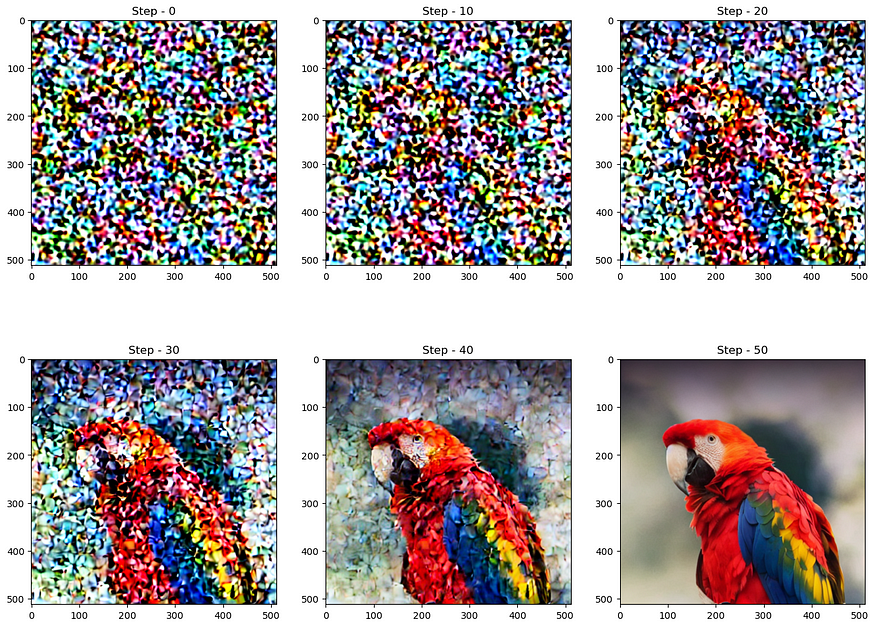
图12:噪声通过步骤的渐进。
让我们看看U-Net如何消除图像中的噪点。让我们从向图像添加一些噪点开始。
encoded_and_noised = scheduler.add_noise(latent_img, noise, timesteps=torch.tensor([scheduler.timesteps[40]])) latents_to_pil(encoded_and_noised)[0]
图 13: 馈送到 U-Net 的噪声输入。
让我们浏览一下U-Net,尝试对这张图片进行降噪。
## Unconditional textual prompt
prompt = [""]
## Using clip model to get embeddings
text_input = tokenizer(prompt, padding="max_length", max_length=tokenizer.model_max_length, truncation=True, return_tensors="pt")
with torch.no_grad():
    text_embeddings = text_encoder(
        text_input.input_ids.to("cuda")
    )[0]

## Using U-Net to predict noise
latent_model_input = torch.cat([encoded_and_noised.to("cuda").float()]).half()
with torch.no_grad():
    noise_pred = unet(
        latent_model_input,40,encoder_hidden_states=text_embeddings
    )["sample"]
## Visualize after subtracting noise
latents_to_pil(encoded_and_noised- noise_pred)[0]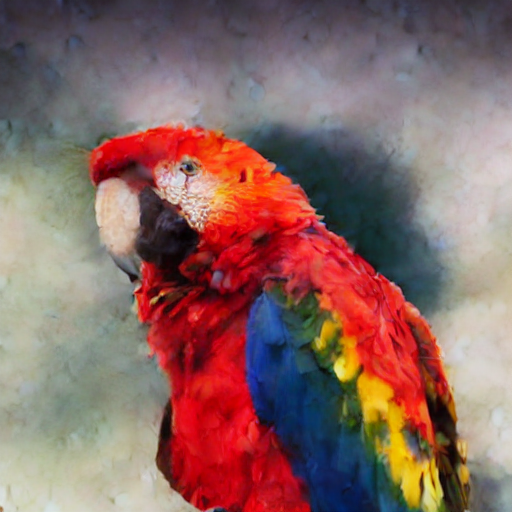
正如我们在上面看到的,U-Net输出比通过的原始噪声输入更清晰。
7.3 它们在稳定扩散管道中的作用是什么
潜在扩散使用U-Net通过几个步骤逐渐减去潜在空间中的噪声,以达到所需的输出。每一步,添加到潜在噪声的噪声量都会减少,直到我们达到最终的去噪输出。U-Nets最早是本文引入的生物医学图像分割。U-Net有一个编码器和一个解码器,由ResNet块组成。稳定的扩散U-Net还具有交叉注意层,使它们能够根据提供的文本描述来调节输出。交叉注意力层通常被添加到U-Net的编码器和解码器部分,通常在ResNet块之间。您可以在此处了解有关此 U-Net 架构的更多信息。
八、把所有东西放在一起,了解扩散过程
如上所示,我展示了如何安装🤗扩散器库以开始生成自己的AI图像和稳定扩散管道的关键组件,即CLIP文本编码器,VAE和U-Net。现在,我们将尝试将这些关键组件放在一起,并对生成图像的扩散过程进行演练。
8.1 概述——扩散过程
稳定扩散模型采用文本输入和种子。然后,文本输入通过 CLIP 模型以生成大小为 77x768 的文本嵌入,种子用于生成大小为 4x64x64 的高斯噪声,这成为第一个潜在图像表示。
注意 — 您会注意到图像中提到了一个额外的维度 (1x),例如用于文本嵌入的 1x77x768,这是因为它表示 1 的批大小。

接下来,U-Net对随机潜在图像表示进行迭代降噪,同时对文本嵌入进行调节。U-Net的输出是预测的噪声残差,然后通过调度器算法用于计算条件潜伏。这个去噪和文本调节的过程重复N次(我们将使用50次)以检索更好的潜在图像表示。完成此过程后,VAE解码器将解码潜在图像表示(4x64x64),以检索最终输出图像(3x512x512)。
注意 — 这种迭代去噪是获得良好输出图像的重要步骤。典型步长在 30–80 之间。然而,最近的一些论文声称通过使用蒸馏技术将其减少到 4-5 步。
8.2 通过代码理解扩散过程
让我们从导入所需的库和帮助程序函数开始。所有这些都已经在上面解释过了。
注意 — 要使用代码正确呈现此内容,建议您在此处阅读。
import torch, logging
## disable warnings
logging.disable(logging.WARNING)
## Imaging  library
from PIL import Image
from torchvision import transforms as tfms
## Basic libraries
import numpy as np
from tqdm.auto import tqdm
import matplotlib.pyplot as plt
%matplotlib inline
from IPython.display import display
import shutil
import os
## For video display
from IPython.display import HTML
from base64 import b64encode

## Import the CLIP artifacts
from transformers import CLIPTextModel, CLIPTokenizer
from diffusers import AutoencoderKL, UNet2DConditionModel, LMSDiscreteScheduler
## Initiating tokenizer and encoder.
tokenizer = CLIPTokenizer.from_pretrained("openai/clip-vit-large-patch14", torch_dtype=torch.float16)
text_encoder = CLIPTextModel.from_pretrained("openai/clip-vit-large-patch14", torch_dtype=torch.float16).to("cuda")
## Initiating the VAE
vae = AutoencoderKL.from_pretrained("CompVis/stable-diffusion-v1-4", subfolder="vae", torch_dtype=torch.float16).to("cuda")
## Initializing a scheduler and Setting number of sampling steps
scheduler = LMSDiscreteScheduler(beta_start=0.00085, beta_end=0.012, beta_schedule="scaled_linear", num_train_timesteps=1000)
scheduler.set_timesteps(50)
## Initializing the U-Net model
unet = UNet2DConditionModel.from_pretrained("CompVis/stable-diffusion-v1-4", subfolder="unet", torch_dtype=torch.float16).to("cuda")
## Helper functions
def load_image(p):
    '''
    Function to load images from a defined path
    '''
    return Image.open(p).convert('RGB').resize((512,512))
def pil_to_latents(image):
    '''
    Function to convert image to latents
    '''
    init_image = tfms.ToTensor()(image).unsqueeze(0) * 2.0 - 1.0
    init_image = init_image.to(device="cuda", dtype=torch.float16)
    init_latent_dist = vae.encode(init_image).latent_dist.sample() * 0.18215
    return init_latent_dist
def latents_to_pil(latents):
    '''
    Function to convert latents to images
    '''
    latents = (1 / 0.18215) * latents
    with torch.no_grad():
        image = vae.decode(latents).sample
    image = (image / 2 + 0.5).clamp(0, 1)
    image = image.detach().cpu().permute(0, 2, 3, 1).numpy()
    images = (image * 255).round().astype("uint8")
    pil_images = [Image.fromarray(image) for image in images]
    return pil_images
def text_enc(prompts, maxlen=None):
    '''
    A function to take a texual promt and convert it into embeddings
    '''
    if maxlen is None: maxlen = tokenizer.model_max_length
    inp = tokenizer(prompts, padding="max_length", max_length=maxlen, truncation=True, return_tensors="pt")
return text_encoder(inp.input_ids.to("cuda"))[0].half()下面的代码是函数中存在的内容的精简版本,用于显示扩散过程的重要部分。StableDiffusionPipeline.from_pretrained
def prompt_2_img(prompts, g=7.5, seed=100, steps=70, dim=512, save_int=False):
    """
    Diffusion process to convert prompt to image
    """

    # Defining batch size
    bs = len(prompts)

    # Converting textual prompts to embedding
    text = text_enc(prompts)

    # Adding an unconditional prompt , helps in the generation process
    uncond =  text_enc([""] * bs, text.shape[1])
    emb = torch.cat([uncond, text])

    # Setting the seed
    if seed: torch.manual_seed(seed)

    # Initiating random noise
    latents = torch.randn((bs, unet.in_channels, dim//8, dim//8))

    # Setting number of steps in scheduler
    scheduler.set_timesteps(steps)

    # Adding noise to the latents
    latents = latents.to("cuda").half() * scheduler.init_noise_sigma

    # Iterating through defined steps
    for i,ts in enumerate(tqdm(scheduler.timesteps)):
        # We need to scale the i/p latents to match the variance
        inp = scheduler.scale_model_input(torch.cat([latents] * 2), ts)

        # Predicting noise residual using U-Net
        with torch.no_grad(): u,t = unet(inp, ts, encoder_hidden_states=emb).sample.chunk(2)

        # Performing Guidance
        pred = u + g*(t-u)

        # Conditioning  the latents
        latents = scheduler.step(pred, ts, latents).prev_sample

        # Saving intermediate images
        if save_int:
            if not os.path.exists(f'./steps'):
                os.mkdir(f'./steps')
            latents_to_pil(latents)[0].save(f'steps/{i:04}.jpeg')

    # Returning the latent representation to output an image of 3x512x512
    return latents_to_pil(latents)
让我们看看该功能是否按预期工作。
images = prompt_2_img(["A dog wearing a hat", "a photograph of an astronaut riding a horse"], save_int=False)
for img in images:display(img)

看起来它正在工作!因此,让我们更深入地了解函数的超参数。
1. - 这是我们通过的文本提示来生成图像。类似于我们在第 1
部分 2 中看到的功能。 or - 这是一个值,用于确定图像应与文本提示的距离。这与一种称为分类器自由指导的技术有关,该技术可提高生成的图像的质量。指导量表的值越高,它就越接近文本提示
3。 - 这设置了生成
初始高斯噪声潜伏的种子 4. - 为生成最终潜伏而采取的去噪步骤的数量。
5. - 图像的尺寸,为简单起见,我们目前正在生成方形图像,因此只需要一个值
6. - 这是可选的,如果我们想保存中间潜在图像,布尔标志有助于可视化。promptpipe(prompt)gguidance scaleseedstepsdimsave_int
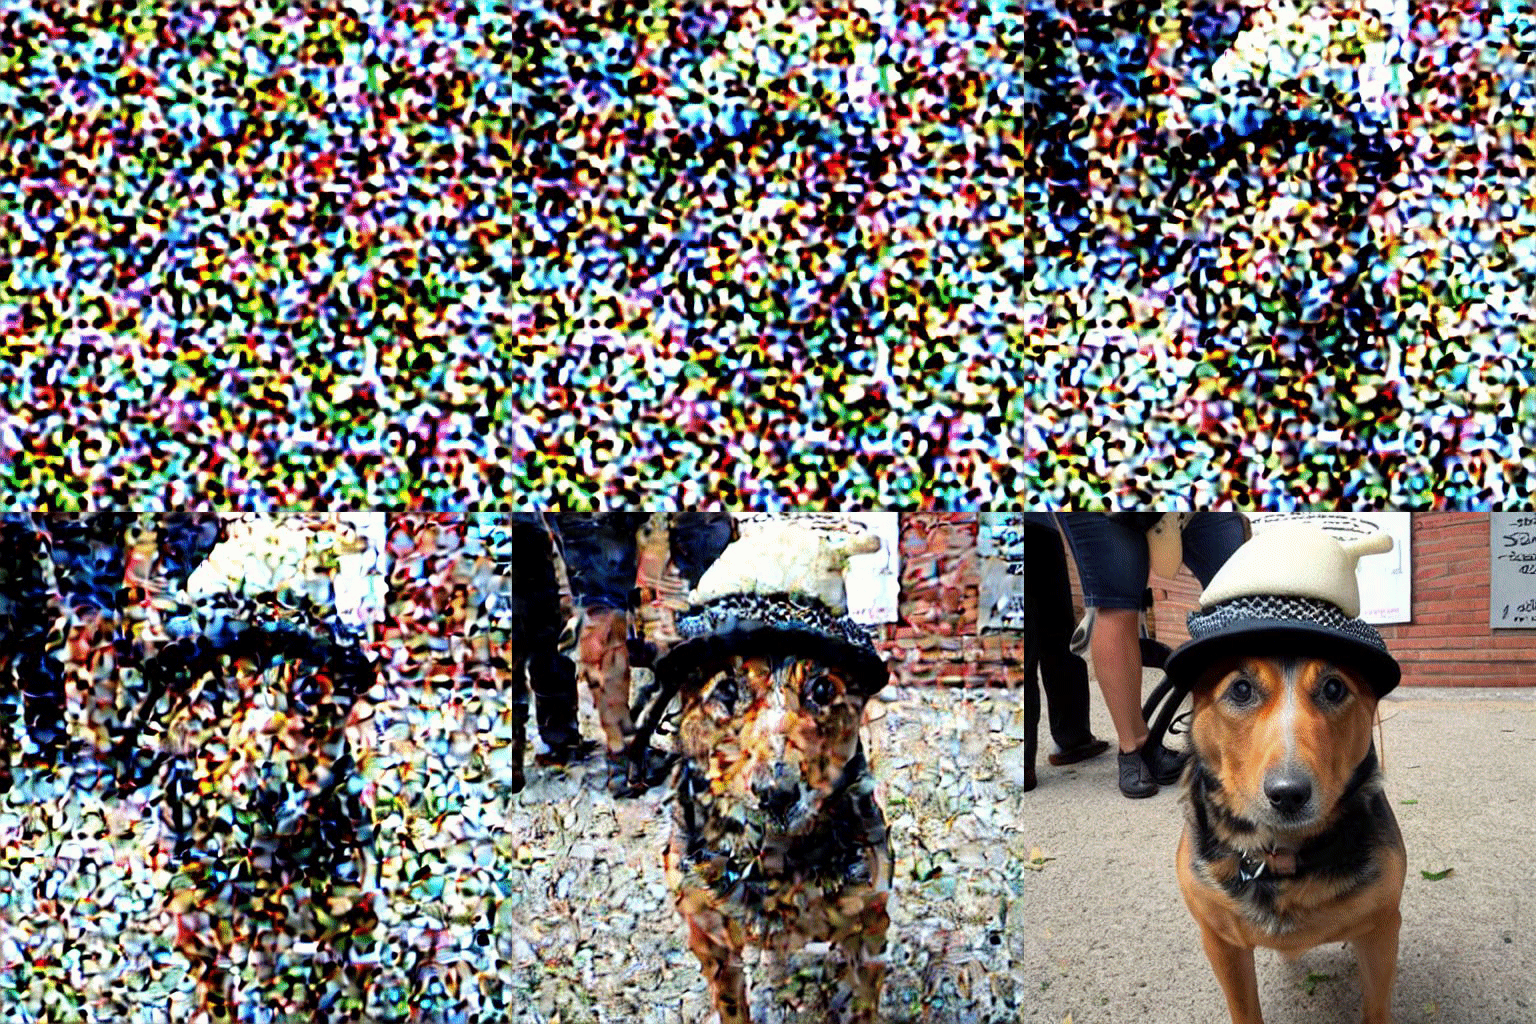
让我们可视化从噪声到最终图像的生成过程。
九、结论
上文全面介绍使用拥抱脸的稳定扩散世界 — 使用文本提示创建 AI 生成图像的,扩散器库我希望您喜欢阅读它,并随意使用我的代码并尝试使用它来生成图像。此外,如果对代码或博客文章有任何反馈,阿尤什·阿格拉瓦尔
