JavaScript面向对象编程再讲
JavaScript支持的面向对象比较复杂,和其他编程语言又有其独特之处。本文是对以前博文 JavaScript的面向对象编程 https://blog.csdn.net/cnds123/article/details/109763357 补充。
概述
这部分是JavaScript面向对象的概括,便于从总体上了解JavaScript面向对象情况,初学者先大体了解即可,不必心忧看不懂,等学习实践过一段时间后,再回过头来看,就容易理解掌握了。
JavaScript中对象(object)
JavaScript中的对象(object)是相关数据和/或功能的集合。这些通常由几个变量和函数组成(当它们位于对象中时称为属性[properties]和方法[methods])。【见https://developer.mozilla.org/en-US/docs/Learn/JavaScript/Objects/Basics对象基础(Object basics)节】
在 JavaScript中一个对象由许多的成员(members)组成,包括:
用Property / properties描述对象的 状态、性质、特征(features)数据。
用 method 描述是对象的 动作、行为、操作。
【如果你接触过其他语言的面向对象编程,请注意Property这个词在JavaScript面向对象编程中的含义。
在Web文档资料中(包括权威的https://developer.mozilla.org/zh-CN/docs/Web 支持多语言包括中英文切换),一般而言,在HTML部分将的attribute译为属性,在CSS部分将Property译为属性,在JavaScript部分将Property译为属性、attribute译为特性。】
早期(ES5标准及其之前)JavaScript的面向对象编程和大多数其他语言如Java、C#的面向对象编程都不太一样,没有class 关键字定义类(classes)。
Java或C#面向对象的两个基本概念:
类: 类是对象的类型模板,例如,定义Student类来表示学生,类 (classes)本身是一种类型(type),如Student表示学生类型,但不表示任何具体的某个学生。
对象:实例是根据类创建的对象,例如,根据Student类可以创建出多个实例,每个实例表示一个具体的学生,他们全都属于Student类型。
在JavaScript中需要大家换一下思维方式!JavaScript不区分类和实例的概念,通过原型(prototype)来实现对象继承特征(inherit features)【https://developer.mozilla.org/zh-CN/docs/Learn/JavaScript/Objects/Object_prototypes 】。
后来【2015年6月发布的ES6标准中】JavaScript 还提供了更接近经典 OOP 概念的特征(features )。注意,这里描述的特征并不是一种继承对象的新方式:在底层,使用的仍是原型。这只是一种更容易的创建原型链(prototype chain)的方法【https://developer.mozilla.org/zh-CN/docs/Learn/JavaScript/Objects/Classes_in_JavaScript 】。
在 ES6中,类 (classes) 作为对象的模板被引入,可以通过 class 关键字定义类。以# 开头的属性(properties)和方法(methods)是私有的,必须在类(class)中声明和使用,如果在类的外部尝试访问,浏览器将会抛出错误:SyntaxError。
类是用于创建对象的模板。他们用代码封装数据(encapsulate data)以处理这些数据。JS 中类建立在原型(prototype)上,但也有一些独特的语法和语义(与 ES5相比)。
类可以用两种方式定义:类表达式(class expression )或类声明( class declaration)。
// Declaration
class Rectangle {
  constructor(height, width) {
    this.height = height;
    this.width = width;
  }
}

// Expression; the class is anonymous but assigned to a variable
const Rectangle = class {
  constructor(height, width) {
    this.height = height;
    this.width = width;
  }
};

// Expression; the class has its own name
const Rectangle = class Rectangle2 {
  constructor(height, width) {
    this.height = height;
    this.width = width;
  }
};
【https://developer.mozilla.org/zh-CN/docs/Web/JavaScript/Reference/Classes 】。
早期的JavaScript面向对象的实现
先看看早期的JavaScript面向对象的实现
早期的JavaScript,生成实例对象的传统方法是通过构造函数。
在JavaScript中,每个函数(function)其实都是一个Function对象。其他对象一样具有属性(property)和方法(method)。
可以用作构造函数(constructor)的函数实例具有“prototype”属性(property)。每个由用户定义的函数都会有一个 prototype 属性。
一个 Function 对象在使用 new 运算符来作为构造函数(constructor)时,会用到它的 prototype 属性(property),它将成为新对象的原型(prototype)。
这是JavaScriptde 面向对象实现的经典方法,它用构造函数模拟"类",在其内部用this关键字指代实例对象。如:
function Point(x, y) {
  this.x = x;
  this.y = y;
  this.explain = "这是一个点的位置";
  this.position = function(){
     return '(' + this.x + ', ' + this.y + ')';
  };
}

//生成实例对象
let p1 = new Point(1, 2);
let p2 = new Point(3, 5);

console.log(p1.x) //输出:1
console.log(p1.explain) //输出:这是一个点的位置
console.log(p1.position()) //输出:(1, 2)
上面的例子——构造函数模式,表面上好像没什么问题,但是实际上这样做,有一个很大的弊端。那就是对于每一个实例对象,explain属性和position()方法都是一模。每一次生成一个实例,都必须为重复的内容,多占用一些内存,缺乏效率。
Javascript生成实例对象时,会自动含有一个constructor属性,指向它们的构造函数,每一个构造函数都有一个prototype属性,指向另一个对象。这个对象的所有属性和方法,都会被构造函数的实例继承。类的属性和方法,可以定义在构造函数的prototype对象之上。这意味着,我们可以把那些不变的属性和方法,直接定义在prototype对象上。因此可以将上例改造为:
function Point(x, y) {
  this.x = x;
  this.y = y;
}
Point.prototype.explain = "这是一个点的位置";
Point.prototype.position = function () {
  return '(' + this.x + ', ' + this.y + ')';
};

//生成实例对象
let p1 = new Point(1, 2);
let p2 = new Point(3, 5);

console.log(p1.x)//输出:1
console.log(p1.explain) //输出:这是一个点的位置
console.log(p1.position()) //输出:(1, 2)
这时所有实例的explain属性和position()方法,其实都是同一个内存地址,指向prototype对象。因此节省了内存提高了运行效率。这称为原型模式。
早期面向对象的设计模式,除上面介绍的构造函数模式和原型模式,还有
单例模式
工厂模式
在此,就不具体介绍了。
ES6中新增class关键字的使用
下面重点介绍ES6中新增class关键字后的情况。
在ES6中新增了类的概念,可用class关键字声明一个类,之后用该类实例化对象,这样更像面向对象编程的语法。
类和对象关系:
类抽象了对象的公共部分,它泛指某一大类(class);
对象特指某一个,通过类实例化一个具体的对象;
下面给出示例源码:
<script>
//ES6 之后===
// 定义一个学生的类
class Student{
    constructor(name){
        this.name = name;
    }

    hello(){
        console.log(this.name + '你好啊!')
    }
}

// PupilStudent子类继承父类Student
class PupilStudent extends Student{
    constructor(name,grade){
        super(name); //super关键字
        this.grade = grade;
    }

    myGrade(){
        console.log(this.name +'是' +this.grade + '年级学生')
    }
}

//创建实例对象
let LiJun = new Student("李军");
let XiaoMing = new PupilStudent("小明",1);

// 通过实例调用方法
LiJun.hello(); //输出:李军你好啊!
XiaoMing.myGrade(); //输出:小明是1年级学生

</script>
将上面代码保存文件名为:class关键字示例.html
几点说明:
☆类中函数(方法)不需要写function。
☆this关键字总是指向函数所在的当前对象,类里面共有的属性和方法一定要加this使用;构造函数中的this 指向的是创建的实例对象;谁调用类中的方法,this就指向谁。
☆必须要先定义类,才能通过类实例化对象;类必须使用new实例化对象。
☆constructor()方法是类的构造函数(默认方法),用于传递参数,返回实例对象,通过new命令生成对象实例,自动调用该方法——constructor()方法,也称为constructor() 函数。若没有显示定义,类内部会自动给我们创建一个constructor()。
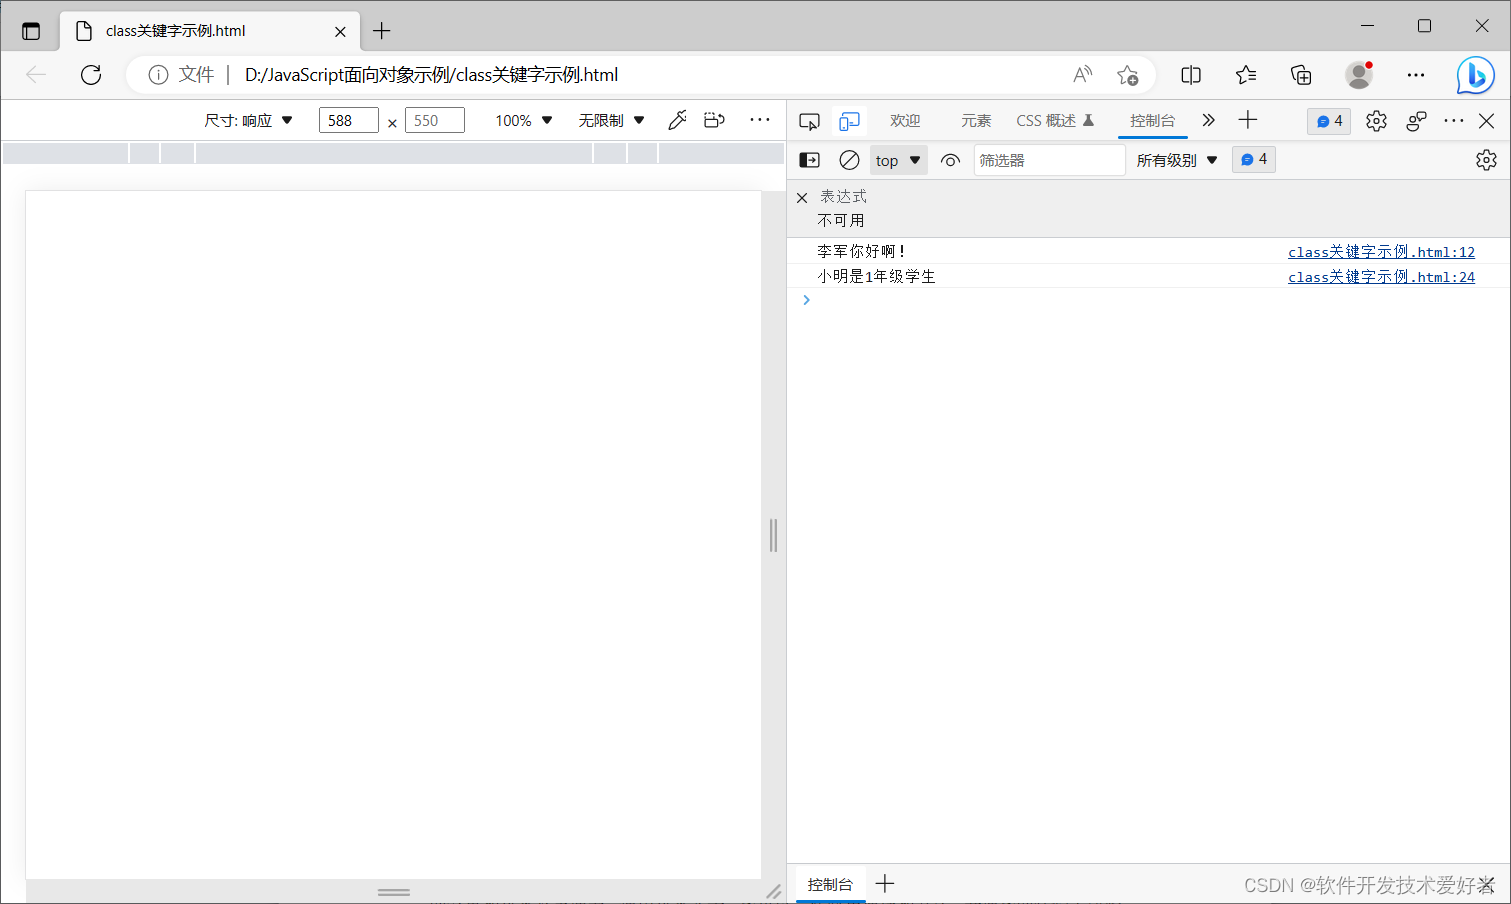
用浏览器打开“class关键字示例.html”,什么也看不到?
打开浏览器的“控制台”(console) 面板,就看到了
【如何打开浏览器的“控制台”(console) 面板?
打开浏览器后,按下 F12键 【或 按 Ctrl+Shift+J (Windows、Linux) 或 Command+Option+J (macOS)】,然后单击 “控制台”(console) 面板,就进入了控制台。
顺便简要介绍浏览器“控制台”的使用
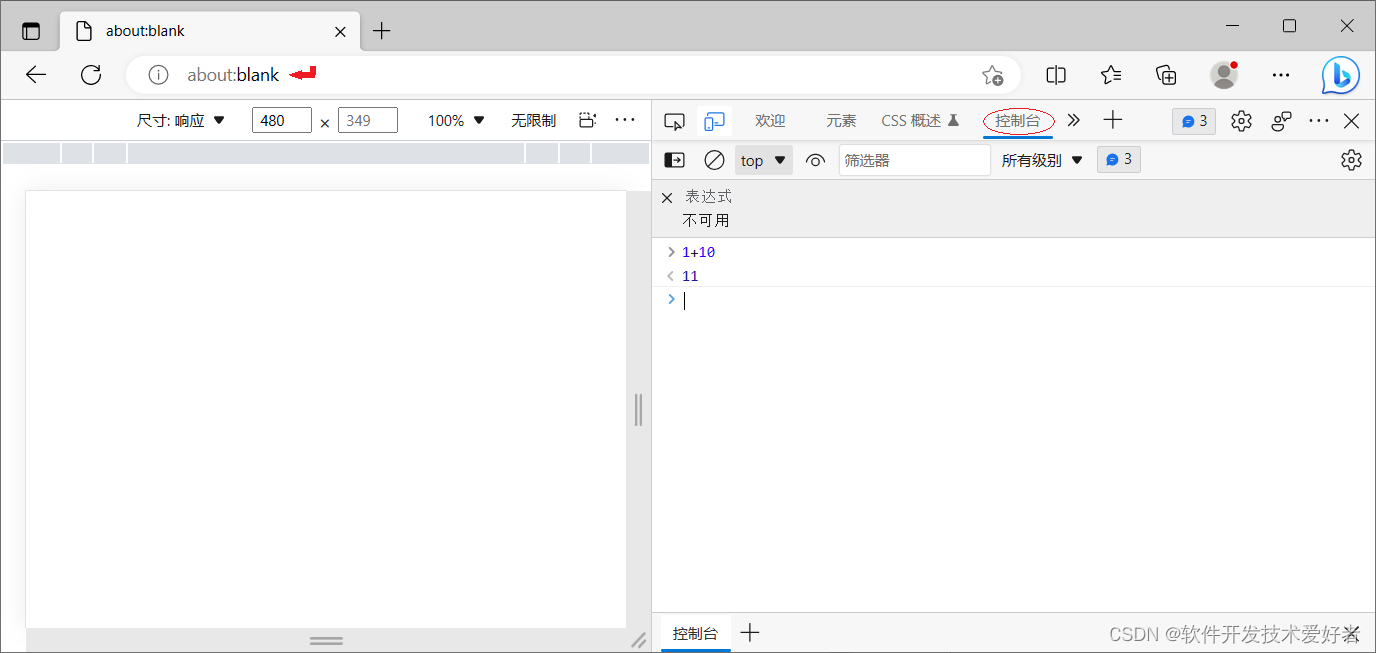
在浏览器地址栏输入about:blank回车,将打开浏览器空白页的命令——about:blank是内置在浏览器中的命令,可以打开浏览器空白页(没有任何内容)。进入控制台以后,就可以在提示符(> 符号)后输入代码,然后按回车(Enter键),代码就会执行。如果按Shift + Enter键,就是代码换行,不会触发执行。执行结果显示在<符号之后。
以win10的Microsoft Edge浏览器为例,参见下图:
】
上面代码显示效果如下:
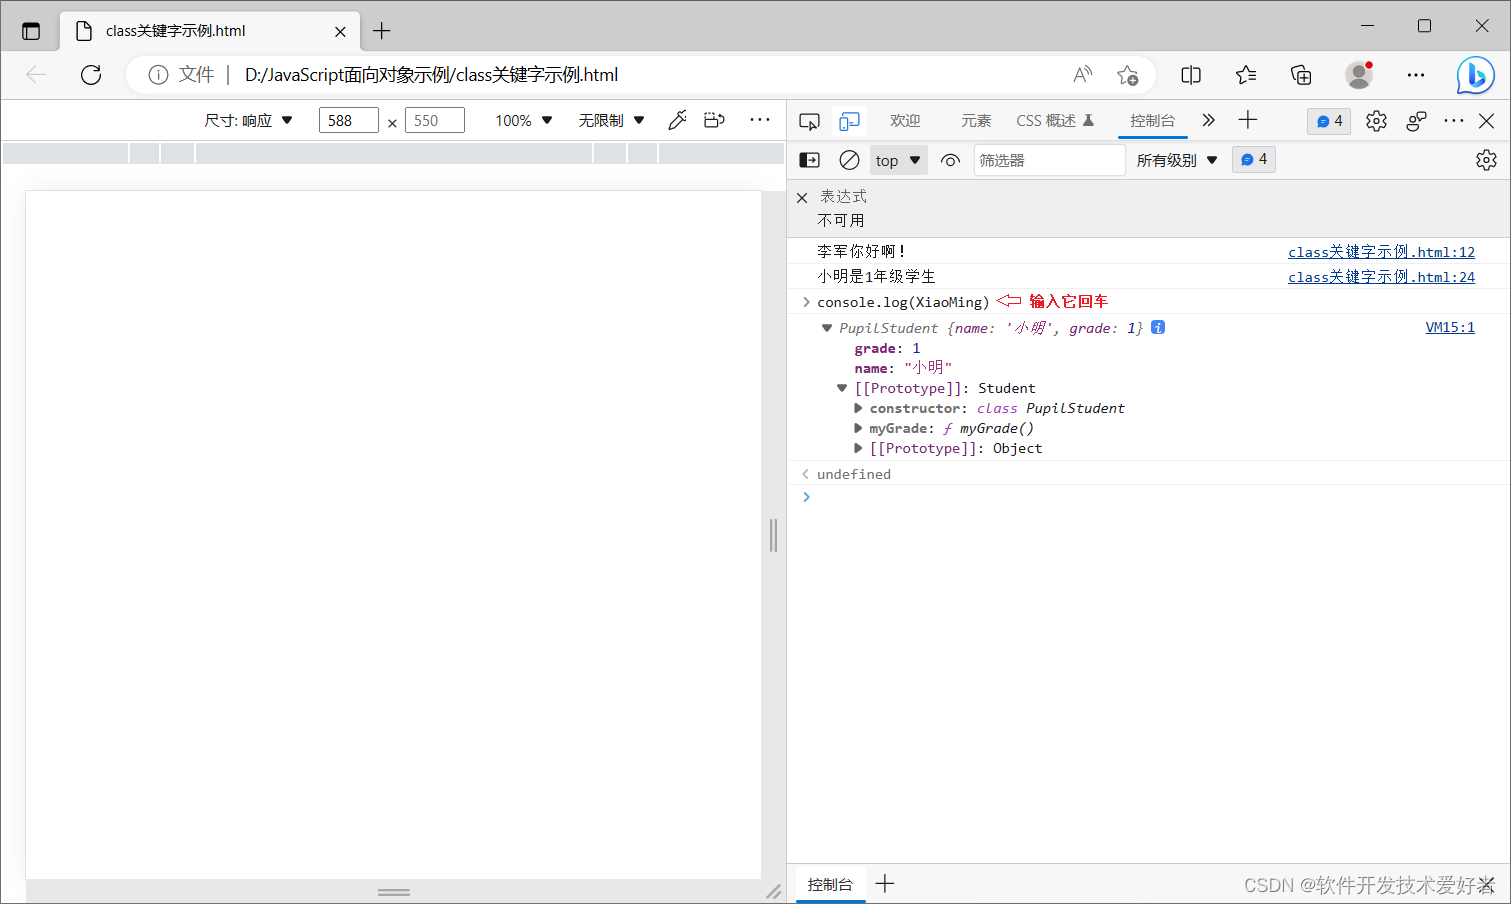
下面查看一下上述代码XiaoMing对象原型(prototype):
在“控制台”(console)输入
console.log(XiaoMing)
参见下图:
【为什么浏览器控制台(Console)运行JavaScript代码有时会出现“undefined”?可见https://blog.csdn.net/cnds123/article/details/128014970】
继承是指子类可以继承父类的一些属性和方法。
子类继承父类的语法如下:
class 父类 extends 子类{
……
}
具体示例可见上例的
// PupilStudent子类继承父类Student
class PupilStudent extends Student{
……
}
部分。
需要注意的是,子类要继承父类中的参数和方法,需要super关键字。
子类在构造函数中使用super,必须放到this前面(即必须先调用父类的构造方法,再使用子类的构造方法)。否则报错。
将上例中
super(name); //super关键字
改为
this.name = name;
运行报错,参见下图:
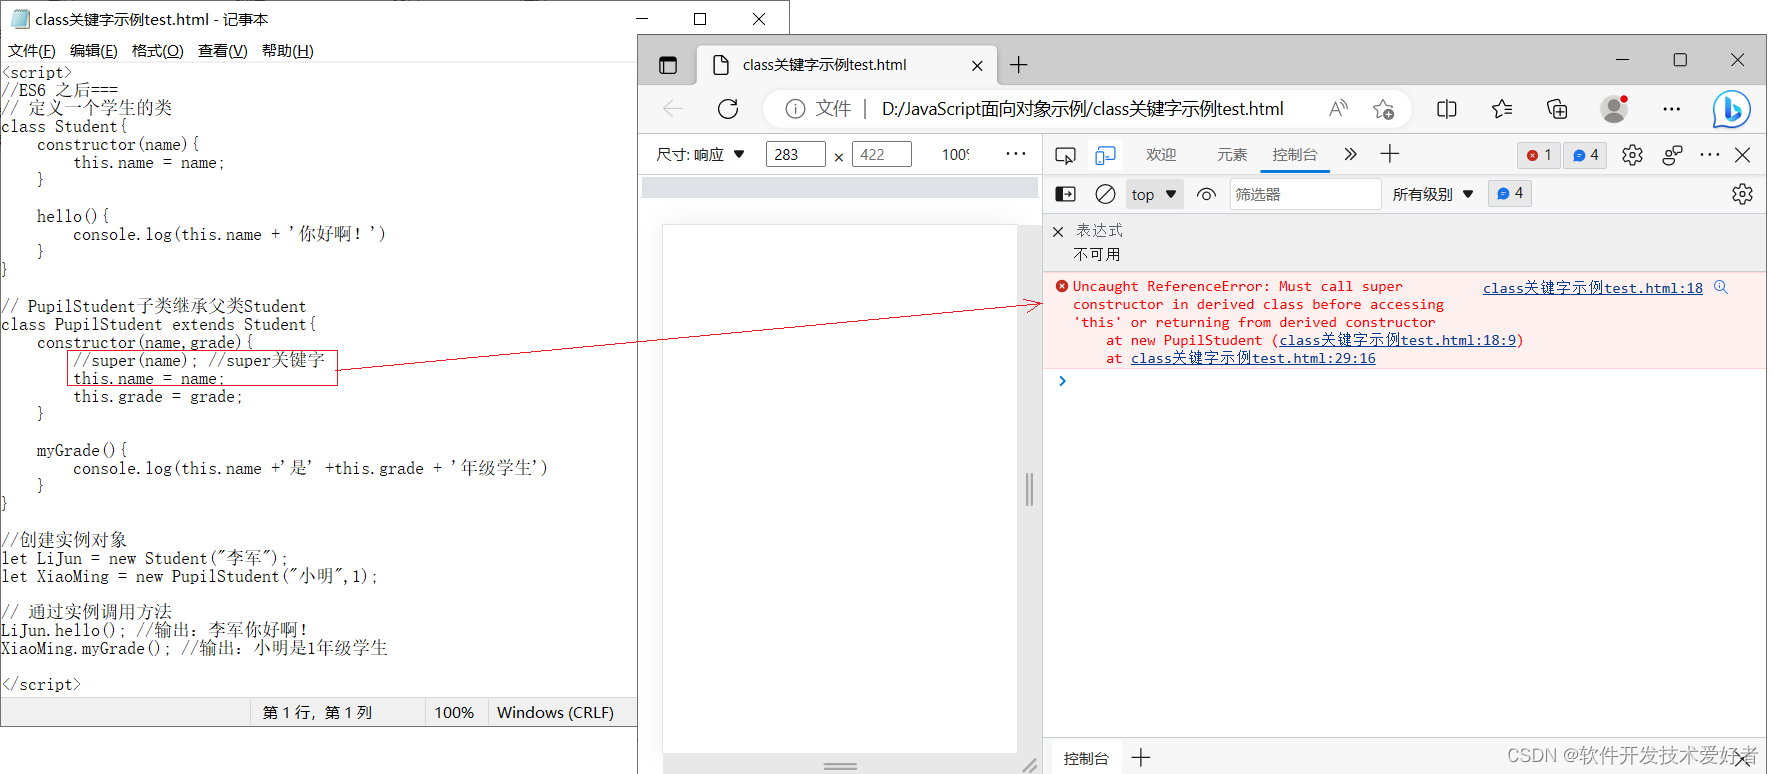
【报错:
Uncaught ReferenceError: Must call super constructor in derived class before accessing 'this' or returning from derived constructor
at ……
大意是,未捕获的ReferenceError:在访问“this”或从派生构造函数返回之前,必须调用派生类中的super构造函数。】
super关键字
关键字super,指向当前对象的原型对象,它用于访问和调用对象父类上的函数,可以调用父类的构造函数,也可以调用父类的普通函数。
子类在构造函数中使用super,必须放到this前面(即必须先调用父类的构造方法,再使用子类的构造方法)。上面示例中子类在构造函数
super(name); //super关键字
this.grade = grade;
的两句,若改为
this.grade = grade;
super(name); //super关键字
将报和前面相似的错误。你可以试试。
面向对象的的三大特征(feature)简介
封装(encapsulation):封装即信息隐蔽,在确定系统的某一部分内容时,应考虑到其它部分的信息及联系都在这一部分的内部进行,外部各部分之间的信息联系应尽可能的少。目的是尽量做到“高内聚,低耦合”,高内聚就是类的内部数据操作细节自己完成,不允许外部干涉;低耦合:仅暴露少量的方法给外部使用。例如,将对应的行为抽取为方法,状态数据抽取为属性,创建良好的类。
继承(Inheritance):继承是类和类之间的一种关系。子类(subclass)继承超类(superclass,也叫父类)的属性和方法。
多态(polymorphism):当一个方法拥有相同的函数名,但是在不同的类中可以具有不同的实现时,我们称这一特性为多态。当子类中的方法替换超类的实现时,我们说子类重写(override)超类中的版本。
下面展开介绍。
创建类的简明语法:
class ClassName {
// 类体
}
创建实例:
xx = new ClassName r();
注意语法规范,如:创建类 类名后面不要加小括号,类中的函数不需要加 function。
类里面的共有的属性和方法一定要加this使用。
在 ES6 中类没有变量提升,所以必须先定义类,才能通过类实例化对象。
请留意类里面的this指向问题。constructor 里面的this指向实例对象, 方法里面的this 指向这个方法的调用者。
下面给出示例源码:
<script>
  // 1. 创建类 class 创建一个 Star类
  class Star {
    //在类中定义constructor函数
    constructor(uname, age) {
      this.uname = uname;
      this.age = age;
    }
    //在类中定义普通函数,这里是 sing(song)
    sing(song) {
      console.log(this.uname + "经典歌曲:" + song);
    }
  }

  // 2. 利用类创建对象 new
  var ldh = new Star("刘德华", 28);
  var zxy = new Star("张学友", 27);

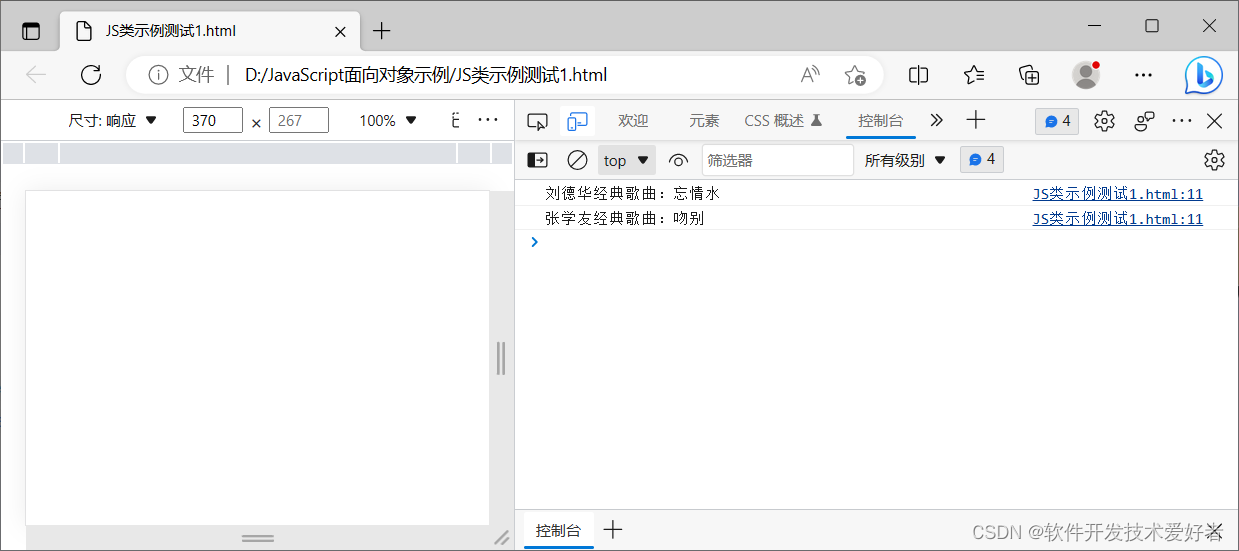
  ldh.sing("忘情水"); //输出:刘德华经典歌曲:忘情水
  zxy.sing("吻别");   //输出:张学友经典歌曲:吻别
</script>
将上面代码保存文件名为:JS类示例测试1.html,用浏览器打开它,再按下 F12键打开浏览器的“控制台”(console) 面板,显示效果如下:
以#开头的属性(properties)和方法(methods)是私有的,必须在类(class)中声明和使用,如果在类的外部尝试访问,浏览器将会抛出错误:SyntaxError。
示例源码如下:
<script>
class Example {
    hiA='Hello';
    #hiB='Hello';

    somePublicMethod() {
        this.#somePrivateMethod();
    }

    #somePrivateMethod() {
        console.log('You called me?');
    }
}

const myExample = new Example();
console.log(myExample.hiA) //输出:Hello
//console.log(myExample.#hiB) // 若不注释掉本句将报错SyntaxError
myExample.somePublicMethod(); //输出:You called me?
//myExample.#somePrivateMethod(); // 若不注释掉本句将报错SyntaxError

</script>
你可以测试运行试试。
面向对象重要特征(feature):继承性(inheritance)。
继承是指子类可以继承父类的一些属性和方法。创建继承的简明语法:
// 父类
class FatherName {
// 父类体
}
// 子类继承父类
class SonV extends FatherName {
// 子类体
}
super关键字
super关键字用于访问和调用对象父类上的函数,可以调用父类的构造函数,也可以调用父类的普通函数。
注意:子类在构造函数中使用 super,必须放到 this 前面(必须先调用父级的构造方法,在使用子类的构造方法)
下面给出示例源码:
<script>
  //定义父类
  class Father {
    constructor(x, y) {
      this.x = x;
      this.y = y;
    }
    sum() {
      console.log(this.x + this.y);
    }
  }

  //定义子类,子类继承父类加法方法 同时 扩展减法方法
  class Son extends Father {
    constructor(x, y) {
      // 利用 super 调用父类的构造函数
      // super 必须在字类this之前调用
      super(x, y);
      this.x = x;
      this.y = y;
    }
    sub() {
      console.log(this.x - this.y);
    }
  }

  //利用类创建对象 new
  var son = new Son(5, 3);

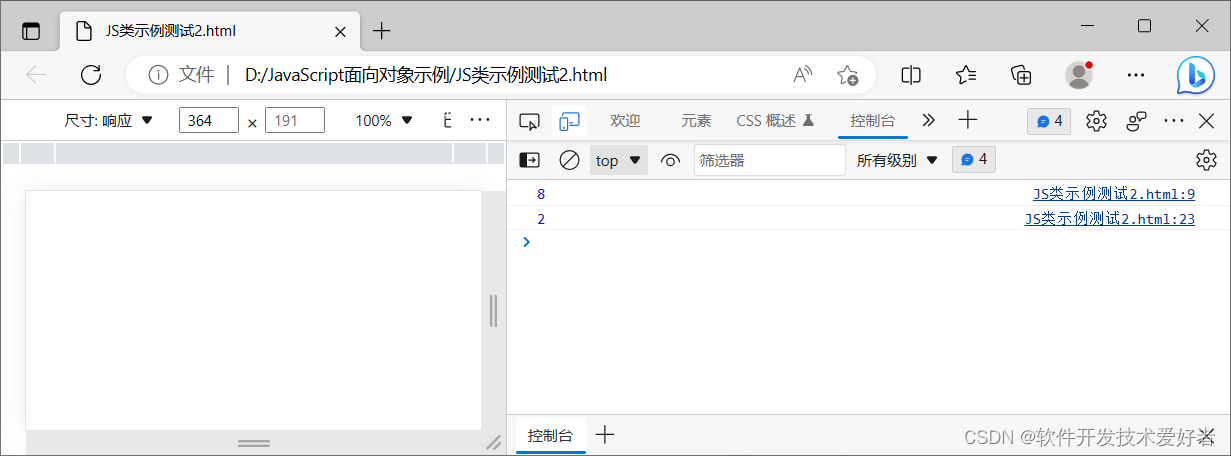
  son.sum(); //输出:8
  son.sub(); //输出:6
</script>
将上面代码保存文件名为:JS类示例测试2.html,用浏览器打开它,再按下 F12键打开浏览器的“控制台”(console) 面板,显示效果如下:
面向对象重要特征(feature):多态(polymorphism)
多态指子类重写父类的方法。
下面给出重写(子类重写父类的方法)示例源码:
<script>
class Person{
    constructor(name){
        // var sex = '男'
        this.name = name
    }
    //say()方法
    say(){
        console.log(this.name+'哈哈哈哈');
    }
}
class Son extends Person{
    constructor(name,age){
        super() //调用Person的constructor
        this.name = name
        this.age = age
    }
    //重写say()方法
    say(){
            console.log(this.name+'嘻嘻嘻嘻');
    }

}

var person = new Person('刘德华')
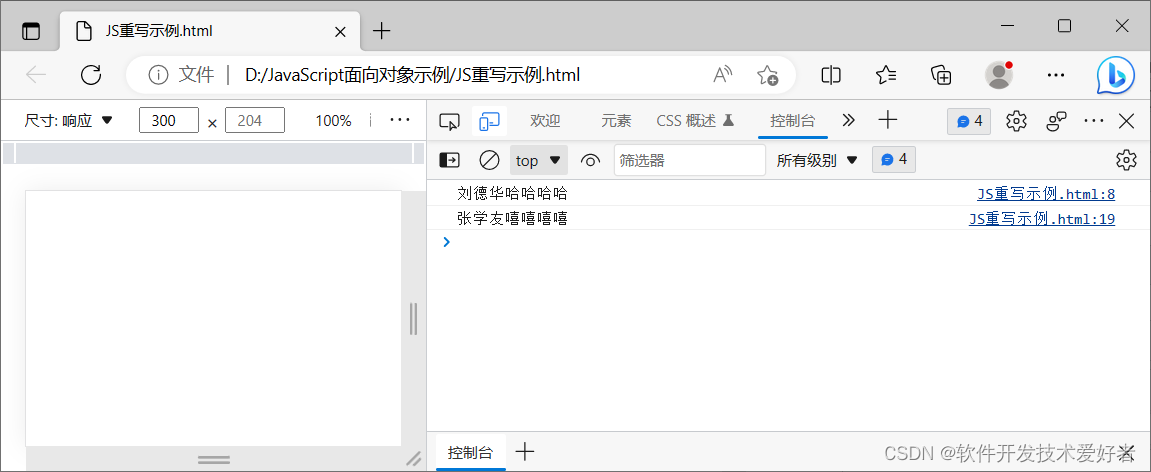
person.say()//刘德华哈哈哈哈

var son = new Son('张学友')
son.say() //张学友嘻嘻嘻嘻

</script>
将上面代码保存文件名为:JS重写示例.html,用浏览器打开它,再按下 F12键打开浏览器的“控制台”(console) 面板,显示效果如下:
现在介绍,ES6提供的class的取值函数(getter)和存值函数(setter)的作用
取值函数(getter)和存值函数(setter)可以自定义赋值和取值行为。当一个属性只有getter没有setter的时候,是无法进行赋值操作的,初始化也不行。参见下图:
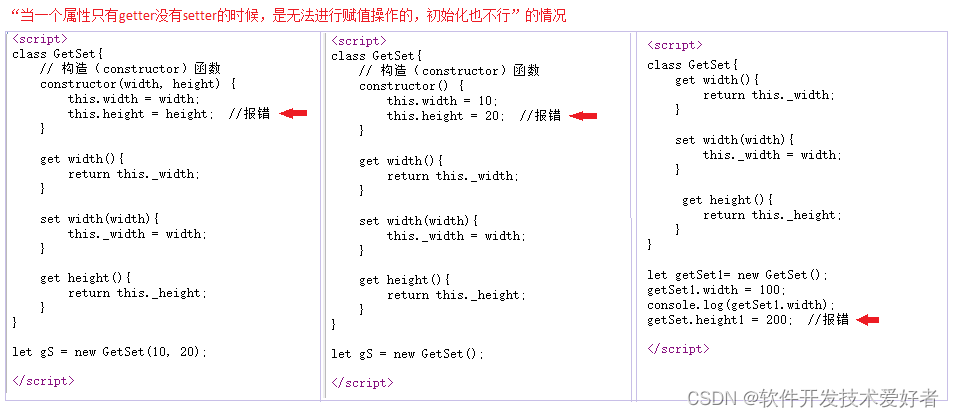
下面给出情况1的示例代码,以便于读者测试:
<script>
class GetSet{
    // 构造(constructor)函数
    constructor(width, height) {
        this.width = width;
        this.height = height;  //报错
    }

    get width(){
        return this._width;
    }

    set width(width){
        this._width = width;
    }

    get height(){
        return this._height;
    }
}

let gS = new GetSet(10, 20);
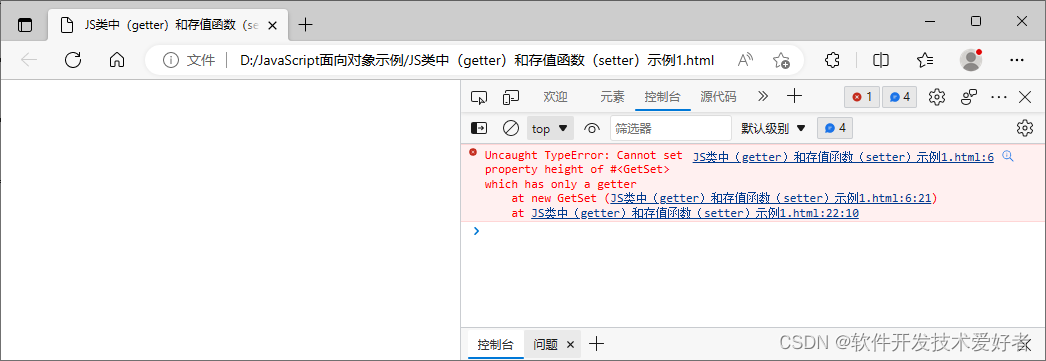
将上面代码保存文件名为:JS类中(getter)和存值函数(setter)示例1.html,用浏览器打开它,再按下 F12键打开浏览器的“控制台”(console) 面板,显示效果如下:
应用例子
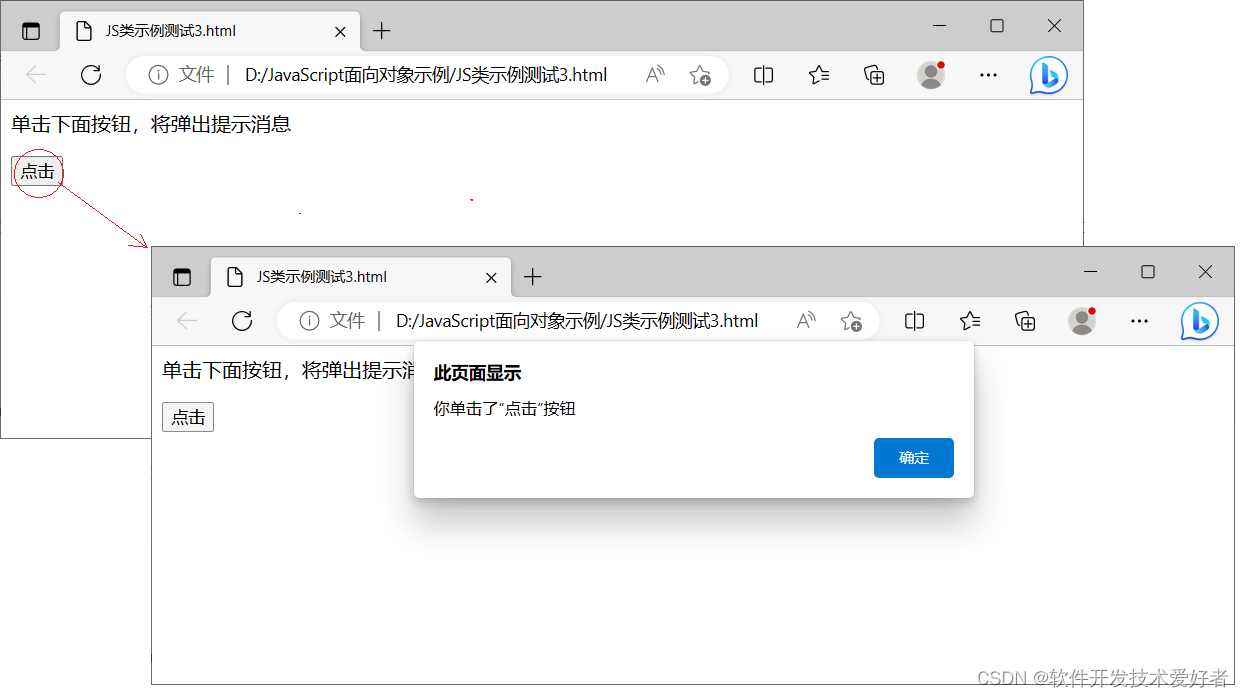
例1、下面给出一个按钮的示例,单击按钮,将弹出提示消息,源码如下:
<body>
    <p>单击下面按钮,将弹出提示消息</p>
    <button>点击</button>

    <script>

        // 1. 创建类 class 创建一个 C类
        class C{
            constructor() {
                // constructor 里面的this 指向的是 创建的实例对象
                this.btn = document.querySelector('button');
                //按钮调用fn函数
                this.btn.onclick = this.fn;  //注意:此处fn后面不要加(),想要点击完调用,不需要立即调用
                //加括号:代表立即执行,也代表该函数的返回值
                //不加括号:代表函数体本身(Function类型)
            }

            //在类中定义普通函数,这里是 fn()
            fn() {
                //console.log("你单击了“点击”按钮");
                alert("你单击了“点击”按钮");
            }
        }

        // 2. 利用类创建对象 new
        var c = new C();

    </script>
</body>
将上面代码保存文件名为:JS类示例测试3.html,用浏览器打开它,再单击了页面上“点击”按钮试试,显示效果如下:
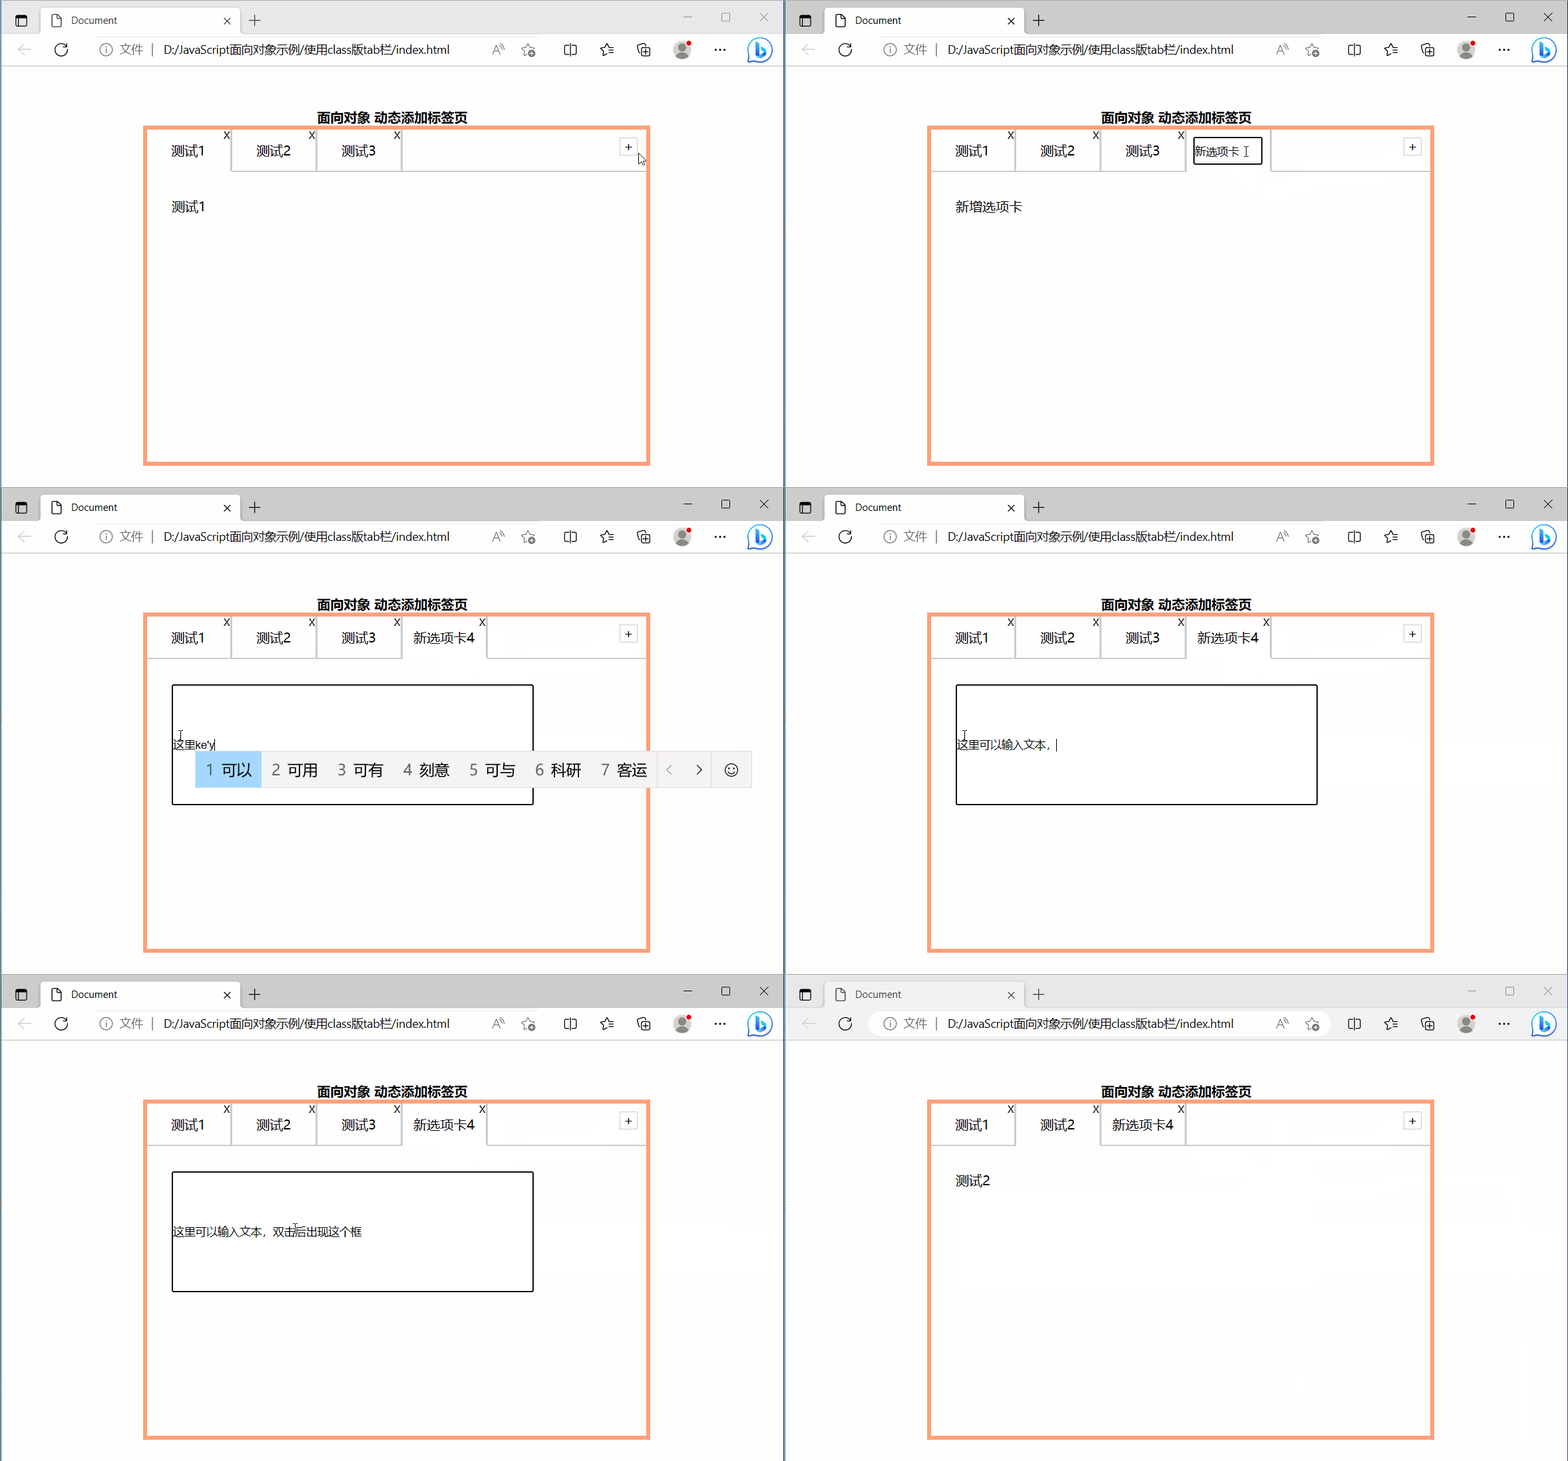
例2、一个比较大的示例——使用类的tab 栏切换。
可以实现tab栏的动态切换、添加、删除、编辑。双击tab的标题可以编辑tab标题,双击tab的页面可以输入编辑页面内容。
先给出效果图:
此项目参考自网络。
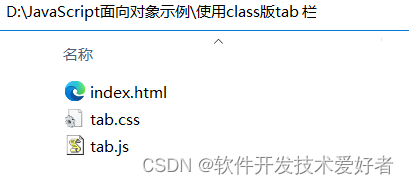
项目包含的文件,为简便使用放到同一个目录中,我这里目录名是“使用class版tab栏”,含有三个文件,参见下图:
tab.js文件的内容如下:
var that;
class Tab {
    constructor(id){
        // 获取元素
        that = this;
        // tab栏盒子
        this.main = document.querySelector(id);
        // 加号
        this.add = this.main.querySelector('.tabadd');
        // li的父元素
        this.ul = this.main.querySelector('.firstnav ul:first-child');
        // section的父元素
        this.fsection = this.main.querySelector('.tabscon');
        // 初始化操作让相关的元素绑定事件
        this.init();
    }

    init(){
        this.updateNode();
        // 初始化操作让相关的元素绑定事件
        this.add.onclick = this.addTab;
        for(var i = 0; i<this.lis.length;i++){
            this.lis[i].index=i;
            this.lis[i].onclick = this.toggleTab;
            this.remove[i].onclick = this.removeTab;
            this.lis[i].ondblclick = this.editTab;
            this.sections[i].ondblclick = this.editTab;
        }
    }

    // 因为我们动态添加元素 需要从新获取对应的元素
    updateNode(){
        // 所有的li
        this.lis = this.ul.querySelectorAll('li');
        // 所有的section
        this.sections = this.fsection.querySelectorAll('section');
        // 所有的X删除
        this.remove = this.ul.querySelectorAll('li span')
    }

     //1. 切换功能
    toggleTab(){
        //排他思想
        // 清除所有的li和section的类
        that.clearClass()
        // 给当前的li和section加上类
        this.className='liactive'
        that.sections[this.index].className='conactive'
    }

    // 清除所有的li和section的类
    clearClass(){
        for(var i=0;i<this.lis.length;i++){
            this.lis[i].className='';
            this.sections[i].className='';
        }
    }

    // 2. 添加功能
    addTab(){
        that.clearClass()
        // (1) 创建li元素和section元素
        var li = '<li class="liactive">新增选项卡<span >X</span></li>';
        var section = '<section class="conactive">新增选项卡</section>';
        // (2) 把这两个元素追加到对应的父元素里面
        that.ul.insertAdjacentHTML('beforeend',li);
        that.fsection.insertAdjacentHTML('beforeend',section);
        that.init();
    }

    // 3. 删除功能
    removeTab(e){
        e.stopPropagation();  // 阻止冒泡 防止触发li 的切换点击事件
        var index = this.parentNode.index;
        // 根据索引号删除对应的li 和section   remove()方法可以直接删除指定的元素
        that.lis[index].remove();
        that.sections[index].remove();
        that.init();
        // 当我们删除的不是选中状态的li 的时候,原来的选中状态li保持不变
        if (document.querySelector('.liactive')) return;
        // 当我们删除了选中状态的这个li 的时候, 让它的前一个li 处于选定状态
        (that.lis[index] && that.lis[index].click())||(that.lis[--index] && that.lis[index].click())
    }

    // 4. 修改功能
    editTab(e){
        var str = this.innerHTML;
        var isnav =(str.indexOf('<span>X</span>')!==-1);  // 是否是tab 标签
        if(isnav) str = this.innerHTML.replace('<span>X</span>','')
        // 双击禁止选定文字
        window.getSelection ? window.getSelection().removeAllRanges() : document.selection.empty();
        this.innerHTML = '<input type="text" />';
        var input = this.children[0];
        input.value = str;
        input.select();// 文本框里面的文字处于选定状态
        // 当我们离开文本框就把文本框里面的值给span
        input.onblur =  function(){
            if(isnav){
                this.parentNode.innerHTML = this.value + '<span>X</span>'
            }else{
                this.parentNode.innerHTML = this.value;
            }
        }
        // 按下回车也可以把文本框里面的值给span
        input.onkeyup = function(e){
            if(e.keyCode === 13){
                // 手动调用表单失去焦点事件  不需要鼠标离开操作
                this.blur();
            }
        }
    }

}

new Tab('#tab')
tab.css文件的内容如下:
* {
    margin: 0;
    padding: 0;
}

ul li {
    list-style: none;
}

main {
    width: 600px;
    height: 400px;
    border-radius: 10px;
    margin: 50px auto;
}

main h4 {
    /*height: 100px;*/
    /*line-height: 100px;*/
    text-align: center;
}

.tabsbox {
    width: 600px;
    margin: 0 auto;
    height: 400px;
    border: 5px solid lightsalmon;
    position: relative;
}

nav ul {
    overflow: hidden;
}

nav ul li {
    float: left;
    width: 100px;
    height: 50px;
    line-height: 50px;
    text-align: center;
    border-right: 3px solid #ccc;
    position: relative;
}

nav ul li.liactive {
    border-bottom: 2px solid #fff;
    z-index: 9;
}

#tab input {
    width: 80%;
    height: 60%;
}

nav ul li span:last-child {
    position: absolute;
    user-select: none;
    font-size: 12px;
    top: -18px;
    right: 0;
    display: inline-block;
    height: 20px;
}

.tabadd {
    position: absolute;
    /* width: 100px; */
    top: 0;
    right: 0;
}

.tabadd span {
    display: block;
    width: 20px;
    height: 20px;
    line-height: 20px;
    text-align: center;
    border: 1px solid #ccc;
    float: right;
    margin: 10px;
    user-select: none;
}

.tabscon {
    width: 100%;
    height: 300px;
    position: absolute;
    padding: 30px;
    top: 50px;
    left: 0px;
    box-sizing: border-box;
    border-top: 2px solid #ccc;
}

.tabscon section,
.tabscon section.conactive {
    display: none;
    width: 100%;
    height: 100%;
}

.tabscon section.conactive {
    display: block;
}
index.html文件的内容如下:
<!doctype html>
<html lang="zh">
<head>
    <meta charset="UTF-8">
    <meta name="viewport" content="width=device-width" />
    <title>Document</title>
    <link   rel="stylesheet" href="./tab.css">
</head>
<body>
    <main>
        <h4>面向对象 动态添加标签页</h4>
        <div class="tabsbox" id="tab">
            <!--tab 标签-->
            <nav class="firstnav">
                <ul>
                    <li class="liactive">测试1<span >X</span></li>
                    <li>测试2<span>X</span></li>
                    <li>测试3<span>X</span></li>
                </ul>
                <div class="tabadd">
                    <span>+</span>
                </div>
            </nav>

            <!--tab 内容-->
            <div class="tabscon">
                <section class="conactive">测试1</section>
                <section>测试2</section>
                <section>测试3</section>
            </div>
        </div>
    </main>

    <script src="./tab.js"></script>
</body>
</html>
用浏览器打开index.html文件,就可以看到效果了。
附录、编程语言和面向对象浅谈 https://blog.csdn.net/cnds123/article/details/128998309
参考
https://blog.csdn.net/ks795820/article/details/122487046
https://www.freecodecamp.org/chinese/news/object-oriented-javascript-for-beginners/
https://es6.ruanyifeng.com/#docs/class
https://www.w3schools.cn/js/js_class_intro.html 【英文https://www.w3schools.com/js/js_class_intro.asp】


