springmvc
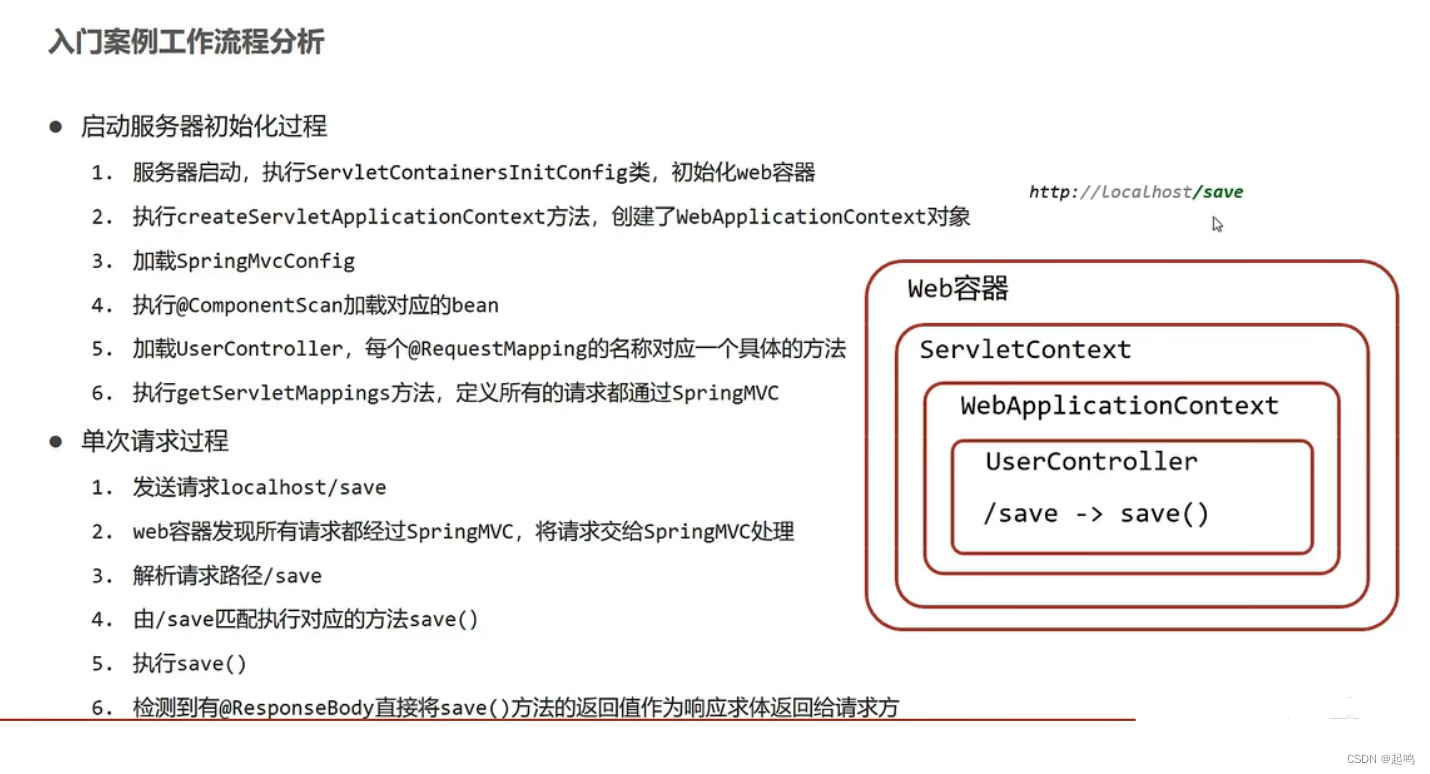
替换之前的servlet,用注解型标记进行操作的servlet类(就是之前servlet类上面的@Webservlet注解中参数:当前类的访问路径名),然后响应也用注解,据体如下:
先创建web项目
再导入需要的包:servlet包 (别忘了设置<scope>为provided)、mvc的包,和tomcat插件
<?xml version="1.0" encoding="UTF-8"?>

<project xmlns="http://maven.apache.org/POM/4.0.0" xmlns:xsi="http://www.w3.org/2001/XMLSchema-instance"
  xsi:schemaLocation="http://maven.apache.org/POM/4.0.0 http://maven.apache.org/xsd/maven-4.0.0.xsd">
  <modelVersion>4.0.0</modelVersion>

  <groupId>org.example</groupId>
  <artifactId>sptingmvc</artifactId>
  <version>1.0-SNAPSHOT</version>
  <packaging>war</packaging>

  <dependencies>
    <dependency>
      <groupId>javax.servlet</groupId>
      <artifactId>javax.servlet-api</artifactId>
      <version>4.0.1</version>
      <scope>provided</scope>
    </dependency>

    <dependency>
      <groupId>org.springframework</groupId>
      <artifactId>spring-webmvc</artifactId>
      <version>5.2.7.RELEASE</version>
    </dependency>
  </dependencies>

  <build>
    <plugins>
      <!-- tomcat插件 -->
      <plugin>
        <groupId>org.apache.tomcat.maven</groupId>
        <artifactId>tomcat7-maven-plugin</artifactId>
        <version>2.2</version>
      </plugin>
    </plugins>
  </build>

  <properties>
    <project.build.sourceEncoding>UTF-8</project.build.sourceEncoding>
    <maven.compiler.source>1.7</maven.compiler.source>
    <maven.compiler.target>1.7</maven.compiler.target>
  </properties>


</project>
创建控制类:
- 里面用注解标志请求时的访问路径
- 里面用注解标志响应时返回的数据
- 里面用注解标志注册成Bean
package com.itjh.servletmvc;

import org.springframework.stereotype.Controller;
import org.springframework.web.bind.annotation.RequestMapping;
import org.springframework.web.bind.annotation.ResponseBody;

@Controller
//控制器
public class sermvc {
    //请求时的访问路径
    @RequestMapping("/sav")
    //返回给浏览器的响应数据
    @ResponseBody
    public String save(){
        System.out.println("spring.......mvc");
        return "{'name':'zhangsan'}}";
    }
}
既然上面使用了注册成Bean,那肯定要配置类,于是创建注解型的配置类:
package com.itjh.Config;

import org.springframework.context.annotation.ComponentScan;
import org.springframework.context.annotation.Configuration;

@Configuration()
@ComponentScan("com.itjh.servletmvc")
public class SpringmvcConfig {
}
万事俱备只欠东风:需要让tomcat启动之后知道这个配置类,就像之前学spring一样,需要在测试类中加载这个配置类(就是最开始的xml配置文件,即容器),别忘了需要继承AbstractDispatcherServletInitializer
package com.itjh.Config.test;

import com.itjh.Config.SpringmvcConfig;
import org.springframework.web.context.WebApplicationContext;
import org.springframework.web.context.support.AnnotationConfigWebApplicationContext;
import org.springframework.web.servlet.support.AbstractDispatcherServletInitializer;

public class SpringmvcTest extends AbstractDispatcherServletInitializer {
    //加载springmvc容器
    @Override
    protected WebApplicationContext createServletApplicationContext() {
        AnnotationConfigWebApplicationContext context=new AnnotationConfigWebApplicationContext();
        //注册一下springmvc容器
        context.register(SpringmvcConfig.class);
        System.out.println("加载springmvc容器");
        return context;
    }
    //从前端过来的请求,被拦截,即设置哪些请求归springmvc管
    @Override
    protected String[] getServletMappings() {
        System.out.println("拦截。。。");
        return new String[]{"/"};
    }
    //加载spring容器
    @Override
    protected WebApplicationContext createRootApplicationContext() {
        return null;
    }
}
两个配置类
分别是Spring配置类和SpringMVC配置类
这两种配置类应当对应的是不同的对象,如SpringMVC对应的是控制类,Spring对应Service等,如下
而在项目运行时需要特别不同的配置类加载不同的对象而不能加载错了,于是就有了两种方法完成这个
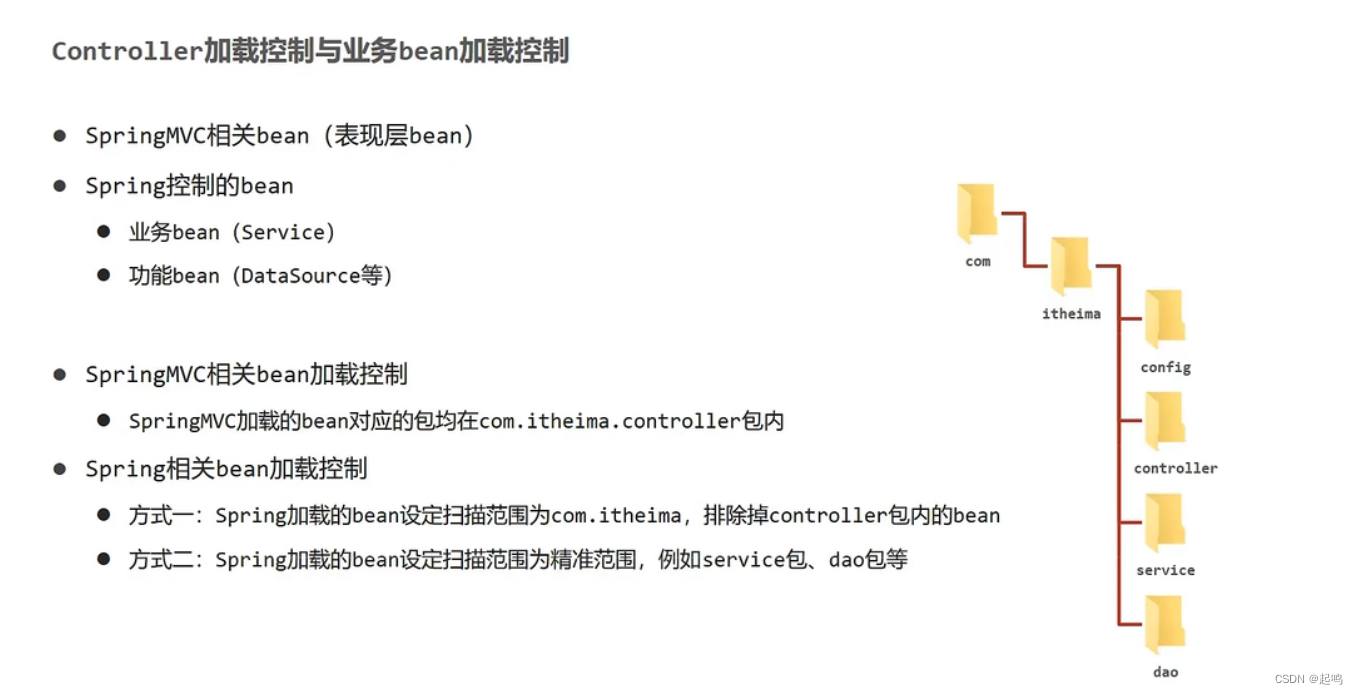
方法一:去除指定有注解标志的对象
package com.itjh.Config;

import org.springframework.context.annotation.ComponentScan;
import org.springframework.context.annotation.Configuration;
import org.springframework.context.annotation.FilterType;
import org.springframework.stereotype.Controller;

@Configuration
@ComponentScan(value = "com.itjh"
        , excludeFilters = @ComponentScan.Filter(
        		//指定按照注解来去除
                type = FilterType.ANNOTATION,
                //指定被此注解名标志了的类
                classes = Controller.class
    )
)
public class SpringConfig {

}
SpringMVC配置类:注释了注解(原因下面解释)
package com.itjh.Config;

import org.springframework.context.annotation.ComponentScan;
import org.springframework.context.annotation.Configuration;

//@Configuration
@ComponentScan("com.itjh.servletmvc")
public class SpringmvcConfig {
}
测试类:得到指定Bean,上面已经去除了,所以应该找不到
package com.itjh.test;

import com.itjh.Config.SpringConfig;
import org.springframework.context.annotation.AnnotationConfigApplicationContext;
import com.itjh.servletmvc.sermvc;

public class Test01 {
    public static void main(String[] args) {
        AnnotationConfigApplicationContext context=new AnnotationConfigApplicationContext(SpringConfig.class);
        System.out.println(context.getBean(sermvc.class));
    }
}
结果:
Exception in thread "main" org.springframework.beans.factory.NoSuchBeanDefinitionException: No qualifying bean of type 'com.itjh.servletmvc.sermvc' available
	at org.springframework.beans.factory.support.DefaultListableBeanFactory.getBean(DefaultListableBeanFactory.java:352)
	at org.springframework.beans.factory.support.DefaultListableBeanFactory.getBean(DefaultListableBeanFactory.java:343)
	at org.springframework.context.support.AbstractApplicationContext.getBean(AbstractApplicationContext.java:1127)
	at com.itjh.test.Test01.main(Test01.java:10)

Process finished with exit code 1
当测试类中加载了Spring配置类之后,由于SpringMVC也在Spring配置类指定扫描的范围之内,所以就会加载SpringMVC中指定加载的东西,所以需要注释掉,免得SpringMVC配置类被加载之后就会立即加载其自身指定的包,这是个可以稍微注意一下的点
SpringMVC入门案例中的(测试类)可以进行简化,因为只有其中的配置文件是变化的,于是继承AbstractAnnotationConfigDispatcherServletInitializer:和入门案例中的一一对应代码如下
package com.itjh.test;

import com.itjh.Config.SpringConfig;
import com.itjh.Config.SpringmvcConfig;
import org.springframework.web.servlet.support.AbstractAnnotationConfigDispatcherServletInitializer;
public class SpringmvcTest extends AbstractAnnotationConfigDispatcherServletInitializer {
    //加载Spring配置类
    @Override
    protected Class<?>[] getRootConfigClasses() {
        return new Class[]{SpringConfig.class};
    }
	//加载SpringMVC配置类
    @Override
    protected Class<?>[] getServletConfigClasses() {
        return new Class[]{SpringmvcConfig.class};
    }

    @Override
    protected String[] getServletMappings() {
        return new String[]{"/"};
    }
 }
相比之下更简便


