css实现炫酷充电动画

news2025/1/18 17:03:52

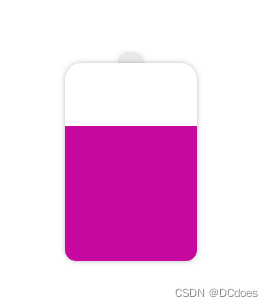
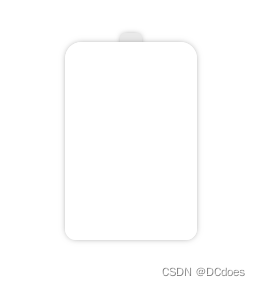
先绘制一个电池,电池头部和电池的身体
在这里插入图片描述
这里其实就是两个div,使用z-index改变层级,电池的身体盖住头部,圆角使用border-radius完成
html部分,完整的css部分在最后

<div class="chargerBox">
     <div class="chargerHead"></div>
     <div class="chargerBody">
             <div class="water">
                  <div class="whiteBox"></div>
             </div>
     </div>

     <div class="shade"></div>
</div>

绘制电池的css部分

.chargerBox{
    width: 200px;
    height: 200px;
    background: #eee;
    margin: 30px;
    padding: 50px;
    .chargerHead{
        width: 20px;
        height: 20px;
        background: #e9e9e9;
        border-radius: 4px;
        margin: 0 auto;
        box-shadow: 0px 0px 6px -2px #6d6d6d;
        animation: light 1s forwards linear 25s;
    }
    .chargerBody{
        width: 120px;
        height: 180px;
        margin: 0 auto;
        margin-top: -12px;
        border-radius: 15px 15px 10px 10px;
        z-index: 10;
        background-color: #fff;
        box-shadow: 0px 0px 6px -2px #6d6d6d;
   }
}

绘制完身体后开始给电池充电,让电池身体内部动起来。
给电池内部添加一个divdiv的初始高度为0,随着动画的播放,慢慢的充满电池
在这里插入图片描述
这里充电的颜色可以改成渐变,随着电量的饱和,渐变的颜色也会随之更改,linear-gradient渐变是不能直接更改颜色的,这里可以使用 filter: hue-rotate();来修改图像的色相值,从而达到渐变动画的效果。
下面是充电部分的代码:

.water{
      width: 120px;
      height: 10px;
      position: absolute;
      bottom: 0;
      background: linear-gradient(0deg,#7F7FD5,#86A8E7,#91eae4);
      filter: hue-rotate(0deg);  /**关于渐变,普通的颜色更改是无效的,只能通过filter:hue-rotate色相旋转来实现颜色变化,初始不变 */
      animation: riseWater 20s forwards  linear;
      left: 50%;
      transform: translateX(-50%);
}
@keyframes riseWater {
      from {
           height: 10px;
      }
      to {
           height: 100%;
           filter: hue-rotate(60deg);   /* 颜色变化 */
         }
}

在这里插入图片描述
现在电池的电量已经充起来了,写到这里,充电的部分已经ok了,剩下的就是让电量动起来,像水一样流动

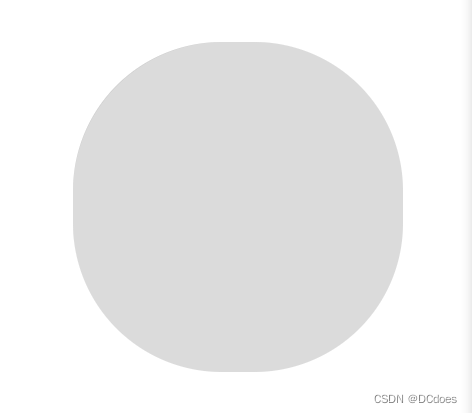
先绘制一个圆角矩形

border-radius: 45% 
在这里插入图片描述
这个圆角矩形就是充电动画的关键,静止的时候其实看不出来它与水流有什么关联,咱们让它动起来观察一下
在这里插入图片描述
这一块就是水流动画的显示部分,白色的是水流,灰色的不展示,上一步中已经写好了充电的动画,这里只需要将该位置叠加到充电动画上面,即可完成充电的水流效果。
在这里插入图片描述
水流一般是多层的,所以这里可以再添加一个旋转的矩形,两个矩形旋转的角度和时长不同,并且更改其中一个矩形的rgba即可实现真实的水流效果。

.whiteBox{
         width: 300px;
         height: 300px;
         position: absolute;
         left: 50%;
         bottom: -10px;
         transform: translateX(-50%);
         animation: whiteBoxTop 25s forwards linear;

         &::before
         {
           content: '';
           width: 100%;
           height: 100%;
           position: absolute;
           background: #fff;
           border-radius: 45% ;
           animation: whiteSpin 5s infinite linear;
         }
         &::after{
           content: '';
            width: 101%;
            height: 101%;
            position: absolute;
            border-radius: 45% ;
            background: rgba(255,255,255,0.3);
            animation: whiteSpin2 7s infinite linear;
         }
}
@keyframes whiteBoxTop {
            from {
                bottom: 0;
            }
            to {
                bottom: 190px;
            }
}

@keyframes whiteSpin {
            from {
                transform:rotate(0deg);
            }
            to {
                transform:rotate(360deg);
            }
}

@keyframes whiteSpin2 {
            from {
                transform:rotate(0deg);
            }
            to {
                transform:rotate(360deg);
            }
}

注意:矩形的旋转必须是360度的,否则会出现卡顿的情况,因为无限循环的动画第一次循环结束后会回到最初的起点,如果不是360度可能会发生旋转到某度(例如:200度)的时候度数重置到0,重新循环就会出现不流畅的画面。
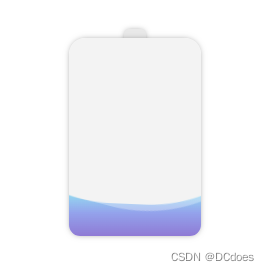
在这里插入图片描述
做完水流动画后,给电池的头部加一个动画,延迟时间为充电设置的时间,当电池充满时,头部亮起表示电池已经充满。
我这里设置的充满时长为20s,这里需要延迟25s,因为水流的中间有凹陷的地方,所以延迟时间需要大于充满时长才行。

    .chargerHead{
        width: 20px;
        height: 20px;
        background: #e9e9e9;
        border-radius: 4px;
        margin: 0 auto;
        z-index: 10;
        box-shadow: 0px 0px 6px -2px #6d6d6d;
        animation: light 1s forwards linear 25s;  /*延迟25s*/
    }
    @keyframes light {
        from {
            background: #ffe793;
        }
        to {
            background: #ffe793;
            filter: contrast(200%);  /*让头部亮起来 增加200%的饱和度*/
        }
    }

完成这些后,需要给电池增加渐变阴影,让电池有厚度感和真实感,这里创建一个div,大小和电池一致,通过给电池添加z-index使电池覆盖div,使用filter: blur(20px)来让底部的div高斯模糊从而实现阴影的效果,阴影和电池的颜色保持一致(动态渐变),并且div的动画时长和高度也和电池保持一致。

/* 渐变阴影 */
.shade{
        width: 120px;
        height: 0px;
        margin: 0 auto;
        margin-top: 0px;
        border-radius: 15px 15px 15px 15px;
        background: linear-gradient(0deg,#7F7FD5,#86A8E7,#91eae4);
        filter: blur(10px);
        animation: shadeBase 25s forwards linear;
}
@keyframes shadeBase {
        from {  
            height: 0px; 
            margin-top: 0px;
            filter: blur(20px) hue-rotate(0deg);   /* 颜色变化 */ 
        }
        to {  
            height: 180px; 
            margin-top: -180px;  /*高度和电池一致*/
            filter: blur(20px) hue-rotate(60deg);   /* 颜色变化 */ 
        }
    }
}

在这里插入图片描述
除了这种方案外,还可以使用box-shadow实现阴影,box-shadow使用rgba,在动画渲染的同时修改rgba来实现阴影颜色的变化。

   @keyframes shadeBase {
        from {  
            height: 0px; 
            margin-top: 0px;
            box-shadow: 0px 0px 15px 10px rgba(143, 148, 227,0.2);

        }
        to {  
            height: 180px; 
            margin-top: -180px;
            box-shadow: 0px 5px 20px 5px rgba(203, 163, 238,0.8); 
        }
    }

下面是css部分的代码

.chargerBox{
    width: 200px;
    height: 200px;
    margin: 30px;
    padding: 50px;
    .chargerHead{
        width: 20px;
        height: 20px;
        background: #e9e9e9;
        border-radius: 4px;
        margin: 0 auto;
        z-index: 10;
        box-shadow: 0px 0px 6px -2px #6d6d6d;
        animation: light 1s forwards linear 25s;
    }
    @keyframes light {
        from {
            background: #ffe793;
        }
        to {
            background: #ffe793;
            filter: contrast(200%);
        }
    }

    .chargerBody{
        width: 120px;
        height: 180px;
        margin: 0 auto;
        margin-top: -12px;
        border-radius: 15px 15px 10px 10px;
        z-index: 10;
        box-shadow: 0px 0px 6px -2px #6d6d6d;
        position: relative;
        overflow: hidden;
        .water{
            width: 120px;
            height: 10px;
            position: absolute;
            bottom: 0;
            background: linear-gradient(0deg,#7F7FD5,#86A8E7,#91eae4);
            filter: hue-rotate(0deg);  /**关于渐变,普通的颜色更改是无效的,只能通过filter:hue-rotate色相旋转来实现颜色变化,初始不变 */
            animation: riseWater 20s forwards  linear;
            left: 50%;
            transform: translateX(-50%);
        }
        @keyframes riseWater {
            from {
                height: 10px;
            }
            to {
                height: 100%;
                filter: hue-rotate(60deg);   /* 颜色变化 */
            }
        }


        .whiteBox{
            width: 300px;
            height: 300px;
            position: absolute;
            left: 50%;
            bottom: -10px;
            transform: translateX(-50%);
            animation: whiteBoxTop 25s forwards linear;

            &::before
            {
                content: '';
                width: 100%;
                height: 100%;
                position: absolute;
                background: #fff;
                border-radius: 45% ;
                animation: whiteSpin 5s infinite linear;
            }
            &::after{
                content: '';
                width: 101%;
                height: 101%;
                position: absolute;
                border-radius: 45% ;
                background: rgba(255,255,255,0.3);
                animation: whiteSpin2 7s infinite linear;
            }
        }
        @keyframes whiteBoxTop {
            from {
                bottom: 0;
            }
            to {
                bottom: 190px;
            }
        }
        @keyframes whiteSpin {
            from {
                transform:rotate(0deg);
            }
            to {
                transform:rotate(360deg);
            }
        }
        @keyframes whiteSpin2 {
            from {
                transform:rotate(0deg);
            }
            to {
                transform:rotate(360deg);
            }
        }
    }


    /* 渐变阴影 */
    .shade{
        width: 120px;
        height: 0px;
        margin: 0 auto;
        margin-top: 0px;
        border-radius: 15px 15px 15px 15px;
        background: linear-gradient(0deg,#7F7FD5,#86A8E7,#91eae4);
        filter: blur(10px);
        animation: shadeBase 25s forwards linear;
    }
    @keyframes shadeBase {
        from {  
            height: 0px; 
            margin-top: 0px;
            filter: blur(20px) hue-rotate(0deg);   /* 颜色变化 */ 
        }
        to {  
            height: 180px; 
            margin-top: -180px;
            filter: blur(20px) hue-rotate(60deg);   /* 颜色变化 */ 
        }
    }
}

该动画的灵感来自:https://github.com/chokcoco/iCSS/issues/75


案例源码:https://gitee.com/wang_fan_w/css-diary

如果觉得这篇文章对你有帮助,欢迎点赞、收藏、转发哦~

本文来自互联网用户投稿,该文观点仅代表作者本人,不代表本站立场。本站仅提供信息存储空间服务,不拥有所有权,不承担相关法律责任。如若转载,请注明出处:http://www.coloradmin.cn/o/409110.html

如若内容造成侵权/违法违规/事实不符,请联系多彩编程网进行投诉反馈,一经查实,立即删除!

相关文章

Vue ref获取元素和组件实例

获取元素 获取元素还不简单&#xff1f;直接document.querySelector(“#id”)不就获取到了吗&#xff1f;例如下面的代码。在写Vue的过程中&#xff0c;我们从来不会写这种代码&#xff0c;但是下面的代码在vue里面是可以运行的。 methods:{getEl(){let title document.queryS…

CSS实现: 水平居中 的几种方法

实现方法&#xff1a; 1、添加 margin 值 auto 2、定位 position(子绝父相) 偏移值 left margin-left 回退 [ 需要计算&#xff0c;有点 麻烦 ] 3、定位 position(子绝父相) 偏移值 left CSS-2d transform 4、文字居中 text-align:center; 行内块元素 5、弹性盒子布局 [ 推…

vue之@click绑定的函数,如何实现加不加括号都可执行

这篇文章的由来&#xff0c;其实是朋友在群里好奇click绑定方式的种类&#xff0c;大家七嘴八舌讨论出来的&#xff0c;觉得过程还是比较有意义&#xff0c;就记录下来&#xff1a; 1、原生js绑定点击事件 好久不用原生js绑定事件&#xff0c;基本都已经忘了怎么绑定。还把括号…

es6的some和every方法使用;

文章略长&#xff0c;但比较简单。 es6中的数组方法some()和every()都接收一个回调函数作为参数&#xff0c;该回调函数又接收三个参数&#xff0c;分别是数组元素、数组元素的索引、调用some或every方法的数组本身。它们的区别就是&#xff1a; some方法用于判断数组中是否存…

node-sass安装报错及其解决方案

一、下载依赖报错 这里报错了也就没后面的剧情了&#xff0c;就像电视剧刚开局主角就嗝屁了&#xff0c;看看执行 npm i 的时候报错类容&#xff1a; 二、解决方案 1、下载源在国外&#xff0c;更换中国镜像源&#xff0c;删除package.json中的node-sass,分别下载node包和node-…

你的应用太慢了,给我司带来了巨额损失,该怎么办

记得很久之前看过谷歌官方有这么样的声明&#xff1a;如果一个页面的加载时间从 1 秒增加到3 秒&#xff0c;那么用户跳出的概率将增加 32%。 但是早在 2012 年&#xff0c;亚马逊就计算出了&#xff0c;页面加载速度一旦下降一秒钟&#xff0c;每年就会损失 16 亿美元的销售额…

〖大前端 - 基础入门三大核心之CSS篇⑳〗- 2D变形

说明&#xff1a;该文属于 大前端全栈架构白宝书专栏&#xff0c;目前阶段免费开放&#xff0c;购买任意白宝书体系化专栏可加入TFS-CLUB 私域社区。福利&#xff1a;除了通过订阅"白宝书系列专栏"加入社区获取所有付费专栏的内容之外&#xff0c;还可以通过加入星荐…

HTML 基本开发方式,学会常用的 HTML 标签

一、HTML 基本开发方式 1、如何编写 HTML 代码 本身的语法比较简单&#xff0c;语法风格和 Java 之类的差别很大&#xff0c;(并不能表达一些逻辑&#xff0c;而只是能表达 “有哪些东西" 一种信息)&#xff0c;使用记事本创建一个文件&#xff0c;后缀名改成 .html 即可…

Vue报错:Error in v-on handler: “TypeError: Cannot read properties of undefined (reading ‘skuId‘)“

背景: 当点击按钮时候&#xff0c;正常情况控制台的Network应该要发送一个变化量&#xff0c;现在控制台的Network不仅不显示&#xff0c;而且还报错&#xff0c;报错信息如下&#xff1a; vue.runtime.esm.js?c320:619 [Vue warn]: Error in v-on handler: "TypeError: …

【React全家桶】Flux与Redux

&#x1f39e;️&#x1f39e;️&#x1f39e;️ 博主主页&#xff1a; 糖 &#xff0d;O&#xff0d; &#x1f449;&#x1f449;&#x1f449; react专栏&#xff1a;react全家桶 &#x1f339;&#x1f339;&#x1f339;希望各位博主多多支持&#xff01;&#xff01;&a…

Vue3.0 项目启动(打造企业级音乐App)

系列文章目录 内容参考链接Vue3.0 项目启动Vue3.0 项目启动&#xff08;打造企业级音乐App&#xff09;Vue3.0项目——打造企业级音乐App&#xff08;一&#xff09;Tab栏、轮播图、歌单列表、滚动组件Vue3.0项目——打造企业级音乐App&#xff08;二&#xff09;图片懒加载、…

功能:Session与Vue:登录获取权限,并完成session存储

一、需求说明 1、系统登录&#xff0c;每个账号表示一位用户&#xff0c;每位用户分配有不同的权限&#xff0c;不同的权限有着不同的操作。 2、现需要每位用户登录时都能获取到对应的权限&#xff0c;在登录系统中进行使用&#xff0c;退出时则清空权限。 3、项目框架&#x…

一个非常好看的前端Vue3登录页面

Vue3lessElement Plus <template> <div id"login"><div id"contain"><div id"left_card"><h1>欢迎来到我的Vue3大世界</h1><span>Welcome to my Vue3 world</span></div><div id&quo…

HTML学习笔记 1-用HBuilderX写的HTML无法在浏览器上运行怎么办?问题出在这里:HBuilderX外部web服务支撑配置

初学HTML的时候&#xff0c;用的是HBuilderX开发软件 写了一段简单的代码 <!DOCTYPE html> <html><head><meta charset"UTF-8"><title>这是网页的标题</title></head><body><p>这里是网页的内容</p>&l…

解决Vue报错:Uncaught (in promise) NavigationDuplicated: Avoided redundant navigation to current location

问题描述&#xff1a;重复点击导航时&#xff0c;控制台出现报错 &#xff0c;虽然不影响功能使用&#xff0c;但也不能坐视不管。解决 Vue 重复点击相同路由&#xff0c;出现 Uncaught (in promise) NavigationDuplicated: Avoided redundant navigation 问题 .报错内容&#…

Nginx部署前端静态网站详细教学(一步步操作)

前言 从零开始使用Xshell、Xftp、Nginx 简单部署静态网站&#xff0c;需准备云服务器(阿里云、腾讯云、华为云等都可) 一.下载安装Xshell和Xftp XShell 用于命令行操作服务器&#xff0c;Xftp 用于对服务器的文件上传和下载 官方下载地址&#xff1a;NetSarang Homepage CN - …

你评论,我赠书~【哈士奇赠书 - 16期】〖Vue.js 快速入门实战〗等你来拿

推荐&#xff1a; Python全栈白宝书专栏&#xff0c;免费阶段订阅数量4300&#xff0c;购买任意白宝书体系化专栏可加入TFS-CLUB 私域社区。福利&#xff1a;加入社区的小伙伴们&#xff0c;除了可以获取博主所有付费专栏的阅读权限之外&#xff0c;还有机会加入 星荐官共赢计划…

html网页调用后端python代码方法

当我们利用html代码制作网页时&#xff0c;可以用以下方法进行python代码的调用&#xff1a; 1.简单的python代码例如输出‘hello world’时,可以选择直接在网页写入python代码的方式调用&#xff0c;这时候我们就需要了解Pyscript了。以下是在网页里直接运行简易python语段的…

AJAX中的跨域(CORS) 问题 (更新于2023.02.04)

目录​​​​​​​ 预检请求 实例讲解 2023.02.04 更新 此文章在介绍跨域加载的同时&#xff0c;也解决了在使用axios.post()时如下跨域加载失败问题&#xff1a; from origin null has been blocked by CORS policy: Response to preflight request doesnt pass access c…

element-ui实现图片上传功能(前台部分)

文章目录前言一、 template 部分二、script部分1、导入token2、在data中注册以下3、method中的方法4、style前言 最近做的项目中需要实现图片上传功能&#xff0c;一开始也不懂&#xff0c;经过一段时间的学习后&#xff0c;终于实现了图片上传功能。我将分为前台与后台两部分…