vue3使用element-plus实现登录/注册页面
- 登录/注册页面组件
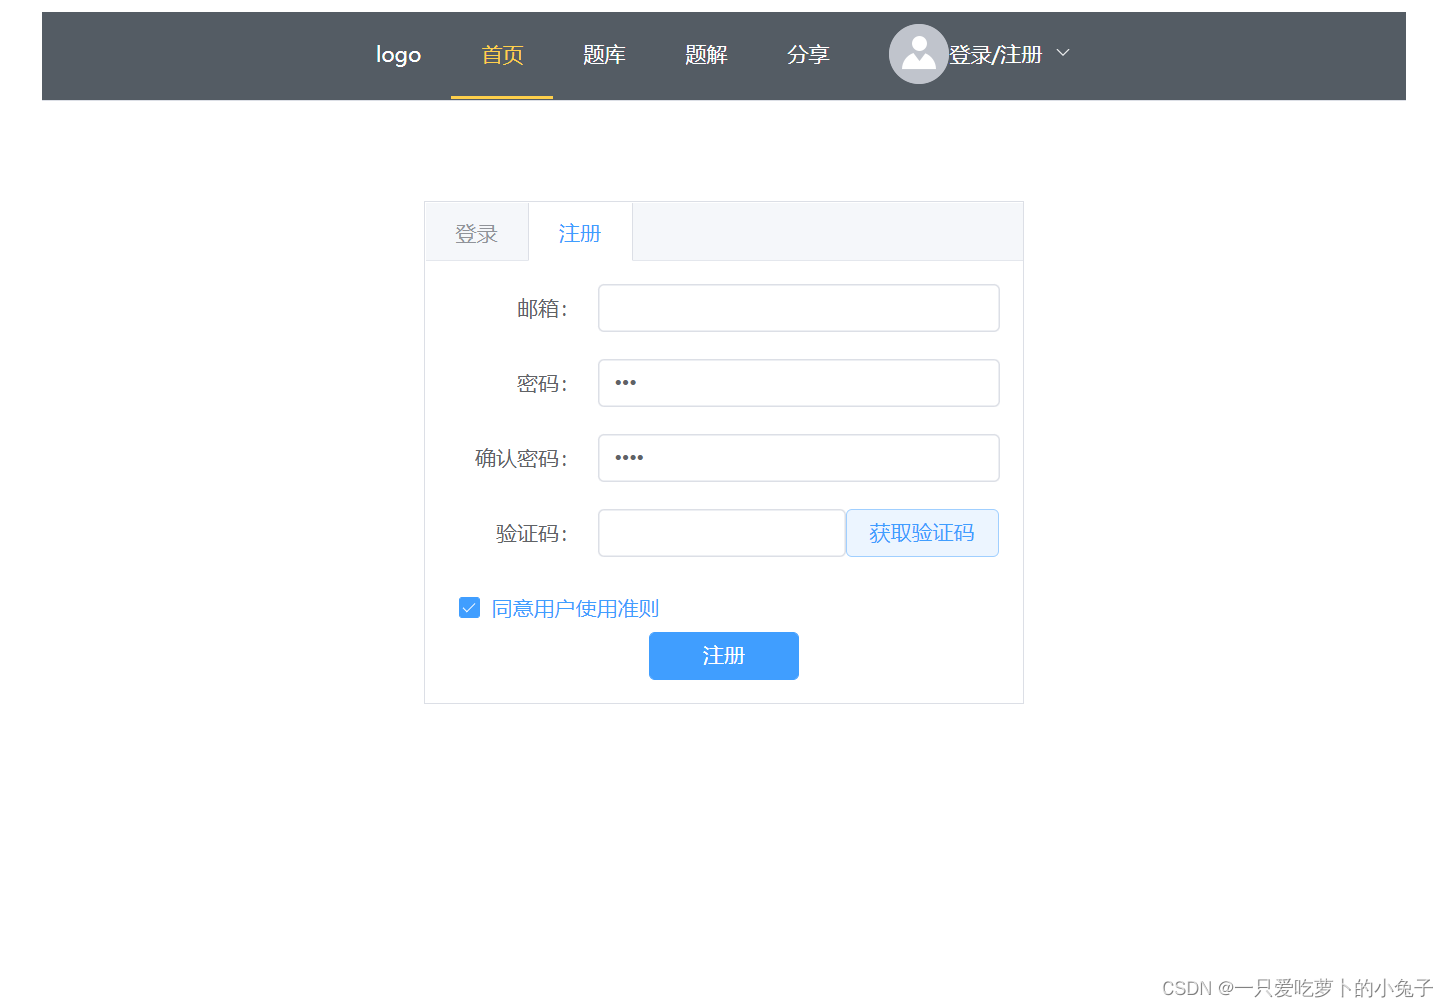
- 预览
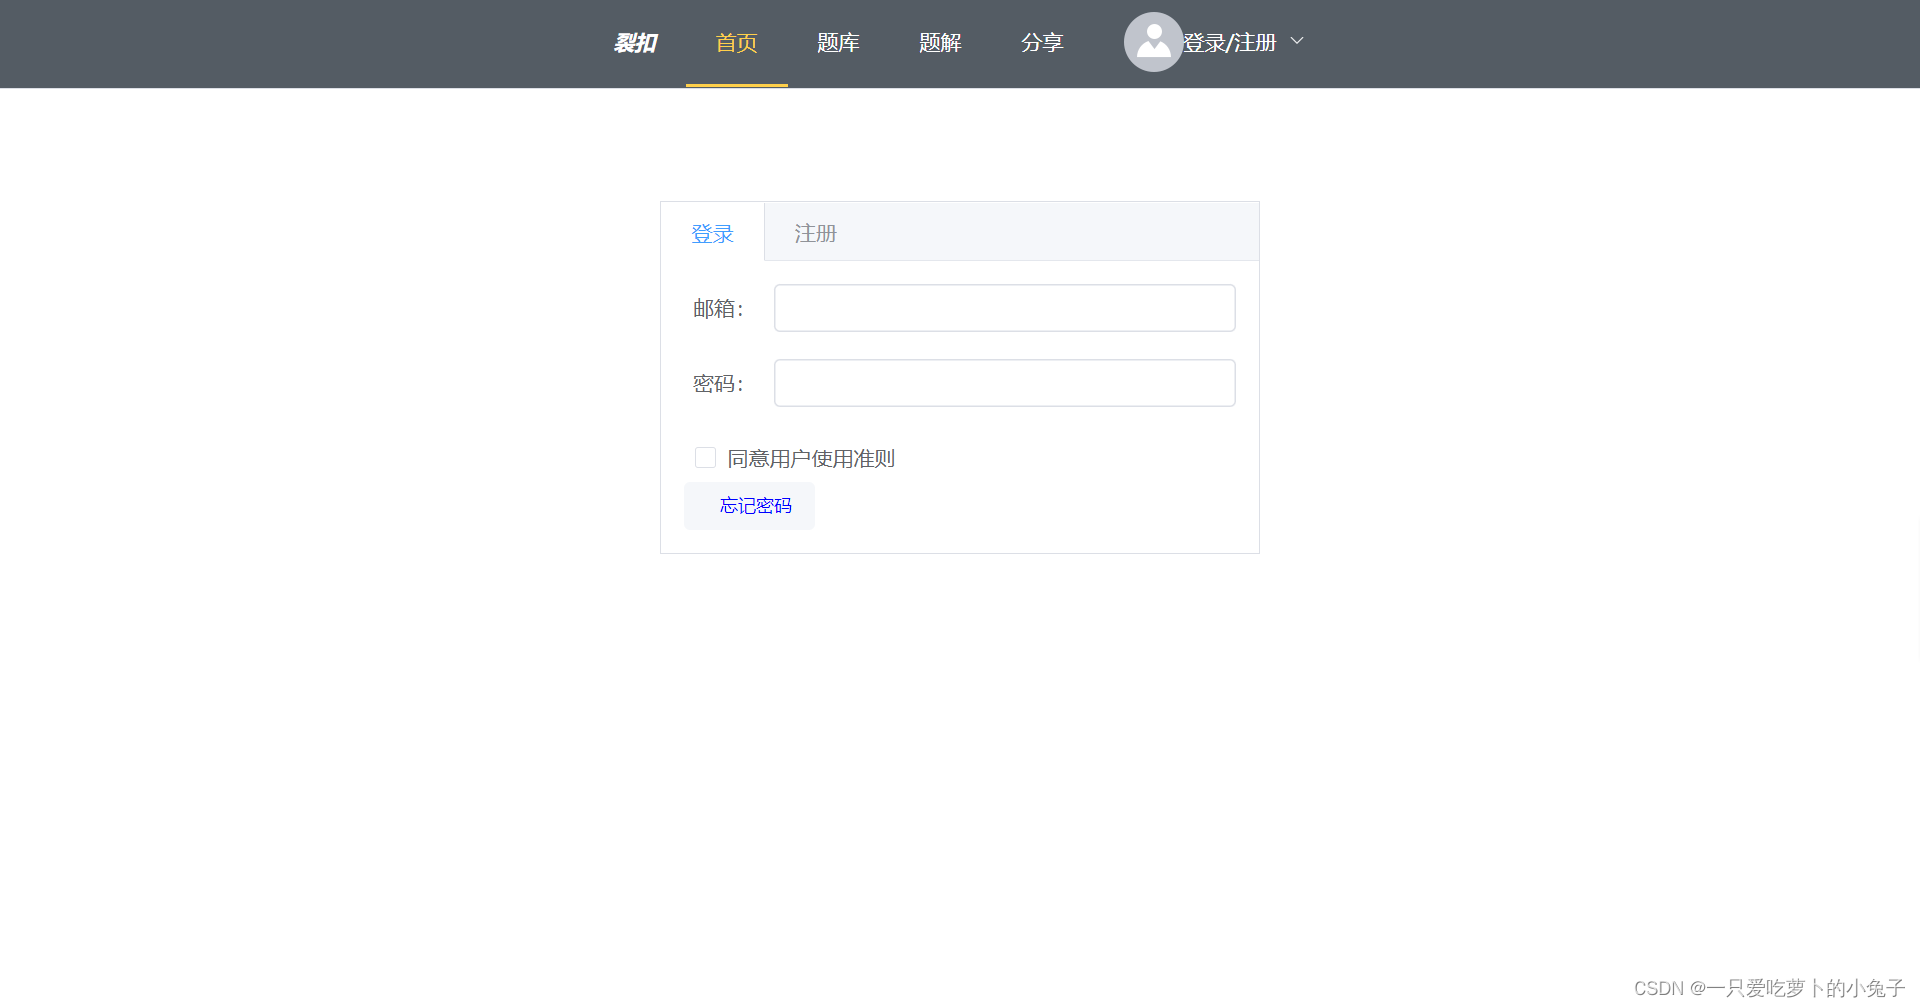
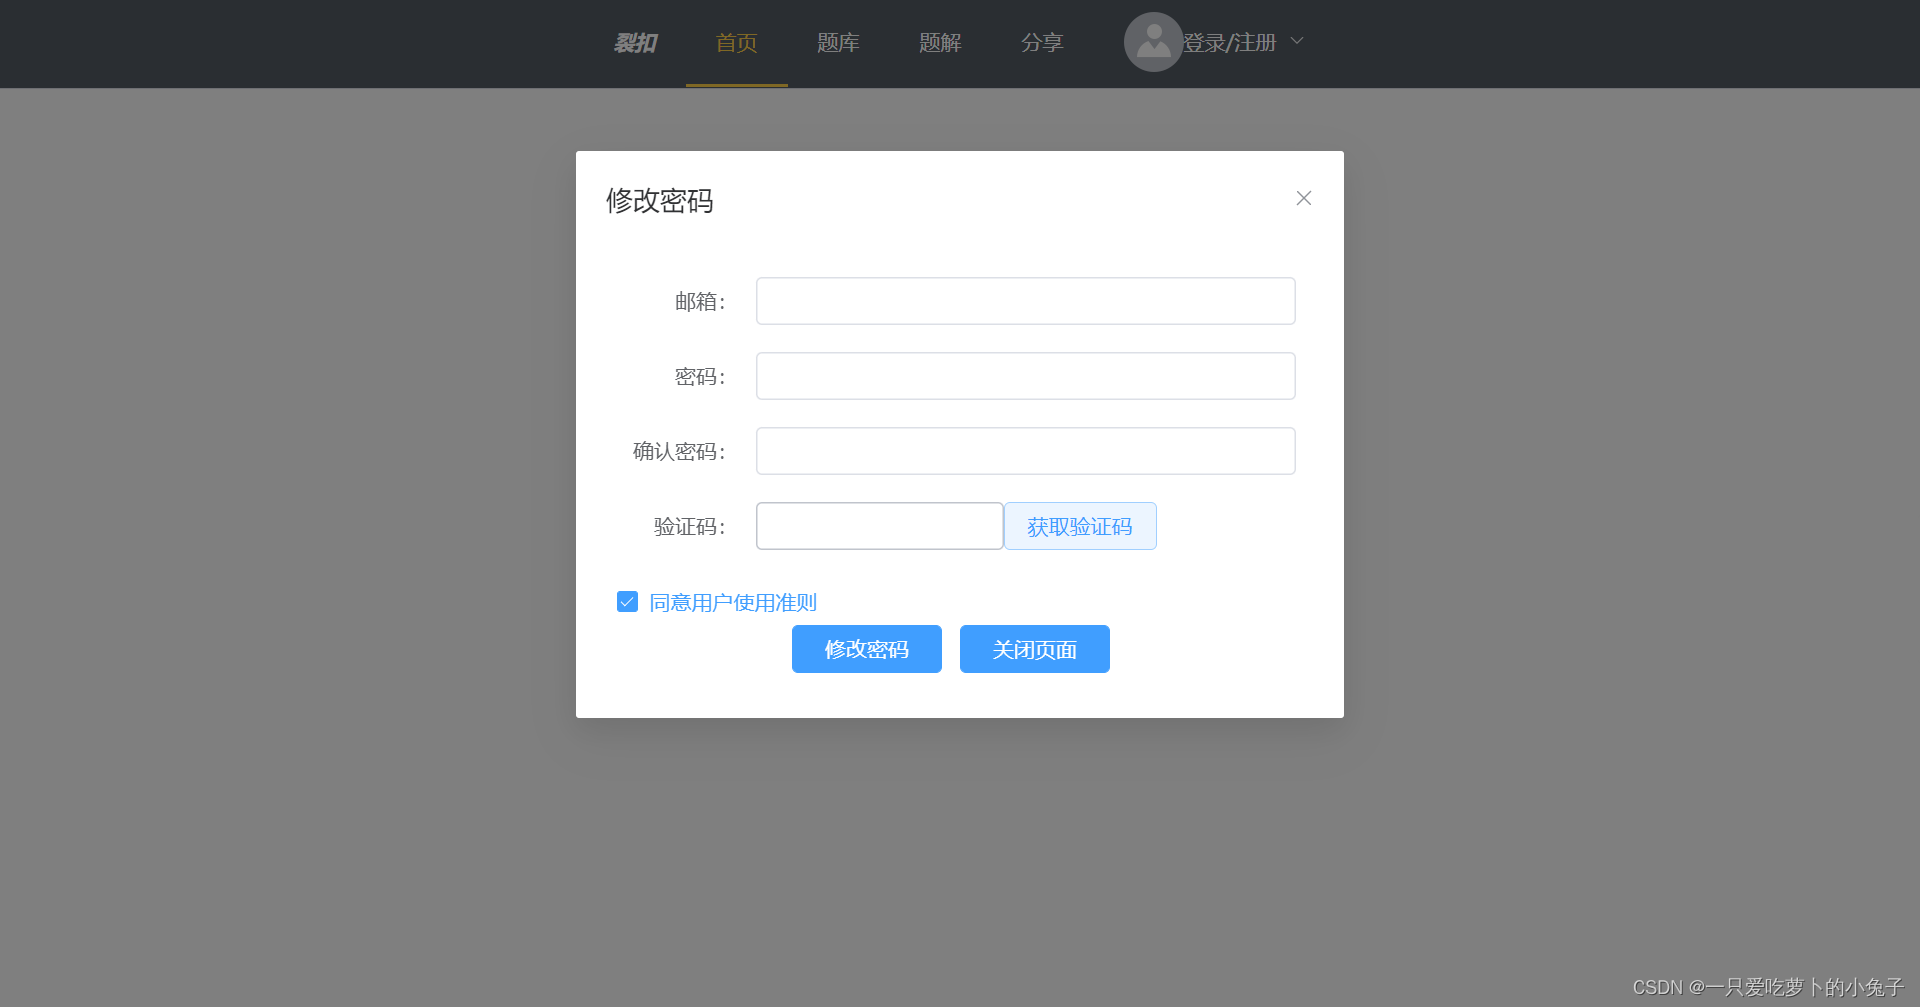
- 添加忘记密码弹窗
- 预览
- 已有样式的修改
- 1.字体大小
- 2.router-link默认样式
登录/注册页面组件
vue3 的登录和注册页面
目前只有框架和函数框架, 根据具体需要填充,
已有功能:
1.没有勾选同意使用手册, 登录和注册按钮是处于隐藏状态的
2.密码与确认密码不一致确认
3.其余功能处于待填充状态
<template>
  <div class="layout">
    <el-tabs type="border-card">
      <el-tab-pane label="登录">
        <el-form
          label-position="right"
          label-width="60px"
          style="max-width: 460px"
          class="loginForm"
        >
          <el-form-item label="邮箱:">
            <el-input v-model="Email" />
          </el-form-item>
          <el-form-item label="密码:">
            <el-input type="password" v-model="password" />
          </el-form-item>

          <el-row>
            <el-checkbox
              class="checkBox"
              v-model="isAgree"
              label="同意用户使用准则"
              name="type"
            />
          </el-row>
          <el-button
            v-if="isAgree"
            type="primary"
            class="loginBtn"
            @click="login"
          >
            登录
          </el-button>
        </el-form>
      </el-tab-pane>

      <el-tab-pane label="注册">
        <el-form
          label-position="right"
          label-width="100px"
          style="max-width: 460px"
          class="loginForm"
        >
          <el-form-item label="邮箱:">
            <el-input v-model="rEmail" />
          </el-form-item>
          <el-form-item label="密码:">
            <el-input type="password" v-model="rPassword" />
          </el-form-item>
          <el-form-item label="确认密码:">
            <el-input
              type="password"
              v-model="confirmPassword"
              @blur="confirmFunc"
            />
          </el-form-item>
          <el-form-item label="验证码:">
            <el-row>
              <el-input
                type="password"
                v-model="identifyCode"
                class="inpWidth"
              />
              <el-button type="primary" @click="getIdentifyCode" plain>
                获取验证码
              </el-button>
            </el-row>
          </el-form-item>

          <el-row>
            <el-checkbox
              class="checkBox"
              v-model="rAgree"
              label="同意用户使用准则"
              name="type"
            />
          </el-row>
          <el-button
            v-if="rAgree"
            type="primary"
            class="loginBtn"
            @click="register"
          >
            注册
          </el-button>
        </el-form>
      </el-tab-pane>
    </el-tabs>
  </div>
</template>
<script>
import { reactive, toRefs } from "@vue/reactivity";
import { ElMessage } from "element-plus";
export default {
  setup() {
    const form = reactive({
      Email: "",
      password: "",
      isAgree: 0,
    });
    const registerForm = reactive({
      rEmail: "",
      rPassword: "",
      confirmPassword: "",
      identifyCode: "",
      rAgree: 0,
    });

    // 方法
    // 登录
    function login() {
      console.log(form);
    }
    // 注册
    function register() {
      console.log("注册", registerForm);
    }
    // 获取验证码
    function getIdentifyCode() {
      console.log("获取验证码");
    }
    // 确认密码
    // function confirmFunc() {
    //   if (registerForm.confirmPassword !== registerForm.rPassword)
    //     alert("密码与确认密码不一致");
    // }
    const confirmFunc = () => {
      if (registerForm.confirmPassword !== registerForm.rPassword)
        ElMessage.error("密码与确认密码不一致.");
    };
    return {
      ...toRefs(form),
      ...toRefs(registerForm),
      login,
      register,
      getIdentifyCode,
      confirmFunc,
    };
  },
};
</script>

<style scoped>
.layout {
  position: absolute;
  left: calc(50% - 200px);
  top: 20%;
  width: 400px;
}
.loginBtn {
  width: 100px;
}
.loginForm {
  text-align: center;
}
.checkBox {
  margin-left: 7px;
}
.inpWidth {
  width: 165px;
}
</style>
预览
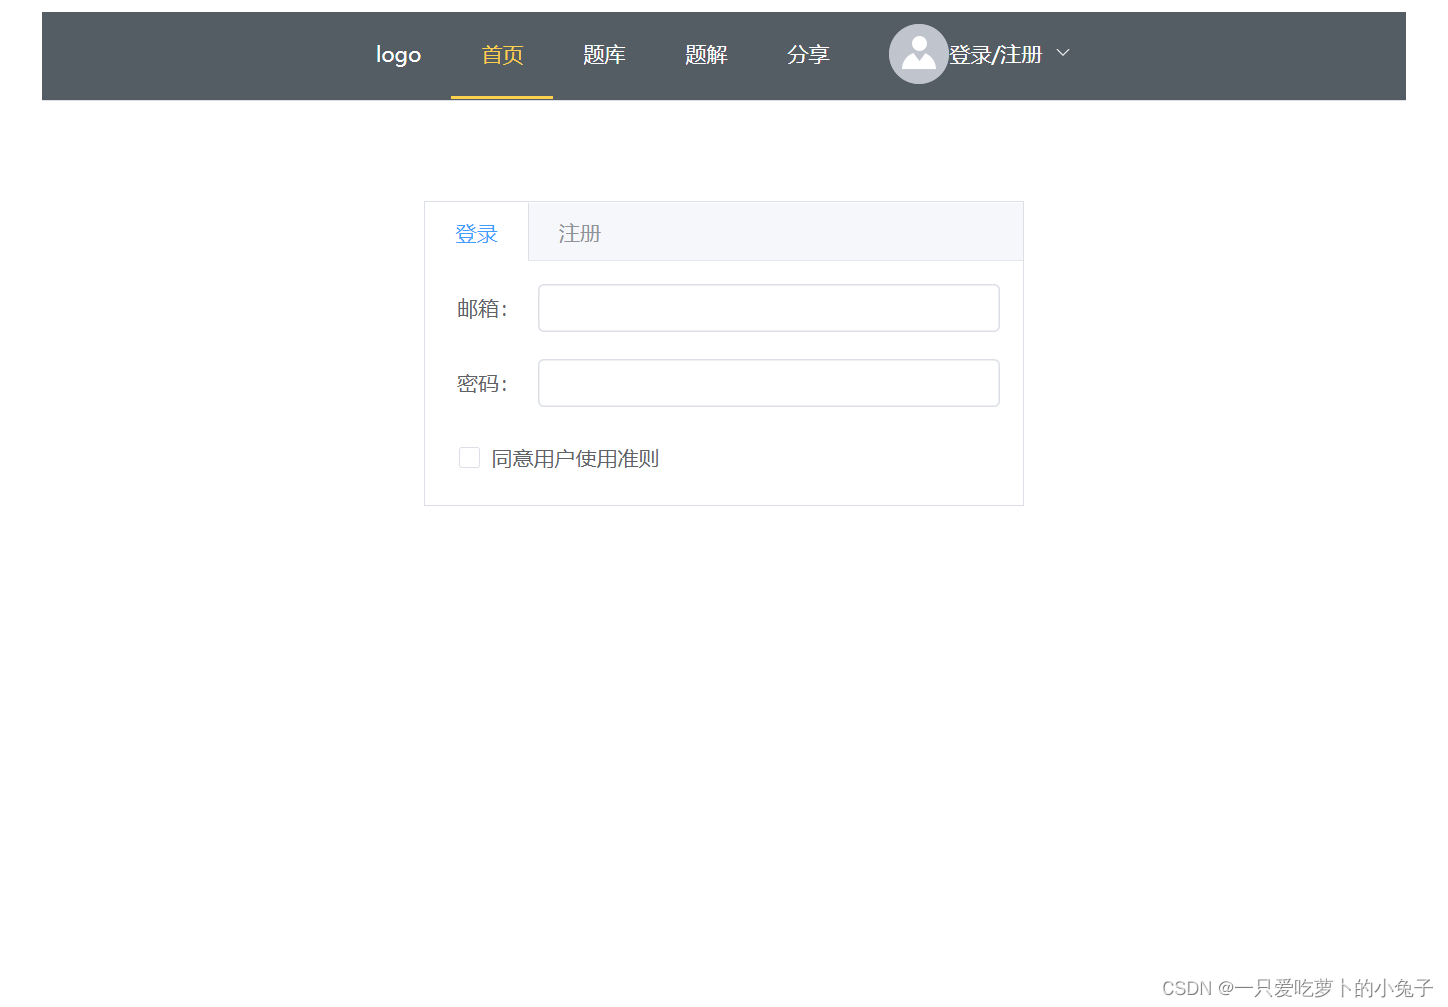
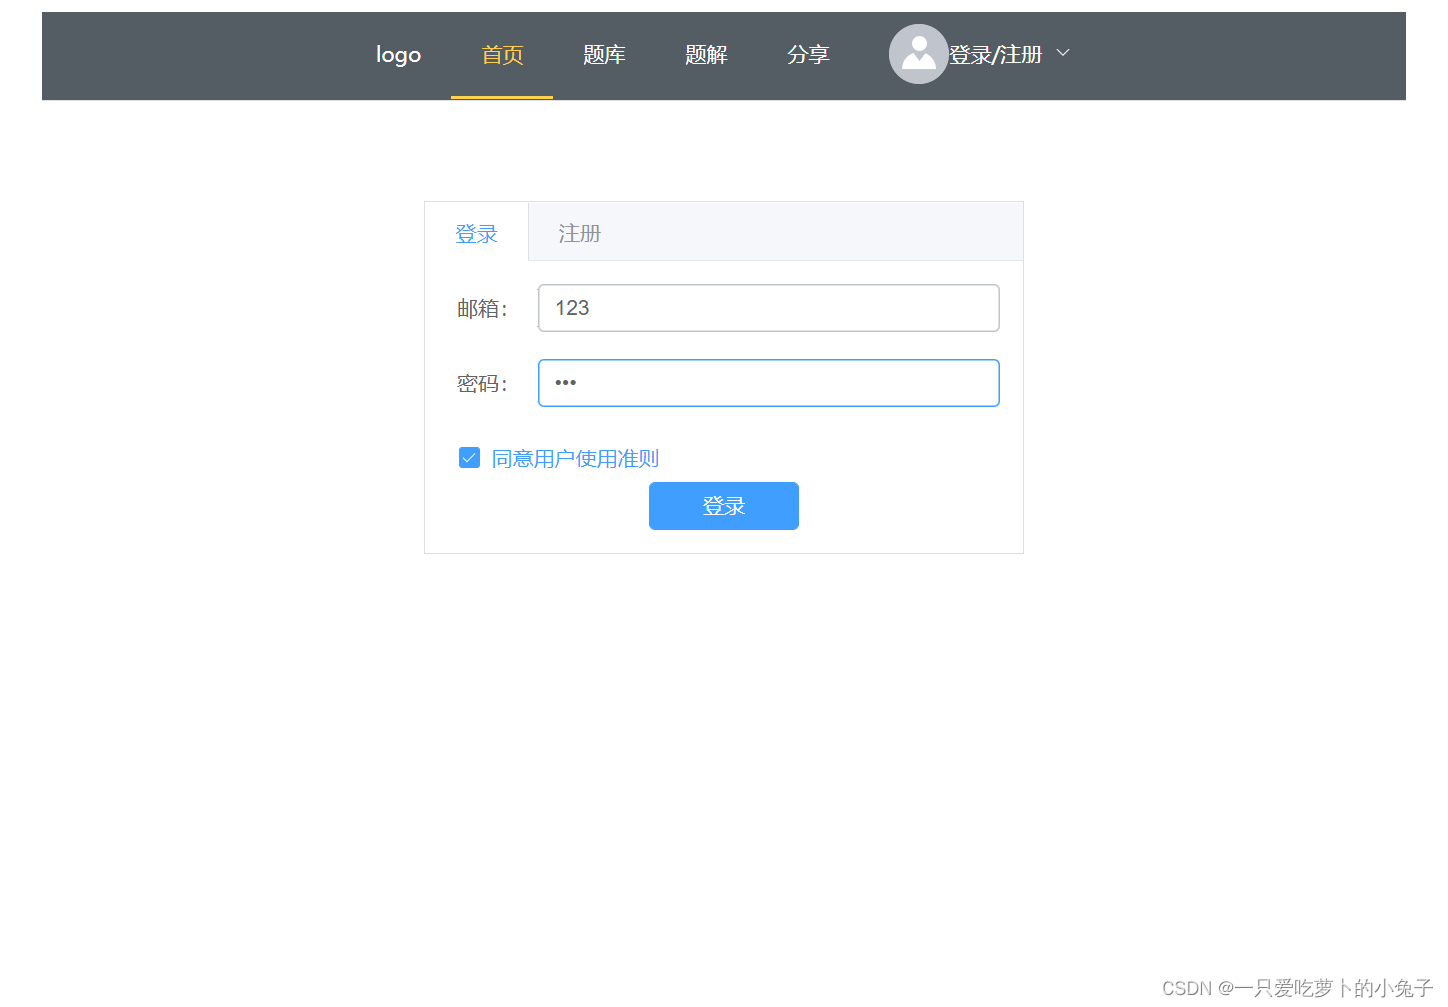
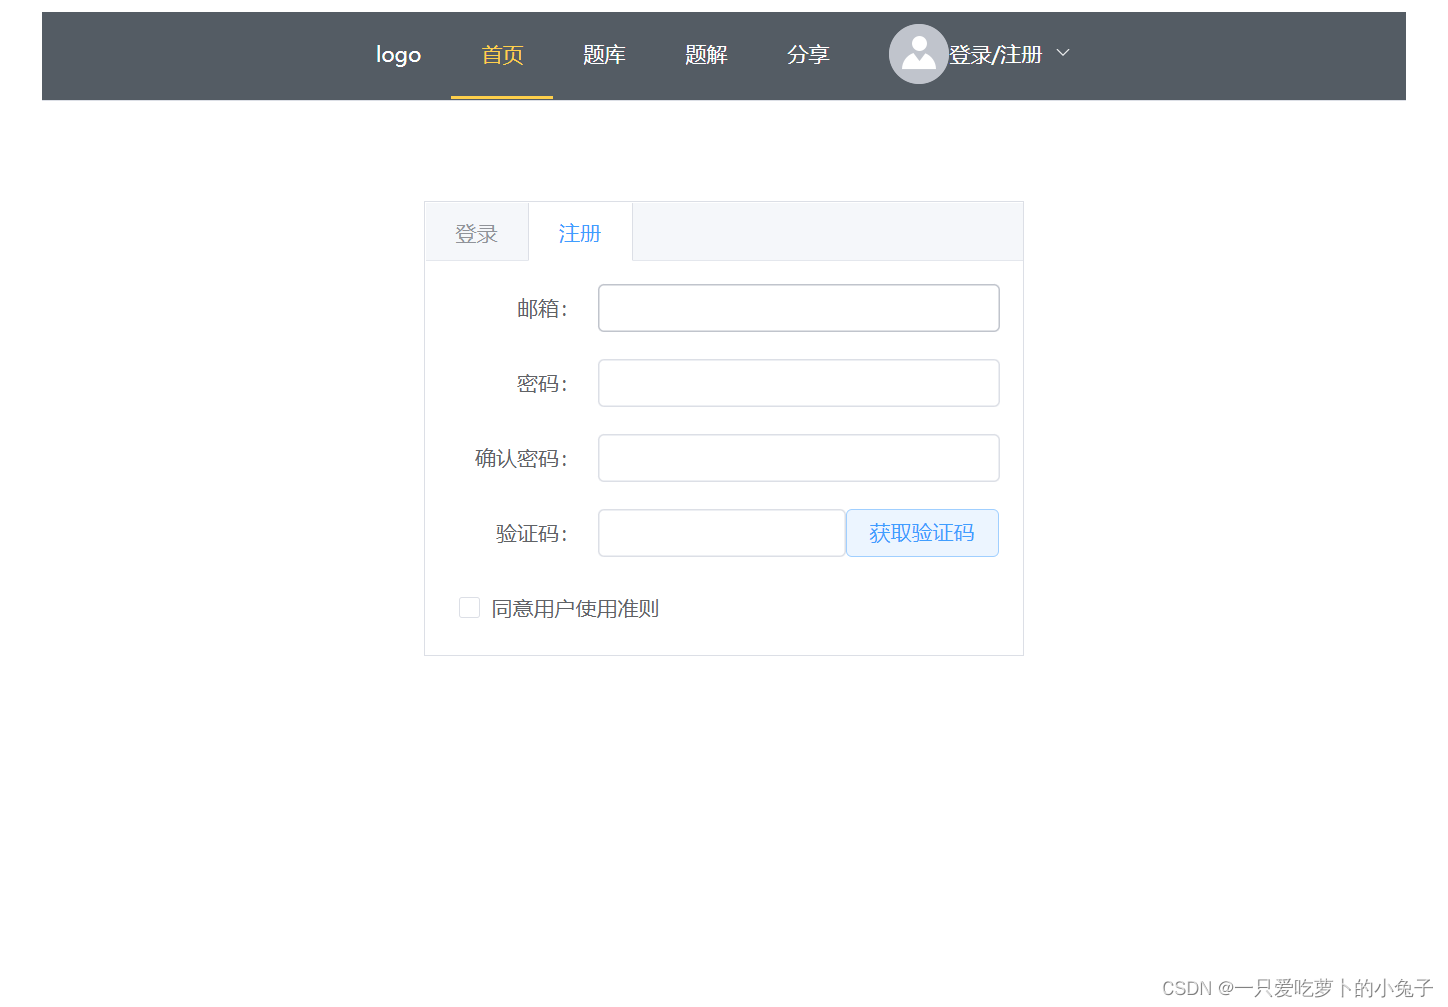
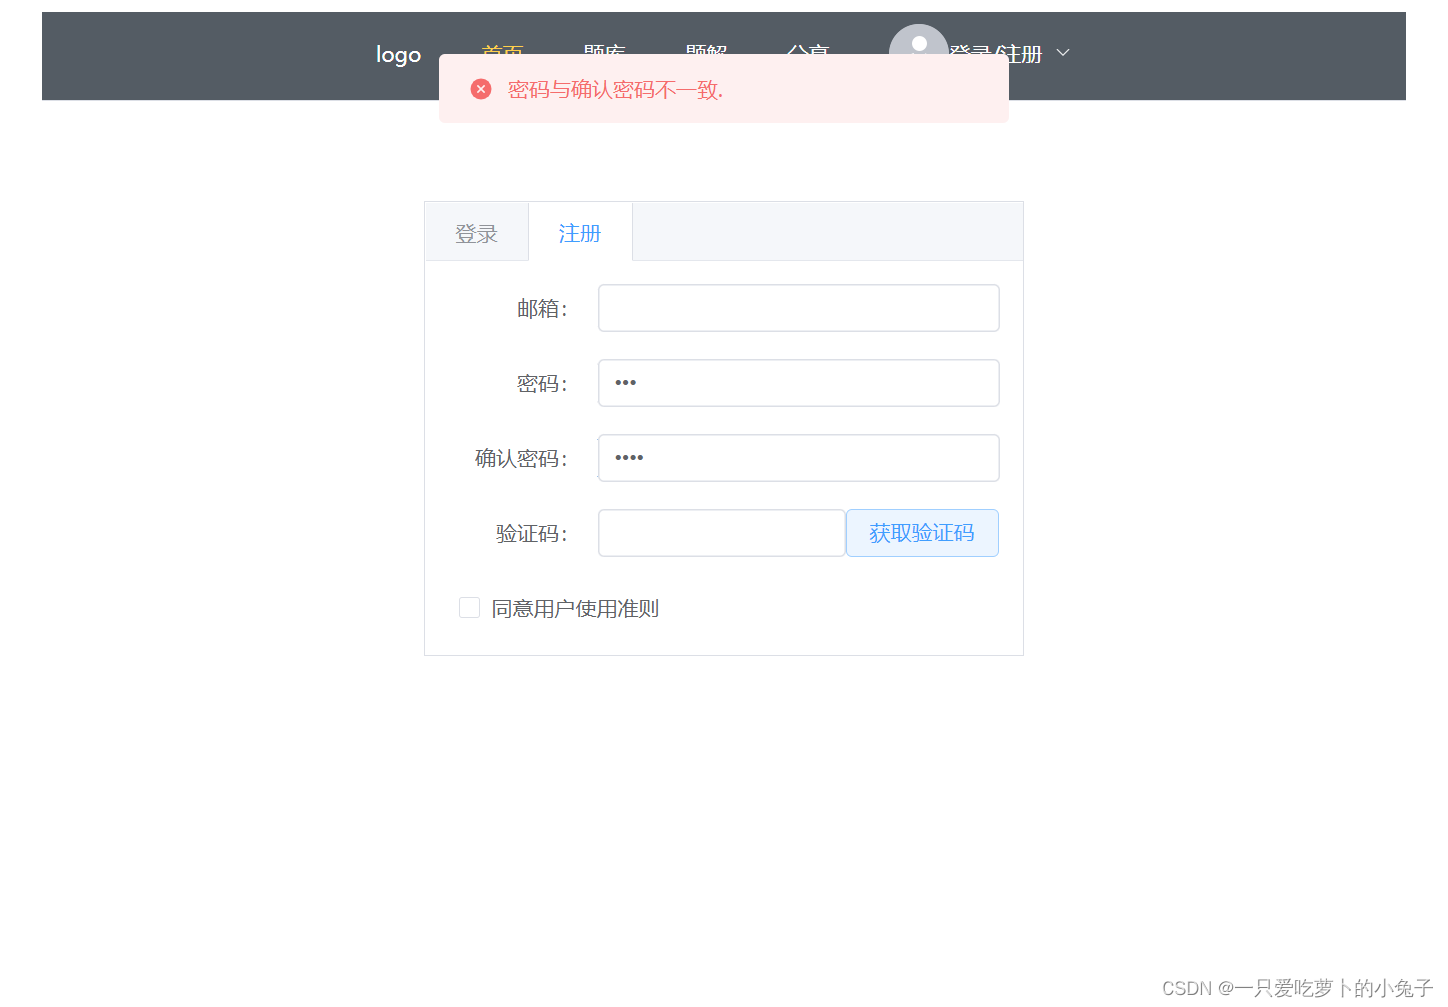
添加忘记密码弹窗
<template>
  <div class="layout">
    <el-tabs type="border-card">
      <el-tab-pane label="登录">
        <el-form
          label-position="right"
          label-width="60px"
          style="max-width: 460px"
          class="loginForm"
        >
          <el-form-item label="邮箱:">
            <el-input v-model="Email" />
          </el-form-item>
          <el-form-item label="密码:">
            <el-input type="password" v-model="password" />
          </el-form-item>

          <el-row>
            <el-checkbox
              class="checkBox"
              v-model="isAgree"
              label="同意用户使用准则"
              name="type"
            />
          </el-row>
          <el-row>
            <el-button text>
              <a class="floatR" @click="isChangePassword = true">忘记密码</a>
            </el-button>
          </el-row>
          <el-button
            v-if="isAgree"
            type="primary"
            class="loginBtn"
            @click="login"
          >
            登录
          </el-button>
        </el-form>
      </el-tab-pane>

      <el-tab-pane label="注册">
        <el-form
          label-position="right"
          label-width="100px"
          style="max-width: 460px"
          class="loginForm"
        >
          <el-form-item label="邮箱:">
            <el-input v-model="rEmail" />
          </el-form-item>
          <el-form-item label="密码:">
            <el-input type="password" v-model="rPassword" />
          </el-form-item>
          <el-form-item label="确认密码:">
            <el-input
              type="password"
              v-model="confirmPassword"
              @blur="confirmFunc"
            />
          </el-form-item>
          <el-form-item label="验证码:">
            <el-row>
              <el-input
                type="password"
                v-model="identifyCode"
                class="inpWidth"
              />
              <el-button type="primary" @click="getIdentifyCode" plain>
                获取验证码
              </el-button>
            </el-row>
          </el-form-item>

          <el-row>
            <el-checkbox
              class="checkBox"
              v-model="rAgree"
              label="同意用户使用准则"
              name="type"
            />
          </el-row>
          <el-button
            v-if="rAgree"
            type="primary"
            class="loginBtn"
            @click="register"
          >
            注册
          </el-button>
        </el-form>
      </el-tab-pane>
    </el-tabs>
  </div>
  <!-- 忘记密码弹窗 -->
  <teleport to="body">
    <el-dialog v-model="isChangePassword" title="修改密码" width="40%">
      <el-form
        label-position="right"
        label-width="100px"
        style="max-width: 460px"
        class="loginForm"
      >
        <el-form-item label="邮箱:">
          <el-input v-model="rEmail" />
        </el-form-item>
        <el-form-item label="密码:">
          <el-input type="password" v-model="rPassword" />
        </el-form-item>
        <el-form-item label="确认密码:">
          <el-input
            type="password"
            v-model="confirmPassword"
            @blur="confirmFunc"
          />
        </el-form-item>
        <el-form-item label="验证码:">
          <el-row>
            <el-input type="password" v-model="identifyCode" class="inpWidth" />
            <el-button type="primary" @click="getIdentifyCode" plain>
              获取验证码
            </el-button>
          </el-row>
        </el-form-item>

        <el-row>
          <el-checkbox
            class="checkBox"
            v-model="rAgree"
            label="同意用户使用准则"
            name="type"
          />
        </el-row>
        <el-button
          v-if="rAgree"
          type="primary"
          class="loginBtn"
          @click="changePassword"
        >
          修改密码
        </el-button>
        <el-button
          v-if="rAgree"
          type="primary"
          class="loginBtn"
          @click="isChangePassword = false"
        >
          关闭页面
        </el-button>
      </el-form>
    </el-dialog>
  </teleport>
</template>
<script>
import { reactive, toRefs, ref } from "@vue/reactivity";
import { ElMessage } from "element-plus";
export default {
  setup() {
    const form = reactive({
      Email: "",
      password: "",
      isAgree: 0,
    });
    const registerForm = reactive({
      rEmail: "",
      rPassword: "",
      confirmPassword: "",
      identifyCode: "",
      rAgree: 0,
    });

    // 方法
    // 登录 将账号密码写入后台,获取用户数据,后登录
    // 需要修改共享数据
    function login() {
      console.log(form);
    }
    // 注册 -- 将账号密码写入后台, 自动登录
    // 需要修改共享数据
    function register() {
      console.log("注册", registerForm);
    }
    // 获取验证码
    function getIdentifyCode() {
      console.log("获取验证码");
    }
    // 确认密码
    const confirmFunc = () => {
      if (registerForm.confirmPassword !== registerForm.rPassword)
        ElMessage.error("密码与确认密码不一致.");
    };
    // 修改密码
    let isChangePassword = ref(false);
    // 用的是注册参数
    function changePassword() {}

    return {
      isChangePassword,
      ...toRefs(form),
      ...toRefs(registerForm),
      login,
      register,
      getIdentifyCode,
      confirmFunc,
      changePassword,
    };
  },
};
</script>

<style scoped>
.layout {
  position: absolute;
  left: calc(50% - 200px);
  top: 20%;
  width: 400px;
}
.loginBtn {
  width: 100px;
}
.loginForm {
  text-align: center;
}
.checkBox {
  margin-left: 7px;
}
.inpWidth {
  width: 165px;
}
.floatR {
  font-size: 10px;
  margin-left: 9px;
  color: blue;
}
</style>
预览
已有样式的修改
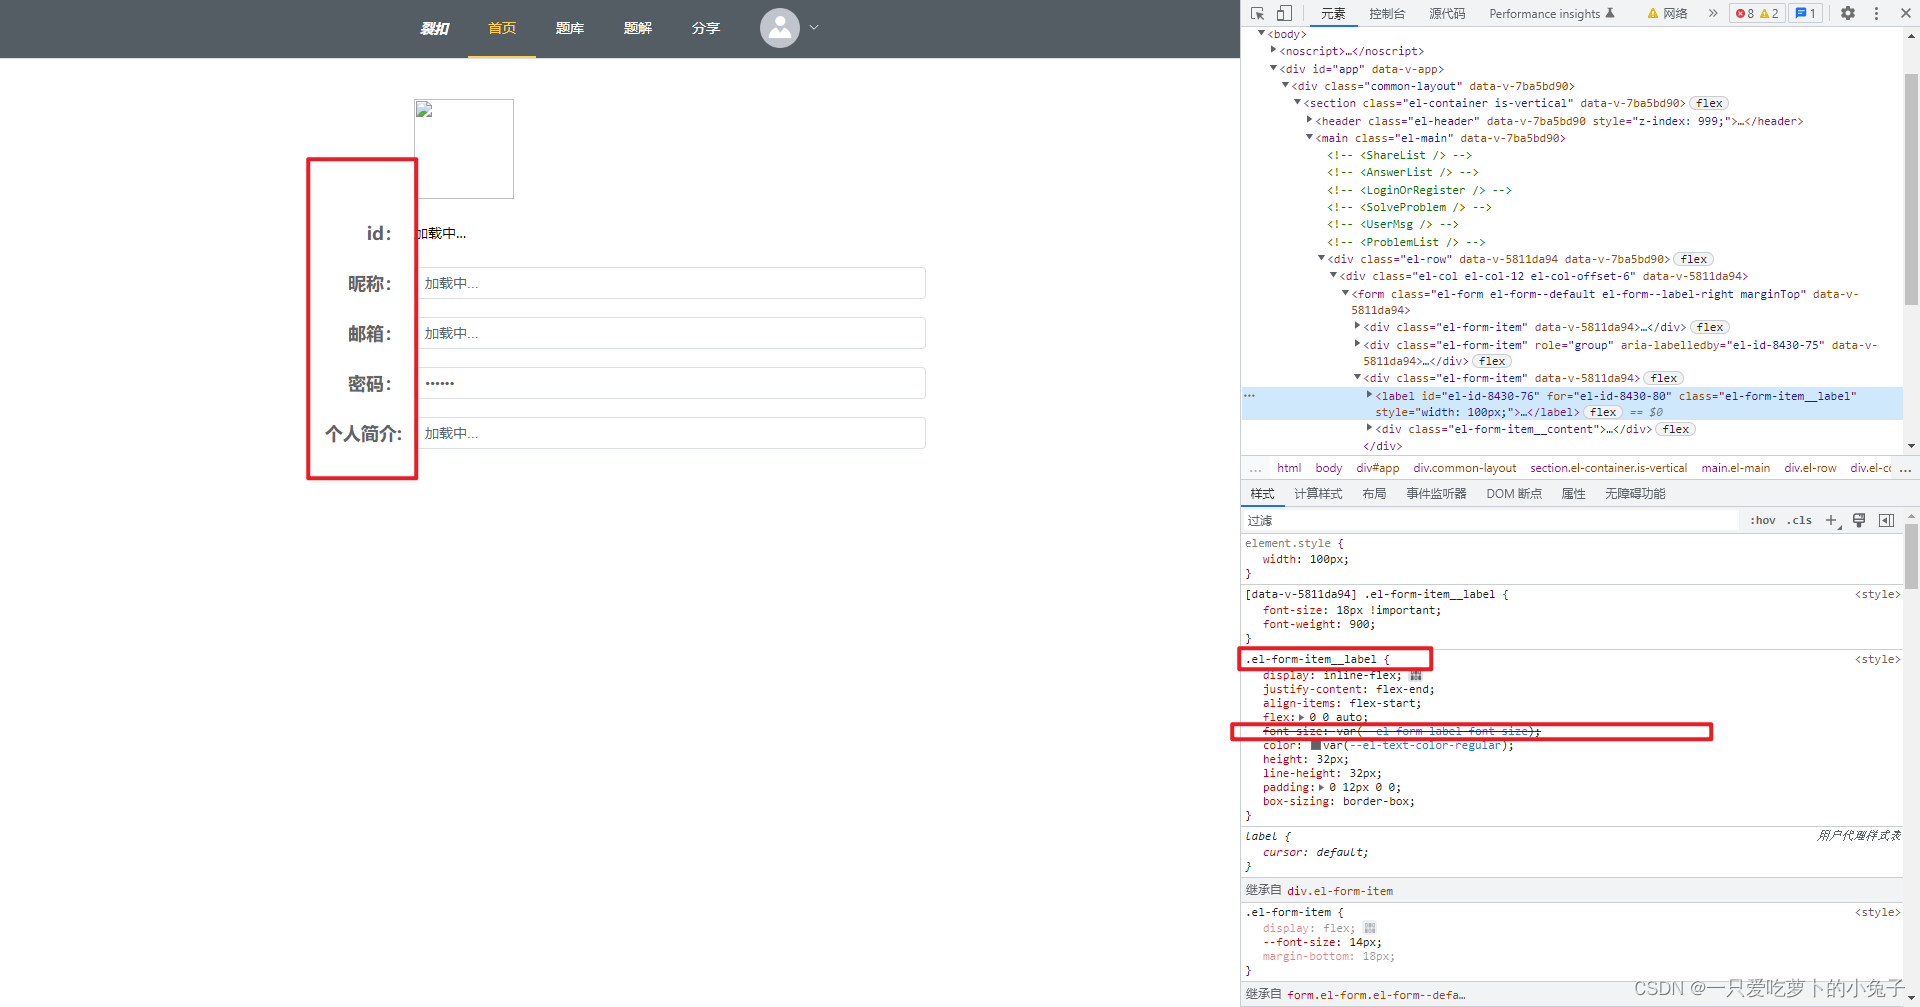
1.字体大小
首先获取对应选择器
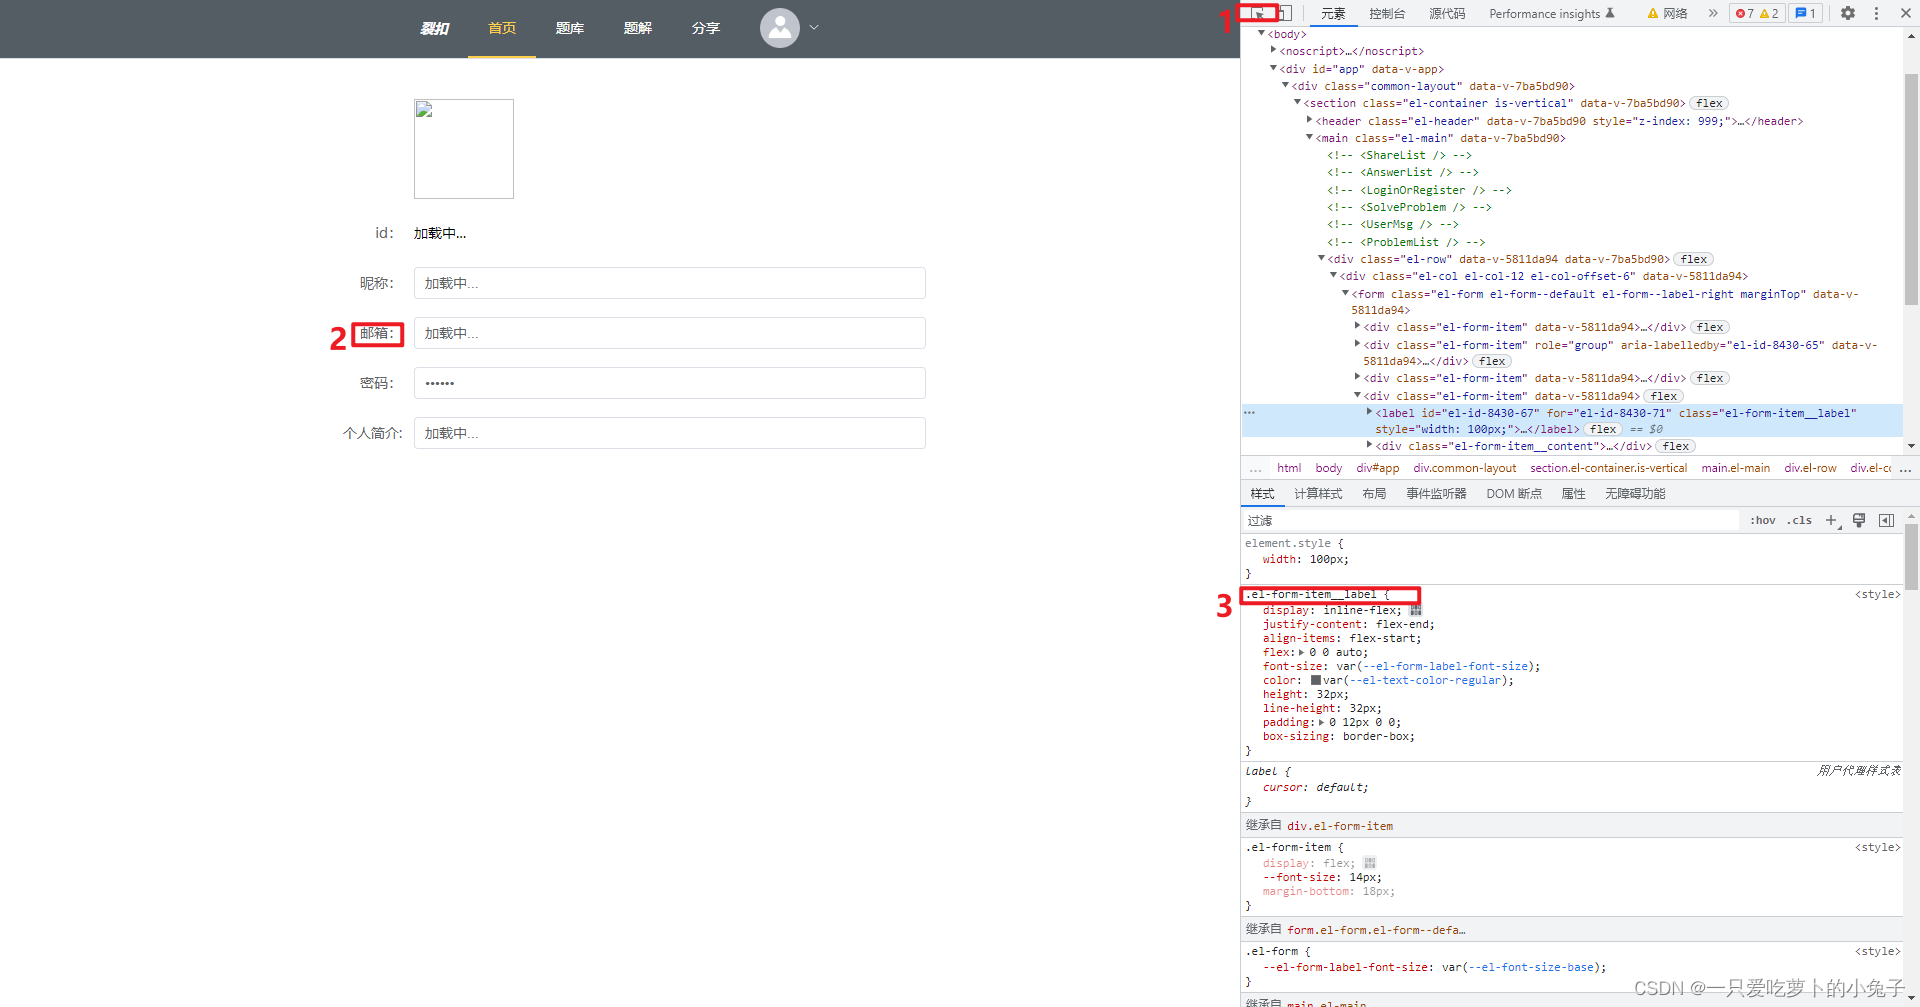
然后修改字体大小
<style>
/deep/.el-form-item__label {
  font-size: 18px !important;
  font-weight: 900;
}


/* vue3 中*/
:deep(.el-textarea__inner) {
  min-width: 487px;
}
</style>
结果:
2.router-link默认样式
<style>
/* .router-link-active {
  text-decoration: none;
  color: blue;
} */
a {
  text-decoration: none;
  color: blue;
}
</style>
亲测效果:



![[暑假]Vue生命周期-笔记](https://img-blog.csdnimg.cn/f3b97e888cc6499792d35bf9c1e3f984.png)




![ErrorCaptureStackTrace(err); Error [ERR_MODULE_NOT_FOUND]: Cannot find module](https://img-blog.csdnimg.cn/fbefd0852b644434827306fc79944fa1.png)