LED闪烁
1.1 电路连接示意图
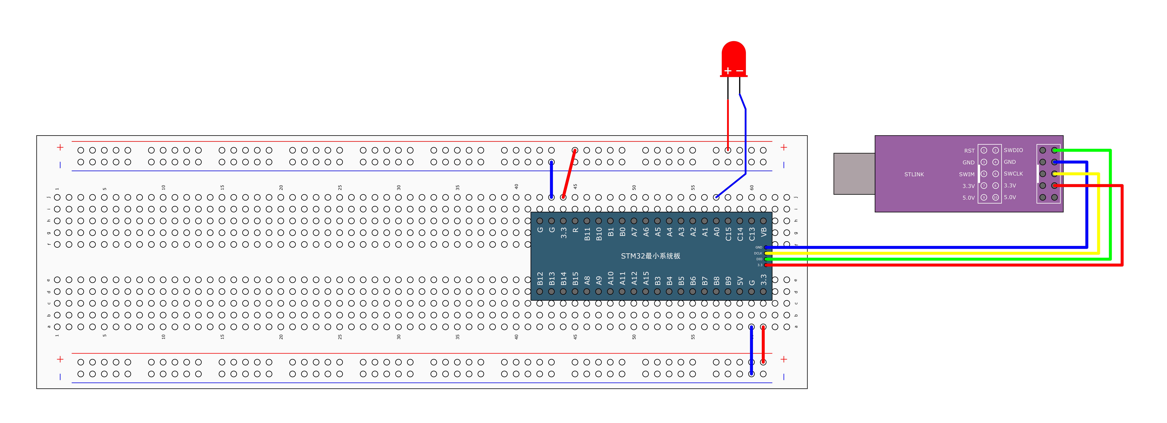
LED采用低电平点亮的方式,利用ST-Link的3.3V进行供电。
1.2程序设计
1.21知识储备
GPIO配置步骤步骤:
1. 第⼀步,使⽤RCC开启GPIO的时钟
2. 第⼆步,使⽤GPIO_Init()函数初始化GPIO
3. 第三步,使⽤输出或者输⼊的函数控制GPIO口
常⽤的RCC库函数
开启时钟
void RCC_AHBPeriphClockCmd(uint32_t RCC_AHBPeriph,FunctionalStateNewState);
void RCC_APB2PeriphClockCmd(uint32_t RCC_APB2Periph,FunctionalStateNewState);
void RCC_APB1PeriphClockCmd(uint32_t RCC_APB1Periph,FunctionalStateNewState);
其中包含两个参数:参数1:选择外设,参数2:使能或者失能
常用的GPIO库函数
复位GPIO外设函数
void GPIO_DeInit(GPIO_TypeDef* GPIOx);调用函数,所指定的GPIO外设就会被复位。
复位AFIO外设函数
void GPIO_AFIODeInit(void);初始化GPIO⼜函数
⽤结构体的参数来初始化GPIO口,先定义⼀个结构体变量,然后把再给结构体赋值,最后调⽤此函数,函数内部会⾃动读取结构体的值,然后⾃动把外设的各个参数配置好。
void GPIO_Init(GPIO_TypeDef* GPIOx,GPIO_InitTypedef*GPIO_InitStruct);为GPIO结构体变量赋一个默认值
void GPIO_StructInit(GPIO_InitTypedef* GPIO_InitTypedef);GPIO的4个输入函数
读取输⼊数据寄存器某端口的输⼊值,返回值是⾼低电平函数
uint8_t GPIO_ReadInputDataBit(GPIO_TypeDef* GPIOx, uint16_t GPIO_Pin);读取GPIO的每⼀位,返回值是16位的数据,每⼀位代表⼀个端⼜值
uint16_t GPIO_ReadInputData(GPIO_TypeDef* GPIOx);读取输出数据寄存器的某⼀位
uint8_t GPIO_ReadOutputDataBit(GPIO_TypeDef* GPIOx, uint16_t GPIO_Pin);读取整个输出寄存器
uint16_t GPIO_ReadOutputData(GPIO_InitTypedef* GPIOx);GPIO的4个输出函数
把指定的端口设置为⾼电平
void GPIO_SetBits(GPIO_InitTypedef* GPIOx,uint16_t GPIO_Pin);把指定的端口设置为低电平
void GPIO_ResetBits(GPIO_InitTypedef* GPIOx,uint16_t GPIO_Pin);根据第三个参数的值来设置电平
void GPIO_WriteBit(GPIO_InitTypedef* GPIOx,uint16_t GPIO_Pin,BitAction BitVal);对GPIOx的16个端口同时进⾏写⼊操作:
void GPIO_Write(GPIO_TypeDef* GPIOx, uint16_t PortVal);1.22 小灯闪烁
约定低电平点亮,高电平熄灭
配置好GPIO后,再循环内点亮LED延时一段时间,再熄灭LED
#include "stm32f10x.h"                  // Device header
#include "Delay.h"

int main(void)
{
    RCC_APB2PeriphClockCmd(RCC_APB2Periph_GPIOA, ENABLE);//两个参数1.点亮PA0口 2.开启时钟

    GPIO_InitTypeDef GPIO_InitStructure;//定义GPIO结构体(局部变量)
    //结构体成员
    GPIO_InitStructure.GPIO_Mode = GPIO_Mode_Out_PP;//使用推挽输出
    GPIO_InitStructure.GPIO_Pin = GPIO_Pin_0;//选择GPIO外设的0号引脚
    GPIO_InitStructure.GPIO_Speed = GPIO_Speed_50MHz;//配置输出速度
    GPIO_Init(GPIOA, &GPIO_InitStructure);//GPIO初始化结构体的地址

    while (1)
    {
        GPIO_ResetBits(GPIOA, GPIO_Pin_0);//把指定的端口设置为低电平,点亮LED
        Delay_ms(500);//延时
        GPIO_SetBits(GPIOA, GPIO_Pin_0); //把指定的端口设置为高电平,熄灭LED
        Delay_ms(500);

        GPIO_WriteBit(GPIOA, GPIO_Pin_0, Bit_RESET);//Bit_RESET置低电平
        Delay_ms(500);
        GPIO_WriteBit(GPIOA, GPIO_Pin_0, Bit_SET);// Bit_SET置高电平
        Delay_ms(500);
        //若给具体的数,1是高电平,0是低电平需要加上强制类型转换,将0和1转换为枚举类型
        GPIO_WriteBit(GPIOA, GPIO_Pin_0, (BitAction)0);
        Delay_ms(500);
        GPIO_WriteBit(GPIOA, GPIO_Pin_0, (BitAction)1);
        Delay_ms(500);
    }
}
注意:在推挽输出模式下,⾼低电平都具有驱动能⼒,开漏输出模式的高电平是没有驱动能⼒的,开漏输出模式的低电平具有驱动能力。
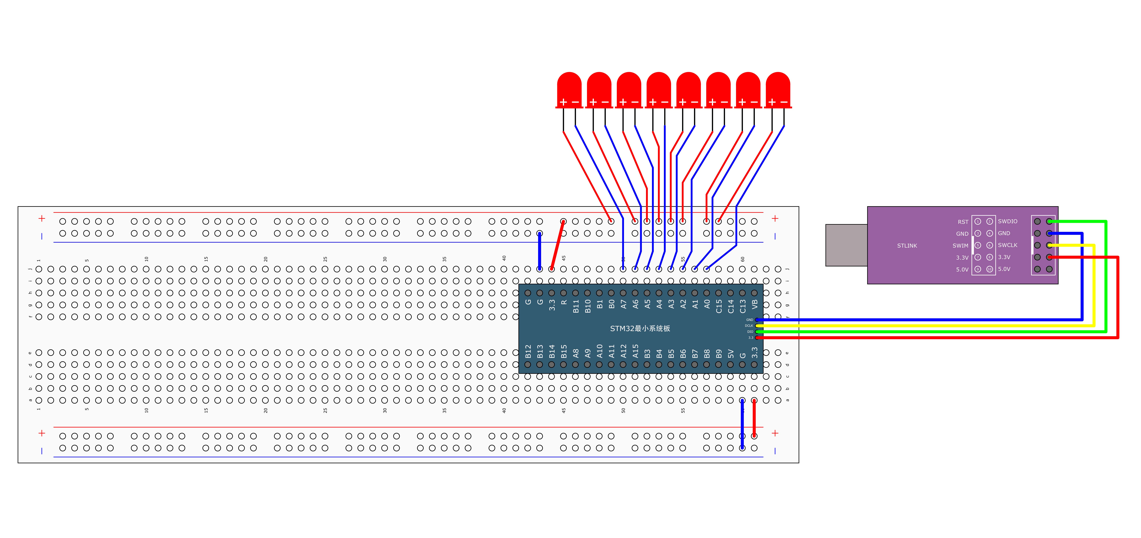
2. LED流水灯
2.1 电路连接示意图
2.2 程序设计
16个端口依次点亮熄灭,延时100ms
#include "stm32f10x.h"                  // Device header
#include "Delay.h"

int main(void)
{
    RCC_APB2PeriphClockCmd(RCC_APB2Periph_GPIOA, ENABLE);//两个参数1.点亮PA0口 2.开启时钟

    GPIO_InitTypeDef GPIO_InitStructure;//定义GPIO结构体(局部变量)
    //结构体成员
    GPIO_InitStructure.GPIO_Mode = GPIO_Mode_Out_PP;//使用推挽输出
    GPIO_InitStructure.GPIO_Pin = GPIO_Pin_All;//选择GPIO外设的16个端口
    GPIO_InitStructure.GPIO_Speed = GPIO_Speed_50MHz;//配置输出速度
    GPIO_Init(GPIOA, &GPIO_InitStructure);//GPIO初始化结构体的地址

    while (1)
    {
        //0x0001就是指向GPIO_Pin_XXX ,加上按位取反 那么则可以低电平点亮
        GPIO_Write(GPIOA, ~0x0001);    //0000 0000 0000 0001
        Delay_ms(100);
        GPIO_Write(GPIOA, ~0x0002);    //0000 0000 0000 0010
        Delay_ms(100);
        GPIO_Write(GPIOA, ~0x0004);    //0000 0000 0000 0100
        Delay_ms(100);
        GPIO_Write(GPIOA, ~0x0008);    //0000 0000 0000 1000
        Delay_ms(100);
        GPIO_Write(GPIOA, ~0x0010);    //0000 0000 0001 0000
        Delay_ms(100);
        GPIO_Write(GPIOA, ~0x0020);    //0000 0000 0010 0000
        Delay_ms(100);
        GPIO_Write(GPIOA, ~0x0040);    //0000 0000 0100 0000
        Delay_ms(100);
        GPIO_Write(GPIOA, ~0x0080);    //0000 0000 1000 0000
        Delay_ms(100);
        //GPIO_Write(GPIOA,~0x0001<<i);
        //Delay_ms(100);
    }
}
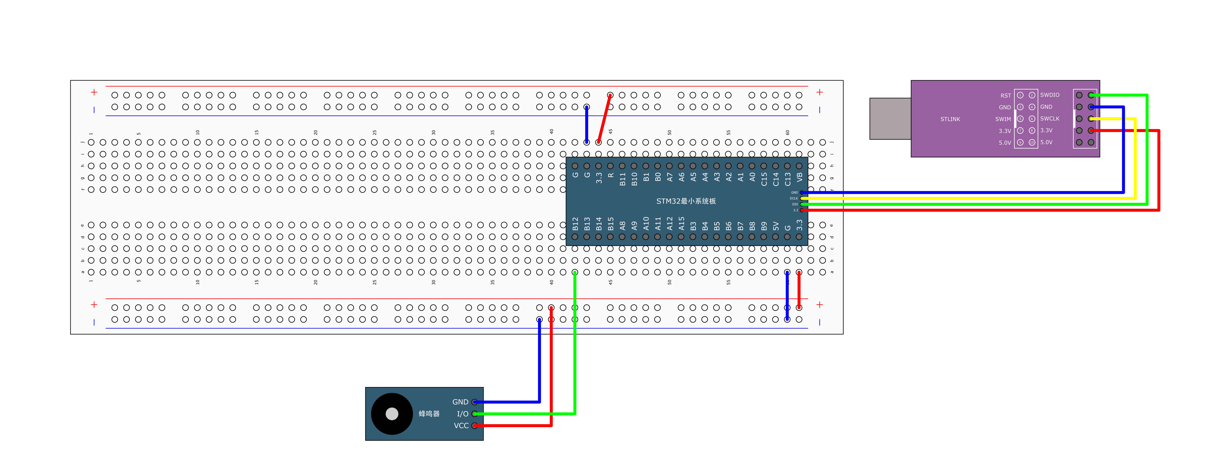
3. 蜂鸣器
3.1 电路连接示意图
3.2 程序设计
使用PB12号端口,给PB12输出低电平,蜂鸣器响,输出高电平,蜂鸣器不响。
#include "stm32f10x.h"                  // Device header
#include "Delay.h"

int main(void)
{
    RCC_APB2PeriphClockCmd(RCC_APB2Periph_GPIOB, ENABLE);//开启时钟

    GPIO_InitTypeDef GPIO_InitStructure;//定义GPIO结构体(局部变量)
    //结构体成员
    GPIO_InitStructure.GPIO_Mode = GPIO_Mode_Out_PP;//使用推挽输出
    GPIO_InitStructure.GPIO_Pin = GPIO_Pin_12;//选择GPIO外设的16个端口
    GPIO_InitStructure.GPIO_Speed = GPIO_Speed_50MHz;//配置输出速度
    GPIO_Init(GPIOB, &GPIO_InitStructure);//GPIO初始化结构体的地址
    while (1)
    {
        GPIO_ResetBits(GPIOB, GPIO_Pin_12);//低电平响,高电平不响。
        Delay_ms(100);
        GPIO_SetBits(GPIOB, GPIO_Pin_12);
        Delay_ms(100);
        GPIO_ResetBits(GPIOB, GPIO_Pin_12);
        Delay_ms(100);
        GPIO_SetBits(GPIOB, GPIO_Pin_12);//三短一长 声音效果体验
        Delay_ms(700);
    }
}


