rabbitmq配置windows authentication(windows account
- 开启插件
- 配置文件
- 创建一个不需要密码的账号,赋予administrator权限。
- 用windows账号和密码登录rabbitmq
- 加密明文密码
- 创建密钥的文件,添加密钥字符串
- 加密解密用户名密码
- 配置加密后的字符串
- 重启rabbitmq,并且登录windows账号
参考: https://www.rabbitmq.com/ldap.html
前言:
前面的文章讲到怎么为rabbitmq配置https ssl,这次是在之前的基础上配置使用window的accout。
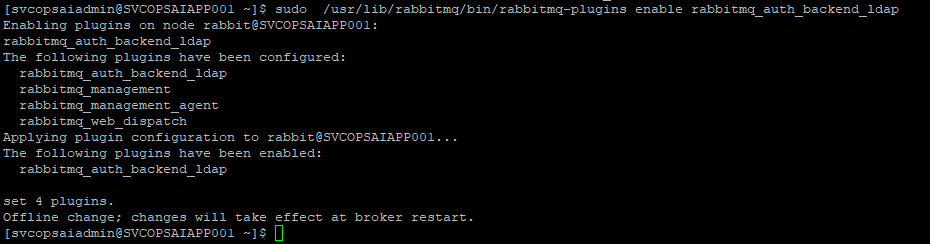
开启插件
rabbitmq-plugins enable rabbitmq_auth_backend_ldap
配置文件
[
        {rabbit,[
        {tcp_listeners, [5672]},
        {auth_backends, [{rabbit_auth_backend_ldap, rabbit_auth_backend_internal},
                           rabbit_auth_backend_internal]},
        {config_entry_decoder, [
                        {passphrase, {file, "/etc/rabbitmq/key"}}
        ]},
        {ssl_listeners, [5671]},
        {ssl_options, [{cacertfile, "/etc/rabbitmq/certs/rootCA.crt"},
                    {certfile,   "/etc/rabbitmq/certs/server.crt"},
                    {keyfile,    "/etc/rabbitmq/certs/server.key"},
                    {verify, verify_none},
                    {fail_if_no_peer_cert, false},
                    {versions, ['tlsv1.2']}
                    ]}
        ]},
        {rabbitmq_management, [
                {listener, [
                        {port, 15672},
                        {ip, "rabbitmq_ip"},
                            {ssl, true},
                            {ssl_opts,
                            [{cacertfile, "/etc/rabbitmq/certs/rootCA.crt"},
                            {certfile, "/etc/rabbitmq/certs/server.crt"},
                            {keyfile, "/etc/rabbitmq/certs/server.key"}
                       ]}
                ]}
        ]},
        {rabbitmq_auth_backend_ldap,[
                {servers, ["your LDAP server"]},
                {use_ssl, true},
                {ssl_options, [
                                        {cacertfile, "/etc/rabbitmq/certs/ROOT_CA.crt"},
                                        {verify, verify_peer},
                                        {depth, 2}]},
                {port, 636},
                {timeout, 15000},
                {log,   network_unsafe },
                {dn_lookup_bind, {“username@domain”,“your_password”}},
                {dn_lookup_base, "DC=XX,DC=XX"},
                {dn_lookup_attribute, "sAMAccountName"},
                {user_dn_pattern, "${username}"}
        ]}
].
rabbitmq_ip 换成你的服务器IP
your LDAP server换成认证服务器的IP
port,默认是636
username@domain 换成你的账号
your_password换成你的密码
dn_lookup_attribute 有两种类型sAMAccountName和userPrincipalName
sAMAccountName 不要@和后面的域名 例如d1234567
userPrincipalName则是
u
s
e
r
n
a
m
e
@
d
o
m
a
i
n
.
注
意
这
是
是
用
{username}@domain. 注意这是是用
username@domain.注意这是是用{username},不需要替换。
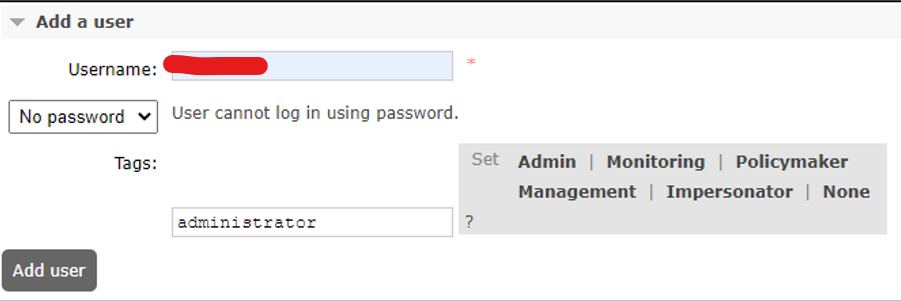
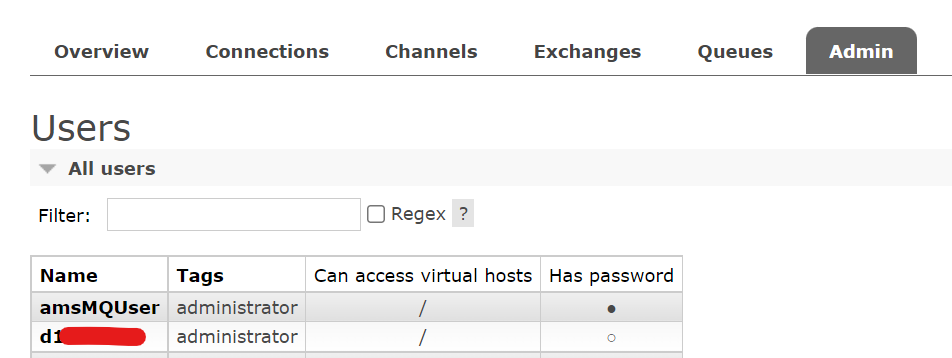
创建一个不需要密码的账号,赋予administrator权限。
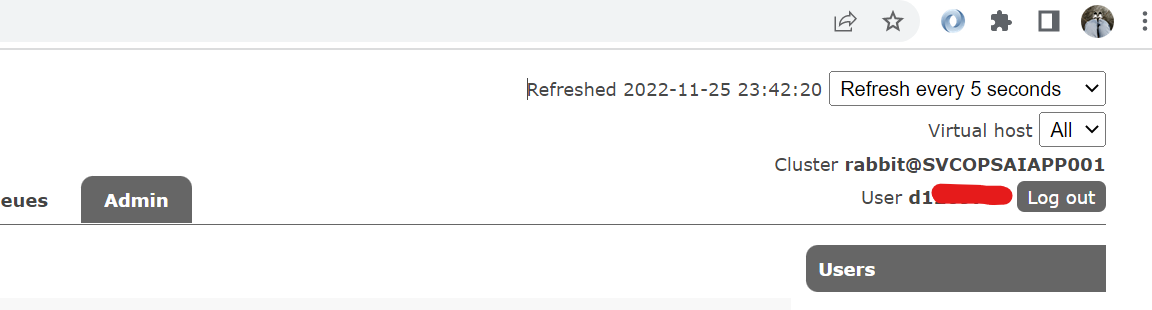
用windows账号和密码登录rabbitmq
加密明文密码
参考文章:https://www.rabbitmq.com/configure.html#configuration-encryption
创建密钥的文件,添加密钥字符串
sudo vi /etc/rabbitmq/key
加密解密用户名密码
在linux
rabbitmqctl encode '<<"guest">>' mypassphrase
{encrypted,<<"... long encrypted value...">>}
rabbitmqctl encode '"amqp://fred:secret@host1.domain/my_vhost"' mypassphrase
{encrypted,<<"... long encrypted value...">>}
在windows
rabbitmqctl encode "<<""guest"">>" mypassphrase
{encrypted,<<"... long encrypted value...">>}
rabbitmqctl encode '"amqp://fred:secret@host1.domain/my_vhost"' mypassphrase
{encrypted,<<"... long encrypted value...">>}
解密
在linux
rabbitmqctl decode '{encrypted, <<"...">>}' mypassphrase
<<"guest">>
rabbitmqctl decode '{encrypted, <<"...">>}' mypassphrase
"amqp://fred:secret@host1.domain/my_vhost"
在windows
rabbitmqctl decode "{encrypted, <<""..."">>}" mypassphrase
<<"guest">>
rabbitmqctl decode "{encrypted, <<""..."">>}" mypassphrase
"amqp://fred:secret@host1.domain/my_vhost"
配置加密后的字符串
{dn_lookup_bind, {encrypted, <<“XXX”>>}}


![[附源码]Python计算机毕业设计高校辅导员工作管理系统](https://img-blog.csdnimg.cn/4c27509c5c9a49daa7bc97df794b9968.png)


![[足式机器人]Part3机构运动微分几何学分析与综合Ch02-3 平面机构离散运动鞍点综合——【读书笔记】](https://img-blog.csdnimg.cn/8ff87b007ee64973ae5d2ad3fc56e331.png)


![[附源码]java毕业设计中小企业人力资源管理系统](https://img-blog.csdnimg.cn/b9bf0f1de8db4079bb2ac3fdaaaff4d2.png)