1、介绍(官方网址:nginx news )
1.1 常见用法
1) web服务器软件 httpd http协议
同类的web服务器软件:apache nginx(俄罗斯) IIS(微软 fastcgi) lighttpd(德国)
2)代理服务器 反向代理
3)邮箱代理服务器 IMAP POP3 SMTP
4)负载均衡功能 LB loadblance
1.2 Nginx架构的特点:
①高可靠:稳定性 master进程 管理调度请求分发到哪一个worker=> worker进程 响应请求 一master多worker
②热部署 :(1)平滑升级 (2)可以快速重载配置
③高并发:可以同时响应更多的请求 事件 epoll模型 几万
④响应快:尤其在处理静态文件上,响应速度很快 sendfile
⑤低消耗:cpu和内存 1w个请求 内存2-3MB
⑥分布式支持 :反向代理 七层负载均衡
2、相关说明
2.1 常见安装方式:
①yum安装配置,需使用Nginx官方源或者EPEL源
2.2 编译参数说明
| 参数 | 作用 |
|---|---|
| --prefix | 编译安装到的软件目录 |
| --user | worker进程运行用户 |
| --group | worker进程运行用户组 |
| --with-http_ssl_module | 支持https 需要==pcel-devel==依赖 |
| --with-http_stub_status_module | 基本状态信息显示 查看请求数、连接数等 |
| --with-http_realip_module | 定义客户端地址和端口为header头信息 常用于反向代理后的真实IP获取 |
2.3、目录介绍 (查看安装目录/usr/local/nginx )
| 目录 | 作用 |
|---|---|
| conf | 配置文件 |
| html | 网站默认目录 |
| logs | 日志 |
| sbin | 可执行文件 [软件的启动 停止 重启等] |
3、脚本实现安装及其初始化
第一步:创建软件运行用户以及安装依赖
# useradd -s/sbin/nologin -M www
安装依赖
# yum -y install pcre-devel zlib-devel openssl-devel
第二步:编译安装 (安装软件请联系博主)
# cd /root/soft
# tar xvf nginx-1.14.2.tar.gz
# cd nginx-1.14.2
# ./configure --prefix=/usr/local/nginx --user=www --group=www --with-http_ssl_module --with-http_stub_status_module --with-http_realip_module# make && make install
}
第三步:查看nginx的二进制可执行文件的相关参数

# cd /usr/local/nginx/sbin
# ./nginx -h
第四步:执行后显示
nginx version: nginx/1.14.2
Usage: nginx [-?hvVtTq] [-s signal] [-c filename] [-p prefix] [-g directives]Options:
#查看帮助
-?,-h : this help
#查看版本并退出
-v : show version and exit
#查看版本和配置选项并退出
-V : show version and configure options then exit
#检测配置文件语法并退出
-t : test configuration and exit
#检测配置文件语法打印它并退出
-T : test configuration, dump it and exit
#在配置测试期间禁止显示非错误信息
-q : suppress non-error messages during configuration testing
#发送信号给主进程 stop强制退出 quit优雅的退出 reopen重开日志 reload重载配置
-s signal : send signal to a master process: stop, quit, reopen, reload
#设置nginx目录 $prefix路径
-p prefix : set prefix path (default: /usr/local/nginx/)
#指定启动使用的配置文件
-c filename : set configuration file (default: conf/nginx.conf)
#在配置文件之外设置全局指令
-g directives : set global directives out of configuration file
一般主要使用:
-s参数控制管理nginx服务
-V参数查看nginx开启的模块和编译参数
-t参数检测配置文件是否有错误
第五步:服务配置
- 使用社区的服务配置文件
nginx编译包里默认没有服务启动脚本模板,可以通过社区获得
Red Hat NGINX Init Script | NGINX
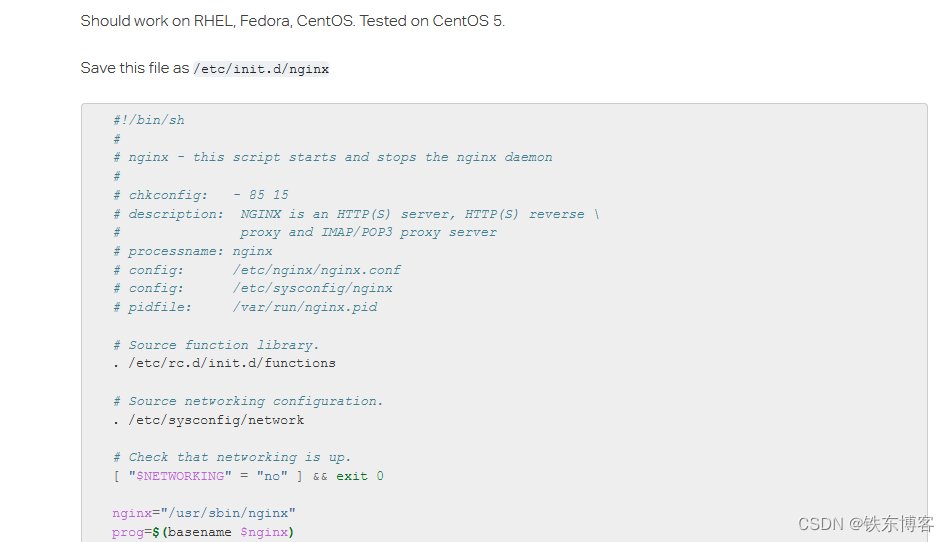
将里面的内容 复制创建nginx文件
- 上传脚本到/etc/init.d目录下
# vim /etc/init.d/nginx
- 修改软件和配置路径
#执行文件路径 第22行
nginx="/usr/local/nginx/sbin/nginx"
#配置文件路径 第25行
NGINIX_CONF_FILE="/usr/local/nginx/conf/nginx.conf"
第六步:添加开机自启动
# chmod +x /etc/init.d/nginx
# chkconfig --add nginx# chkconfig nginx on
说明:注意在服务脚本中,有chkconfig配置开启模式、开启顺序、关闭顺序设置
#!/bin/sh
#
# nginx - this script starts and stops the nginx daemon
# 开启模式(0-6) 开启顺序 关闭顺序
# chkconfig: - 85 15
第七步:测试是否能开启

# service nginx start

拓展,平时公司为了方便都会边写一个shell脚本安装,这样不用每次都是分开跑命令,脚本如下:
#!/bin/bash
#编译安装Nginx
nginx_install(){
#创建软件运行用户
`id www` &>>/dev/null
if [ $? -ne 0 ];then
   useradd -s/sbin/nologin -M www
fi
#安装依赖
yum -y install pcre-devel zlib-devel openssl-devel
#编译安装
cd /root/soft
tar xvf nginx-1.14.2.tar.gz
cd nginx-1.14.2
./configure --prefix=/usr/local/nginx --user=www --group=www --with-http_ssl_module --with-http_stub_status_module --with-http_realip_module && make && make install
}
#脚本开始时间
start_time=`date +%s`
#执行的脚本代码
nginx_install
#脚本结束时间
end_time=`date +%s`
#脚本执行花费时间
const_time=$((end_time-start_time))
echo 'Take time is: '$const_time's'
按上面的sh文件执行完之后,然后 从第三步开始执行查看。


![Java高效率复习-SpringMVC[SpringMVC-2]](https://img-blog.csdnimg.cn/a3b4fce9b7c040e8aa4fb792b5eefa89.png)


