Web HA集群部署 - RHCS
- 1. RHCS介绍
- 2. RHCS的核心功能
- 2.1 负载均衡
- 2.2 高可用
- 2.3 存储
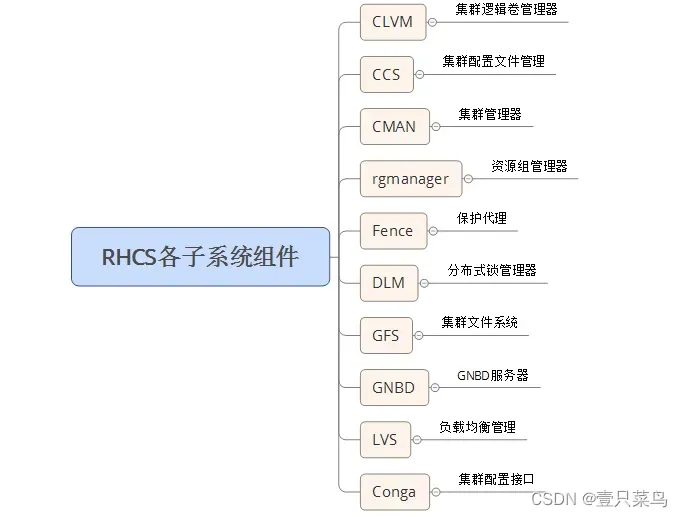
- 3. RHCS集群的组成部分
- 3.1 集群管理器CMAN
- 3.2 资源组管理器rgmanager
- 3.3 集群配置文件管理CCS
- 3.4 保护设备Fencs
- 3.5 分布式锁管理器DLM
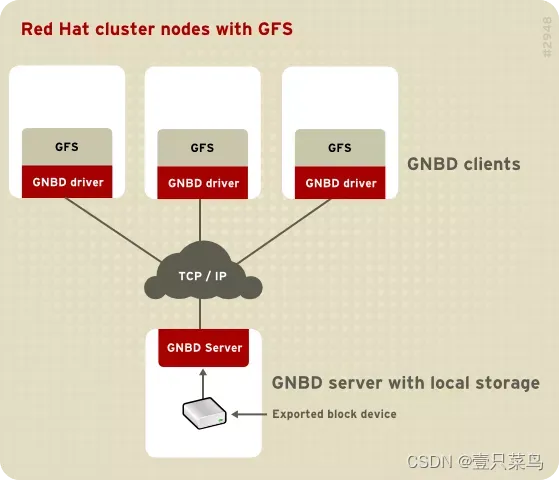
- 3.6 集群文件系统GFS
- 3.7 集群配置管理工具Conga
- 4. RHCS历史
- 4.1 RHEL4/Centos4:Cman
- 4.2 RHEL5/Centos5:OpenAIS + Cman + rgmanager
- 4.3 RHEL6/Centos6:corosync + Cman + rgmanager/ corosync +pacemaker
- 4.4 RHEL7/Centos7:corosync + pacemaker
- 5 RHCS集群部署
- 5.1 环境准备
- 5.2 安装软件
- 5.3 集群环境准备
- 1. 启动pcsd
- 2. 修改hacluster密码
- 3. 配置节点之间的相互认证
- 4. 各节点之间时间同步
- 5.4 集群部署
- 1. 创建集群
- 2. 开启集群
- 5.5 创建GFS2文件系统
- 1.创建gfs2文件系统
- 2. 配置dlm锁监控时间
- 3. 关于DLM
- 5.6 stonith配置
- 5.7配置多路心跳
- 5.8 配置集群应用
1. RHCS介绍
RHCS(Red Hat Cluster Suite,红帽集群套件)是Red Hat公司开发整合的一套综合集群软件组件,提供了集群系统中三种集群构架,分别是高可用性集群、负载均衡集群、存储集群,可以通过在部署时采用不同的配置,以满足你的对高可用性、负载均衡、可扩展性、文件共享和节约成本的需要。
2. RHCS的核心功能
2.1 负载均衡
RHCS的负载均衡集群通过LVS(Linux Virtual Server)来实现其功能,LVS是由前端的调度器与后端的RS节点组成,客户端的访问请求通过调度器根据算法及集群类型的不同将其调度至集群的RS节点,由调度器调度到的RS节点响应客户端请求。同时,LVS提供了故障转移功能,当集群中的RS节点中有任意一个或多个出现故障时,LVS会自动将故障节点下线,将分配到故障节点的客户端请求移到无故障节点运行;故障节点修复,又将重新加入集群继续工作,从而保证了服务的不中断运行。RHCS集群类型有DR,NAT,TUN,FULLNAT,可为各种复杂的网络环境提供不同的解决方案。
2.2 高可用
RHCS的高可用集群中的高可用服务在无故障情况下,可运行于任意节点,通过定义组资源或者各种约束关系,将提供同一类服务的资源运行在同一个节点,当提供服务的节点故障或分裂时,集群可通过仲裁设备(非必须)判定资源运行于哪个节点,即拥有法定票数多的一方继续运行集群服务,而故障的或不拥有法定票数的一方则作下线处理。保证了服务的不中断运行。

2.3 存储
RHCS通过GFS提供集群存储功能,GFS是一个分布式文件系统,它通过锁管理机制,使集群中的各节点互相通告共享文件锁,从而可以使多个节点同时挂载共享文件系统来完成数据读写等操作。
3. RHCS集群的组成部分
3.1 集群管理器CMAN
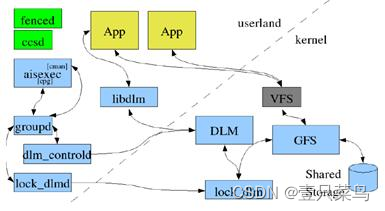
Cluster Manager,简称CMAN,是一个分布式集群管理工具,它运行在集群的各个节点上,为RHCS提供集群管理任务。CMAN用于管理集群成员、传递节点间心跳信息。它通过监控每个节点的运行状态来了解节点成员之间的关系,当集群中某个节点出现故障,节点成员关系将发生改变,CMAN及时将这种改变通知底层,进而做出相应的调整。cman之上有ccs和fencs两个组件。
3.2 资源组管理器rgmanager
通过定义的集群资源,来管理这些资源,被管理的资源包括故障切换域的定义、资源(如 IP 地址)和服务。它也定义了群集服务和群集服务的故障切换行为。
3.3 集群配置文件管理CCS
其默认配置文件为/etc/cluster/cluster.conf,运行于集群中各节点,当某一节点的配置信息发生改变时,使同一集群内的其他节点的配置文件发生相应变化。
3.4 保护设备Fencs
当 CMAN 决定某个节点已经发生故障,它将告知其他群集基础结构组件。在收到通知后,fenced 将保护(fence)故障节点。其他群集基础结构组件将决定采取什么行动,也就是说,它们执行任何必需的恢复。例如,当 DLM 和 GFS 被告知节点故障时,将暂停活动,直到它们检测到 fenced 已经完成对故障节点的保护。当确认故障节点已经被保护时,DLM 和 GFS 会执行恢复。DLM 释放对失败节点的锁定;GFS 恢复故障节点的日志。GNBD也是Fencs的一个组件。
3.5 分布式锁管理器DLM
分布式锁管理器管理集群中挂载使用GFS的节点来同步它们对共享资源的访问,它运行于每一个集群节点,是集群中所有节点共享锁文件。CLVM使用锁管理器来同步对LVM卷和卷组(也对共享存储)的更新。
3.6 集群文件系统GFS
GFS 是允许集群内所有节点可同时访问某个共享的块设备的集群文件系统。GFS 是一个原生(native)文件系统,它直接和 Linux 内核文件系统接口的 VFS 层进行通信。GFS 使用分布式元数据和多个日志来优化群集操作。要维护文件系统的完整性,GFS 使用一个锁管理器来协调 I/O。当节点修改了 GFS 文件系统上的数据,这个改动马上为使用这个文件系统的其他群集节点可见。同时,GFS使整个群集只需安装一次应用程序或补丁,并可使集群内多个节点的服务对数据可以并行读/写操作。
3.7 集群配置管理工具Conga
Conga是为RHCS集群和存储提供集中配置和管理的软件组件集合,Conga里的主要组件是luci和ricci,它们都是可单独安装的。luci是一个服务器组件,它运行在一台机器上并通过ricci与多个群集和机器通信。ricci是运行在Conga管理的每台机器(群集成员或独立的机器)上的代理。
Conga在CentOS 7上ricci被更换为pcsd。
4. RHCS历史
4.1 RHEL4/Centos4:Cman
在RHEL4/Centos4上,Cman(Cluster manager)来实现高可用功能,ccsd作这用户空间的配置工具;Cman的配置文件为/etc/cluster/cluster.conf ;Cman、DLM和GFS都是工作在内核空间。

4.2 RHEL5/Centos5:OpenAIS + Cman + rgmanager
在RHEL5/Centos5上,引入了OpenAIS(aisexec为核心进程)作为基础信息层, 而Cman作为投票系统以aisexec插件的形式工作,但Cman还是主导整个高可用集群,所以配置文件也还是/etc/cluster/cluster.conf;资源管理器CRM为rgmanager(resource group manager,下图中的groupd);配置管理工具有ccsd、luci/ricci和system-config-cluster(gui);注意这时候高可用功能移到了用户空间。
4.3 RHEL6/Centos6:corosync + Cman + rgmanager/ corosync +pacemaker
在RHEL6/Centos6上,OpenAIS独立成为corosync,前期corosync也还是没有投票系统,如果以Cman作为投票系统,以插件的形式工作,主导的是Cman, 所以配置文件也还是/etc/cluster/cluster.conf;资源管理器CRM为rgmanager;但如果不用Cman,CRM就可以用pacemaker,其配置文件为/etc/corosync/corosyc.conf,配置管理工具也有ccsd、luci/ricci和system-config-cluster(gui);
而corosync的第二个版本出来后,引入votequorum后有独立完整的投票系统,投票功能比cman优秀,自此cman退出江湖,不再有主导地位,配置文件由corosync主导,CRM自然也就pacemaker了,配置工具有pcs、LCMC等。
4.4 RHEL7/Centos7:corosync + pacemaker
在RHEL7/Centos7上,已经取消了RHCS组件,直接是用corosync + pacemaker来实现高可用集群。
5 RHCS集群部署
5.1 环境准备
① 服务器环境:
node1:192.168.71.183
node2:192.168.71.253
漂移Vip:192.168.71.254(即我们访问服务的ip)
② 配置内容:
- 设置服务器名称,使用
hostname并修改/etc/hosts - 关闭防火墙、SELINUX、配置IP、修改HOSTS
具体操作可参考前几章
/etc/hosts配置内容
[root@node2 keepalived]# cat /etc/hosts
...
192.168.71.183 node1
192.168.71.253 node2
192.168.71.254 vip
5.2 安装软件
在CENTOS7中默认采用corosync(心跳管理)、pacemaker(资源管理)、pcs(配置工具)可以构建HA集群
[root@node2 keepalived]# yum -y install corosync pacemaker *pcs* *fence* gfs2* dlm*
5.3 集群环境准备
1. 启动pcsd
各节点执行
[root@node2 keepalived]# systemctl start pcsd
[root@node2 keepalived]# systemctl enable pcsd
Created symlink from /etc/systemd/system/multi-user.target.wants/pcsd.service to /usr/lib/systemd/system/pcsd.service.
[root@node2 keepalived]# systemctl status pcsd
● pcsd.service - PCS GUI and remote configuration interface
   Loaded: loaded (/usr/lib/systemd/system/pcsd.service; enabled; vendor preset: disabled)
   Active: active (running) since Thu 2023-03-02 10:28:25 EST; 21s ago
     Docs: man:pcsd(8)
           man:pcs(8)
 Main PID: 63022 (pcsd)
   CGroup: /system.slice/pcsd.service
           └─63022 /usr/bin/ruby /usr/lib/pcsd/pcsd

Mar 02 10:28:24 node2 systemd[1]: Starting PCS GUI and remote configuration interface...
Mar 02 10:28:25 node2 systemd[1]: Started PCS GUI and remote configuration interface.
2. 修改hacluster密码
各节点执行
[root@node1 keepalived]# passwd hacluster
Changing password for user hacluster.
New password:
BAD PASSWORD: The password contains the user name in some form
Retype new password:
passwd: all authentication tokens updated successfully.
密码:hacluster
如果没有账号hacluster,可以手动创建
3. 配置节点之间的相互认证
在任意节点执行
[root@node2 keepalived]# pcs cluster auth node1 node2
Username: hacluster
Password:
node1: Authorized
node2: Authorized
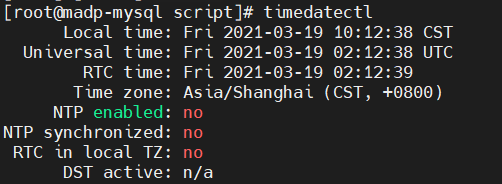
4. 各节点之间时间同步
在node1和node2分别进行时间同步,可以使用ntp实现
具体操作可参考本专栏第二章《CHAPTER 2 Web HA集群部署 - Heartbeat》,此处不赘述
5.4 集群部署
1. 创建集群
以nascluster为本集群的名称,在主节点执行如下指令
[root@node1 keepalived]# pcs cluster setup --name nascluster node1 node2
Destroying cluster on nodes: node1, node2...
node2: Stopping Cluster (pacemaker)...
node1: Stopping Cluster (pacemaker)...
node1: Successfully destroyed cluster
node2: Successfully destroyed cluster

Sending 'pacemaker_remote authkey' to 'node1', 'node2'
node2: successful distribution of the file 'pacemaker_remote authkey'
node1: successful distribution of the file 'pacemaker_remote authkey'
Sending cluster config files to the nodes...
node1: Succeeded
node2: Succeeded

Synchronizing pcsd certificates on nodes node1, node2...
node1: Success
node2: Success
Restarting pcsd on the nodes in order to reload the certificates...
node1: Success
node2: Success
注意:pcs在执行以上命令时会生产/etc/corosync/corosync.conf及修改/var/lib/pacemaker/cib/cib.xml文件,corosync.conf是corosync的配置文件,cib.xml为pacemaker的配置文件。这两个配置文件是集群的核心配置,重装系统时建议做好这两个配置文件的备份。
2. 开启集群
- pcs cluster start --all 开启集群
- pcs cluster enable --all 设置集群自动启动
- pcs cluster status 查看集群状态
在主节点执行
[root@node1 keepalived]# pcs cluster start --all
node1: Starting Cluster (corosync)...
node2: Starting Cluster (corosync)...
node1: Starting Cluster (pacemaker)...
node2: Starting Cluster (pacemaker)...
[root@node1 keepalived]# ^C
[root@node1 keepalived]# pcs cluster enable --all
node1: Cluster Enabled
node2: Cluster Enabled
[root@node1 keepalived]# pcs cluster status
Cluster Status:
 Stack: corosync
 Current DC: node2 (version 1.1.23-1.el7_9.1-9acf116022) - partition with quorum
 Last updated: Thu Mar  2 10:43:35 2023
 Last change: Thu Mar  2 10:43:10 2023 by hacluster via crmd on node2
 2 nodes configured
 0 resource instances configured

PCSD Status:
  node2: Online
  node1: Online
当有半数以上的节点在线时,这个集群就认为自己拥有法定人数是“合法”的。换而言之,就是下面的公式: total_nodes < 2 * active_nodes,也就是说假设集群中有4个节点,但是活动节点有3个,4<2*3即是合法的集群,如果活动节点有2个,4=2*2不能满足total_nodes < 2 * active_nodes了,这个集群就非法了。
① 因此在双节点的集群中,只有当两者都在线时才“合法”的这个规则会让“双节点集群”毫无意义,但是我们可以控制Pacemaker发现集群达不到法定人数时候的行为。简单来说,我们告诉集群忽略它。在两个节点的情况下设置以下值
[root@node1 keepalived]# pcs property set no-quorum-policy=ignore
② 集群故障时候服务迁移
[root@node1 keepalived]# pcs resource defaults migration-threshold=1
Warning: Defaults do not apply to resources which override them with their own defined values
默认值为1
③ 查看集群状态
[root@node1 rhcs]# pcs cluster status
Cluster Status:
 Stack: corosync
 Current DC: node2 (version 1.1.23-1.el7_9.1-9acf116022) - partition with quorum
 Last updated: Thu Mar  2 10:55:42 2023
 Last change: Thu Mar  2 10:49:45 2023 by root via cibadmin on node1
 2 nodes configured
 0 resource instances configured

PCSD Status:
  node2: Online
  node1: Online
④ 查看集群成员
[root@node1 rhcs]# corosync-cmapctl |grep members
runtime.totem.pg.mrp.srp.members.1.config_version (u64) = 0
runtime.totem.pg.mrp.srp.members.1.ip (str) = r(0) ip(192.168.71.183)
runtime.totem.pg.mrp.srp.members.1.join_count (u32) = 1
runtime.totem.pg.mrp.srp.members.1.status (str) = joined
runtime.totem.pg.mrp.srp.members.2.config_version (u64) = 0
runtime.totem.pg.mrp.srp.members.2.ip (str) = r(0) ip(192.168.71.253)
runtime.totem.pg.mrp.srp.members.2.join_count (u32) = 1
runtime.totem.pg.mrp.srp.members.2.status (str) = joined
⑤ 查看成员信息
[root@node1 rhcs]# pcs status corosync

Membership information
----------------------
    Nodeid      Votes Name
         1          1 node1 (local)
         2          1 node2
⑥ 查看XML
[root@node1 rhcs]# pcs cluster cib
<cib crm_feature_set="3.0.14" validate-with="pacemaker-2.10" epoch="7" num_updates="0" admin_epoch="0" cib-last-written="Thu Mar  2 10:49:45 2023" update-origin="node1" update-client="cibadmin" update-user="root" have-quorum="1" dc-uuid="2">
  <configuration>
    <crm_config>
      <cluster_property_set id="cib-bootstrap-options">
        <nvpair id="cib-bootstrap-options-have-watchdog" name="have-watchdog" value="false"/>
        <nvpair id="cib-bootstrap-options-dc-version" name="dc-version" value="1.1.23-1.el7_9.1-9acf116022"/>
        <nvpair id="cib-bootstrap-options-cluster-infrastructure" name="cluster-infrastructure" value="corosync"/>
        <nvpair id="cib-bootstrap-options-cluster-name" name="cluster-name" value="nascluster"/>
        <nvpair id="cib-bootstrap-options-no-quorum-policy" name="no-quorum-policy" value="ignore"/>
      </cluster_property_set>
    </crm_config>
    <nodes>
      <node id="1" uname="node1"/>
      <node id="2" uname="node2"/>
    </nodes>
    <resources/>
    <constraints/>
    <rsc_defaults>
      <meta_attributes id="rsc_defaults-options">
        <nvpair id="rsc_defaults-options-migration-threshold" name="migration-threshold" value="1"/>
      </meta_attributes>
    </rsc_defaults>
  </configuration>
  <status>
    <node_state id="2" uname="node2" in_ccm="true" crmd="online" crm-debug-origin="do_state_transition" join="member" expected="member">
      <lrm id="2">
        <lrm_resources/>
      </lrm>
    </node_state>
    <node_state id="1" uname="node1" in_ccm="true" crmd="online" crm-debug-origin="do_state_transition" join="member" expected="member">
      <lrm id="1">
        <lrm_resources/>
      </lrm>
    </node_state>
  </status>
</cib>
检查配置文件,发现提示没有STONITH设备。
[root@node1 rhcs]# crm_verify -L -V
   error: unpack_resources:     Resource start-up disabled since no STONITH resources have been defined
   error: unpack_resources:     Either configure some or disable STONITH with the stonith-enabled option
   error: unpack_resources:     NOTE: Clusters with shared data need STONITH to ensure data integrity
Errors found during check: config not valid
暂时关闭stonish,后面再详细讲讲stonish的配置。
[root@node1 rhcs]# pcs property set stonith-enabled=false
⑦ 配置集群IP
[root@node1 rhcs]# pcs resource create vip ocf:heartbeat:IPaddr2 ip=192.168.71.254 cidr_netmask=24 op monitor interval=30s
vip为自定义的一个集群IP的名称,监控时间为30S。
⑧ 测试浮动IP地址在集群中能否正常切换:
停node1的集群服务
[root@node1 rhcs]# pcs cluster stop node1
node1: Stopping Cluster (pacemaker)...
node1: Stopping Cluster (corosync)...
在node2上查看状态
[root@node2 keepalived]# pcs  status
Cluster name: nascluster
Stack: corosync
Current DC: node2 (version 1.1.23-1.el7_9.1-9acf116022) - partition with quorum
Last updated: Thu Mar  2 11:06:41 2023
Last change: Thu Mar  2 11:05:20 2023 by root via cibadmin on node1

2 nodes configured
1 resource instance configured

Online: [ node2 ]
OFFLINE: [ node1 ]

Full list of resources:

 vip    (ocf::heartbeat:IPaddr2):       Started node2		#此条表示vip在node02上执行了

Daemon Status:
  corosync: active/enabled
  pacemaker: active/enabled
  pcsd: active/enabled
在node1恢复后,为防止node2资源迁回node1(迁来迁去对还是会对业务有一定影响)
[root@node1 rhcs]# pcs resource defaults resource-stickiness=100
Warning: Defaults do not apply to resources which override them with their own defined values
[root@node1 rhcs]# pcs resource defaults
migration-threshold=1									#迁移阈值
resource-stickiness=100									#资源粘滞
5.5 创建GFS2文件系统
1.创建gfs2文件系统
[root@node1 ~]# mkfs.gfs2 -p lock_dlm -j 2 -t nascluster:nas /dev/sdc
This will destroy any data on /dev/sdc
Are you sure you want to proceed? [y/n] y
Discarding device contents (may take a while on large devices): Done
Adding journals: Done
Building resource groups: Done
Creating quota file: Done
Writing superblock and syncing: Done
Device:                    /dev/sdc
Block size:                4096
Device size:               5.00 GB (1310720 blocks)
Filesystem size:           5.00 GB (1310718 blocks)
Journals:                  2
Journal size:              32MB
Resource groups:           22
Locking protocol:          "lock_dlm"
Lock table:                "nascluster:nas"
UUID:                      b56c56cf-a841-4a24-a03c-0e52077fccad
[root@node1 ~]#
关于创建逻辑卷,可以参考SECTION 10 逻辑卷管理
2. 配置dlm锁监控时间
[root@node1 ~]# pcs cluster cib dlm_cfg		###由于cib.xml非常重要,为避免出错不建议直接修改,故生成一个dlm_cfg文件,将配置写入dlm_cfg文件后,再将dlm_cfg写入cib.xml中。
[root@node1 ~]# pcs -f dlm_cfg resource create dlm ocf:pacemaker:controld op monitor interval=60s
[root@node1 ~]# pcs -f dlm_cfg resource clone dlm clone-max=2 clone-node-max=1
[root@node1 ~]# pcs -f dlm_cfg resource show
 vip    (ocf::heartbeat:IPaddr2):       Started node2
 Clone Set: dlm-clone [dlm]
     Stopped: [ node1 node2 ]
[root@node1 ~]# pcs cluster cib-push dlm_cfg
CIB updated
[root@node2 ~]# pcs status
[root@node1 ~]# pcs -f dlm_cfg resource show
 vip    (ocf::heartbeat:IPaddr2):       Started node1
 Clone Set: dlm-clone [dlm]
     Stopped: [ node1 node2 ]
[root@node1 ~]# pcs cluster cib-push dlm_cfg
CIB updated
[root@node1 ~]# pcs status
Cluster name: nascluster
Stack: corosync
Current DC: node1 (version 1.1.23-1.el7_9.1-9acf116022) - partition with quorum
Last updated: Thu Mar  2 12:54:56 2023
Last change: Thu Mar  2 12:54:50 2023 by root via cibadmin on node1

2 nodes configured
3 resource instances configured

Online: [ node1 node2 ]

Full list of resources:

 vip    (ocf::heartbeat:IPaddr2):       Started node1
 Clone Set: dlm-clone [dlm]
     Stopped: [ node1 node2 ]

Failed Resource Actions:
* dlm_start_0 on node1 'not configured' (6): call=13, status=complete, exitreason='',
    last-rc-change='Thu Mar  2 12:54:52 2023', queued=0ms, exec=59ms
* dlm_start_0 on node2 'not configured' (6): call=11, status=complete, exitreason='',
    last-rc-change='Thu Mar  2 12:55:07 2023', queued=0ms, exec=99ms

Daemon Status:
  corosync: active/enabled
  pacemaker: active/enabled
  pcsd: active/enabled
笔者这里dlm提示没配置
3. 关于DLM
DistributedLock Manager,简称DLM,是一个分布式锁管理器,它是RHCS的一个底层基础构件,同时也为集群提供了一个公用的锁运行机制。DLM运行在每个节点上,GFS通过锁管理器的机制来同步访问文件系统的元数据。CLVM通过锁管理器来同步更新数据到LVM卷和卷组。
DLM不需要设定锁管理服务器,它采用对等的锁管理方式,大大提高了处理性能。同时,DLM避免了单个节点失败需要整体恢复的性能瓶颈。另外,DLM的请求是本地的,不需要网络请求,因此请求会立即生效。最后,DLM通过分层机制,可以实现多个锁空间的并行锁模式。
5.6 stonith配置
查看本系统支持的fence设备
[root@node1 ~]# pcs stonith list
fence_aliyun - Fence agent for Aliyun (Aliyun Web Services)
fence_amt_ws - Fence agent for AMT (WS)
fence_apc - Fence agent for APC over telnet/ssh
...
查看即将要使用的fence设备相关信息
[root@node1 ~]# pcs stonith describe fence_ilo4
生成初始配置文件stonith_cfg
pcs cluster cib stonith_cfg
创建一个名为ipmi-fence-node1的fence设备名称用于建node1的fence,pcmk_host_check="static-list"的功能是将node1与192.168.71.183对应,注意新版本的pcs的action字段更改为pcmk_reboot_action
pcs -f stonith_cfg stonith create ipmi-fence-node1 fence_ipmilan lanplus="true" pcmk_host_list="node1" pcmk_host_check="static-list" pcmk_reboot_action="reboot" ipaddr="192.168.71.183" login="root" passwd="yurq" op monitor interval=60s
pcs -f stonith_cfg stonith create ipmi-fence-node2 fence_ipmilan lanplus="true" pcmk_host_list="node2" pcmk_host_check="static-list" pcmk_reboot_action="reboot" ipaddr="192.168.71.183" login="root" passwd="yurq" op monitor interval=60s
检查stonith_cfg中stonith配置信息
pcs -f stonith_cfg stonith
上文关闭了stonish,现在开启stonish
pcs -f stonith_cfg property setstonith-enabled=true

pcs property set stonith-enabled=true
检查stonith_cfg中stonith是否已经开启
pcs -f stonith_cfg property
将stonith_cfg写入cib.xml
pcs cluster cib-push stonith_cfg
node2上测试FENCE是否成功
stonith_admin --reboot node1
node1上测试FENCE是否成功
stonith_admin --reboot node2
将node1业务VIP迁移到node2上测试集群是否正常。(手动切换)
pcs cluster standby node1
在集群所有节点重启后发现gfs的文件系统无法自动挂载,定义了fstab也不行,经过分析发现系统开机时候执行了pcs cluster start,而且很快就返回启动成功的结果,但是系统日志里面显示仍然还启动完成,考虑到系统进入系统之后集群有可能还没启动完成,所有自然无法挂载gfs的文件系统。
如果无法自动挂载,我自己编写了一个循环挂载的脚本。供参考。
编辑脚本mountnas.sh
#!/bin/bash

i=1

while(($i<50))

do

mount |grep nas

if [ $? = 1 ];then mount /dev/sdc

else exit

fi

sleep 3

done
还需要给rc.local加个权限,要不然开机不会执行rc.local
chmod 777 /etc/rc.local centos7
在/etc/rc.local加入bash /mountnas.sh
5.7配置多路心跳
在rhcs中,可以配置多路心跳,一路将fence作为心跳,一路将网络作为心跳,在corosync pacemaker的集群中,找了国内外很多技术文章,均未做相关描述的。主要是因为corosync pacemaker的集群相对来说已经很可靠,在未配置多路心跳之前将业务网卡DOWN后,发现 node2的集群马上失效,集群IP立即切换至node1上,未出现脑裂的情况。
在/etc/corosync.conf中,毕竟corosync管理心跳,所以只有在它里面想办法了,在centos7之前的corosync.conf配置中,会定义interface {}作为多个网络,但是在centos7中经过PCS统一管理后,经过测试发现pacemaker只认nodelist{}作为网络,难道这又是一个变动?
在totem {}定义:
rrp_mode: passive  #默认为none,修改为passive才可以支持两个网段

nodelist {

node{

   ring0_addr:node1

   ring0_addr:test01  -test01为第二个心跳

    }

node{

   ring0_addr:node2

   ring0_addr:test02  -test02为第二个心跳

    }

         }
记得修改host表。
重启集群即可生效,目前node1,node2对应192.168.71.0网段,test01 test02对应192.168.103.0网段,同时可以在192.168.103.0网段上再新建一个业务IP,
在配置集群IP之前需要对test1 test2配置认证。
[root@node01 ~]# pcs cluster auth test01 test02

Username: hacluster

Password:

test01: Authorized

test02: Authorized
出现以下显示表示认证成功。
[root@node02 ~]# pcs cluster auth test01 test02

test01: Already authorized

test02: Already authorized
配置集群IP
pcs resource create testip ocf:heartbeat:IPaddr2 ip=192.168.103.10 cidr_netmask=24 op monitor interval=30s
注意testip与上文的vip已经名字不一样,两个集群IP的名字不能一致。
5.8 配置集群应用
以apache为例:
apache安装过程略。
pcs resource create web ocf:heartbeat:apache configfile=/etc/httpd/conf/httpd.conf status url="http://localhost/server-status" op monitor interval=1min
pcs status查看apache状态,
pcs resource group add httpd(组名称) vip web
pcs constraint colocation add Web vipINFINITY 将apache与vip绑定在同一个节点上。
pcs constraint order vip then Web,指定集群IP先启动,然后再启动apache
pcs constraint location Web prefers node01=200指定node01优先启动apache
crm_simulate -sL 查看资源黏性值,集群业务优先在资源黏性值高的节点上运行。
Current cluster status:

Online: [ node01 node02]

vip (ocf:heartbeat:IPaddr2): Started node01

Web (ocf:heartbeat:apache): Started node01

Allocation scores:

native_color: vip allocation score on node01:200

native_color: vip allocation score on node02:50

native_color: Web allocation score on node01:200

native_color: Web allocation score on node02:50

Transition Summary:
手动切换集群资源
以上配置由集群自动分配资源到node1、node2上,有时候为了维护,必须手动迁移资源到指定节点上。
# pcs constraint location Web prefers node1=INFINITY

# pcs constraint --full 查看资源状态

# pcs constraint remove location-Web-node1-INFINITY将控制权还给集群