一、介绍
1.1、rsync 对比 scp
相同:
都有拷贝的功能

不同:
rsync:具有增量复制,每次复制的时候,会扫描对端是否在同路径下有我要发送的一样的文件或者目录,如果,如果存在,则不进行复制。边复制,边统计,边比较。而且rsync是先对比后,在传输,所以会发现使用rsync 传输后,发现会卡在那
scp: 不具备增量复制

Rysnc特性和优点:
可以镜像保存整个目录树和文件系统
可以很容易做到保持原来文件的权限、时间、软硬链接等等无须特殊权限即可安装。
快速:第一次同步时 rsync 会复制全部内容,但在下一次只传输修改过的文件
压缩传输: rsync 在传输数据的过程中可以实行压缩及解压缩操作,因此可以使用更少的带宽. 跟http一样压缩传输
安全: 可以使用scp、ssh等方式来传输文件,当然也可以通过直接的socket连接支持匿名传输,以方便进行网站镜象。
选择性保持:符号连接,硬链接,文件属性,权限,时间等

Rysnc缺点:每次都需要扫面,所以会占用I/O,cpu等
Linux 系统默认安装rsync(最小化安装没有rsync)
Linux 不依赖ssh,需要两端都有rsync
1.2、rsync的默认算法
在man rsync的文档里可以看到:
Rsync finds files that need to be transferred using a "quick check" algorithm (by default) that looks for files that have changed in size or in last-modified time.
Any changes in the other preserved attributes (as requested by options) are made on the destination file directly when the quick check indicates that the file』s data does not need to be updated.
即默认rsync只会比较文件大小和最后修改时间,只要这两者一样,rsync即认为文件相同。其它属性(包括文件内容)的不同,并不会让rsync同步该文件!
1.3、查看rsync版本
rsync --version
1.4、rsync传输模式(数据同步方式)
推push: 一台主机负责把数据传送给其他主机,服务器开销很大,比较适合后端服务器少的情况(比如大于10台,考虑节点量很大,发送到第10期间,有新的数据,可能存在再一次给第一个机器发送数据进行)
拉pull: 所有主机定时去找一主机拉数据,可能就会导致数据缓慢---- 自动化& 虚拟化 --> CI/CD docker推:目的主机配置为rsync服务器,源主机周期性的使用rsync命令把要同步的目录推过去需要备份的机器是客户端,存储备份的机器是服务端)
拉:源主机配置为rsync服务器,目的主机周期性的使用rsync命令把要同步的目录拉过来(需要备份的机器是服务端,存储备份的机器是客户端两种方案,rsync都有对应的命令来实现
1.5、xinetd
Xinetd 是管理 Rsync 的工具,他还可以管理其他的工具比如FTFP, 类似 (TFTP) 进行管理轻量级的小服务,默认Linux 6 版本都是通过xinetd服务进行管理的,默认在xinetd目录下,在比如 tftp 保存在xinetd目录下,7版本rsync可以自己管理
PXE:无人值守
二、部署
2.1、规划
IP              hostname  /etc/redhat-release
192.168.206.5   master01  CentOS Linux release 7.5.1804 (Core)
192.168.206.6   master02  CentOS Linux release 7.5.1804 (Core)
2.2 、安装rsync(都需要)
yum install -y rsync xinetd # xintend 可以不装,由于我是最小化安装Centos,所以需要安装rsync[root@master01 ~]# rpm -qa rsync
rsync-3.1.2-12.el7_9.x86_64
[root@master01 ~]# rpm -qa xinetd
xinetd-2.3.15-14.el7.x86_64
[root@master01 ~]# rpm -ql rsync
/etc/rsyncd.conf
/etc/sysconfig/rsyncd
/usr/bin/rsync
/usr/lib/systemd/system/rsyncd.service
/usr/lib/systemd/system/rsyncd.socket
/usr/lib/systemd/system/rsyncd@.service
/usr/share/doc/rsync-3.1.2
/usr/share/doc/rsync-3.1.2/COPYING
/usr/share/doc/rsync-3.1.2/NEWS
/usr/share/doc/rsync-3.1.2/OLDNEWS
/usr/share/doc/rsync-3.1.2/README
/usr/share/doc/rsync-3.1.2/support
/usr/share/doc/rsync-3.1.2/support/Makefile
/usr/share/doc/rsync-3.1.2/support/atomic-rsync
/usr/share/doc/rsync-3.1.2/support/cvs2includes
/usr/share/doc/rsync-3.1.2/support/deny-rsync
/usr/share/doc/rsync-3.1.2/support/file-attr-restore
/usr/share/doc/rsync-3.1.2/support/files-to-excludes
/usr/share/doc/rsync-3.1.2/support/git-set-file-times
/usr/share/doc/rsync-3.1.2/support/instant-rsyncd
/usr/share/doc/rsync-3.1.2/support/logfilter
/usr/share/doc/rsync-3.1.2/support/lsh
/usr/share/doc/rsync-3.1.2/support/lsh.sh
/usr/share/doc/rsync-3.1.2/support/mapfrom
/usr/share/doc/rsync-3.1.2/support/mapto
/usr/share/doc/rsync-3.1.2/support/mnt-excl
/usr/share/doc/rsync-3.1.2/support/munge-symlinks
/usr/share/doc/rsync-3.1.2/support/rrsync
/usr/share/doc/rsync-3.1.2/support/rsync-no-vanished
/usr/share/doc/rsync-3.1.2/support/rsync-slash-strip
/usr/share/doc/rsync-3.1.2/support/rsyncstats
/usr/share/doc/rsync-3.1.2/support/savetransfer.c
/usr/share/doc/rsync-3.1.2/tech_report.tex
/usr/share/man/man1/rsync.1.gz
/usr/share/man/man5/rsyncd.conf.5.gz
[root@master01 ~]# rpm -ql xinetd
/etc/sysconfig/xinetd
/etc/xinetd.conf
/etc/xinetd.d/chargen-dgram
/etc/xinetd.d/chargen-stream
/etc/xinetd.d/daytime-dgram
/etc/xinetd.d/daytime-stream
/etc/xinetd.d/discard-dgram
/etc/xinetd.d/discard-stream
/etc/xinetd.d/echo-dgram
/etc/xinetd.d/echo-stream
/etc/xinetd.d/tcpmux-server
/etc/xinetd.d/time-dgram
/etc/xinetd.d/time-stream
/usr/lib/systemd/system/xinetd.service
/usr/sbin/xinetd
/usr/share/doc/xinetd-2.3.15
/usr/share/doc/xinetd-2.3.15/CHANGELOG
/usr/share/doc/xinetd-2.3.15/COPYRIGHT
/usr/share/doc/xinetd-2.3.15/README
/usr/share/doc/xinetd-2.3.15/empty.conf
/usr/share/doc/xinetd-2.3.15/sample.conf
/usr/share/man/man5/xinetd.conf.5.gz
/usr/share/man/man5/xinetd.log.5.gz
/usr/share/man/man8/xinetd.8.gz
[root@master01 ~]#
可以看到 xinetd 下已经没有 rsync
[root@master01 ~]# ll /etc/xinetd.d/
-rw-------. 1 root root 1157 4月   1 2020 chargen-dgram
-rw-------. 1 root root 1159 4月   1 2020 chargen-stream
-rw-------. 1 root root 1157 4月   1 2020 daytime-dgram
-rw-------. 1 root root 1159 4月   1 2020 daytime-stream
-rw-------. 1 root root 1157 4月   1 2020 discard-dgram
-rw-------. 1 root root 1159 4月   1 2020 discard-stream
-rw-------. 1 root root 1148 4月   1 2020 echo-dgram
-rw-------. 1 root root 1150 4月   1 2020 echo-stream
-rw-------. 1 root root 1212 4月   1 2020 tcpmux-server
-rw-------. 1 root root 1149 4月   1 2020 time-dgram
-rw-------. 1 root root 1150 4月   1 2020 time-stream
[root@master01 ~]#
2.3 、rsync 服务启动(都需要)
[root@master01 ~]# rsync --daemon
[root@master01 ~]# netstat -tulpn |grep 873
tcp        0      0 0.0.0.0:873             0.0.0.0:*               LISTEN      19367/rsync
tcp6       0      0 :::873                  :::*                    LISTEN      19367/rsync
[root@master01 ~]#
2.4、rsync 参数 (标红重点)
rsync命令和scp命令很相似
-a,--archive archive mode 权限保存模式, 相当于 -rlptgoD 参数,存档,递归,保持属性等-r,--recursive 复制所有下面的资料,递归处理
-l,--links 复制所有的连接,拷贝连接文件
-p,--perms 保留档案权限 ,文件原有属性
-t,--times 保留时间点,文件原有时间
-g,--group 保留原有属组
o,--owner 保留档案所有者(root onlv
D,--devices 保留device资讯(root only)
-z,--compress 压缩模式, 当资料在传送到目的端时候,在传输的时候,会对源文件进行压缩处理,在传递给目标后进行解压,只是提高传输速度,压缩过程是rsync内部进行转换,并不会对源有文件进行修改
H.--hard-links 保留硬链接文件
A, --acls 保留ACL属性文件,需要配合--perms
P, -P参数和 --partial --progress 相同.只是为了把参数简单化,表示传输进度
--version,输出rsync版本
-v,--verbose 执行过程中,显示复杂的详细输出信息-u, --update 仅仅进行更新,也就是跳过已经存在的目标位置,并且文件时间要晚于要备份的文件,不覆盖新的文件。也就是如果DEST中的文件比SRC新,则不同步即。默认
rsync只会比较文件大小和最后修改时间,只要这两者一样,rsync即认为文件相同。其它属性(包括文件内容)的不同,并不会让rsync同步该文件,加上-u 参数,不会判断文件大小。--port=PORT,定义rsyncd(daemon)要运行的port(预设为tcp 873)
-delete,删除那些目标位置有的文件而备份源没有的文件,比如拷贝目录www,在www中源文件有www/html/123.html,而目标目录也有一个www目录,切也有www/html/123.html,则删除目标www/html/123.html,拷贝源文件的www/html/123.html,期间不会影响源文件的www/html/123.html。此命令慎用,万一目标目录此文件有用,则会删除,故如果是单纯的完全一致拷贝,可使用。–delete 选项,表示客户端上的数据要与服务器端完全一致,多则删之,少则补之
-password-file=FILE ,从 FILE 中得到密码
-bwlimit=KBPS,限制 1/O 带宽
-filter "-filename”,需要过滤的文件
--exclude=filname,需要过滤的文件
-progress,显示备份过程
常用的-avz
2.5、详细讲解-u, -a,-delete 参数
master01:
[root@master01 ~]# mkdir /data/test1
[root@master01 ~]# cd /data/test1/
[root@master01 test1]# echo "nihao" >1.txt
[root@master01 test1]# echo "shijie" >2.txt
[root@master01 test1]# ll
-rw-r--r-- 1 root root 6 3月   2 06:59 1.txt
-rw-r--r-- 1 root root 7 3月   2 06:59 2.txt

master02:
[root@master02 ~]# mkdir /data/test1
[root@master02 ~]# cd /data/test1/
[root@master02 test1]# echo "nihao hsijie" >1.txt
[root@master02 test1]# ll
-rw-r--r-- 1 root root 13 3月   2 06:59 1.txt
rsync -av
[root@master01 test1]# rsync -av /data/test1/ root@192.168.206.6:/data/test1/
root@192.168.206.6's password:
sending incremental file list
./
1.txt
2.txt

sent 190 bytes  received 63 bytes  101.20 bytes/sec
total size is 13  speedup is 0.05


[root@master02 test1]# ll
总用量 8
-rw-r--r-- 1 root root 6 3月   2 06:59 1.txt
-rw-r--r-- 1 root root 7 3月   2 06:59 2.txt
[root@master02 test1]# cat 1.txt
nihao
[root@master02 test1]#
总结:目标文件有1.txt,只是添加了 -a 参数,会把目标文件有1.txt 进行替换,那到底谁替换了
rsync -rv 和 rsync -lv
[root@master01 test1]# rsync -rv /data/test1/ root@192.168.206.6:/data/test1/
root@192.168.206.6's password:
sending incremental file list
1.txt

sent 135 bytes  received 41 bytes  50.29 bytes/sec
total size is 13  speedup is 0.07

[root@master02 test1]# cat 1.txt
nihao
[root@master02 test1]# echo "nihao hsijie" >1.txt


[root@master01 test1]# rsync -lv /data/test1/ root@192.168.206.6:/data/test1/
root@192.168.206.6's password:
skipping directory .

sent 16 bytes  received 12 bytes  8.00 bytes/sec
total size is 0  speedup is 0.00

[root@master02 test1]# cat 1.txt
nihao hsijie


[root@master02 test1]# ll
-rw-r--r-- 1 root root 13 3月   2 07:04 1.txt
-rw-r--r-- 1 root root  7 3月   2 06:59 2.txt
[root@master02 test1]# rm -f 2.txt

[root@master01 test1]# rsync -lv /data/test1/ root@192.168.206.6:/data/test1/
root@192.168.206.6's password:
skipping directory .

sent 16 bytes  received 12 bytes  11.20 bytes/sec
total size is 0  speedup is 0.00

[root@master02 test1]# ll
-rw-r--r-- 1 root root 13 3月   2 07:04 1.txt
总结:很明显,是参数-r 将目标文件有1.txt 替换,但是问题来了,没有 -r ,rsync根本无法拷贝复制,这个参数是基础,故-r必须有,亦或者说-a必须有,那如何才能让目标文件1.txt 不被替换,就是忽略已经存在的文件
rsync -au
[root@master02 test1]# ll
-rw-r--r-- 1 root root 13 3月   2 07:04 1.txt
[root@master02 test1]#


[root@master01 test1]# rsync -auv /data/test1/ root@192.168.206.6:/data/test1/
root@192.168.206.6's password:
sending incremental file list
./
2.txt

sent 141 bytes  received 38 bytes  71.60 bytes/sec
total size is 13  speedup is 0.07
[root@master01 test1]#

[root@master02 test1]# cat 1.txt
nihao hsijie
[root@master02 test1]#
总结:-u 参数,让目标文件1.txt 不被替换,就是忽略已经存在的文件
rsync --delete
[root@master02 test1]# ll
-rw-r--r-- 1 root root 13 3月   2 07:21 1.txt
-rw-r--r-- 1 root root 13 3月   2 07:28 3.txt
[root@master02 test1]# cat 1.txt
nihao hsijie

[root@master01 test1]# ll
-rw-r--r-- 1 root root 6 3月   2 06:59 1.txt
-rw-r--r-- 1 root root 7 3月   2 06:59 2.txt
[root@master01 test1]#
[root@master01 test1]# cat 1.txt
nihao

[root@master01 test1]# rsync -avz --delete /data/test1/ root@192.168.206.6:/data/test1/
root@192.168.206.6's password:
sending incremental file list
deleting 3.txt
./
1.txt
2.txt

sent 187 bytes  received 72 bytes  19.19 bytes/sec
total size is 13  speedup is 0.05

[root@master02 test1]# ll
总用量 8
-rw-r--r-- 1 root root 6 3月   2 06:59 1.txt
-rw-r--r-- 1 root root 7 3月   2 06:59 2.txt
[root@master02 test1]# cat 1.txt
nihao
总结:--delete 参数会把,目前目录中3.txt,在源文件中没有删除,1.txt 有则覆盖,说白了,就是删除目录中所有的文件,然后全部复制。
rsync -avzu --delete
[root@master01 test1]# ll
-rw-r--r-- 1 root root 6 3月   2 06:59 1.txt
-rw-r--r-- 1 root root 7 3月   2 06:59 2.txt
[root@master01 test1]# mkdir 123
[root@master01 test1]# cd 123/
[root@master01 123]# echo "shijie" >2.txt
[root@master01 123]# echo "shijie" >1.txt

[root@master02 test1]# cat 1.txt
nihao hsijie
[root@master02 test1]# mkdir 456
[root@master02 test1]# mkdir 123;cd 123/
[root@master02 123]# echo "nihao hsijie" >1.txt

[root@master01 test1]# rsync -avzu --delete /data/test1/ root@192.168.206.6:/data/test1/
root@192.168.206.6's password:
sending incremental file list
./
2.txt
123/
123/2.txt

sent 271 bytes  received 65 bytes  61.09 bytes/sec
total size is 27  speedup is 0.08
[root@master01 test1]#

[root@master02 test1]# ll
drwxr-xr-x 2 root root 32 3月   2 07:35 123
-rw-r--r-- 1 root root 13 3月   2 07:34 1.txt
-rw-r--r-- 1 root root  7 3月   2 06:59 2.txt
[root@master02 test1]# cat 1.txt
nihao hsijie
[root@master02 test1]# cd 123/
[root@master02 123]# ll
-rw-r--r-- 1 root root 13 3月   2 07:38 1.txt
-rw-r--r-- 1 root root  7 3月   2 07:35 2.txt
[root@master02 123]# cat 1.txt
nihao hsijie
[root@master02 123]#
总结:–delete 选项,表示客户端上的数据要与服务器端完全一致,多则删之,少则补之,意思是要保证完全一致,比如 rsync -avz --delete 相当于删除目标目录下的所有的文件,然后从源文件全部拷贝过去。期间添加-u参数, rsync -avzu --delete 可以忽略如果目标文件中,已经存在的文件或者目录,则不替换源文件。
如果,只是想在目标目录中,添加目标目录中没有的文件或者目录,不需要删除目录的文件,使用 rsync -avzu
2.6、停止rsync
直接 kill 掉
[root@master02 web-back-1]# ps -ef |grep rsync
root     17332     1  0 06:10 ?        00:00:00 rsync --daemon
root     18432  2692  0 06:37 pts/0    00:00:00 grep --color=auto rsync

[root@master02 web-back-1]# kill 17332
[root@master02 web-back-1]# ps -ef |grep rsync
root     18552  2692 21 06:37 pts/0    00:00:00 grep --color=auto rsync
[root@master02 web-back-1]#
三、使用root账户传输案例
使用 rsync 备份网站目录,对 master 01 网站目录 /var/www/html (yum 安装httpd) 目录进行备份到master02的/data/web-back下
不推荐使用如下:
不推荐拷贝过程使用非root账号,如果使用非root账号,比如传输过程中,使用rsync账户传输,会导致在源文件中,存在所属主、所属组是nginx ,或者是root,在传输后,都变成 rsync,因为rsync只能创建 rsync 所属主、所属组
建立用户(两个节点),rsync 尽可能不要使用 root,故新建一个用户rsync,名字随意
groupadd rsync
useradd rsync -g rsync

给用户修改密码
echo rsync:123456|chpasswd

准备文件
[root@master01 ~]# ll /var/www/html/
-rw-rwxr--+ 1 root root  0 12月 27 18:05 123
-rw-r--r--  1 root root 12 2月  20 13:39 index.html
drwxr-xr-x. 2 root root  6 12月 27 18:07 wenjianjia

[root@master02 ~]# mkdir /data/web-back


默认给/var/www/html 提所属主和组(chown),但是不建议,其他用户不能访问,故可以为文件设置单独的文件权限(文件ACL)
[root@master01 ~]# getfacl /var/www/html/
getfacl: Removing leading '/' from absolute path names
# file: var/www/html/
# owner: root
# group: root
user::rwx
user:rget1:rwx
group::r-x
mask::rwx
other::r-x

[root@master01 ~]# setfacl -R -m user:rsync:rwx /var/www/html/
[root@master01 ~]# getfacl /var/www/html/
getfacl: Removing leading '/' from absolute path names
# file: var/www/html/
# owner: root
# group: root
user::rwx
user:rget1:rwx
user:rsync:rwx
group::r-x
mask::rwx
other::r-x

[root@master01 ~]# setfacl -R -m default:rsync:rwx /var/www/html/
[root@master01 ~]# getfacl /var/www/html/
getfacl: Removing leading '/' from absolute path names
# file: var/www/html/
# owner: root
# group: root
user::rwx
user:rget1:rwx
user:rsync:rwx
group::r-x
mask::rwx
other::r-x
default:user::rwx
default:user:rsync:rwx
default:group::r-x
default:mask::rwx
default:other::r-x

[root@master01 ~]# ll /var/www/html/
-rw-rwxr--+ 1 root root  0 12月 27 18:05 123
-rw-rwxr--+ 1 root root 12 2月  20 13:39 index.html
drwxrwxr-x+ 2 root root  6 12月 27 18:07 wenjianjia
[root@master01 ~]#

目标目录提所属主、组,要不无法复制使用rsync账户
chown -R /data/web-back

[root@master01 opt]# rsync -azv --delete /opt/fastdfs/ rsync@192.168.206.6:/data/web-back-2/
使用 root 传输
[root@master01 ~]# cd /opt/fastdfs/
[root@master01 fastdfs]# ll
drwxr-xr-x   2 nginx nginx    6 3月   2 06:19 123
-rw-r--r--   1 nginx nginx    0 3月   2 06:19 456
drwxr-xr-x.  5 root  root    80 2月   2 14:18 data
lrwxrwxrwx.  1 root  root    13 2月   2 14:09 fastdfs -> fastdfs-6.08/
drwxrwxr-x. 13 root  root  4096 3月   3 2022 fastdfs-6.08
lrwxrwxrwx   1 root  root    26 2月   3 13:59 fastdfs-nginx-module -> fastdfs-nginx-module-1.22/
drwxrwxr-x   3 root  root    47 11月 19 2019 fastdfs-nginx-module-1.22
lrwxrwxrwx.  1 root  root    21 2月   2 14:03 libfastcommon -> libfastcommon-1.0.57/
drwxrwxr-x.  6 root  root   182 2月   2 14:04 libfastcommon-1.0.57
lrwxrwxrwx.  1 root  root    22 2月   2 14:08 libserverframe -> libserverframe-1.1.15/
drwxrwxr-x.  4 root  root   142 6月   6 2022 libserverframe-1.1.15

[root@master02 web-back-2]# mkdir /data/web-back-1

注意:/opt/fastdfs/ 加/代表不拷贝目录,只要fastdfs下的文件
[root@master01 ~]# rsync -azv --delete /opt/fastdfs/ root@192.168.206.6:/data/web-back-1

[root@master02 web-back-2]# cd /data/web-back-1
[root@master02 web-back-1]# ll
总用量 0
drwxr-xr-x  2 nginx nginx   6 3月   2 06:19 123
-rw-r--r--  1 nginx nginx   0 3月   2 06:19 456
drwxr-xr-x  5 root  root   80 2月   2 14:18 data
lrwxrwxrwx  1 root  root   13 2月   2 14:09 fastdfs -> fastdfs-6.08/
drwxrwxr-x 13 root  root  322 3月   3 2022 fastdfs-6.08
lrwxrwxrwx  1 root  root   26 2月   3 13:59 fastdfs-nginx-module -> fastdfs-nginx-module-1.22/
drwxrwxr-x  3 root  root   47 11月 19 2019 fastdfs-nginx-module-1.22
lrwxrwxrwx  1 root  root   21 2月   2 14:03 libfastcommon -> libfastcommon-1.0.57/
drwxrwxr-x  6 root  root  182 2月   2 14:04 libfastcommon-1.0.57
lrwxrwxrwx  1 root  root   22 2月   2 14:08 libserverframe -> libserverframe-1.1.15/
drwxrwxr-x  4 root  root  142 6月   6 2022 libserverframe-1.1.15
[root@master02 web-back-1]#
传出过程中会有进行
[root@master02 web-back-1]# ps -ef |grep rsync
root     17332     1  0 06:10 ?        00:00:00 rsync --daemon
root     18348 18271 30 06:36 ?        00:00:00 rsync --server -vlogDtpre.iLsfxC --delete . /data/web-back-1/
root     18353 18348  0 06:36 ?        00:00:00 rsync --server -vlogDtpre.iLsfxC --delete . /data/web-back-1/
root     18355  2692  5 06:36 pts/0    00:00:00 grep --color=auto rsync
四、配置文件启动
4.1、参数
uid = root  # 使用那个用户启动rsync
gid = root  # 用户对应的组
address = 192.168.206.5   # 使用那个网卡进启动rsync
port = 873 # 端口

# 允许哪些IP能通过rsync进行获取数据
# 可以是IP、网段(192.168.19.0/255.255.255.0 或者 192.168.19.0/24)、或者*
host allow = 192.168.206.0/24

# 是否牢笼机制,yes锁定家目录,如果被黑客攻击,无法访问rsync定义的家目录之外
use chroot = yes

# 最大的连接数量,比如=4,最大有4个同时连接我rsync
max connections = 4

# pid 文件
pid file = /var/run/rsyncd.pid

# rsync 启动后,锁定不让其他程序再次使用
lock file = /var/run/rsync.lock

# 日志文件
log file = /var/log/rsyncd.log

# 自定义提示,在使用rsync进行传输的时候,会弹出来
motd file =/etc/rsyncd.motd


[wwwroot]          # 定义模块的名字
path = /web/back/  # 同步到哪里去
read only = false  # 关闭只读模式,就等于是读写模式
list = yes         # 是否允许查看模块信息
auth users = rsyncuser  # 自定义用户,此用户并非是系统用户,此用于rsync服务端向我这个模块信息发送数据的时候,使用的用户名,加上下述配置的密码
secrets file = /etc/rsync.passwd  # 定义密码存放路径
4.2、演示
master 01 作为数据源(可以做可以不做,可以使用默认的参数):
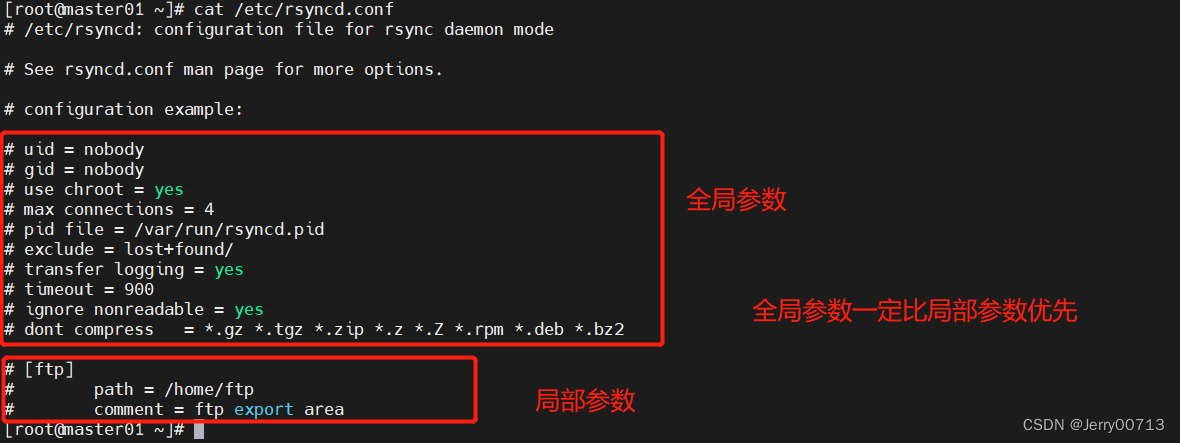
[root@master01 ~]# cat /etc/rsyncd.conf
# /etc/rsyncd: configuration file for rsync daemon mode

# See rsyncd.conf man page for more options.

# configuration example:

# uid = nobody
# gid = nobody
# use chroot = yes
# max connections = 4
# pid file = /var/run/rsyncd.pid
# exclude = lost+found/
# transfer logging = yes
# timeout = 900
# ignore nonreadable = yes
# dont compress   = *.gz *.tgz *.zip *.z *.Z *.rpm *.deb *.bz2

# [ftp]
#        path = /home/ftp
#        comment = ftp export area

uid = root
gid = root
address = 192.168.206.5
port = 873
host allow = 192.168.206.0/24
use chroot = yes
max connections = 4
pid file = /var/run/rsyncd.pid
lock file = /var/run/rsync.lock
log file = /var/log/rsyncd.log
motd file =/etc/rsyncd.motd
master 02 作为备份:
uid = root
gid = root
address = 192.168.206.6
port = 873
host allow = 192.168.206.0/24
use chroot = yes
max connections = 4
pid file = /var/run/rsyncd.pid
lock file = /var/run/rsync.lock
log file = /var/log/rsyncd.log
motd file =/etc/rsyncd.motd

[wwwroot]
path = /web/back/
read only = false
list = yes
auth users = rsyncuser
secrets file = /etc/rsync.passwd
在master 02 上制作rsync的/etc/rsync.passwd 和 /etc/rsyncd.motd
[root@master02 ~]# echo "nginx backup server" > /etc/rsyncd.motd
[root@master02 ~]# echo "rsyncuser:123abcd" > /etc/rsync.passwd
[root@master02 ~]# chmod 600 /etc/rsync.passwd    # 必须是600或者是700 ,否则会验证失败
重启rsync
[root@master01 ~]# ps -ef |grep rsync
root      9166  6070  0 03:20 pts/0    00:00:00 grep --color=auto rsync

[root@master01 ~]# rsync --daemon --config=/etc/rsyncd.conf   # 必须指定使用的配置文件
[root@master01 ~]# ps -ef |grep rsync
root      9330     1  0 03:21 ?        00:00:00 rsync --daemon --config=/etc/rsyncd.conf
root      9339  6070  0 03:21 pts/0    00:00:00 grep --color=auto rsync

[root@master01 ~]# netstat -tulpn |grep rsync
tcp        0      0 192.168.206.5:873       0.0.0.0:*               LISTEN      9330/rsync
验证rsync
[root@master02 ~]# mkdir -p /web/back/

[root@master01 ~]# rsync -azvu /var/www/html/ rsyncuser@192.168.206.6::wwwroot
nginx backup server

Password:
sending incremental file list
./
123
index.html
wenjianjia/

sent 231 bytes  received 65 bytes  84.57 bytes/sec
total size is 12  speedup is 0.04
[root@master01 ~]#
注意事项:使用rsyncuser@192.168.206.6::wwwroot 和 root@192.168.206.6:/web/back/ 区别
root@192.168.206.6:/web/back/
[root@master01 html]# ll
-rw-rw-r--+ 1 elasticsearch elasticsearch  0 3月   3 03:54 1111111
-rw-rwxr--+ 1 root          root           0 12月 27 18:05 123
-rw-rw-r--+ 1 elasticsearch elasticsearch  0 3月   3 03:50 456
-rw-rwxr--+ 1 root          root          12 2月  20 13:39 index.html
-rw-rw-r--+ 1 nginx         nginx          0 3月   3 03:40 nginx
drwxrwxr-x+ 2 nginx         nginx          6 3月   3 03:40 nginx_123
-rw-rw-r--+ 1 rsync1        rsync1         0 3月   3 04:11 rsync123
drwxrwxr-x+ 2 root          root           6 12月 27 18:07 wenjianjia

[root@master01 html]# id rsync1
uid=1005(rsync1) gid=1005(rsync1) 组=1005(rsync1)

[root@master01 html]# id elasticsearch
uid=1002(elasticsearch) gid=1002(elasticsearch) 组=1002(elasticsearch)

[root@master02 back]# id rsync1
id: rsync1: no such user

[root@master01 html]# rsync -azvu /var/www/html/ root@192.168.206.6:/web/back/
sending incremental file list
./
1111111
123
456
index.html
nginx
rsync123
nginx_123/
wenjianjia/

sent 560 bytes  received 145 bytes  1,410.00 bytes/sec
total size is 12  speedup is 0.02

[root@master02 back]# ll
-rw-rw-r-- 1 elasticsearch elasticsearch  0 3月   3 03:54 1111111
-rw-rwxr-- 1 root          root           0 12月 27 18:05 123
-rw-rw-r-- 1 elasticsearch elasticsearch  0 3月   3 03:50 456
-rw-rwxr-- 1 root          root          12 2月  20 13:39 index.html
-rw-rw-r-- 1 nginx         nginx          0 3月   3 03:40 nginx
drwxrwxr-x 2 nginx         nginx          6 3月   3 03:40 nginx_123
-rw-rw-r-- 1          1005          1005  0 3月   3 04:11 rsync123
drwxrwxr-x 2 root          root           6 12月 27 18:07 wenjianjia
[root@master02 back]#

[root@master02 back]# id elasticsearch
uid=997(elasticsearch) gid=995(elasticsearch) 组=995(elasticsearch)
从上述看,root@192.168.206.6:/web/back/ 拷贝后,rsync自动为你找到,符合拷贝之前的所属所属主、跟组 (按照名字) 。如果备份机器没有此用户,则显示备份前宿主机的用户uuid guid。如果是SCP,直接拷贝后都是使用的传输账户的属主、跟组
使用rsyncuser@192.168.206.6::wwwroot
[root@master01 html]# rsync -azvu /var/www/html/ rsyncuser@192.168.206.6::wwwroot

[root@master01 html]# ll
-rw-rw-r--+ 1 elasticsearch elasticsearch  0 3月   3 03:54 1111111
-rw-rwxr--+ 1 root          root           0 12月 27 18:05 123
-rw-rw-r--+ 1 elasticsearch elasticsearch  0 3月   3 03:50 456
-rw-rwxr--+ 1 root          root          12 2月  20 13:39 index.html
-rw-rw-r--+ 1 nginx         nginx          0 3月   3 03:40 nginx
drwxrwxr-x+ 2 nginx         nginx          6 3月   3 03:40 nginx_123
-rw-rw-r--+ 1 rsync1        rsync1         0 3月   3 04:11 rsync123
drwxrwxr-x+ 2 root          root           6 12月 27 18:07 wenjianjia

[root@master01 html]# id elasticsearch
uid=1002(elasticsearch) gid=1002(elasticsearch) 组=1002(elasticsearch)
[root@master01 html]# id nginx
uid=1001(nginx) gid=1001(nginx) 组=1001(nginx)
[root@master01 html]# id rsync1
uid=1005(rsync1) gid=1005(rsync1) 组=1005(rsync1)

[root@master02 back]# ll
-rw-rw-r-- 1 rsync rsync  0 3月   3 03:54 1111111
-rw-rwxr-- 1 root  root   0 12月 27 18:05 123
-rw-rw-r-- 1 rsync rsync  0 3月   3 03:50 456
-rw-rwxr-- 1 root  root  12 2月  20 13:39 index.html
-rw-rw-r-- 1 rget1 rget1  0 3月   3 03:40 nginx
drwxrwxr-x 2 rget1 rget1  6 3月   3 03:40 nginx_123
-rw-rw-r-- 1  1005  1005  0 3月   3 04:11 rsync123
drwxrwxr-x 2 root  root   6 12月 27 18:07 wenjianjia

[root@master02 back]# id rsync
uid=1002(rsync) gid=1002(rsync) 组=1002(rsync)

[root@master02 back]# id rget1
uid=1001(rget1) gid=1001(rget1) 组=1001(rget1)
从上述看,rrsyncuser@192.168.206.6::wwwroot 拷贝后,rsync自动为你找到,符合拷贝之前的所属所属主、跟组 (uuid guid) 。
4.3 、自动化
如果不使用ssh,使用rsync的密码,每次输入不能实现自动化,故在发送端写好,直接调用
[root@master01 html]# echo "123abcd" > /opt/passwd
[root@master01 html]# chmod 600 /opt/passwd
[root@master01 html]# rsync -azvu /var/www/html/ rsyncuser@192.168.206.6::wwwroot --password-file=/opt/passwd
nginx backup server

sending incremental file list
./
1111111
123
456
index.html
nginx
rsync123
nginx_123/
wenjianjia/

sent 564 bytes  received 145 bytes  1,418.00 bytes/sec
total size is 12  speedup is 0.02
简单的脚本自动化
[root@master01 html]# cat /opt/rsync.sh
#!/bin/bash
# 2023/03/03 04:33
# Used to backup
# Auther by Jerry
rsync -azvu /var/www/html/ rsyncuser@192.168.206.6::wwwroot --password-file=/opt/passwd

[root@master01 html]# bash /opt/rsync.sh  # 查看无问题
[root@master01 html]# echo "01 3 * * * /bin/bash /opt/rsync.sh &" >> /var/spool/cron/root
[root@master01 html]# crontab -l
01 3 * * * /bin/bash /opt/rsync.sh &
五、inotify
目前是 通过 crontab 定时任务触发 rsync 同步,如何实现实时同步,inotify 通过触发式更新,此软件用于监控目录发生的变化,但是不能监控文件是否发生改变,故发生目录变化后,告知rsync,rsync 在通过自己的机制,对目录进行增量差异对比,在进行判断同步那个文件或者目录。当然现在有更好的软件,是基于监控文件的,故就不需要再让rsync 进行判断,故使用sersync + rsync。
六、sersync + rsync
为什么要用rsync+sersync架构?
sersync 是及基于 inotify 开发的,类似于 inotify-tool 的工具
sersync可以记录下被监听目录中发生变化的(包括加、删除、修改)具体某一个文件或者某一个目录的名字,然后使用rsync同步的时候,只同步发生变化的文件或者目录
rsync+inotify-tools与rsync+sersync架构的区别?
1、rsync+inotify-tools
a、inotify只能记录下被监听的目录发生了变化(增,删,改)并没有把具体是哪个文件或者哪个目录发生了变化记录下来;b、rsync在同步的时候,并不知道具体是哪个文件或目录发生了变化,每次都是对整个目录进行同步,当数据量很大时,整个目录同步非常耗时(rsync要对整个目录遍历查找对比文件),因此效率很低
2、rsync+sersync
a、sersync可以记录被监听目录中发生变化的(增,删,改)具体某个文件或目录的名字
6、rsync在同步时,只同步发生变化的文件或目录(每次发生变化的数据相对整个同步目录数据来说很小,rsync在遍历查找对比文件时,速度很快),大此效率很高。
规划:sersync服务器(master 01) rsync服务器(master 02)
6.1、 部署
[root@master01 src]# yum -y install inotify-tools
[root@master01 src]# wget https://raw.githubusercontent.com/wsgzao/sersync/master/sersync2.5.4_64bit_binary_stable_final.tar.gz
               wget https://storage.googleapis.com/google-code-archive-downloads/v2/code.google.com/sersync/sersync2.5.4_64bit_binary_stable_final.tar.gz


[root@master01 src]# tar -zxvf sersync2.5.4_64bit_binary_stable_final.tar.gz
[root@master01 src]# cp -a GNU-Linux-x86 /usr/local/sersync
[root@master01 src]# mv /usr/local/sersync/sersync2  /usr/local/sersync/sersync
[root@master01 src]# echo 'PATH=/usr/local/sersync:$PATH' >> /etc/profile
[root@master01 src]# source /etc/profile
6.2、修改配置文件
vi /usr/local/sersync/confxml.xml
     23     <sersync> #  <!--需要监控的目录-->
     24         <localpath watch="/var/www/html">    # 添加监控的目录
     25             <remote ip="192.168.206.6" name="wwwroot"/>  # IP:将监控的文件发送给谁,name: rsync模块名字,所以远端要以daemon模式先运行好rsync
     26             <!--<remote ip="192.168.8.39" name="tongbu"/>-->  # 不用修改<!--是注释,除非下面开启了ssh start,此时name为远程shell方式运行时的目标目录
     27             <!--<remote ip="192.168.8.40" name="tongbu"/>-->
     28         </localpath>
     29         <rsync>   # 配置rsync
     30             <commonParams params="-artuz"/>
     31             <auth start="false" users="rsyncuser" passwordfile="/opt/passwd"/>  # auth start = true 打开开启,users 是模块的用户名,pass就是密码存放位置,如果是ssh形式,需要做ssh免密,这里pass只能给模块用,所以passwordfile=''
     32             <userDefinedPort start="true" port="873"/><!-- port=873 -->    # 端口,# 设置rsync远程服务端口,非默认端口需要打开自定义(若开启rsync+ssh, 则这里需定义SSH端口)
     33             <timeout start="false" time="100"/><!-- timeout=100 --> # 设置超时时间
     34             <ssh start="false"/> # 是否使用远程shell模式而非rsync daemon运行rsync命令
     35         </rsync>

     36         <failLog path="/tmp/rsync_fail_log.sh" timeToExecute="60"/><!--default every 60mins execute once--> # 错误重传。sersync传输失败日志脚本路径,每隔60会重新执行该脚本,执行完毕会自动清空。
     37         <crontab start="false" schedule="600"><!--600mins--> # 是否开启crontab功能,默认关闭
     38             <crontabfilter start="false">  # crontab定时传输的筛选功能
     39                 <exclude expression="*.php"></exclude>
     40                 <exclude expression="info/*"></exclude>
     41             </crontabfilter>
     42         </crontab>
     43         <plugin start="false" name="command"/>
     44     </sersync>
     45
     46     <plugin name="command">         # 插件脚本范例
     47         <param prefix="/bin/sh" suffix="" ignoreError="true"/>  <!--prefix /opt/tongbu/mmm.sh suffix-->
     48         <filter start="false">
     49             <include expression="(.*)\.php"/>
     50             <include expression="(.*)\.sh"/>
     51         </filter>
     52     </plugin>
     53
     54     <plugin name="socket">       # 插件脚本范例
     55         <localpath watch="/opt/tongbu">
     56             <deshost ip="192.168.138.20" port="8009"/>
     57         </localpath>
     58     </plugin>
     59     <plugin name="refreshCDN">
     60         <localpath watch="/data0/htdocs/cms.xoyo.com/site/">
     61             <cdninfo domainname="ccms.chinacache.com" port="80" username="xxxx" passwd="xxxx"/>
     62             <sendurl base="http://pic.xoyo.com/cms"/>
     63             <regexurl regex="false" match="cms.xoyo.com/site([/a-zA-Z0-9]*).xoyo.com/images"/>
     64         </localpath>
     65     </plugin>
     66 </head>
6.3、以后台方式执行同步
-d 后台 -r 递归 -o 指定配置文件
[root@master01 sersync]# sersync -d -r -o /usr/local/sersync/confxml.xml

set the system param
execute:echo 50000000 > /proc/sys/fs/inotify/max_user_watches  # 自动修改参数
execute:echo 327679 > /proc/sys/fs/inotify/max_queued_events -  # 自动修改参数
parse the command param
option: -d      run as a daemon
option: -r      rsync all the local files to the remote servers before the sersync work
option: -o      config xml name:  /usr/local/sersync/confxml.xml
daemon thread num: 10                    # 后台启动
parse xml config file
host ip : localhost     host port: 8008  # 占用端口
daemon start,sersync run behind the console
use rsync password-file :
user is rsyncuser
passwordfile is         /opt/passwd      # 调用rsync的密码
config xml parse success
please set /etc/rsyncd.conf max connections=0 Manually
sersync working thread 12  = 1(primary thread) + 1(fail retry thread) + 10(daemon sub threads)
Max threads numbers is: 22 = 12(Thread pool nums) + 10(Sub threads)
please according your cpu ,use -n param to adjust the cpu rate
------------------------------------------
rsync the directory recursivly to the remote servers once
working please wait...
execute command: cd /var/www/html && rsync -artuz -R --delete ./  --port=873  rsyncuser@192.168.206.6::wwwroot --password-file=/opt/passwd >/dev/null 2>&1  指定rsyncd的命令
run the sersync:
watch path is: /var/www/html
说明:还有些其他参数,使用“-h”选项查看。
参数-d:启用守护进程模式,让sersync运行在后台
参数-r: 在监控前,将监控目录与远程主机用rsync命令推送一遍,
即首先让远端目录和本地一致,以后再同步则通过监控实现增量同步
参数-n:指定开启守护线程的数量,默认为10个
参数-o:指定配置文件,默认使用confxml.xml文件
参数-m:单独启用其他模块,使用 -m refreshCDN 开启刷新CDN模块
参数-m:单独启用其他模块,使用 -m socket 开启socket模块
参数-m:单独启用其他模块,使用 -m http 开启http模块
不加-m参数,则默认执行同步程序
6.4、观察过程
备份机器执行watch查看
[root@master02 ~]# cd /web/back/
[root@master02 back]# watch ls -l

master机器执行touch
[root@master02 ~]# cd /var/www/html/
[root@master02 ~]# touch file
6.5 、增加启动脚本
[root@master01 sersync]# pwd
/usr/local/sersync

[root@master01 sersync]# cat shutdown.sh
#!/bin/bash

status=`ps aux |grep 'sersync \-d \-r \-o \/usr/local/sersync/bbs_confxml.xml'|wc -l`

if [ $status -ne 0 ]; then
 kill -9 `ps aux |grep 'sersync \-d \-r \-o \/usr/local/sersync/bbs_confxml.xml'|awk -F ' ' '{print $2}'` >>./sersync.log
else
 exit 0;
fi

[root@master01 sersync]# cat startup.sh
#!/bin/bash
sersync='/usr/local/sersync/sersync'
confxml='/usr/local/sersync/confxml.xml'

status=$(ps aux |grep 'ps aux |grep 'sersync \-d \-r \-o \/usr/local/sersync/bbs_confxml.xml'|wc -l)

if [ $status -eq 0 ]; then
 $sersync -d -r -o $confxml >>./sersync.log &
else
 exit 0;
fi

[root@master01 sersync]# chmod 755 startup.sh shutdown.sh
6.6、监控另一个目录
使用ssh形式
[root@master01 sersync]# pwd
/usr/local/sersync

[root@master01 sersync]# ll
-rwxr-xr-x  1 root root    2205 3月   3 07:04 bbs_confxml.xml
-rwxr-xr-x  1 root root    2222 3月   3 06:17 confxml.xml
-rwxr-xr-x  1 root root 1810128 10月 26 2011 sersync
-rw-r--r--  1 root root    1182 3月   3 06:45 sersync.log
-rwxr-xr-x+ 1 root root     194 3月   3 06:50 shutdown.sh
-rwxr-xr-x  1 root root     235 3月   3 06:51 startup.sh

[root@master01 sersync]# cat bbs_confxml.xml

    <sersync>
        <localpath watch="/var/www/bbs/">
            <remote ip="192.168.206.6" name="/data/bbs/"/>  # name 目标目录
            <!--<remote ip="192.168.8.39" name="tongbu"/>-->
            <!--<remote ip="192.168.8.40" name="tongbu"/>-->
        </localpath>
        <rsync>
            <commonParams params="-artuz"/>
            <auth start="true" users="root" passwordfile=""/>  # 密码是空,要做免密,ssh用户root
            <userDefinedPort start="true" port="22"/><!-- port=22 -->  # 22
            <timeout start="false" time="100"/><!-- timeout=100 -->
            <ssh start="true"/>  # true
        </rsync>
[root@master01 sersync]# sersync -d -r -o /usr/local/sersync/bbs_confxml.xml