前言
从现在开始进入高级部分的学习,鼓励自己一下!
画个大饼: 常用类->集合框架->IO流->多线程->网络编程 ->注解与反射->GUI
很重要的东西,不能不会!
Object类
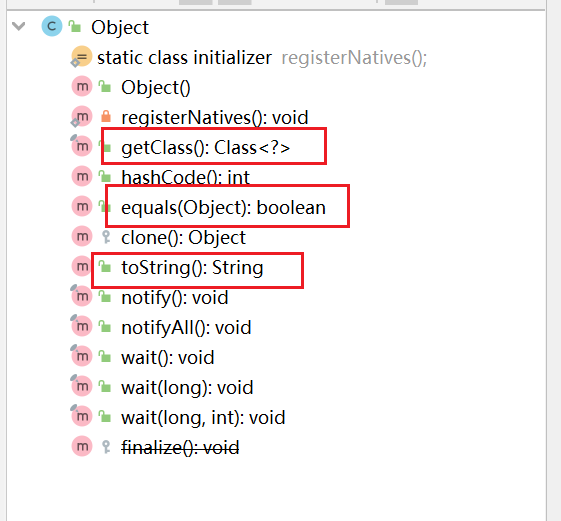
祖宗类,主要方法:
toString()
getClass()
equals()
clone()
finalize()
clone ( protected )
分配一个和源对象同样大小的空间,在这个而空间创造一个对象。调用时的代码就是super.clone()
clone和new的区别
new() | clone() | |
分配空间 | 根据new后面的类型,分配空间 | 根据clone对象的大小,分配空间 |
初始化 | 调用构造函数,填充对象的域(初始化) | 使用源对象的域,填充新对象的域 |
发布对象的引用 | 把对象的引用发布到外部 | clone方法返回,把新的对象引用发布到外部 |
clone和copy的区别
clone是复制域,是新建了一个区域,内容和原对象一样
copy(就是 = )是引用,是两个名字指向内存的同一个object
复写clone()
但clone也有问题,因为java中,除了八大类型是值传递,其他类对象传参数都是引用。
比如某对象中有一个引用对象,clone就是复制了一个引用,指向的还是同一个内存object。克隆类和原始类共享一块区域,这不是我们想要的。
clone的保护机制
clone是protected的,需要改写为public
综上,实现深克隆需要以下几步:
类要实现cloneable接口
成员中的类对象,在类中写个clone()
clone()重写为public
调用super.clone()实现复制
类的clone重写为深复制
将clone()重写为public
clone()中,先浅复制一下整体,再调用给类中涉及到的其他类的clone
如:Employee类,中包含SchoolInfo类。实现Employee类的深度clone,
首先这两个类都要implement cloneable;
其次,SchoolInfo里写一个public clone(), 返回SchoolInfo对象,这个对象是(SchoolInfo)super.clone()来的;
然后,Employee里写一个public clone(), 返回Employee对象,这个对象也是(Employee)super.clone()来的,同时这个对象的schoolInfo成员,也要是schoolInfo.clone()来的;
Employee代码:
package com.Object.CloneTest;

public class Employee implements Cloneable {
    String name;
    int age;
    SchoolInfo schoolInfo;

    // getter & setter
    public String getName() {
        return name;
    }

    public int getAge() {
        return age;
    }

    public SchoolInfo getSchoolInfo() {
        return schoolInfo;
    }

    public void setSchoolInfo(SchoolInfo schoolInfo) {
        this.schoolInfo = schoolInfo;
    }

    public void setName(String name) {
        this.name = name;
    }

    public void setAge(int age) {
        this.age = age;
    }

    // constructor
    public Employee(String name, int age, SchoolInfo schoolInfo){
        this.name = name;
        this.age = age;
        this.schoolInfo = schoolInfo;
    }
    public Employee(){}

    // clone,重点在于super.clone()  和 schoolinfo.clone()
    public Employee clone(){
        Employee employee = null;
        try {
            employee = (Employee) super.clone();
            employee.schoolInfo = (SchoolInfo) schoolInfo.clone();
        }catch(CloneNotSupportedException e){
            e.printStackTrace();
        }
        return employee;
    }

}
SchoolInfo代码
package com.Object.CloneTest;

public class SchoolInfo implements Cloneable {
    String schoolName;
    int graduateYear;

    public String getSchoolName() {
        return schoolName;
    }

    public void setSchoolName(String schoolName) {
        this.schoolName = schoolName;
    }

    public int getGraduateYear() {
        return graduateYear;
    }

    public void setGraduateYear(int graduateYear) {
        this.graduateYear = graduateYear;
    }

    public SchoolInfo clone(){
        SchoolInfo schoolInfo = new SchoolInfo();

        try{
            schoolInfo =(SchoolInfo) super.clone();
        }
        catch(CloneNotSupportedException e){
            e.printStackTrace();
        }
        return schoolInfo;
    }
}
Test代码:
package com.Object.CloneTest;

public class Test {
    public static void main(String[] args) {

        // 初始化原始类
        SchoolInfo info = new SchoolInfo();
        info.schoolName = "清华大学";
        info.graduateYear = 2023;
        Employee Cindy = new Employee("Cindy", 22, info);

        // 新建一个Employee
        Employee Wind = Cindy.clone();
        System.out.println(Wind.schoolInfo.graduateYear);
        Wind.schoolInfo.setGraduateYear(20);
        System.out.println("Cindy的毕业年份: " + Cindy.schoolInfo.graduateYear);
        System.out.println("Wind的毕业年份: " + Wind.schoolInfo.graduateYear);
    }
}

改变Wind中SchoolInfo对象的值,并没有改变Cindy中对应的值,可见实现了深度复制clone
toString ( public )
返回字符串,类名+@+对象哈希码的无符号十六进制表示
Test中测试:
        // toString()
        /*
        如果Employee的clone中,没有调用schoolInfo的clone()函数,则这里输出的是:
        com.Object.CloneTest.SchoolInfo@3941a79c
        com.Object.CloneTest.SchoolInfo@3941a79c

        如果Employee的clone中,调用schoolInfo的clone()函数,则这里输出的是:
        com.Object.CloneTest.SchoolInfo@3941a79c
        com.Object.CloneTest.SchoolInfo@506e1b77

        可见,调用成员变量所在类的clone,的确是新建了一个域,实现了深复制
         */

        System.out.println(Cindy.schoolInfo.toString());
        System.out.println(Wind.schoolInfo.toString());
getClass( public )
一般和getName()配合使用
// getClass
        SchoolInfo schoolInfo = new SchoolInfo();
        System.out.println(schoolInfo.getClass().getName());
equals
比较调用equals的对象,和形参obj所引用的对象,是否是同一个
// equals
        System.out.println(Wind.schoolInfo.equals(Cindy.schoolInfo));
如果像比较内容,则需要重写equals函数,比如String类中就重写了
hashCode()
返回对象哈希值
如果对象equals为true,那么hashCode可推出为true
但hash相等,不一定equals
wait()
调用该方法后线程进入睡眠状态,直到:
其他线程调用了该对象的notify
其他线程调用了该对象的notifyAll
其他线程调用了interrupt中断该线程
时间间隔到了
此时该线程可以被调度,如果是被中断的话,会InterruptedException异常
notify()和notifyAll()
唤醒在该对象上等待的某个线程/所有线程
包装类
介绍
基本数据类型所对应的包装类,可采用面向对象技术,继承Object类.
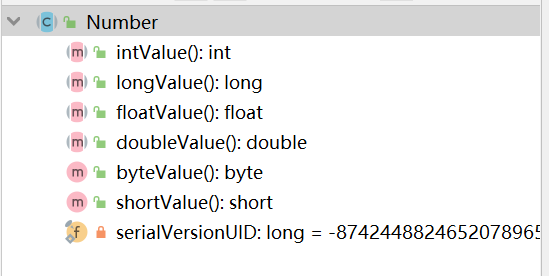
所有的包装类,都是Number抽象类的子类
可以互换:
装箱:基本类型 ->包装类
拆箱:包装类 -> 基本类型
byte | Byte |
short | Short |
int | Integer |
long | Long |
char | Character |
float | Float |
double | Double |
boolean | Boolean |
应用
int<->integer
public static void main(String[] args) {
        // 新建Integer对象
        int m = 500;
        Integer iObject = new Integer(m);
        int n = iObject.intValue();
        System.out.println(n);

        /*
        .equals 比较的是值
         */
        Integer iObj1 = new Integer(500);
        System.out.println(iObj1.equals(iObject));   // true
        System.out.println(iObj1.equals(m));         // true
        Integer iObj2 = new Integer(300);
        System.out.println(iObj2.equals(iObject));   // false

        /*
        toString 得到的也是值,不是class Name @ 哈希码
         */
        System.out.println(iObj1.toString());   // 500
        System.out.println(iObj2.toString());   // 300

        /*
        hashCode 得到的也是值
         */
        System.out.println("hash Obj1 => " + iObj1.hashCode());   // 500
        System.out.println("hash Obj2 => " + iObj2.hashCode());   // 300
    }
源码:

        int m = 500;
        Integer iObject = new Integer(m);
        System.out.println(iObject.equals(m));         // true
(所以,int m = 5; 和new一个Integer对象,对象value = 5; 这两个变量判断equals时,int如果是实参,会自动把int转换为Integer类)


字符串转化为整数
Integer.parseInt(String s, int radix)
public static void main(String[] args) {
        /*
        hello不能被parseInt
        1234可以被parseInt为1234
        32daj不能被parseInt
         */
        String[] ss = {"hello", "1234", "32daj"};
        for (String s:ss){
            try {
                int m = Integer.parseInt(s, 10);
                System.out.println(s + "可以被parseInt为" + m);
            }catch(Exception e){
                System.out.println(s + "不能被parseInt");
            }
        }
    }
整数转换为字符串
Integer.toString()
整数后面加""即可
自动拆箱和装箱
Integer i = 100;    // 自动装箱,等同于Integer I = new Integer(i)
int j = i;    // 自动拆箱,等同于int j = i.intValue()
java1.5以后,不用显式写出new Integer()
Math类
    public static void main(String[] args) {
        System.out.println("sqrt(a): 4的平方根" + Math.sqrt(4));
        System.out.println("cbrt(a): 8的立方根" + Math.cbrt(8));
        System.out.println("pow(a,b): 计算次方, 4 的 2 次方:" + Math.pow(4,2));
        System.out.println("Max(a,b): 最大值" + Math.max(4,3));
        System.out.println("Min(a,b): 最小值" + Math.min(4,3));
        System.out.println("abs(a): 绝对值" + Math.abs(-102) +" " + Math.abs(3.4));
        System.out.println("ceil(a): >2.4的最小整数值" + Math.ceil(2.4));
        System.out.println("floor(a): <3.2的最大整数值" + Math.floor(3.2));
        System.out.println("random(): [0.1)随机" + Math.random());
        System.out.println("rint(): 四舍五入,但0.5时取偶数整数,返回double" + Math.rint(4.5));
        System.out.println("round(): 四舍五入,但0.5时取偶数整数,返回int(输入float)/ long(输入double)" + Math.round(4.5));
    }
Random类
两种
java.lang.Math.Random
[0.0,1.0) 下的带正号的double值
random(): [0.1)随机0.007757039688858547
2. java.util.Random
Random(): 创建一个随机数生成器
Random( Long Seed): 使用单个Long种子创建一个新的随机数生成器
    public static void main(String[] args) {
        Random r = new Random();
        int iRandom = r.nextInt(120); // [0, 120) 的整数, 每次生成都不一样
        System.out.println(iRandom);

        Random rSeed = new Random(20);
        for(int i = 0; i < 10; i++){    // 生成的这十个数,每次运行程序,生成的序列都一样
            System.out.println(rSeed.nextInt(120));
        }
    }
日期时间类
Date类
构造函数
Date() 当前日期和时间
Date(long millisec) 1970.1.1 起的毫秒数
我看还可以通过,Date(23,1,2) 来新建Date对象
创建对象后,有:
getTime()函数,返回自1970.1.1以来的毫秒数
setTime(long time) 用1970.1.1后的毫秒数设置日期
toString() 将对象转换为 dow mon dd hh:mm:ss zzz yyy
    public static void main(String[] args) {
        // 获取当前时间
        // Thu Mar 02 15:36:57 CST 2023
        Date date = new Date();
        System.out.println(date.toString());

        // 获取自1970.1.1的毫秒数
        // 比较两个毫秒数:false
        Date date1 = new Date();
        long time = date.getTime();
        long time1 = date1.getTime();
        System.out.print("比较两个毫秒数:");
        System.out.println(time==time1);

        // 比较日期
        // false
        Date date2 = new Date(23,01,3);
        System.out.println(date.before(date2));
    }
SimpleDateFormat
格式化日期 yyyy-MM-dd hh:mm:ss
大小写的原因:MM月份,mm分钟 ,HH为24小时制,hh为12小时
    public static void main(String[] args) {
        // 24小时制
        SimpleDateFormat f  = new SimpleDateFormat("yyyy年MM月dd日 HH:mm:ss");
        // 12小时制
        SimpleDateFormat f1  = new SimpleDateFormat("yyyy年MM月dd日 hh:mm:ss");
        Date date = new Date();
        System.out.println(f.format(date)); //2023年03月02日 15:46:19
        System.out.println(f1.format(date));//2023年03月02日 03:46:19
    }
还有一种,printf
    public static void main(String[] args) {
        Date d = new Date();
        // %tc 全部日期信息
        // 周四 3月 02 15:49:43 CST 2023
        System.out.printf("%tc", d);
        System.out.println();
        // %tF 年-月-日
        // 2023-03-02
        System.out.printf("%tF", d);
        System.out.println();
        // tD 日/月/年(2位)
        // 03/02/23
        System.out.printf("%tD", d);
        System.out.println();
        // %tr
        // 03:52:26 下午
        System.out.printf("%tr", d);
        System.out.println();
        // %tt
        // 15:52:26
        System.out.printf("%tT", d);
        System.out.println();
        // %tR
        // 15:52
        System.out.printf("%tR", d);
        System.out.println();
    }
休眠sleep
Thread.sleep(1000*3) // 休眠3秒Calendar类
获取日期的特定部分、在特定部分进行加减
Calendar比Date强大
创建:不是new出来的,是类的一个.getInstance() 方法得到的
Calendar calendar = Calendar.getInstance();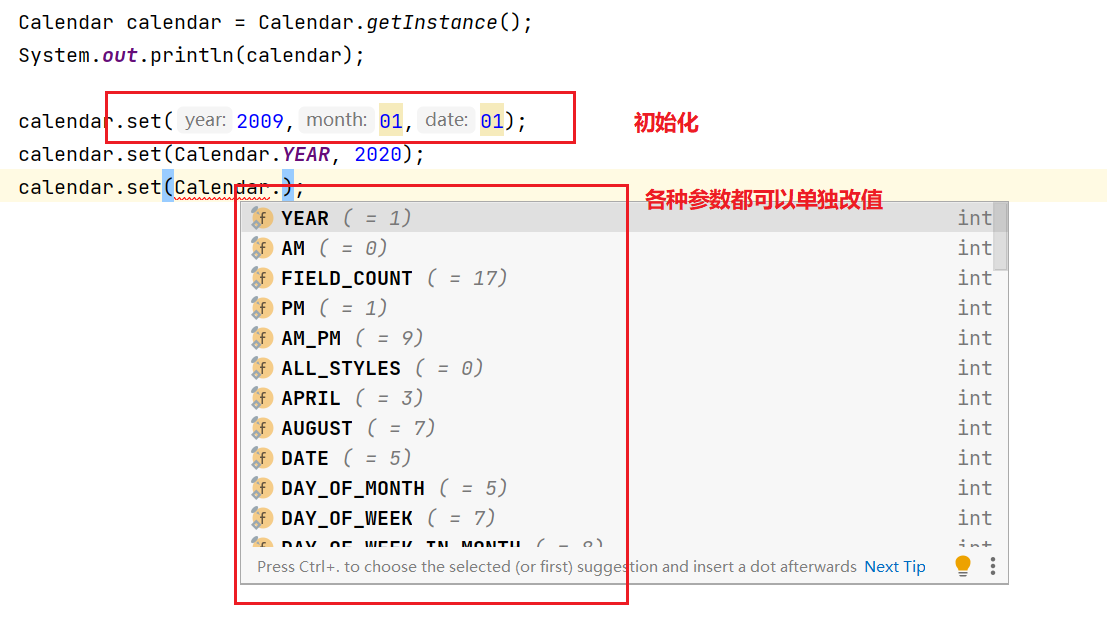
String类
创建方法:
直接复制 String s = “hello”:开辟堆内存空间,自动入池
new一个对象String s = new String("hello"):先开辟一个堆空间放hello,new的时候又开辟一个,s指向后一个,之前的堆空间变成垃圾,不会自动入池
    public static void main(String[] args) {
        String s = "hello";
        String s0 = "hello";
        String s1 = new String("hello");
        String s2  = s1;
        // s1是引用类型,所以 == 是比较的地址
        System.out.println(s == s1);    // false
        System.out.println(s1 == s2);   // true

        // s 和 s0都是基本数据类型,所以比较的是内容
        System.out.println(s == s0);    // true
    }
常量池、享元模式
StringBuilder 和 StringBuffer
线程非线程的,跳过没看


