Request&Response
- 1 Request和Response的概述
- 2 Request对象
- 2.1 Request继承体系
- 2.2 Request获取请求数据
- 2.2.1 获取请求行数据
- 2.2.2 获取请求头数据
- 2.2.3 获取请求体数据
- 2.2.4 小结
- 2.2.5 获取请求参数的通用方式
- 2.3 IDEA快速创建Servlet
- 2.4 请求参数中文乱码问题
- 2.4.1 POST请求解决方案
- 2.4.2 GET请求解决方案
- 2.5 Request请求转发
- 3 Response对象
- 3.1 Response设置响应数据功能介绍
- 3.2 Respones请求重定向
- 3.3 路径问题
- 3.4 Response响应字符数据
- 3.3 Response响应字节数据
目标
- 掌握Request对象的概念与使用
- 掌握Response对象的概念与使用
- 能够完成用户登录注册案例的实现
- 能够完成SqlSessionFactory工具类的抽取
1 Request和Response的概述
Request是请求对象,Response是响应对象。
request和response这两个参数的作用是什么?
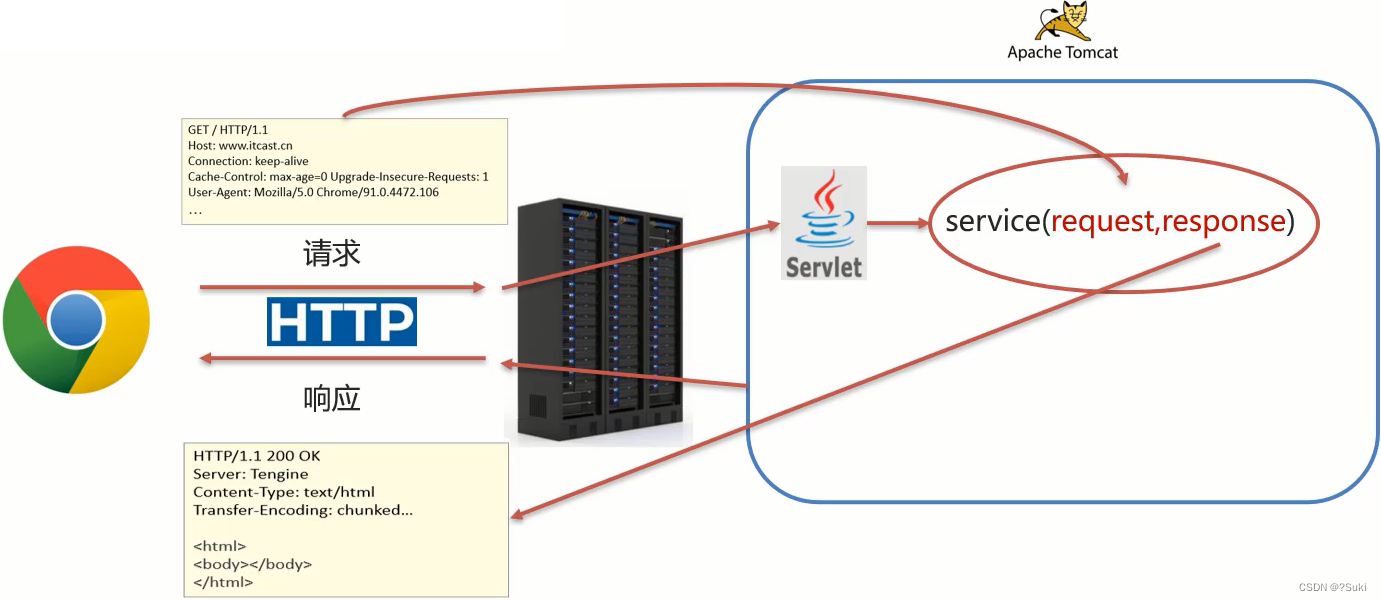
- request:获取请求数据
- 浏览器会发送HTTP请求到后台服务器[Tomcat]
- HTTP的请求中会包含很多请求数据[请求行+请求头+请求体]
- 后台服务器[Tomcat]会对HTTP请求中的数据进行解析并把解析结果存入到一个对象中
- 所存入的对象即为request对象,所以我们可以从request对象中获取请求的相关参数
- 获取到数据后就可以继续后续的业务,比如获取用户名和密码就可以实现登录操作的相关业务
- response:设置响应数据
- 业务处理完后,后台就需要给前端返回业务处理的结果即响应数据
- 把响应数据封装到response对象中
- 后台服务器[Tomcat]会解析response对象,按照[响应行+响应头+响应体]格式拼接结果
- 浏览器最终解析结果,把内容展示在浏览器给用户浏览
对于上述所讲的内容,我们通过一个案例来初步体验下request和response对象的使用。
package com.suki.web;

import javax.servlet.ServletException;
import javax.servlet.annotation.WebServlet;
import javax.servlet.http.HttpServlet;
import javax.servlet.http.HttpServletRequest;
import javax.servlet.http.HttpServletResponse;
import java.io.IOException;

@WebServlet("/demo3")
public class ServletDemo3 extends HttpServlet {
    @Override
    protected void doGet(HttpServletRequest req, HttpServletResponse resp) throws ServletException, IOException {
        //使用request对象 获取请求数据
        String name = req.getParameter("name");//url?name=zhangsan

        //使用response对象 设置响应数据
        resp.setHeader("content-type","text/html;charset=utf-8");
        resp.getWriter().write("<h1>"+name+",欢迎您!</h1>");
    }

    @Override
    protected void doPost(HttpServletRequest req, HttpServletResponse resp) throws ServletException, IOException {
        System.out.println("Post...");
    }
}
启动成功后就可以通过浏览器来访问http://localhost:8080/web_demo_war/demo3?name=suki,并且根据传入参数的不同就可以在页面上展示不同的内容:

小结
在这节中,我们主要认识了下request对象和reponse对象:
- request对象是用来封装请求数据的对象
- response对象是用来封装响应数据的对象
目前我们只知道这两个对象是用来干什么的,那么它们具体是如何实现的,就需要我们继续深入的学习。接下来,就先从Request对象来学习,主要学习下面这些内容:
- request继承体系
- request获取请求参数
- request请求转发
2 Request对象
2.1 Request继承体系
在学习这节内容之前,我们先思考一个问题,前面在介绍Request和Reponse对象的时候,比较细心的同学可能已经发现:
- 当我们的Servlet类实现的是Servlet接口的时候,service方法中的参数是ServletRequest和ServletResponse
- 当我们的Servlet类继承的是HttpServlet类的时候,doGet和doPost方法中的参数就变成HttpServletRequest和HttpServletReponse
那么,
- ServletRequest和HttpServletRequest的关系是什么?
- request对象是有谁来创建的?
- request提供了哪些API,这些API从哪里查?
首先,我们先来看下Request的继承体系:
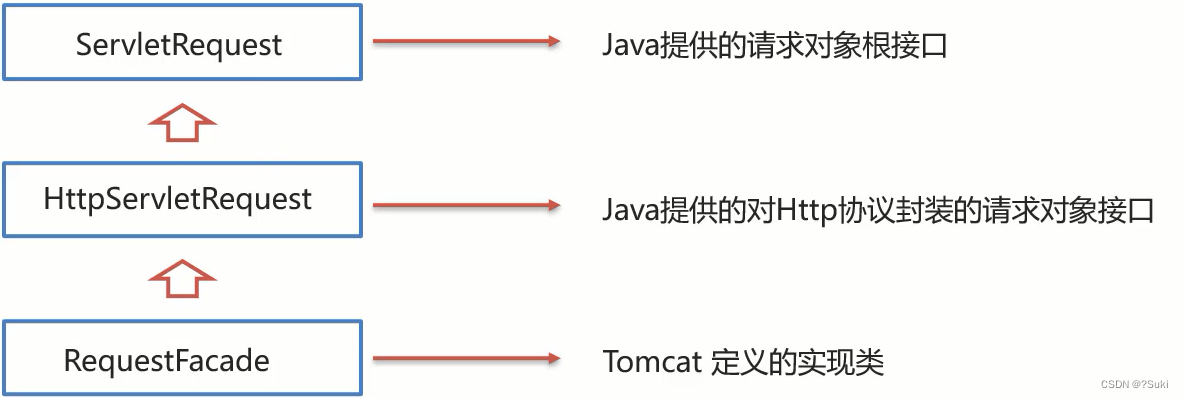
从上图中可以看出,ServletRequest和HttpServletRequest都是Java提供的,所以我们可以打开JavaEE提供的API文档[参考: 资料/JavaEE7-api.chm],打开后可以看到:

所以ServletRequest和HttpServletRequest是继承关系,并且两个都是接口,接口是无法创建对象,这个时候就引发了下面这个问题:
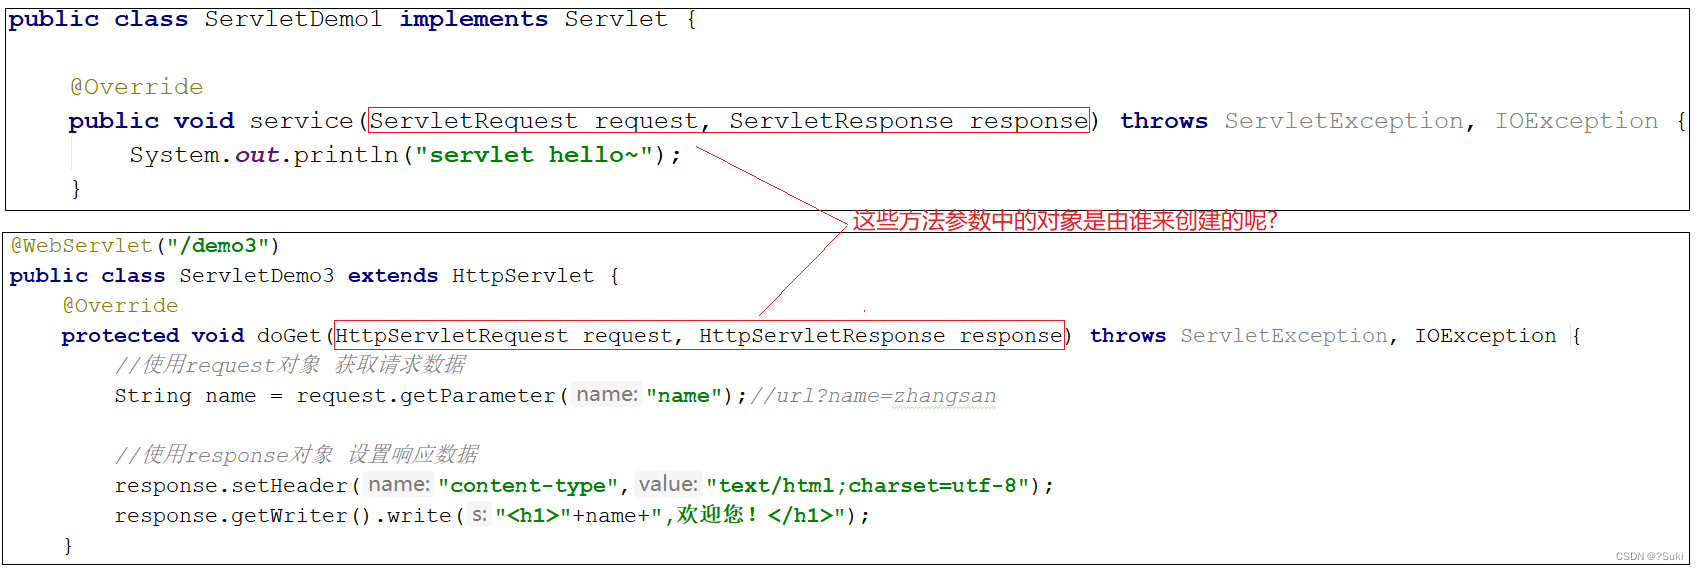
这个时候,我们就需要用到Request继承体系中的RequestFacade:
- 该类实现了HttpServletRequest接口,也间接实现了ServletRequest接口。
- Servlet类中的service方法、doGet方法或者是doPost方法最终都是由Web服务器[Tomcat]来调用的,所以Tomcat提供了方法参数接口的具体实现类,并完成了对象的创建
- 要想了解RequestFacade中都提供了哪些方法,我们可以直接查看JavaEE的API文档中关于ServletRequest和HttpServletRequest的接口文档,因为RequestFacade实现了其接口就需要重写接口中的方法
对于上述结论,要想验证,可以编写一个Servlet,在方法中把request对象打印下,就能看到最终的对象是不是RequestFacade,代码如下:
@WebServlet("/demo2")
public class ServletDemo2 extends HttpServlet {
    @Override
    protected void doGet(HttpServletRequest request, HttpServletResponse response) throws ServletException, IOException {
        System.out.println(request);
    }

    @Override
    protected void doPost(HttpServletRequest request, HttpServletResponse response) throws ServletException, IOException {
    }
}
启动服务器,运行访问http://localhost:8080/request-demo/demo2,得到运行结果:

小结
- Request的继承体系为ServletRequest–>HttpServletRequest–>RequestFacade
- Tomcat需要解析请求数据,封装为request对象,并且创建request对象传递到service方法
- 使用request对象,可以查阅JavaEE API文档的HttpServletRequest接口中方法说明
2.2 Request获取请求数据
HTTP请求数据总共分为三部分内容,分别是请求行、请求头、请求体,对于这三部分内容的数据,分别该如何获取,首先我们先来学习请求行数据如何获取?
2.2.1 获取请求行数据
请求行包含三块内容,分别是请求方式、请求资源路径、HTTP协议及版本

对于这三部分内容,request对象都提供了对应的API方法来获取,具体如下:
- 获取请求方式:
GET
String getMethod()
- 获取虚拟目录(项目访问路径):
/request_demo_war
String getContextPath()
- 获取URL(统一资源定位符):
http://localhost:8080/request_demo_war/req1
StringBuffer getRequestURL()
- 获取URI(统一资源标识符):
/request_demo_war/req1
String getRequestURI()
- 获取请求参数(GET方式):
username=suki&password=123
String getQueryString()
介绍完上述方法后,咱们通过代码把上述方法都使用下:
package com.suki.req;

import javax.servlet.ServletException;
import javax.servlet.annotation.WebServlet;
import javax.servlet.http.HttpServlet;
import javax.servlet.http.HttpServletRequest;
import javax.servlet.http.HttpServletResponse;
import java.io.IOException;

/**
 * @description request 获取请求数据
 */
@WebServlet("/req1")
public class RequestDemo1 extends HttpServlet {
    @Override
    protected void doGet(HttpServletRequest req, HttpServletResponse resp) throws ServletException, IOException {
        //  String getMethod(): 获取请求方式:GET
        String method = req.getMethod();
        System.out.println(method); //GET
        //  String getContextPath(): 获取虚拟目录(项目访问路径):/request_demo_war
        String contextPath = req.getContextPath();
        System.out.println(contextPath);
        //  StringBuffer getRequestURL(): 获取URL(统一资源定位符):http://localhost:8080/request_demo_war/req1
        StringBuffer url = req.getRequestURL();
        System.out.println(url.toString());
        //  String getRequestURI(): 获取URI(统一资源标识符):/request_demo/req1
        String uri = req.getRequestURI();
        System.out.println(uri);
        //  String getQueryString(): 获取请求参数(GET方式):username=suki
        String queryString = req.getQueryString();
        System.out.println(queryString);
    }

    @Override
    protected void doPost(HttpServletRequest req, HttpServletResponse resp) throws ServletException, IOException {

    }
}
启动服务器,访问http://localhost:8080/request_demo_war/req1?username=suki&password=123,获取的结果如下:

2.2.2 获取请求头数据
对于请求头的数据,格式为key: value如下:

所以根据请求头名称获取对应值的方法为:
String getHeader(String name)
接下来,在代码中如果想要获取客户端浏览器的版本信息,则可以使用
/**
 * request 获取请求数据
 */
@WebServlet("/req1")
public class RequestDemo1 extends HttpServlet {
    @Override
    protected void doGet(HttpServletRequest req, HttpServletResponse resp) throws ServletException, IOException {
        //获取请求头: user-agent: 浏览器的版本信息
        String agent = req.getHeader("user-agent");
		System.out.println(agent);
    }
    @Override
    protected void doPost(HttpServletRequest req, HttpServletResponse resp) throws ServletException, IOException {
    }
}
重新启动服务器后,http://localhost:8080/request_demo_war/req1?username=suki&password=123,获取的结果如下:

2.2.3 获取请求体数据
浏览器在发送GET请求的时候是没有请求体的,所以需要把请求方式变更为POST,请求体中的数据格式如下:

对于请求体中的数据,Request对象提供了如下两种方式来获取其中的数据,分别是:
- 获取字节输入流,如果前端发送的是字节数据,比如传递的是文件数据,则使用该方法
ServletInputStream getInputStream()
该方法可以获取字节
- 获取字符输入流,如果前端发送的是纯文本数据,则使用该方法
BufferedReader getReader()
接下来,大家需要思考,要想获取到请求体的内容该如何实现?
具体实现的步骤如下:
1.准备一个页面,在页面中添加form表单,用来发送post请求
2.在Servlet的doPost方法中获取请求体数据
3.在doPost方法中使用request的getReader()或者getInputStream()来获取
4.访问测试
- 在项目的webapp目录下添加一个html页面,名称为:
req.html
<!DOCTYPE html>
<html lang="en">
<head>
    <meta charset="UTF-8">
    <title>Title</title>
</head>
<body>
<!--
    action:form表单提交的请求地址
    method:请求方式,指定为post
-->
<form action="/request-demo/req1" method="post">
    <input type="text" name="username">
    <input type="password" name="password">
    <input type="submit">
</form>
</body>
</html>
- 在Servlet的doPost方法中获取数据
/**
 * request 获取请求数据
 */
@WebServlet("/req1")
public class RequestDemo1 extends HttpServlet {
    @Override
    protected void doGet(HttpServletRequest req, HttpServletResponse resp) throws ServletException, IOException {
    }
    @Override
    protected void doPost(HttpServletRequest req, HttpServletResponse resp) throws ServletException, IOException {
        //在此处获取请求体中的数据
    }
}
- 调用getReader()或者getInputStream()方法,因为目前前端传递的是纯文本数据,所以我们采用getReader()方法来获取
/**
 * request 获取请求数据
 */
@WebServlet("/req1")
public class RequestDemo1 extends HttpServlet {
    @Override
    protected void doGet(HttpServletRequest req, HttpServletResponse resp) throws ServletException, IOException {
    }
    @Override
    protected void doPost(HttpServletRequest req, HttpServletResponse resp) throws ServletException, IOException {
         //获取post 请求体:请求参数
        //1. 获取字符输入流
        BufferedReader br = req.getReader();
        //2. 读取数据
        String line = br.readLine();
        System.out.println(line);
    }
}
注意
BufferedReader流是通过request对象来获取的,当请求完成后request对象就会被销毁,request对象被销毁后,BufferedReader流就会自动关闭,所以此处就不需要手动关闭流了。
- 启动服务器,通过浏览器访问
http://localhost:8080/request_demo_war/req.html

点击提交按钮后,就可以在控制台看到前端所发送的请求数据

2.2.4 小结
HTTP请求数据中包含了请求行、请求头和请求体,针对这三部分内容,Request对象都提供了对应的API方法来获取对应的值:
- 请求行
- getMethod()获取请求方式
- getContextPath()获取项目访问路径
- getRequestURL()获取请求URL
- getRequestURI()获取请求URI
- getQueryString()获取GET请求方式的请求参数
- 请求头
- getHeader(String name)根据请求头名称获取其对应的值
- 请求体
- 注意: 浏览器发送的POST请求才有请求体
- 如果是纯文本数据:getReader()
- 如果是字节数据如文件数据:getInputStream()
2.2.5 获取请求参数的通用方式
在学习下面内容之前,我们先提出两个问题:
- 什么是请求参数?
- 请求参数和请求数据的关系是什么?
1.什么是请求参数?
为了能更好的回答上述两个问题,我们拿用户登录的例子来说明
1.1 想要登录网址,需要进入登录页面
1.2 在登录页面输入用户名和密码
1.3 将用户名和密码提交到后台
1.4 后台校验用户名和密码是否正确
1.5 如果正确,则正常登录,如果不正确,则提示用户名或密码错误
上述例子中,用户名和密码其实就是我们所说的请求参数。
2.什么是请求数据?
请求数据则是包含请求行、请求头和请求体的所有数据
3.请求参数和请求数据的关系是什么?
3.1 请求参数是请求数据中的部分内容
3.2 如果是GET请求,请求参数在请求行中
3.3 如果是POST请求,请求参数一般在请求体中
对于请求参数的获取,常用的有以下两种:
- GET方式:
String getQueryString()
- POST方式:
BufferedReader getReader();
有了上述的知识储备,我们来实现一个案例需求:
(1)发送一个GET请求并携带用户名,后台接收后打印到控制台
(2)发送一个POST请求并携带用户名,后台接收后打印到控制台
此处大家需要注意的是GET请求和POST请求接收参数的方式不一样,具体实现的代码如下:
@WebServlet("/req1")
public class RequestDemo1 extends HttpServlet {
    @Override
    protected void doGet(HttpServletRequest req, HttpServletResponse resp) throws ServletException, IOException {

        String result = req.getQueryString();
        System.out.println(result);

    }
    @Override
    protected void doPost(HttpServletRequest req, HttpServletResponse resp) throws ServletException, IOException {
        BufferedReader br = req.getReader();
        String result = br.readLine();
        System.out.println(result);
    }
}
- 对于上述的代码,会存在什么问题呢?

- 如何解决上述重复代码的问题呢?

当然,也可以在doGet中调用doPost,在doPost中完成参数的获取和打印,另外需要注意的是,doGet和doPost方法都必须存在,不能删除任意一个。
GET请求和POST请求获取请求参数的方式不一样,在获取请求参数这块该如何实现呢?
要想实现,我们就需要思考:
GET请求方式和POST请求方式区别主要在于获取请求参数的方式不一样,是否可以提供一种统一获取请求参数的方式,从而统一doGet和doPost方法内的代码?
解决方案一:
@WebServlet("/req1")
public class RequestDemo1 extends HttpServlet {
    @Override
    protected void doGet(HttpServletRequest req, HttpServletResponse resp) throws ServletException, IOException {
        //获取请求方式
        String method = req.getMethod();
        //获取请求参数
        String params = "";
        if("GET".equals(method)){
            params = req.getQueryString();
        }else if("POST".equals(method)){
            BufferedReader reader = req.getReader();
            params = reader.readLine();
        }
        //将请求参数进行打印控制台
        System.out.println(params);

    }
    @Override
    protected void doPost(HttpServletRequest req, HttpServletResponse resp) throws ServletException, IOException {
        this.doGet(req,resp);
    }
}
使用request的getMethod()来获取请求方式,根据请求方式的不同分别获取请求参数值,这样就可以解决上述问题,但是以后每个Servlet都需要这样写代码,实现起来比较麻烦,这种方案我们不采用
解决方案二:
request对象已经将上述获取请求参数的方法进行了封装,并且request提供的方法实现的功能更强大,以后只需要调用request提供的方法即可,在request的方法中都实现了哪些操作?
(1)根据不同的请求方式获取请求参数,获取的内容如下:

(2)把获取到的内容进行分割,内容如下:

(3)把分割后端数据,存入到一个Map集合中:
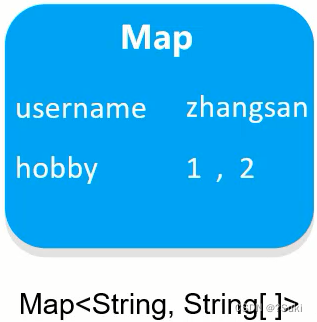
注意:因为参数的值可能是一个,也可能有多个,所以Map的值的类型为String数组。
基于上述理论,request对象为我们提供了如下方法:
- 获取所有参数Map集合
Map<String,String[]> getParameterMap()
- 根据名称获取参数值(数组)
String[] getParameterValues(String name)
- 根据名称获取参数值(单个值)
String getParameter(String name)
接下来,我们通过案例来把上述的三个方法进行实例演示:
1.修改req.html页面,添加爱好选项,爱好可以同时选多个
<!DOCTYPE html>
<html lang="en">
<head>
    <meta charset="UTF-8">
    <title>Title</title>
</head>
<body>
<form action="/request-demo/req2" method="get">
    <input type="text" name="username"><br>
    <input type="password" name="password"><br>
    <input type="checkbox" name="hobby" value="1"> 游泳
    <input type="checkbox" name="hobby" value="2"> 爬山 <br>
    <input type="submit">

</form>
</body>
</html>

2.在Servlet代码中获取页面传递GET请求的参数值
2.1获取GET方式的所有请求参数
/**
 * request 通用方式获取请求参数
 */
@WebServlet("/req2")
public class RequestDemo2 extends HttpServlet {
    @Override
    protected void doGet(HttpServletRequest req, HttpServletResponse resp) throws ServletException, IOException {
        //GET请求逻辑
        System.out.println("get....");
        //1. 获取所有参数的Map集合
        Map<String, String[]> map = req.getParameterMap();
        for (String key : map.keySet()) {
            // username:zhangsan lisi
            System.out.print(key+":");

            //获取值
            String[] values = map.get(key);
            for (String value : values) {
                System.out.print(value + " ");
            }

            System.out.println();
        }
    }

    @Override
    protected void doPost(HttpServletRequest req, HttpServletResponse resp) throws ServletException, IOException {
    }
}
获取的结果为:

2.2获取GET请求参数中的爱好,结果是数组值
/**
 * request 通用方式获取请求参数
 */
@WebServlet("/req2")
public class RequestDemo2 extends HttpServlet {
    @Override
    protected void doGet(HttpServletRequest req, HttpServletResponse resp) throws ServletException, IOException {
        //GET请求逻辑
        //...
        System.out.println("------------");
        String[] hobbies = req.getParameterValues("hobby");
        for (String hobby : hobbies) {
            System.out.println(hobby);
        }
    }

    @Override
    protected void doPost(HttpServletRequest req, HttpServletResponse resp) throws ServletException, IOException {
    }
}
获取的结果为:

2.3获取GET请求参数中的用户名和密码,结果是单个值
/**
 * request 通用方式获取请求参数
 */
@WebServlet("/req2")
public class RequestDemo2 extends HttpServlet {
    @Override
    protected void doGet(HttpServletRequest req, HttpServletResponse resp) throws ServletException, IOException {
        //GET请求逻辑
        //...
        String username = req.getParameter("username");
        String password = req.getParameter("password");
        System.out.println(username);
        System.out.println(password);
    }

    @Override
    protected void doPost(HttpServletRequest req, HttpServletResponse resp) throws ServletException, IOException {
    }
}
获取的结果为:

3.在Servlet代码中获取页面传递POST请求的参数值
3.1将req.html页面form表单的提交方式改成post
3.2将doGet方法中的内容复制到doPost方法中即可
小结
-
req.getParameter()方法使用的频率会比较高
-
以后我们再写代码的时候,就只需要按照如下格式来编写:
public class RequestDemo1 extends HttpServlet {
    @Override
    protected void doGet(HttpServletRequest req, HttpServletResponse resp) throws ServletException, IOException {
       //采用request提供的获取请求参数的通用方式来获取请求参数
       //编写其他的业务代码...
    }
    @Override
    protected void doPost(HttpServletRequest req, HttpServletResponse resp) throws ServletException, IOException {
        this.doGet(req,resp);
    }
}
2.3 IDEA快速创建Servlet
使用通用方式获取请求参数后,屏蔽了GET和POST的请求方式代码的不同,则代码可以定义如下格式:
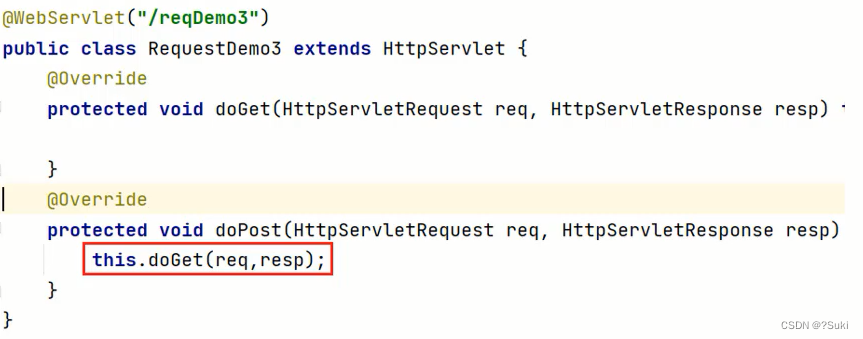
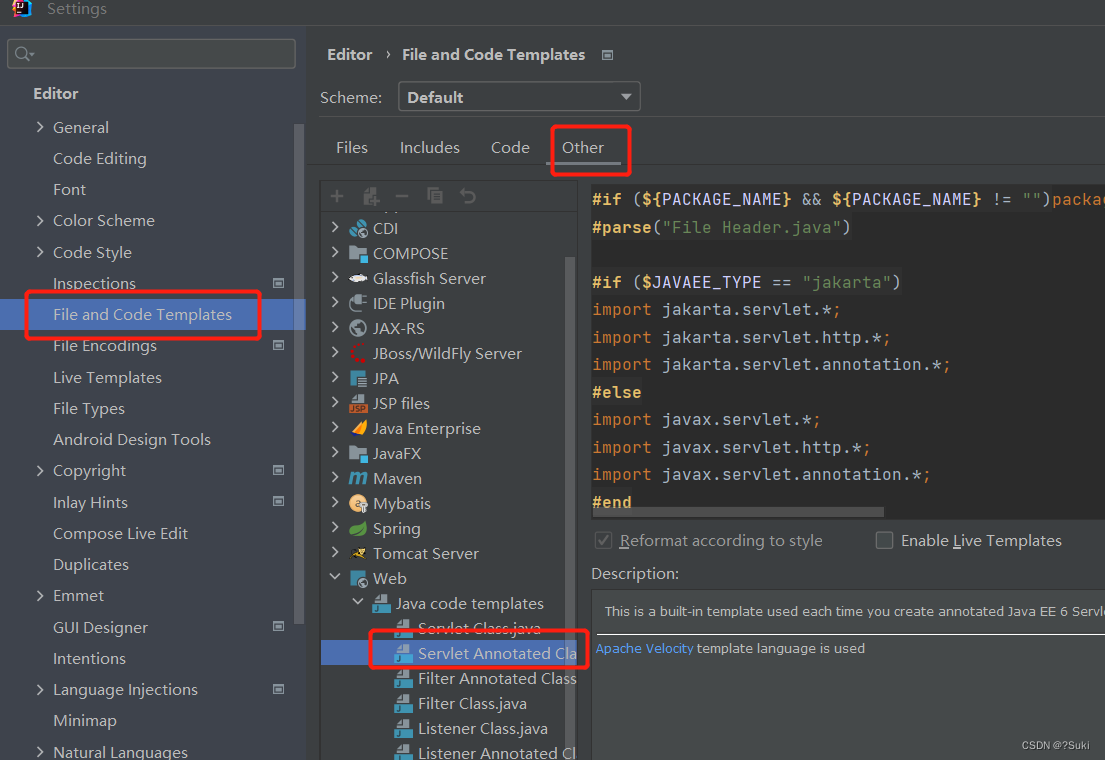
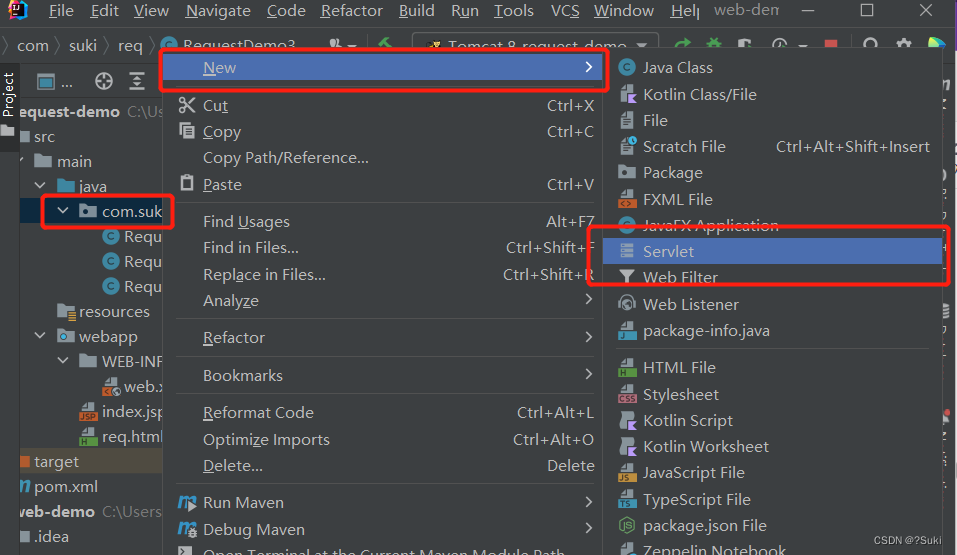
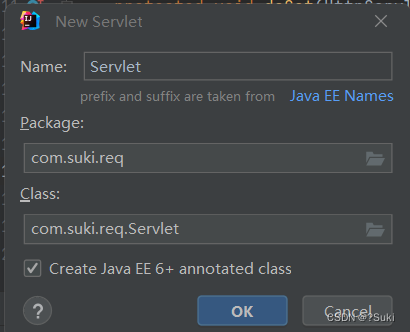
由于格式固定,所以我们可以使用IDEA提供的模板来制作一个Servlet的模板,这样我们后期在创建Servlet的时候就会更高效,具体如何实现:
(1)按照自己的需求,修改Servlet创建的模板内容
(2)使用servlet模板创建Servlet类
2.4 请求参数中文乱码问题
问题展示:
(1)将req.html页面的请求方式修改为get
<!DOCTYPE html>
<html lang="en">
<head>
    <meta charset="UTF-8">
    <title>Title</title>
</head>
<body>
<form action="/request-demo/req2" method="get">
    <input type="text" name="username"><br>
    <input type="password" name="password"><br>
    <input type="checkbox" name="hobby" value="1"> 游泳
    <input type="checkbox" name="hobby" value="2"> 爬山 <br>
    <input type="submit">

</form>
</body>
</html>
(2)在Servlet方法中获取参数,并打印
/**
 * 中文乱码问题解决方案
 */
@WebServlet("/req4")
public class RequestDemo4 extends HttpServlet {
    @Override
    protected void doGet(HttpServletRequest request, HttpServletResponse response) throws ServletException, IOException {
       //1. 获取username
       String username = request.getParameter("username");
       System.out.println(username);
    }

    @Override
    protected void doPost(HttpServletRequest request, HttpServletResponse response) throws ServletException, IOException {
        this.doGet(request, response);
    }
}
(3)启动服务器,页面上输入中文参数

(4)查看控制台打印内容

(5)把req.html页面的请求方式改成post,再次发送请求和中文参数
(6)查看控制台打印内容,依然为乱码

通过上面的案例,会发现,不管是GET还是POST请求,在发送的请求参数中如果有中文,在后台接收的时候,都会出现中文乱码的问题。具体该如何解决呢?
2.4.1 POST请求解决方案
- 分析出现中文乱码的原因:
- POST的请求参数是通过request的getReader()来获取流中的数据
- TOMCAT在获取流的时候采用的编码是ISO-8859-1
- ISO-8859-1编码是不支持中文的,所以会出现乱码
- 解决方案:
- 页面设置的编码格式为UTF-8
- 把TOMCAT在获取流数据之前的编码设置为UTF-8
- 通过request.setCharacterEncoding(“UTF-8”)设置编码,UTF-8也可以写成小写
修改后的代码为:
/**
 * 中文乱码问题解决方案
 */
@WebServlet("/req4")
public class RequestDemo4 extends HttpServlet {
    @Override
    protected void doGet(HttpServletRequest request, HttpServletResponse response) throws ServletException, IOException {
        //1. 解决乱码: POST getReader()
        //设置字符输入流的编码,设置的字符集要和页面保持一致
        request.setCharacterEncoding("UTF-8");
       //2. 获取username
       String username = request.getParameter("username");
       System.out.println(username);
    }

    @Override
    protected void doPost(HttpServletRequest request, HttpServletResponse response) throws ServletException, IOException {
        this.doGet(request, response);
    }
}
重新发送POST请求,就会在控制台看到正常展示的中文结果。
至此POST请求中文乱码的问题就已经解决,但是这种方案不适用于GET请求,这个原因是什么呢,咱们下面再分析。
2.4.2 GET请求解决方案
刚才提到一个问题是POST请求的中文乱码解决方案为什么不适用GET请求?
- GET请求获取请求参数的方式是
request.getQueryString() - POST请求获取请求参数的方式是
request.getReader() - request.setCharacterEncoding(“utf-8”)是设置request处理流的编码
- getQueryString方法并没有通过流的方式获取数据
所以GET请求不能用设置编码的方式来解决中文乱码问题,那问题又来了,如何解决GET请求的中文乱码呢?
- 首先我们需要先分析下GET请求出现乱码的原因:
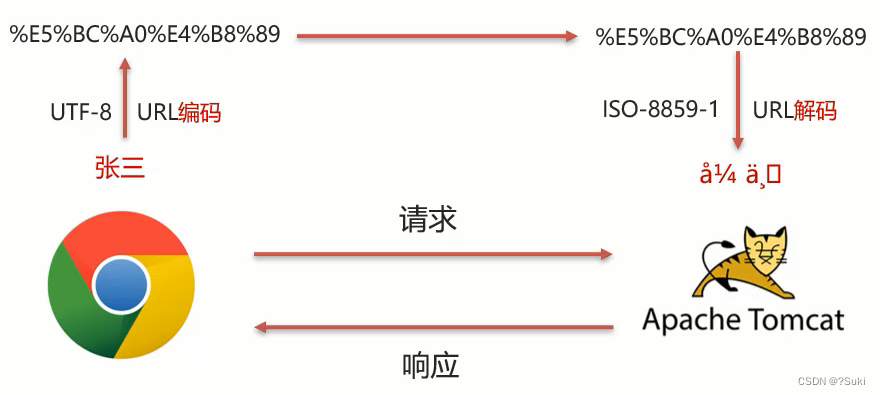
(1)浏览器通过HTTP协议发送请求和数据给后台服务器(Tomcat)
(2)浏览器在发送HTTP的过程中会对中文数据进行URL编码
(3)在进行URL编码的时候会采用页面<meta>标签指定的UTF-8的方式进行编码,张三编码后的结果为%E5%BC%A0%E4%B8%89
(4)后台服务器(Tomcat)接收到%E5%BC%A0%E4%B8%89后会默认按照ISO-8859-1进行URL解码
(5)由于前后编码与解码采用的格式不一样,就会导致后台获取到的数据为乱码。
思考: 如果把req.html页面的<meta>标签的charset属性改成ISO-8859-1,后台不做操作,能解决中文乱码问题么?
答案是否定的,因为ISO-8859-1本身是不支持中文展示的,所以改了标签的charset属性后,会导致页面上的中文内容都无法正常展示。
分析完上面的问题后,我们会发现,其中有两个我们不熟悉的内容就是URL编码和URL解码,什么是URL编码,什么又是URL解码呢?
URL编码
这块知识我们只需要了解下即可,具体编码过程分两步,分别是:
(1)将字符串按照编码方式转为二进制
(2)每个字节转为2个16进制数并在前边加上%
张三按照UTF-8的方式转换成二进制的结果为:
1110 0101 1011 1100 1010 0000 1110 0100 1011 1000 1000 1001
这个结果是如何计算的?
使用http://www.mytju.com/classcode/tools/encode_utf8.asp,输入张三

就可以获取张和三分别对应的10进制,然后在使用计算器,选择程序员模式,计算出对应的二进制数据结果:
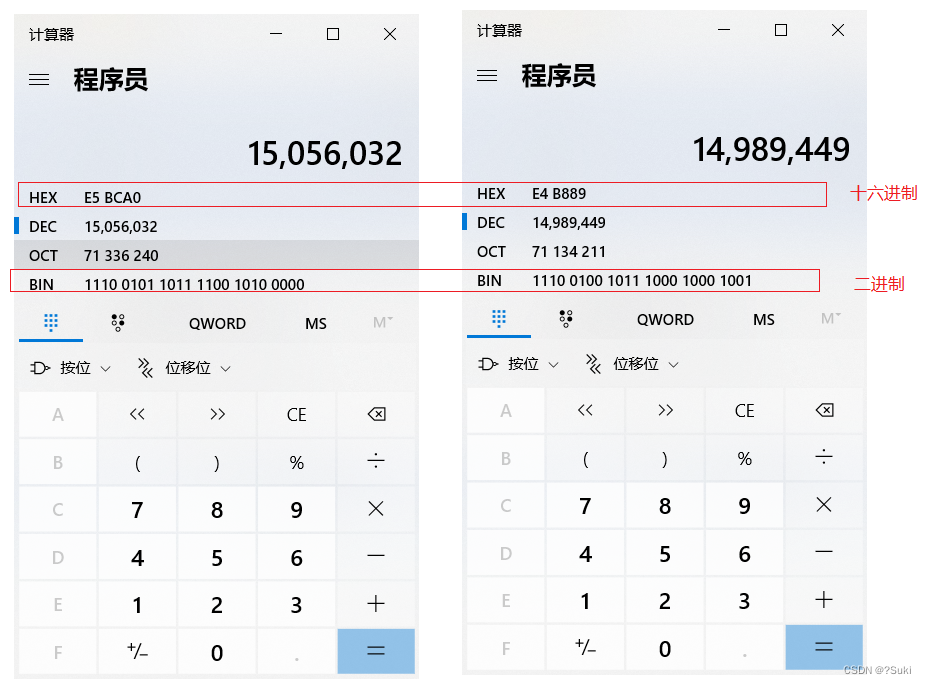
在计算的十六进制结果中,每两位前面加一个%,就可以获取到%E5%BC%A0%E4%B8%89。
当然你从上面所提供的网站中就已经能看到编码16进制的结果了:

但是对于上面的计算过程,如果没有工具,纯手工计算的话,相对来说还是比较复杂的,我们也不需要进行手动计算,在Java中已经为我们提供了编码和解码的API工具类可以让我们更快速的进行编码和解码:
编码:
java.net.URLEncoder.encode("需要被编码的内容","字符集(UTF-8)")
解码:
java.net.URLDecoder.decode("需要被解码的内容","字符集(UTF-8)")
接下来咱们对张三来进行编码和解码
public class URLDemo {

  public static void main(String[] args) throws UnsupportedEncodingException {
        String username = "张三";
        //1. URL编码
        String encode = URLEncoder.encode(username, "utf-8");
        System.out.println(encode); //打印:%E5%BC%A0%E4%B8%89

       //2. URL解码
       //String decode = URLDecoder.decode(encode, "utf-8");//打印:张三
       String decode = URLDecoder.decode(encode, "ISO-8859-1");//打印:`å¼ ä¸ `
       System.out.println(decode);
    }
}
到这,我们就可以分析出GET请求中文参数出现乱码的原因了,
- 浏览器把中文参数按照
UTF-8进行URL编码 - Tomcat对获取到的内容进行了
ISO-8859-1的URL解码 - 在控制台就会出现类上
å¼ ä¸‰的乱码,最后一位是个空格
- 清楚了出现乱码的原因,接下来我们就需要想办法进行解决
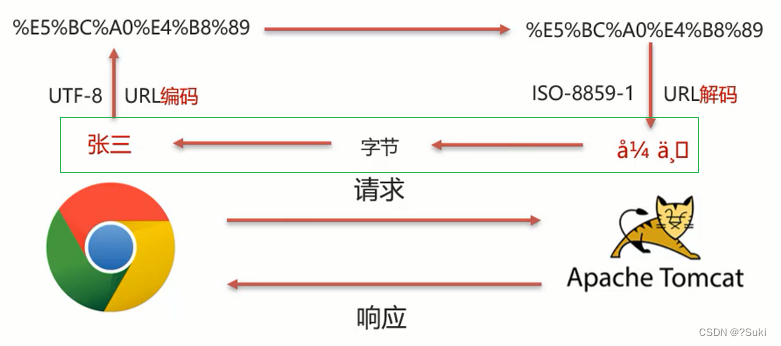
从上图可以看住,
-
在进行编码和解码的时候,不管使用的是哪个字符集,他们对应的
%E5%BC%A0%E4%B8%89是一致的 -
那他们对应的二进制值也是一样的,为:
-
1110 0101 1011 1100 1010 0000 1110 0100 1011 1000 1000 1001
-
-
为所以我们可以考虑把
å¼ ä¸‰转换成字节,在把字节转换成张三,在转换的过程中是它们的编码一致,就可以解决中文乱码问题。
具体的实现步骤为:
1.按照ISO-8859-1编码获取乱码
å¼ ä¸‰对应的字节数组2.按照UTF-8编码获取字节数组对应的字符串
实现代码如下:
public class URLDemo {

  public static void main(String[] args) throws UnsupportedEncodingException {
        String username = "张三";
        //1. URL编码
        String encode = URLEncoder.encode(username, "utf-8");
        System.out.println(encode);
        //2. URL解码
        String decode = URLDecoder.decode(encode, "ISO-8859-1");

        System.out.println(decode); //此处打印的是对应的乱码数据

        //3. 转换为字节数据,编码
        byte[] bytes = decode.getBytes("ISO-8859-1");
        for (byte b : bytes) {
            System.out.print(b + " ");
        }
		//此处打印的是:-27 -68 -96 -28 -72 -119
        //4. 将字节数组转为字符串,解码
        String s = new String(bytes, "utf-8");
        System.out.println(s); //此处打印的是张三
    }
}
说明:在第18行中打印的数据是-27 -68 -96 -28 -72 -119和张三转换成的二进制数据1110 0101 1011 1100 1010 0000 1110 0100 1011 1000 1000 1001为什么不一样呢?
其实打印出来的是十进制数据,我们只需要使用计算机换算下就能得到他们的对应关系。
至此对于GET请求中文乱码的解决方案,我们就已经分析完了,最后在代码中去实现下:
/**
 * 中文乱码问题解决方案
 */
@WebServlet("/req4")
public class RequestDemo4 extends HttpServlet {
    @Override
    protected void doGet(HttpServletRequest request, HttpServletResponse response) throws ServletException, IOException {
        //1. 解决乱码:POST,getReader()
        //request.setCharacterEncoding("UTF-8");//设置字符输入流的编码

        //2. 获取username
        String username = request.getParameter("username");
        System.out.println("解决乱码前:"+username);

        //3. GET,获取参数的方式:getQueryString
        // 乱码原因:tomcat进行URL解码,默认的字符集ISO-8859-1
       /* //3.1 先对乱码数据进行编码:转为字节数组
        byte[] bytes = username.getBytes(StandardCharsets.ISO_8859_1);
        //3.2 字节数组解码
        username = new String(bytes, StandardCharsets.UTF_8);*/

        username  = new String(username.getBytes(StandardCharsets.ISO_8859_1),StandardCharsets.UTF_8);

        System.out.println("解决乱码后:"+username);

    }

    @Override
    protected void doPost(HttpServletRequest request, HttpServletResponse response) throws ServletException, IOException {
        this.doGet(request, response);
    }
}
注意
- 把
request.setCharacterEncoding("UTF-8")代码注释掉后,会发现GET请求参数乱码解决方案同时也可也把POST请求参数乱码的问题也解决了 - 只不过对于POST请求参数一般都会比较多,采用这种方式解决乱码起来比较麻烦,所以对于POST请求还是建议使用设置编码的方式进行。
另外需要说明一点的是Tomcat8.0之后,已将GET请求乱码问题解决,设置默认的解码方式为UTF-8
小结
- 中文乱码解决方案
-
POST请求和GET请求的参数中如果有中文,后台接收数据就会出现中文乱码问题
GET请求在Tomcat8.0以后的版本就不会出现了
-
POST请求解决方案是:设置输入流的编码
request.setCharacterEncoding("UTF-8"); 注意:设置的字符集要和页面保持一致 -
通用方式(GET/POST):需要先解码,再编码
new String(username.getBytes("ISO-8859-1"),"UTF-8");
- URL编码实现方式:
-
编码:
URLEncoder.encode(str,"UTF-8"); -
解码:
URLDecoder.decode(s,"ISO-8859-1");
2.5 Request请求转发
- 请求转发(forward):一种在服务器内部的资源跳转方式。
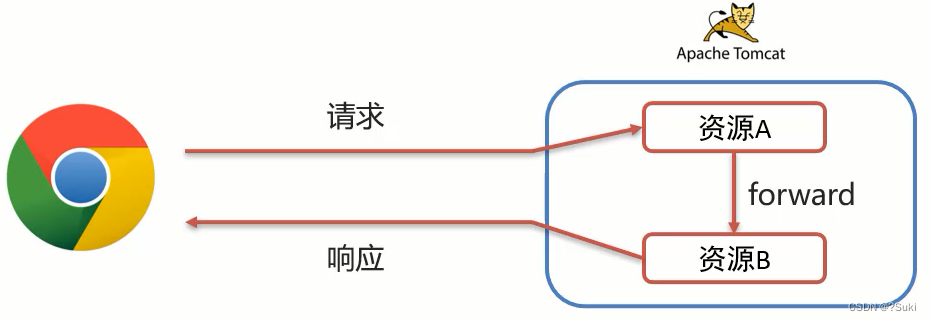
(1)浏览器发送请求给服务器,服务器中对应的资源A接收到请求
(2)资源A处理完请求后将请求发给资源B
(3)资源B处理完后将结果响应给浏览器
(4)请求从资源A到资源B的过程就叫请求转发
- 请求转发的实现方式:
req.getRequestDispatcher("资源B路径").forward(req,resp);
具体如何来使用,我们先来看下需求:

针对上述需求,具体的实现步骤为:
1.创建一个RequestDemo5类,接收/req5的请求,在doGet方法中打印
demo52.创建一个RequestDemo6类,接收/req6的请求,在doGet方法中打印
demo63.在RequestDemo5的方法中使用
req.getRequestDispatcher(“/req6”).forward(req,resp)进行请求转发
4.启动测试
(1)创建RequestDemo5类
/**
 * 请求转发
 */
@WebServlet("/req5")
public class RequestDemo5 extends HttpServlet {
    @Override
    protected void doGet(HttpServletRequest request, HttpServletResponse response) throws ServletException, IOException {
        System.out.println("demo5...");
    }

    @Override
    protected void doPost(HttpServletRequest request, HttpServletResponse response) throws ServletException, IOException {
        this.doGet(request, response);
    }
}
(2)创建RequestDemo6类
/**
 * 请求转发
 */
@WebServlet("/req6")
public class RequestDemo6 extends HttpServlet {
    @Override
    protected void doGet(HttpServletRequest request, HttpServletResponse response) throws ServletException, IOException {
        System.out.println("demo6...");
    }

    @Override
    protected void doPost(HttpServletRequest request, HttpServletResponse response) throws ServletException, IOException {
        this.doGet(request, response);
    }
}
(3)在RequestDemo5的doGet方法中进行请求转发
/**
 * 请求转发
 */
@WebServlet("/req5")
public class RequestDemo5 extends HttpServlet {
    @Override
    protected void doGet(HttpServletRequest request, HttpServletResponse response) throws ServletException, IOException {
        System.out.println("demo5...");
        //请求转发
        request.getRequestDispatcher("/req6").forward(request,response);
    }

    @Override
    protected void doPost(HttpServletRequest request, HttpServletResponse response) throws ServletException, IOException {
        this.doGet(request, response);
    }
}
(4)启动测试
访问http://localhost:8080/request-demo/req5,就可以在控制台看到如下内容:

说明请求已经转发到了/req6
- 请求转发资源间共享数据:使用Request对象
此处主要解决的问题是把请求从/req5转发到/req6的时候,如何传递数据给/req6。
需要使用request对象提供的三个方法:
- 存储数据到request域[范围,数据是存储在request对象]中
void setAttribute(String name,Object o);
- 根据key获取值
Object getAttribute(String name);
- 根据key删除该键值对
void removeAttribute(String name);
接着上个需求来:

1.在RequestDemo5的doGet方法中转发请求之前,将数据存入request域对象中
2.在RequestDemo6的doGet方法从request域对象中获取数据,并将数据打印到控制台
3.启动访问测试
(1)修改RequestDemo5中的方法
@WebServlet("/req5")
public class RequestDemo5 extends HttpServlet {
    @Override
    protected void doGet(HttpServletRequest request, HttpServletResponse response) throws ServletException, IOException {
        System.out.println("demo5...");
        //存储数据
        request.setAttribute("msg","hello");
        //请求转发
        request.getRequestDispatcher("/req6").forward(request,response);

    }

    @Override
    protected void doPost(HttpServletRequest request, HttpServletResponse response) throws ServletException, IOException {
        this.doGet(request, response);
    }
}
(2)修改RequestDemo6中的方法
/**
 * 请求转发
 */
@WebServlet("/req6")
public class RequestDemo6 extends HttpServlet {
    @Override
    protected void doGet(HttpServletRequest request, HttpServletResponse response) throws ServletException, IOException {
        System.out.println("demo6...");
        //获取数据
        Object msg = request.getAttribute("msg");
        System.out.println(msg);

    }

    @Override
    protected void doPost(HttpServletRequest request, HttpServletResponse response) throws ServletException, IOException {
        this.doGet(request, response);
    }
}
(3)启动测试
访问http://localhost:8080/request-demo/req5,就可以在控制台看到如下内容:
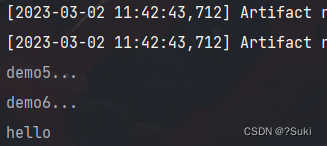
此时就可以实现在转发多个资源之间共享数据。
- 请求转发的特点
-
浏览器地址栏路径不发生变化
虽然后台从
/req5转发到/req6,但是浏览器的地址一直是/req5,未发生变化
-
只能转发到当前服务器的内部资源
不能从一个服务器通过转发访问另一台服务器
-
一次请求,可以在转发资源间使用request共享数据
虽然后台从
/req5转发到/req6,但是这个只有一次请求
3 Response对象
前面讲解完Request对象,接下来我们回到刚开始的那张图:
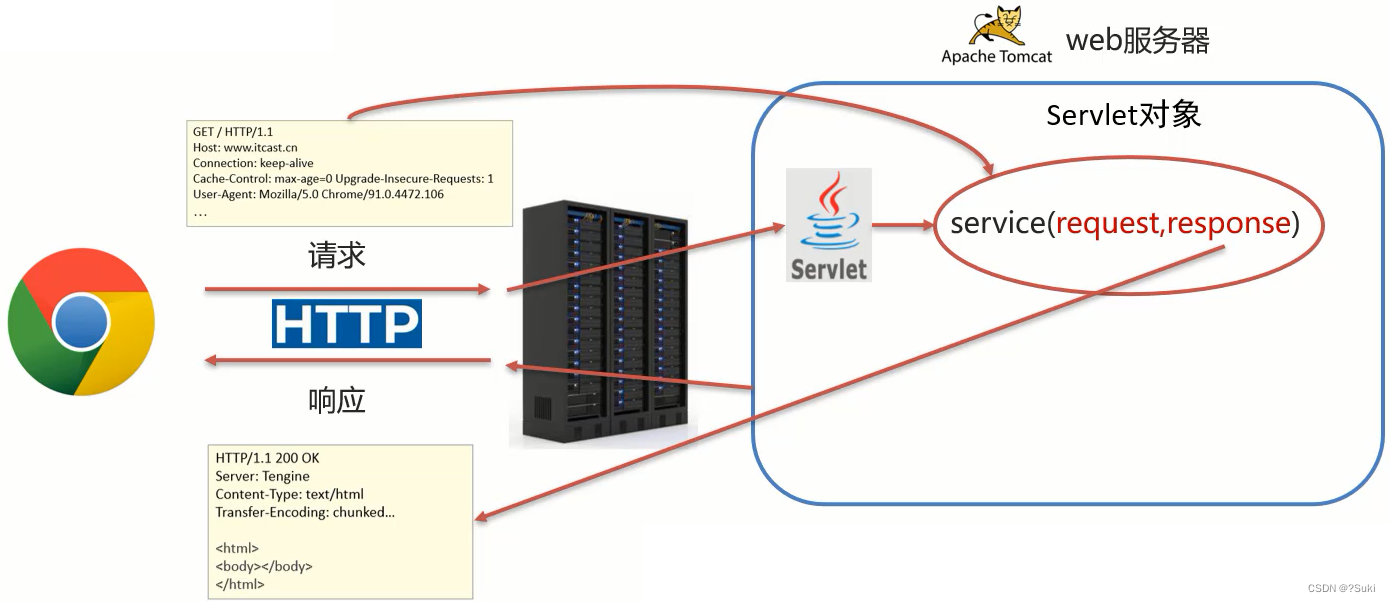
- Request:使用request对象来获取请求数据
- Response:使用response对象来设置响应数据
Reponse的继承体系和Request的继承体系也非常相似:

介绍完Response的相关体系结构后,接下来对于Response我们需要学习如下内容:
- Response设置响应数据的功能介绍
- Response完成重定向
- Response响应字符数据
- Response响应字节数据
3.1 Response设置响应数据功能介绍
HTTP响应数据总共分为三部分内容,分别是响应行、响应头、响应体,对于这三部分内容的数据,respone对象都提供了哪些方法来进行设置?
- 响应行

对于响应头,比较常用的就是设置响应状态码:
void setStatus(int sc);
- 响应头

设置响应头键值对:
void setHeader(String name,String value);
- 响应体

对于响应体,是通过字符、字节输出流的方式往浏览器写,
获取字符输出流:
PrintWriter getWriter();
获取字节输出流
ServletOutputStream getOutputStream();
介绍完这些方法后,后面我们会通过案例把这些方法都用一用,首先先来完成下重定向的功能开发。
3.2 Respones请求重定向
- Response重定向(redirect):一种资源跳转方式。
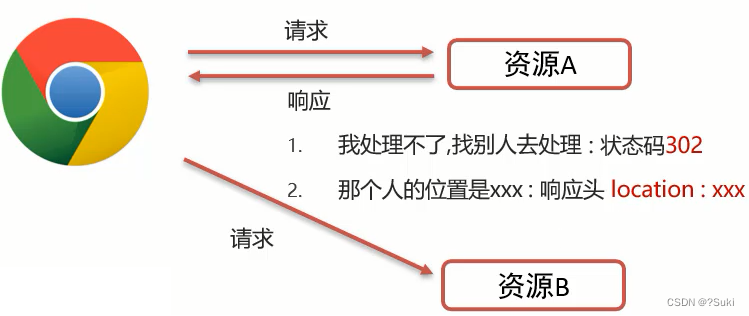
(1)浏览器发送请求给服务器,服务器中对应的资源A接收到请求
(2)资源A现在无法处理该请求,就会给浏览器响应一个302的状态码+location的一个访问资源B的路径
(3)浏览器接收到响应状态码为302就会重新发送请求到location对应的访问地址去访问资源B
(4)资源B接收到请求后进行处理并最终给浏览器响应结果,这整个过程就叫重定向
- 重定向的实现方式:
resp.setStatus(302);
resp.setHeader("location","资源B的访问路径");
具体如何来使用,我们先来看下需求:

针对上述需求,具体的实现步骤为:
1.创建一个ResponseDemo1类,接收/resp1的请求,在doGet方法中打印
resp1....2.创建一个ResponseDemo2类,接收/resp2的请求,在doGet方法中打印
resp2....3.在ResponseDemo1的方法中使用
response.setStatus(302);
response.setHeader(“Location”,“/request-demo/resp2”) 来给前端响应结果数据
4.启动测试
(1)创建ResponseDemo1类
@WebServlet("/resp1")
public class ResponseDemo1 extends HttpServlet {
    @Override
    protected void doGet(HttpServletRequest request, HttpServletResponse response) throws ServletException, IOException {
        System.out.println("resp1....");
    }

    @Override
    protected void doPost(HttpServletRequest request, HttpServletResponse response) throws ServletException, IOException {
        this.doGet(request, response);
    }
}
(2)创建ResponseDemo2类
@WebServlet("/resp2")
public class ResponseDemo2 extends HttpServlet {
    @Override
    protected void doGet(HttpServletRequest request, HttpServletResponse response) throws ServletException, IOException {
        System.out.println("resp2....");
    }

    @Override
    protected void doPost(HttpServletRequest request, HttpServletResponse response) throws ServletException, IOException {
        this.doGet(request, response);
    }
}
(3)在ResponseDemo1的doGet方法中给前端响应数据
@WebServlet("/resp1")
public class ResponseDemo1 extends HttpServlet {
    @Override
    protected void doGet(HttpServletRequest request, HttpServletResponse response) throws ServletException, IOException {
        System.out.println("resp1....");
        //重定向
        //1.设置响应状态码 302
        response.setStatus(302);
        //2. 设置响应头 Location
        response.setHeader("Location","/request-demo/resp2");
    }

    @Override
    protected void doPost(HttpServletRequest request, HttpServletResponse response) throws ServletException, IOException {
        this.doGet(request, response);
    }
}
(4)启动测试
访问http://localhost:8080/request-demo/resp1,就可以在控制台看到如下内容:
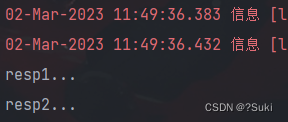
说明/resp1和/resp2都被访问到了。到这重定向就已经完成了。
虽然功能已经实现,但是从设置重定向的两行代码来看,会发现除了重定向的地址不一样,其他的内容都是一模一样,所以request对象给我们提供了简化的编写方式为:
resposne.sendRedirect("/request-demo/resp2")
所以第3步中的代码就可以简化为:
@WebServlet("/resp1")
public class ResponseDemo1 extends HttpServlet {
    @Override
    protected void doGet(HttpServletRequest request, HttpServletResponse response) throws ServletException, IOException {
        System.out.println("resp1....");
        //重定向
        resposne.sendRedirect("/request-demo/resp2");
    }

    @Override
    protected void doPost(HttpServletRequest request, HttpServletResponse response) throws ServletException, IOException {
        this.doGet(request, response);
    }
}
- 重定向的特点
-
浏览器地址栏路径发送变化
当进行重定向访问的时候,由于是由浏览器发送的两次请求,所以地址会发生变化

-
可以重定向到任何位置的资源(服务内容、外部均可)
因为第一次响应结果中包含了浏览器下次要跳转的路径,所以这个路径是可以任意位置资源。
-
两次请求,不能在多个资源使用request共享数据
因为浏览器发送了两次请求,是两个不同的request对象,就无法通过request对象进行共享数据
介绍完请求重定向和请求转发以后,接下来需要把这两个放在一块对比下:

以后到底用哪个,还是需要根据具体的业务来决定。
3.3 路径问题
- 问题1:转发的时候路径上没有加
/request-demo而重定向加了,那么到底什么时候需要加,什么时候不需要加呢?

其实判断的依据很简单,只需要记住下面的规则即可:
- 浏览器使用:需要加虚拟目录(项目访问路径)
- 服务端使用:不需要加虚拟目录
对于转发来说,因为是在服务端进行的,所以不需要加虚拟目录
对于重定向来说,路径最终是由浏览器来发送请求,就需要添加虚拟目录。
掌握了这个规则,接下来就通过一些练习来强化下知识的学习:
<a href='路径'><form action='路径'>- req.getRequestDispatcher(“路径”)
- resp.sendRedirect(“路径”)
答案:
1.超链接,从浏览器发送,需要加
2.表单,从浏览器发送,需要加
3.转发,是从服务器内部跳转,不需要加
4.重定向,是由浏览器进行跳转,需要加。
- 问题2:在重定向的代码中,
/request-demo是固定编码的,如果后期通过Tomcat插件配置了项目的访问路径,那么所有需要重定向的地方都需要重新修改,该如何优化?
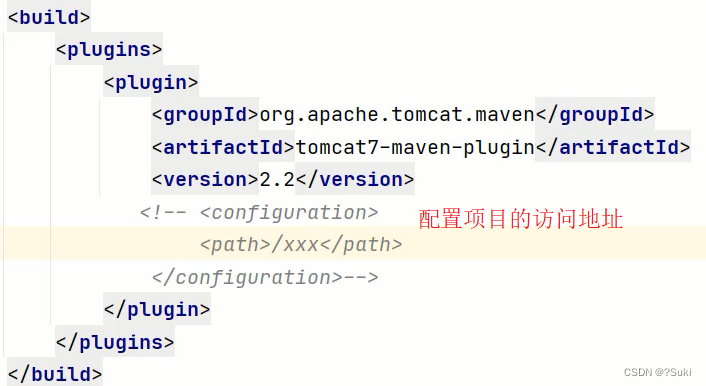
答案也比较简单,我们可以在代码中动态去获取项目访问的虚拟目录,具体如何获取,我们可以借助前面咱们所学习的request对象中的getContextPath()方法,修改后的代码如下:
@WebServlet("/resp1")
public class ResponseDemo1 extends HttpServlet {
    @Override
    protected void doGet(HttpServletRequest request, HttpServletResponse response) throws ServletException, IOException {
        System.out.println("resp1....");

        //简化方式完成重定向
        //动态获取虚拟目录
        String contextPath = request.getContextPath();
        response.sendRedirect(contextPath+"/resp2");
    }

    @Override
    protected void doPost(HttpServletRequest request, HttpServletResponse response) throws ServletException, IOException {
        this.doGet(request, response);
    }
}
重新启动访问测试,功能依然能够实现,此时就可以动态获取项目访问的虚拟路径,从而降低代码的耦合度。
3.4 Response响应字符数据
要想将字符数据写回到浏览器,我们需要两个步骤:
-
通过Response对象获取字符输出流: PrintWriter writer = resp.getWriter();
-
通过字符输出流写数据: writer.write(“aaa”);
接下来,我们实现通过些案例把响应字符数据给实际应用下:
- 返回一个简单的字符串
aaa
/**
 * 响应字符数据:设置字符数据的响应体
 */
@WebServlet("/resp3")
public class ResponseDemo3 extends HttpServlet {
    @Override
    protected void doGet(HttpServletRequest request, HttpServletResponse response) throws ServletException, IOException {
        response.setContentType("text/html;charset=utf-8");
        //1. 获取字符输出流
        PrintWriter writer = response.getWriter();
		 writer.write("aaa");
    }
    @Override
    protected void doPost(HttpServletRequest request, HttpServletResponse response) throws ServletException, IOException {
        this.doGet(request, response);
    }
}
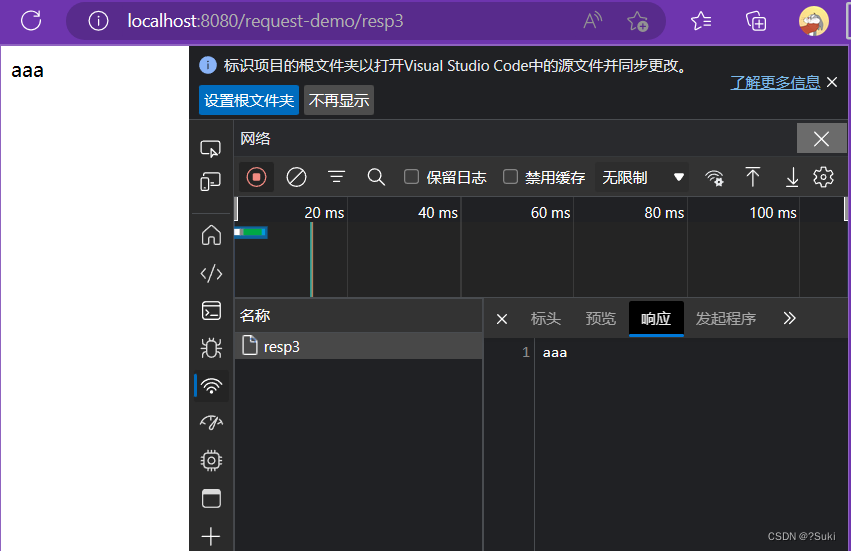
- 返回一串html字符串,并且能被浏览器解析
PrintWriter writer = response.getWriter();
//content-type,告诉浏览器返回的数据类型是HTML类型数据,这样浏览器才会解析HTML标签
response.setHeader("content-type","text/html");
writer.write("<h1>aaa</h1>");
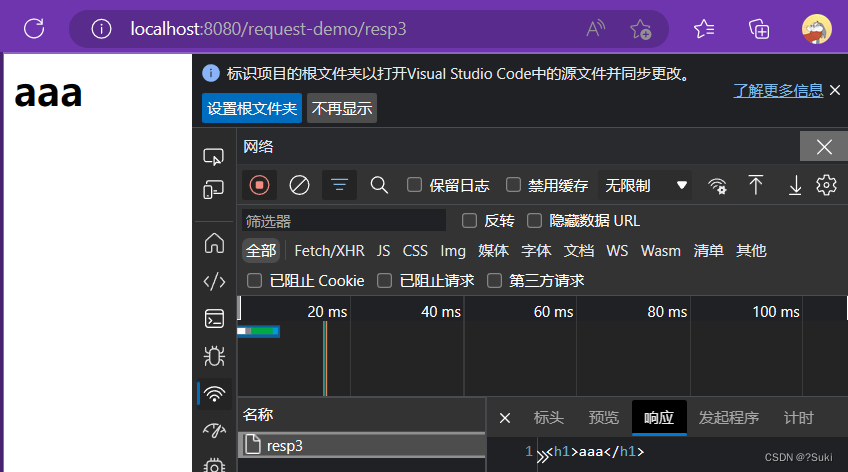
==注意:==一次请求响应结束后,response对象就会被销毁掉,所以不要手动关闭流。
- 返回一个中文的字符串
你好,需要注意设置响应数据的编码为utf-8
//设置响应的数据格式及数据的编码
response.setContentType("text/html;charset=utf-8");
writer.write("你好");

3.3 Response响应字节数据
要想将字节数据写回到浏览器,我们需要两个步骤:
-
通过Response对象获取字节输出流:ServletOutputStream outputStream = resp.getOutputStream();
-
通过字节输出流写数据: outputStream.write(字节数据);
接下来,我们实现通过些案例把响应字符数据给实际应用下:
- 返回一个图片文件到浏览器
/**
 * 响应字节数据:设置字节数据的响应体
 */
@WebServlet("/resp4")
public class ResponseDemo4 extends HttpServlet {
    @Override
    protected void doGet(HttpServletRequest request, HttpServletResponse response) throws ServletException, IOException {
        //1. 读取文件
        FileInputStream fis = new FileInputStream("d://a.jpg");
        //2. 获取response字节输出流
        ServletOutputStream os = response.getOutputStream();
        //3. 完成流的copy
        byte[] buff = new byte[1024];
        int len = 0;
        while ((len = fis.read(buff))!= -1){
            os.write(buff,0,len);
        }
        fis.close();
    }

    @Override
    protected void doPost(HttpServletRequest request, HttpServletResponse response) throws ServletException, IOException {
        this.doGet(request, response);
    }
}

上述代码中,对于流的copy的代码还是比较复杂的,所以我们可以使用别人提供好的方法来简化代码的开发,具体的步骤是:
(1)pom.xml添加依赖
<dependency>
    <groupId>commons-io</groupId>
    <artifactId>commons-io</artifactId>
    <version>2.6</version>
</dependency>
(2)调用工具类方法
//fis:输入流
//os:输出流
IOUtils.copy(fis,os);
优化后的代码:
/**
 * 响应字节数据:设置字节数据的响应体
 */
@WebServlet("/resp4")
public class ResponseDemo4 extends HttpServlet {
    @Override
    protected void doGet(HttpServletRequest request, HttpServletResponse response) throws ServletException, IOException {
        //1. 读取文件
        FileInputStream fis = new FileInputStream("d://a.jpg");
        //2. 获取response字节输出流
        ServletOutputStream os = response.getOutputStream();
        //3. 完成流的copy
      	IOUtils.copy(fis,os);
        fis.close();
    }

    @Override
    protected void doPost(HttpServletRequest request, HttpServletResponse response) throws ServletException, IOException {
        this.doGet(request, response);
    }
}
学习笔记 from 黑马程序员
By – Suki 2023/3/2





![[Java·算法·困难]LeetCode25. K 个一组翻转链表](https://img-blog.csdnimg.cn/d8afa9d66cf8463d88277e112a2488b4.png)


