pipeline,Handler, HandlerContext创建源码剖析
源码解析目标
- Netty中的ChannelPipeline,ChannelHandler和ChannelHandlerContext是核心组件,从源码解析来分析
- Netty是如何设计三个核心组件
- 分析Netty是如何创建和协调三个组件
- 三个组件的结构关系是什么样的
Pipeline 接口设计
- 如下源码,类结构
extends ChannelInboundInvoker, ChannelOutboundInvoker, Iterable<Entry<String, ChannelHandler>> {}

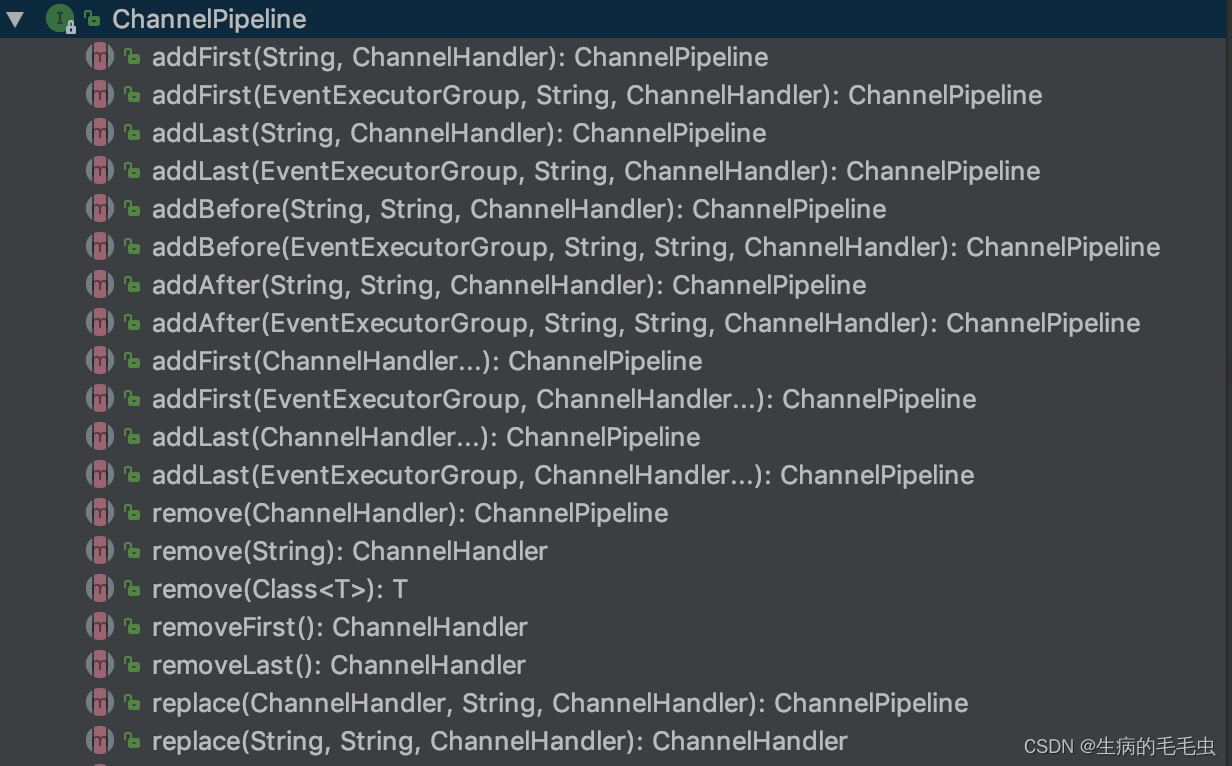
- 可以从源码中看到,ChannelPipeline是一个接口并且继承了inBound,outBound,Iterable接口,它提供了各种addFirst,addLast等类似操作链表的方法,能够多类似链表的结构进行插入,追加,删除,替换操作,同时他的返回值包括ChannelPipeline,或者ChannelHandler或者ChannelHandlerContext
- 我们看如下某个方法
 /**
     * Inserts a {@link ChannelHandler} at the first position of this pipeline.
     *
     * @param name     the name of the handler to insert first
     * @param handler  the handler to insert first
     *
     * @throws IllegalArgumentException
     *         if there's an entry with the same name already in the pipeline
     * @throws NullPointerException
     *         if the specified handler is {@code null}
     */
    ChannelPipeline addFirst(String name, ChannelHandler handler);
- 以上方法是增加链表头节点方法,参数是一个那么,和关键的参数ChannelHandler,说明ChannelPipeline类似链表的结构中封装是一个一个的Handler,继续找源码中的注释查看如下
- 一下是ChannelPipeline 源码中的一个说明图
  * <pre>
 *                                                 I/O Request
 *                                            via {@link Channel} or
 *                                        {@link ChannelHandlerContext}
 *                                                      |
 *  +---------------------------------------------------+---------------+
 *  |                           ChannelPipeline         |               |
 *  |                                                  \|/              |
 *  |    +---------------------+            +-----------+----------+    |
 *  |    | Inbound Handler  N  |            | Outbound Handler  1  |    |
 *  |    +----------+----------+            +-----------+----------+    |
 *  |              /|\                                  |               |
 *  |               |                                  \|/              |
 *  |    +----------+----------+            +-----------+----------+    |
 *  |    | Inbound Handler N-1 |            | Outbound Handler  2  |    |
 *  |    +----------+----------+            +-----------+----------+    |
 *  |              /|\                                  .               |
 *  |               .                                   .               |
 *  | ChannelHandlerContext.fireIN_EVT() ChannelHandlerContext.OUT_EVT()|
 *  |        [ method call]                       [method call]         |
 *  |               .                                   .               |
 *  |               .                                  \|/              |
 *  |    +----------+----------+            +-----------+----------+    |
 *  |    | Inbound Handler  2  |            | Outbound Handler M-1 |    |
 *  |    +----------+----------+            +-----------+----------+    |
 *  |              /|\                                  |               |
 *  |               |                                  \|/              |
 *  |    +----------+----------+            +-----------+----------+    |
 *  |    | Inbound Handler  1  |            | Outbound Handler  M  |    |
 *  |    +----------+----------+            +-----------+----------+    |
 *  |              /|\                                  |               |
 *  +---------------+-----------------------------------+---------------+
 *                  |                                  \|/
 *  +---------------+-----------------------------------+---------------+
 *  |               |                                   |               |
 *  |       [ Socket.read() ]                    [ Socket.write() ]     |
 *  |                                                                   |
 *  |  Netty Internal I/O Threads (Transport Implementation)            |
 *  +-------------------------------------------------------------------+
 * </pre>
- 入上图所示,表示的是一个handler的list,handler用于处理入站或者出站的事件,其中inBound是入站,方向是从Socket到ChannelPipeline。 outBound是出站方向是从ChannelPipeline到Socket,ChannelPipeline实现了一个过滤器模式,方便用户控制事件的处理,以及控制handler在pipeline中的交互
- 接着看如下源码
 * Converts this pipeline into an ordered {@link Map} whose keys are
     * handler names and whose values are handlers.
     */
    Map<String, ChannelHandler> toMap();
	......
    @Override
    ChannelPipeline fireChannelRead(Object msg);
    ......
- 以上源码中注释意思:将pipeline中的Handler 利用name:Handler的方式放入有序的Map中,并且提供以下方法进行处理
- 因此ChannelPipeline会通过fireChannelRead等类似fireXXX的方法来控制ChannelPipeline中的Handler来处理入站和出站事件
- 我们也知道,一个Pipeline中通常会有多个Handler,比如,一个典型的服务器在每个通道的管道中都有以下几个步骤处理
- 处理程序协议解码器–将二进制数据转换为java对象
- 协议编码器–将java对象转换为二进制数据
- 业务逻辑处理器–执行具体的业务逻辑(安具体需求类似入库等)
- 以上第三步骤中的业务逻辑处理程序我们尽量做到不会将线程阻塞,因为此处阻塞必然引起IO速度,进而影响整个Netty程序性能。如果业务程序很快,可以放IO线程中,反之需要异步执行,ChannelHandler对象中给我们提供了线程池用来异步执行
- 接下来我们先来分析ChannelPipeline初始化的源码,依此来理解ChannelPipeline的实现以及对应的数据结构
- 用以下案例来分析源码
//Netty cient端
/**
 * Created by jiamin5 on 2022/9/20.
 */
public class NettyClient {

    public static void main(String[] args) throws Exception {

            EventLoopGroup eventExecutors = new NioEventLoopGroup();
        try {
            Bootstrap bootstrap = new Bootstrap();
            bootstrap.group(eventExecutors)
                    .channel(NioSocketChannel.class)
                    .handler(new ChannelInitializer<SocketChannel>() {
                        @Override
                        protected void initChannel(SocketChannel socketChannel) throws Exception {
                            socketChannel.pipeline().addLast(new NettyClientHandler());
                        }
                    });
            System.out.println("client is ready ....");

            //start client to connection server
            ChannelFuture channelFuture = bootstrap.connect("127.0.0.1", 6668).sync();
            channelFuture.channel().closeFuture().sync();
        }finally {
            eventExecutors.shutdownGracefully();
        }
    }
}

//Netty Server端口
/**
 * Created by jiamin5 on 2022/9/19.
 */
public class NettyService {
    public static void main(String[] args) throws Exception{
        EventLoopGroup bossGroup = new NioEventLoopGroup();
        EventLoopGroup workGroup = new NioEventLoopGroup();

        try {
            ServerBootstrap bootstrap = new ServerBootstrap();
            bootstrap.group(bossGroup, workGroup)
                    .channel(NioServerSocketChannel.class)
                    .option(ChannelOption.SO_BACKLOG, 128)
                    .childOption(ChannelOption.SO_KEEPALIVE, true)
                    .childHandler(new ChannelInitializer<SocketChannel>() {
                        //给pipeline 设置处理器
                        @Override
                        protected void initChannel(SocketChannel socketChannel) throws Exception {
                            System.out.println("客户端 SocketChannel hashCode: "+ socketChannel.hashCode());
                            socketChannel.pipeline().addLast(new NettyServerSchedulerReadHandler());
                        }
                    });
            System.out.println(" ..... Service is ready");
            ChannelFuture cf = bootstrap.bind(6668).sync();
            cf.addListener(new ChannelFutureListener() {
                @Override
                public void operationComplete(ChannelFuture channelFuture) throws Exception {
                    if(cf.isSuccess()){
                        System.out.println(" listener 6668 success!!");
                    }else {
                        System.out.println(" listener 6668 failed!!");
                    }
                }
            });
            cf.channel().closeFuture().sync();
        }finally {
            bossGroup.shutdownGracefully();
            workGroup.shutdownGracefully();
        }
    }
}

//两个不同的ChannelHandler实现
/**
 * 优化耗时读取测试
 * Created by jiamin5 on 2022/9/19.
 */
public class NettyServerOptLongTimeReadHandler extends ChannelInboundHandlerAdapter {
    /**
     *读取数据事件,可以读取客户端发送来的信息
     * */
    @Override
    public void channelRead(ChannelHandlerContext ctx, Object msg) throws Exception {
        // 比如这里我们有一个非常耗时长的业务-> 异步执行 -> 提交该channel 对应的
        // NIOEventLoop 的 taskQueue中,

        // 解决方案1 用户程序自定义的普通任务

        ctx.channel().eventLoop().execute(new Runnable() {
            @Override
            public void run() {

                try {
                    Thread.sleep(5 * 1000);
                    ctx.writeAndFlush(Unpooled.copiedBuffer("hello, 客户端~(>^ω^<)喵2", CharsetUtil.UTF_8));
                    System.out.println("channel code=" + ctx.channel().hashCode());
                } catch (Exception ex) {
                    System.out.println("发生异常" + ex.getMessage());
                }
            }
        });

        ctx.channel().eventLoop().execute(new Runnable() {
            @Override
            public void run() {

                try {
                    Thread.sleep(5 * 1000);
                    ctx.writeAndFlush(Unpooled.copiedBuffer("hello, 客户端~(>^ω^<)喵3", CharsetUtil.UTF_8));
                    System.out.println("channel code=" + ctx.channel().hashCode());
                } catch (Exception ex) {
                    System.out.println("发生异常" + ex.getMessage());
                }
            }
        });

        System.out.println("go on ...");
    }
    @Override
    public void channelReadComplete(ChannelHandlerContext ctx) throws Exception {
        ctx.writeAndFlush(Unpooled.copiedBuffer("hellow, client~ miaomiao", CharsetUtil.UTF_8));
    }
    @Override
    public void exceptionCaught(ChannelHandlerContext ctx, Throwable cause) throws Exception {
        ctx.close();
    }
}

/**
 * 优化耗时读取测试
 * Created by jiamin5 on 2022/9/19.
 */
public class NettyServerSchedulerReadHandler extends ChannelInboundHandlerAdapter {
    /**
     *读取数据事件,可以读取客户端发送来的信息
     * */
    @Override
    public void channelRead(ChannelHandlerContext ctx, Object msg) throws Exception {
        // 比如这里我们有一个非常耗时长的业务-> 异步执行 -> 提交该channel 对应的
        // NIOEventLoop 的 taskQueue中,

        // 解决方案2 定时任务
        ctx.channel().eventLoop().schedule(new Runnable() {
            @Override
            public void run() {

                try {
                    Thread.sleep(5 * 1000);
                    ctx.writeAndFlush(Unpooled.copiedBuffer("hello, 客户端~(>^ω^<)喵3", CharsetUtil.UTF_8));
                    System.out.println("channel code=" + ctx.channel().hashCode());
                } catch (Exception ex) {
                    System.out.println("发生异常" + ex.getMessage());
                }
            }
        }, 10, TimeUnit.SECONDS);

        System.out.println("go on ...");
    }
    @Override
    public void channelReadComplete(ChannelHandlerContext ctx) throws Exception {
        ctx.writeAndFlush(Unpooled.copiedBuffer("hellow, client~ miaomiao", CharsetUtil.UTF_8));
    }
    @Override
    public void exceptionCaught(ChannelHandlerContext ctx, Throwable cause) throws Exception {
        ctx.close();
    }
}
- 我们在上一篇Netty启动流程源码剖析中对ServerBootStrap进行过分析,其中说明ServerBootstrap 对象,他是一个引导类,用于启动服务器和引导整个程序的初始化。此处我们需要看Pipeline的创建过程,那么我们从此处来进行切入点。
- 同时要看ChannelPipeline的初始化代码我们将入口锁定在ChannelPipeline的操作上,在NettyServer的以下语句上加上断点
  bootstrap.group(bossGroup, workGroup)
                    .channel(NioServerSocketChannel.class) //此处加上断点
                    .option(ChannelOption.SO_BACKLOG, 128)
                    .childOption(ChannelOption.SO_KEEPALIVE, true)
                    .childHandler(new ChannelInitializer<SocketChannel>() {
                        //给pipeline 设置处理器
                        @Override
                        protected void initChannel(SocketChannel socketChannel) throws Exception {
                            System.out.println("客户端 SocketChannel hashCode: "+ socketChannel.hashCode());
                            socketChannel.pipeline().addLast(new NettyServerSchedulerReadHandler()); //此处关键节点加上断点
                        }
                    });
- 启动NettyServer进行Debug,进入到 channel(NioServerSocketChannel.class) ,此处会进入到AbstractBootstrap的channel方法如下
/**
     * The {@link Class} which is used to create {@link Channel} instances from.
     * You either use this or {@link #channelFactory(io.netty.channel.ChannelFactory)} if your
     * {@link Channel} implementation has no no-args constructor.
     */
    public B channel(Class<? extends C> channelClass) {
        if (channelClass == null) {
            throw new NullPointerException("channelClass");
        }
        return channelFactory(new ReflectiveChannelFactory<C>(channelClass));
    }
- 之前文章中分析过,这个一个通过反射获取channelClass的方法,我们传入的参数是NioServerSockerChannel。我们直接进入到NioServerSockerChannel的构造方法中。
public NioServerSocketChannel(ServerSocketChannel channel) {
        super(null, channel, SelectionKey.OP_ACCEPT);
        config = new NioServerSocketChannelConfig(this, javaChannel().socket());
    }
//一直从super进去
protected AbstractChannel(Channel parent) {
        this.parent = parent;
        id = newId();
        unsafe = newUnsafe();
        pipeline = newChannelPipeline();
    }
- 以上重点看newChannelPipeline方法,此处是创建ChannelPipeline的关键方法,进入后来到AbstractChannel的NewChannelPipeline方法中
protected DefaultChannelPipeline newChannelPipeline() {
        return new DefaultChannelPipeline(this);
    }
//最终的ChannelPipeline构造方法
protected DefaultChannelPipeline(Channel channel) {
        this.channel = ObjectUtil.checkNotNull(channel, "channel");
        succeededFuture = new SucceededChannelFuture(channel, null);
        voidPromise =  new VoidChannelPromise(channel, true);

        tail = new TailContext(this);
        head = new HeadContext(this);

        head.next = tail;
        tail.prev = head;
    }
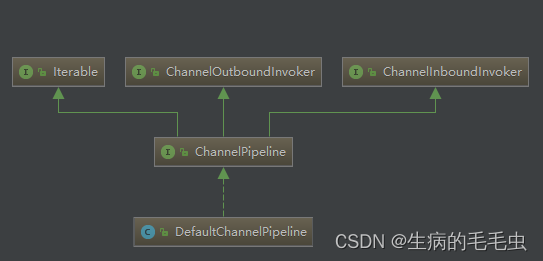
- 如上构造方法中是DefaultChannelPipeline,他是ChannelPipeline的一个抽象子类如下结构图
- 如上代码中参数是我们传入的NioServerSockerChannel
- 方法首先对channel参数进行初始化 this.channel = ObjectUtil.checkNotNull(channel, “channel”);用于pipeline操作channel
- 创建一个future和promise用于异步回调
- 创建一个inBound的tailContext,创建一个即是inbound又是outbound类型的headContext
- 接着讲两个Context相互连接形成双向链表
ChannelHandler 作用以及设计
public interface ChannelHandler {

    /**
     * 当把 ChannelHandler 添加到 pipeline 时被调用
     */
    void handlerAdded(ChannelHandlerContext ctx) throws Exception;

    /**
     * 当从 pipeline 中移除时调用
     */
    void handlerRemoved(ChannelHandlerContext ctx) throws Exception;

    /**
     * 当处理过程中在 pipeline 发生异常时调用
     */
    @Deprecated
    void exceptionCaught(ChannelHandlerContext ctx, Throwable cause) throws Exception;

    @Inherited
    @Documented
    @Target(ElementType.TYPE)
    @Retention(RetentionPolicy.RUNTIME)
    @interface Sharable {
        // no value
    }
}
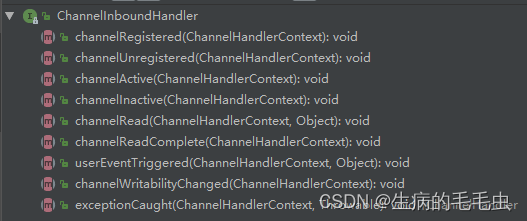
- ChannelHandler是一个接口,从提供的方法中可以看出,作用就是处理IO事件或者拦截IO事件,Handler处理事件时候分为入站和出站,两个方向的操作都是不同的,因此Netty定义了两个子接口继承ChannelHandler
- ChannelInboundHandler 入站事件接口
-
其中ChannelActive用户当Channel处于活动状态时候被调用
-
channelRead当从channel读取数据时候被调用,这两个方法是我们使用Netty编码的时候经常用到的
-
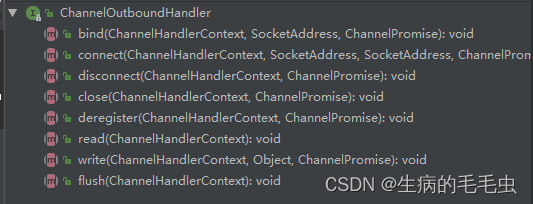
ChannelOutboundHandler 出站事件
-
bind方法,当请求将channel绑定到本地的时候调用
-
close方法,当请求关闭Channel时候调用
-
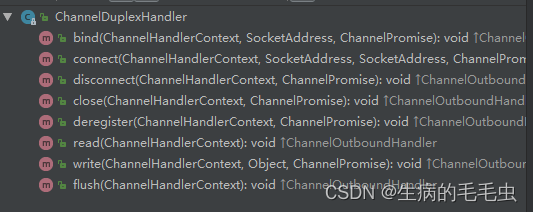
ChannelDuplexHandler处理入站和出站事件
-
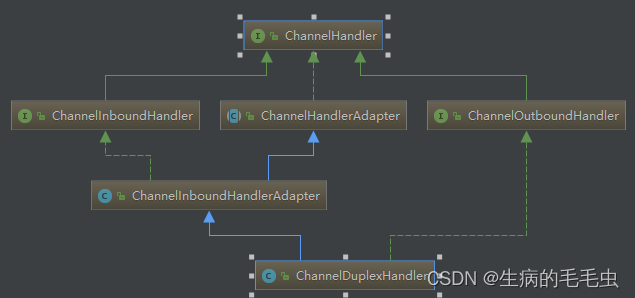
ChannelDuplexHandler间接实现了入站接口并直接实现了出站接口
-
是一个通用的能够同时处理入站事件和出站事件的类,类结构如下
ChannelHandlerContext 作用以及设计
- 如下类结构图

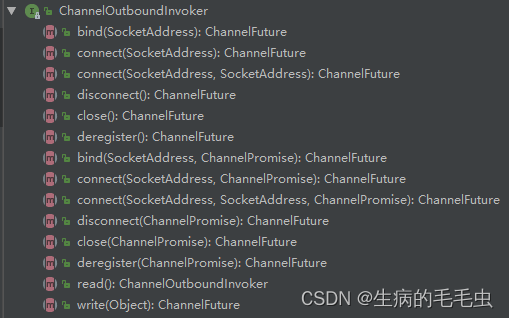
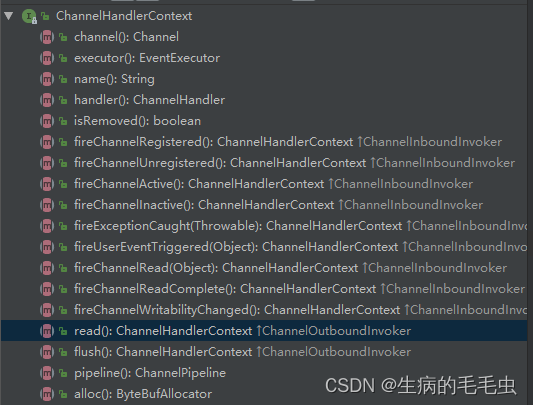
- ChannelHandlerContext基础了出站方法,调用接口和入站方法调用接口,部分方法列表如下:
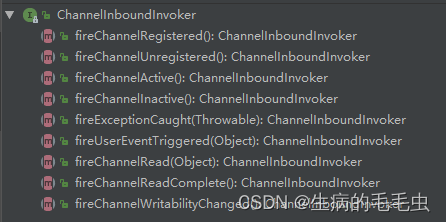
- ChannelHandlerContext不仅仅基础了inboud和outbound方法,同时也定义了一些自己的方法,channel,executor,handler,pipeline,分配内存器,管理handler是否被删除
- context是包装了handler相关的一切,方便Context可以在pipeline下进行操作handler
ChannelPipeline | ChannelHandler | ChannelHandlerContext
- 以上分析了三个核心对象的结构,接下来我们来看下三者的联系
- 我们知道,每个ChannelSocker的创建同时都有一个管道pipeline,我们调用pipeline的add方法添加handler,如下代码
socketChannel.pipeline().addLast(new NettyServerSchedulerReadHandler());
- 刚才解析ChannelPipeline的时候分析了pipeline方法,接着分析DefaultChannelPipeline中的构造方法,
protected DefaultChannelPipeline(Channel channel) {
    this.channel = ObjectUtil.checkNotNull(channel, "channel");
    succeededFuture = new SucceededChannelFuture(channel, null);
    voidPromise = new VoidChannelPromise(channel, true);
    tail = new TailContext(this);
    head = new HeadContext(this);
    head.next = tail;
    tail.prev = head;
}
- 在初始化tail和 head 链表节点的时候,他创建的是一个TailContext, HeadContext,继续进去看Context的初始化
AbstractChannelHandlerContext(DefaultChannelPipeline pipeline, EventExecutor executor, String name,
                                  boolean inbound, boolean outbound) {
        this.name = ObjectUtil.checkNotNull(name, "name");
        this.pipeline = pipeline;
        this.executor = executor;
        this.inbound = inbound;
        this.outbound = outbound;
        // Its ordered if its driven by the EventLoop or the given Executor is an instanceof OrderedEventExecutor.
        ordered = executor == null || executor instanceof OrderedEventExecutor;
    }
-
如上可以看到他的初始化过程中包含 DefaultChannelPipeline, executor 线程池初始化,就是我们创建的EventLoopGroup,包括inbound,outbound两个boolean类型,标识此处的Handler是处理出站还是处理入站
-
接下来我们在到demo中,追Pipeline初始化后的addLast方法,如下
 socketChannel.pipeline().addLast(new NettyServerSchedulerReadHandler());
//进入addLast方法

 @Override
    public final ChannelPipeline addLast(EventExecutorGroup executor, ChannelHandler... handlers) {
        if (handlers == null) {
            throw new NullPointerException("handlers");
        }
        for (ChannelHandler h: handlers) {
            if (h == null) {
                break;
            }
            addLast(executor, null, h);
        }
        return this;
    }
    //继续追addlast
    public final ChannelPipeline addLast(EventExecutorGroup group, String name, ChannelHandler handler) {
        final AbstractChannelHandlerContext newCtx;
        synchronized (this) {
            checkMultiplicity(handler);
            newCtx = newContext(group, filterName(name, handler), handler);
            addLast0(newCtx);
			......
            EventExecutor executor = newCtx.executor();
            if (!executor.inEventLoop()) {
                newCtx.setAddPending();
                executor.execute(new Runnable() {
                    @Override
                    public void run() {
                        callHandlerAdded0(newCtx);
                    }
                });
                return this;
            }
        }
        callHandlerAdded0(newCtx);
        return this;
    }
- 如上方法,中我们addLast可以一次添加n个Handler,DefaultChannelPipeline实现的addLast方法会将Handler循环添加到Pipeline中,
- 在以上addLast中,参数是线程池,name此处是null,handler我们系统传入,Netty同时做了同步synchronized
- checkMultiplicity(handler); 检测是否共享,如果不是,并且已经被别的Pipeline使用则抛出异常
- 调用 newContext(group, filterName(name, handler), handler); ,将Handler包装成Context,如下,创建一个Context
DefaultChannelHandlerContext(
            DefaultChannelPipeline pipeline, EventExecutor executor, String name, ChannelHandler handler) {
        super(pipeline, executor, name, isInbound(handler), isOutbound(handler));
        if (handler == null) {
            throw new NullPointerException("handler");
        }
        this.handler = handler;
    }
-
从此处我们可以看出,每次添加一个Handler都会管理一个Context
-
接着最后调用addLast将包装后的context添加到Pipeline双向链表中,如下
private void addLast0(AbstractChannelHandlerContext newCtx) {
        AbstractChannelHandlerContext prev = tail.prev;
        newCtx.prev = prev;
        newCtx.next = tail;
        prev.next = newCtx;
        tail.prev = newCtx;
    }
- 更具如上分析我们可以得出以下一个三个核心对象的一个组织结构

Pipeline,Handler,HandlerContext创建过程
- 每单创建一个ChannelSocket的时候都会创建一个绑定的pipeline,一对一的关系,创建Pipeline的时候也会创建tail节点,head节点,形成最初的双向链表
- 调用pipeline的addLast方法,更具给定的handler创建Context,然后将这个Context插入到链表的尾端
- Context包装Handler,多个Context在Pipeline中形成双向链表
- 入站方向inbound从head节点开始,出站方法outbound从tail开始
