【任务描述】
本任务要求使用线性布局以及TextView、EditText、Button等常见控件完成智慧园区登录界面的开发。
1、线性布局(LinearLayout)
1.1、LinearLayout概述
线性布局(LinearLayout)主要以水平或垂直方式来排列界面中的控件。并将控件排列到一条直线上。在线性布局中,如果水平排列,垂直方向上只能放一个控件,如果垂直排列,水平方向上也只能方一个控件。
线性布局中的每个元素都位于前一个元素之后,但要注意的是,当元素排列到布局界面的边缘时,后面的元素将不会被显示出来。
1.2、LinearLayout常用属性
1、 orientation属性
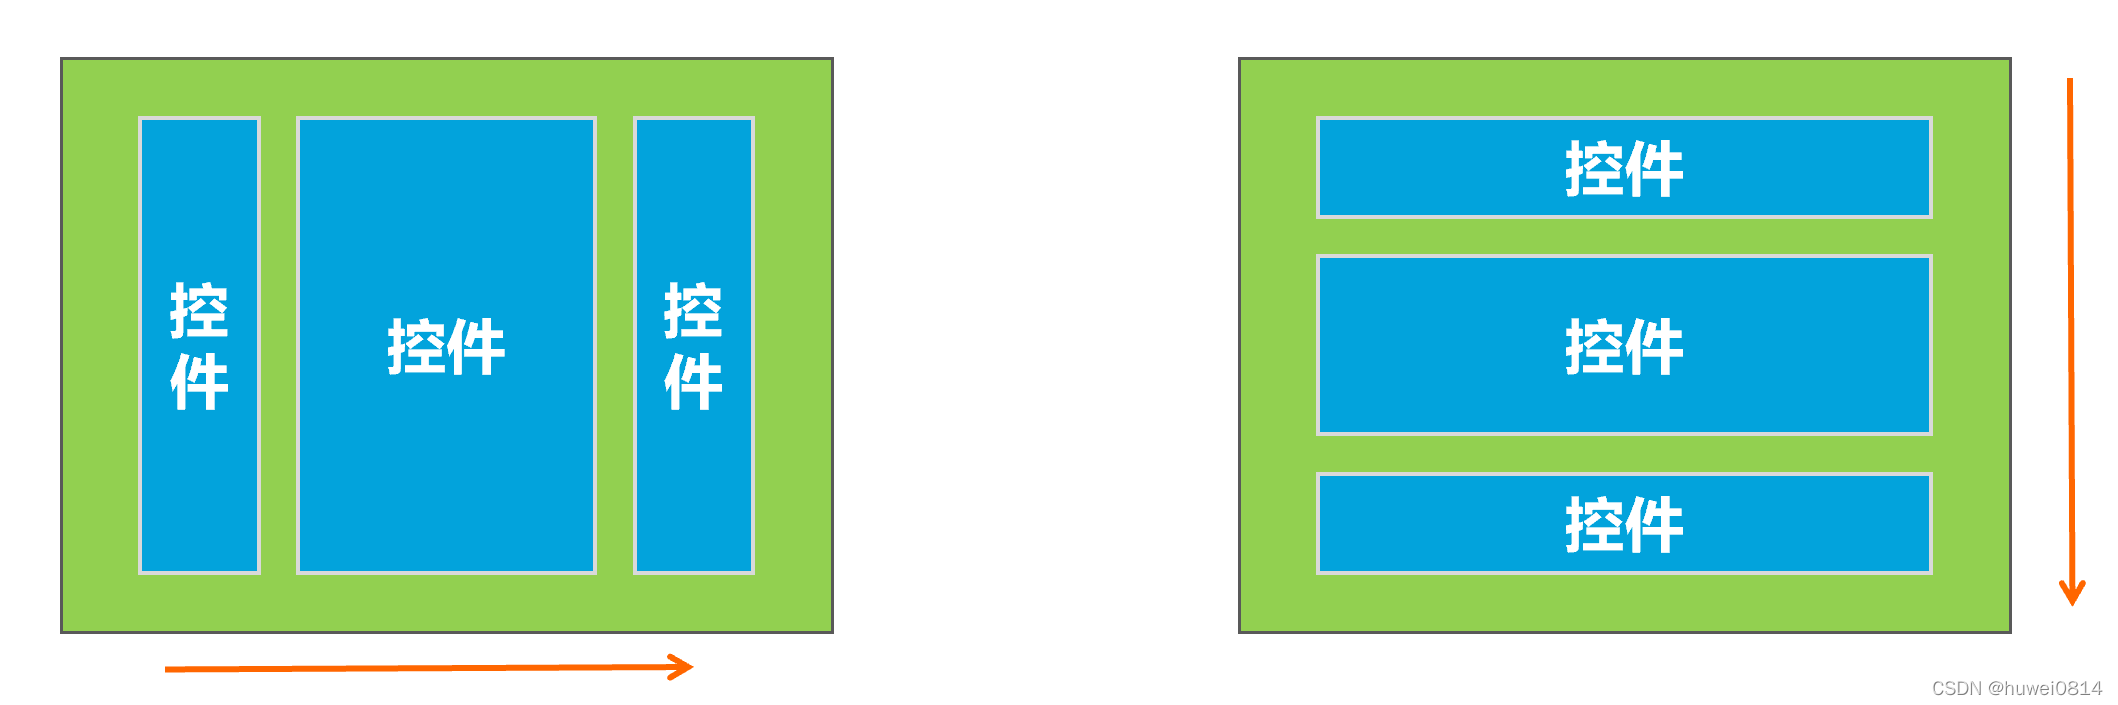
在线性布局中,控件排列有水平和垂直两个方向,控件排列方向由android:orientation属性来控制,该属性需要加在LinearLayout标记的属性中。
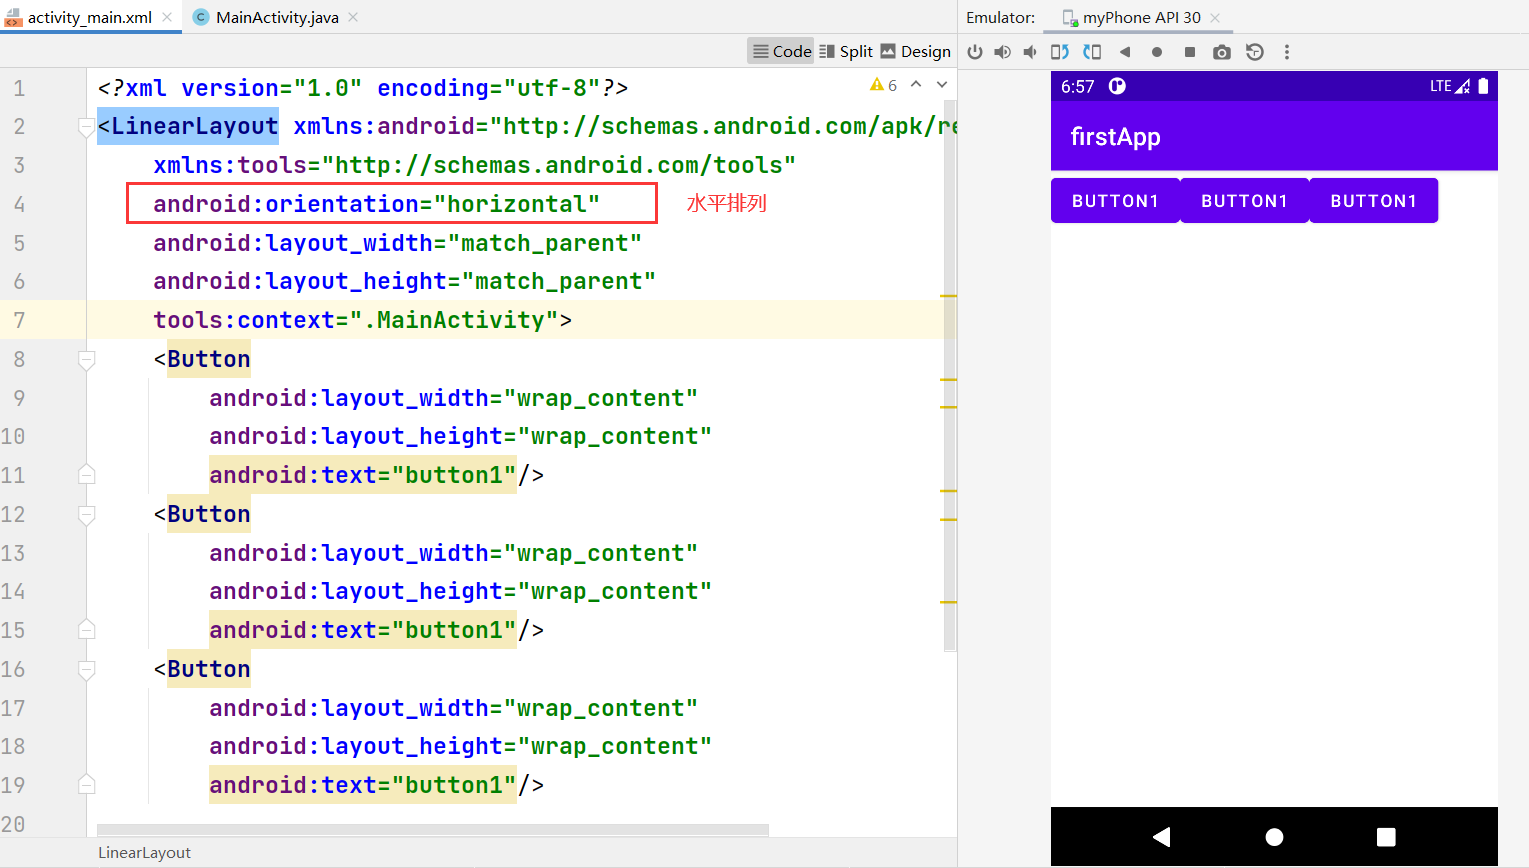
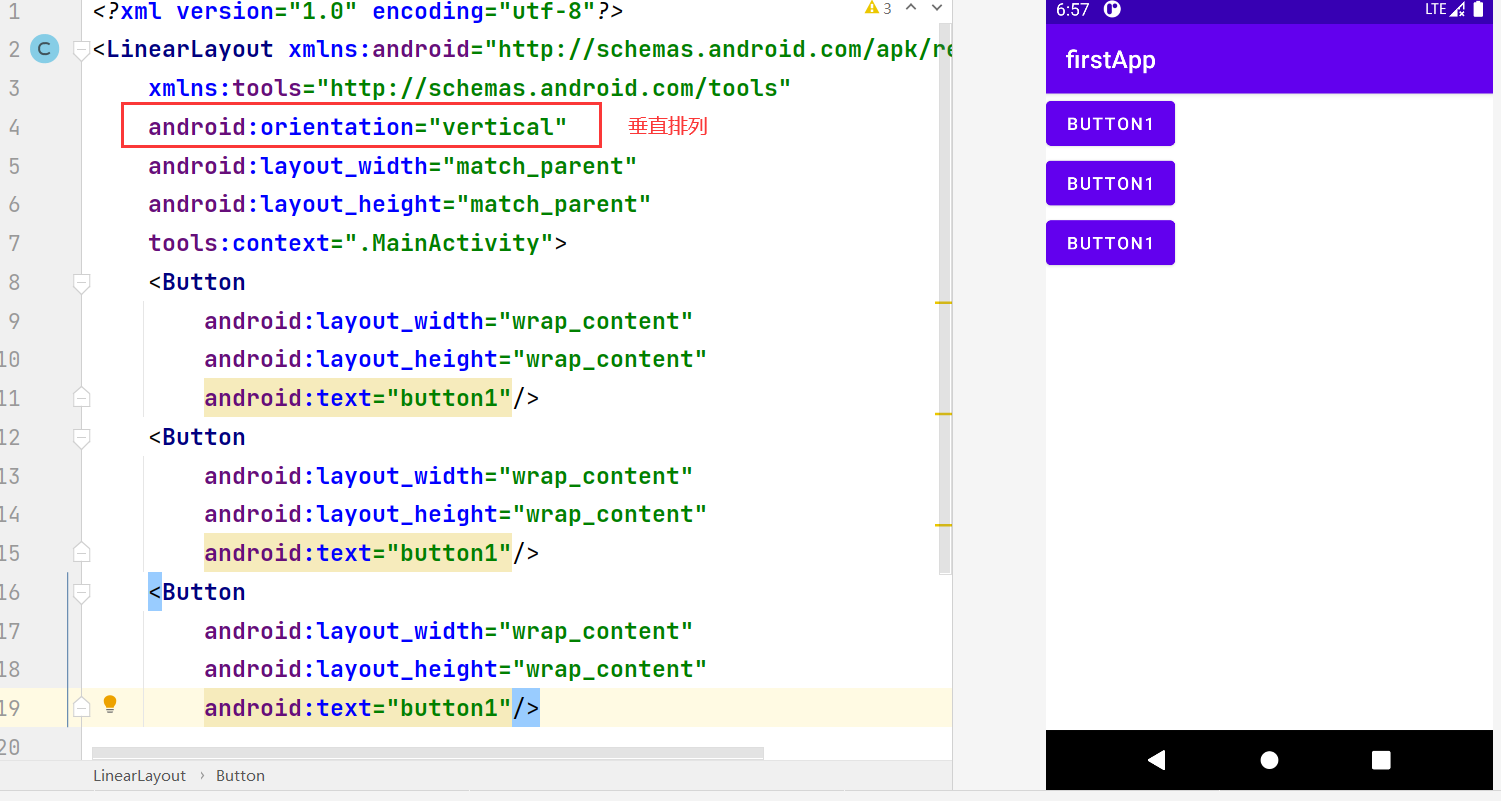
从上图可以看出,将orientation属性值设置成为horizontal,控件将从水平方向从左往右排列,将orientation属性值设置成为vertical控件将从垂直方向从上往下排列。
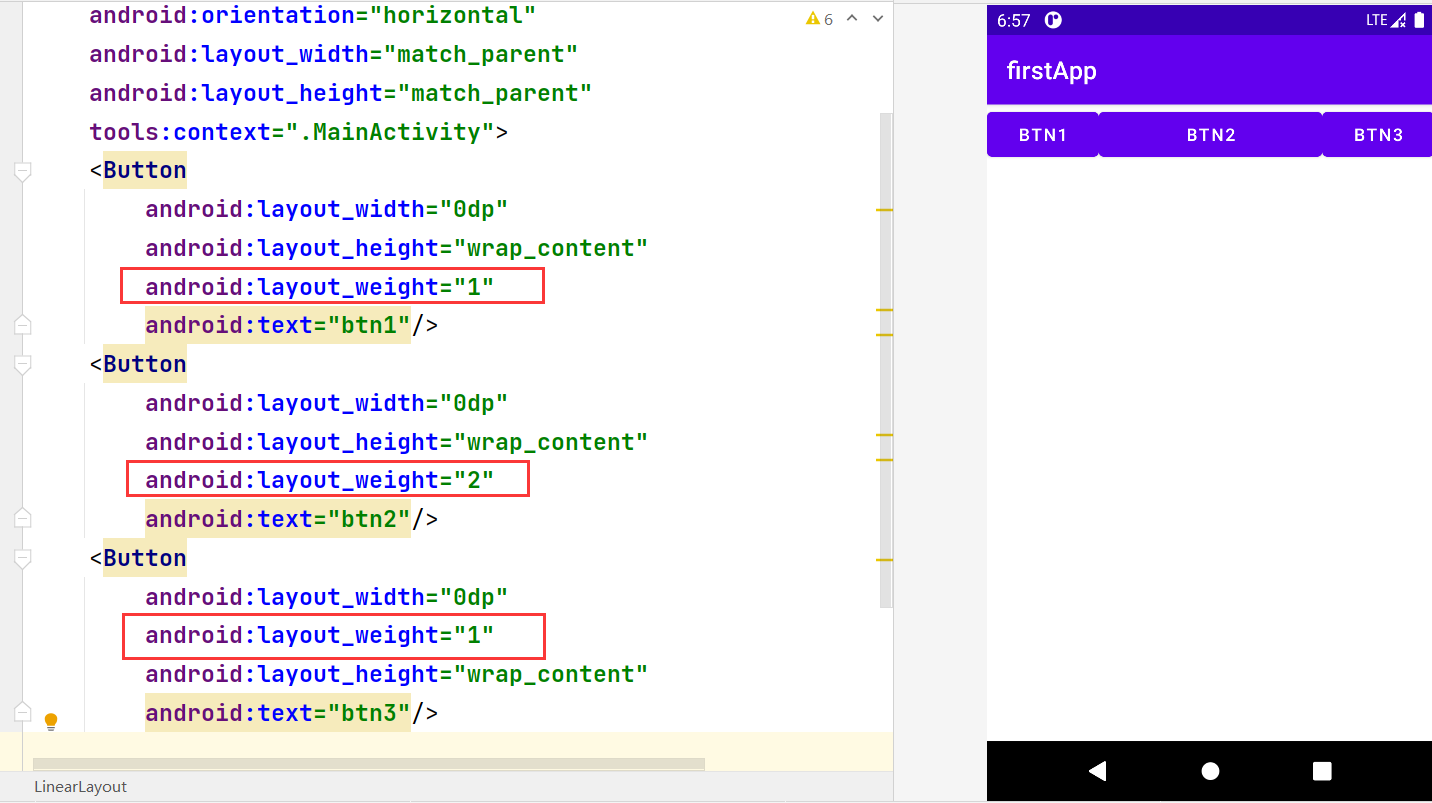
2. layout_weight属性
LinearLayout中另外一个常用的属性是layout_weight,该属性需要加在LinearLayout的子控件中。其作用是分配线性布局中的剩余空间到该控件上。
当LinearLayout的排列方式是horizontal时,layout_weight只能设置宽度的比重,既然宽度使用layout_weight来设置,那么控件的宽度不再由layout_width来决定。同样的道理,当LinearLayout的排列方向是vertical时,layout_weight只能设置高度的比重,高度比重也不再由layout_height来决定。
2、TextView的使用
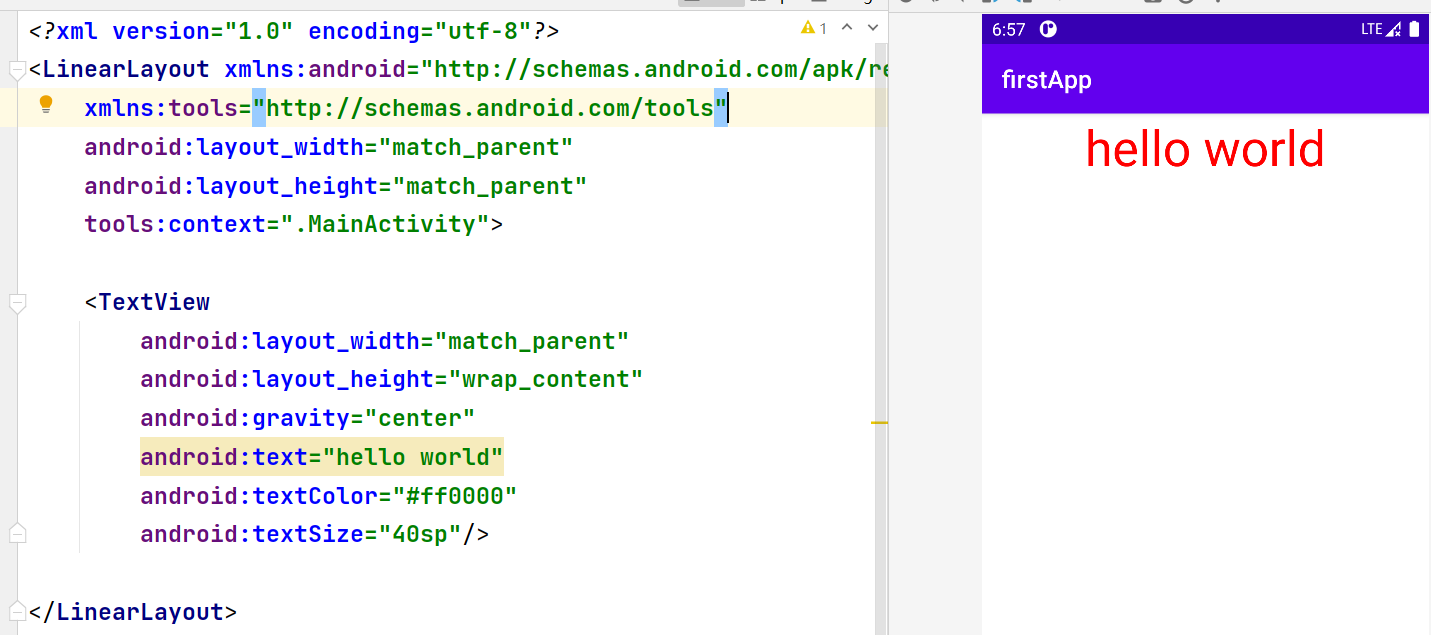
TextView(文本框)可以说是Android中最简单的一个控件了,改控件主要用于在界面上显示一段文本信息。开发者可以在代码中设置 TextView控件属性,如字体内容、大小,颜色、样式等。
下面是TextView常用属性
text = "文本"
textColor = "颜色值" #十六进制
textSize = "文字大小" 单位:sp(官方推荐)、dp、px
textStyle = "文字样式" 可选值:Bold(加粗)、italic(倾斜)、normal(无)
ellipsize = "文字超出截断" 可选值:end(后)、start(前)
maxLenght = "最大长度" 单位:Int,可容纳的最大字符数,超出隐藏
background = "颜色值/照片" #十六进制/图片路径,设置背景
Android中颜色代码用#ARGB表示,A代表透明度,R为Red,G为Green,B为Blue,其中每一个字母用都用一个十六进制来表示,其中透明度A从0到F表示完全透明到完全不透明。例如#FFFF就是完全不透明的白色(F为十六进制的最后一个,而红加绿加蓝自然就是白色了),表示完全不透明时,可以省略A,应用#RGB表示。大多数情况使用#AARRGGBB表示更高精度的颜色值(其中透明度AA可以省略)。
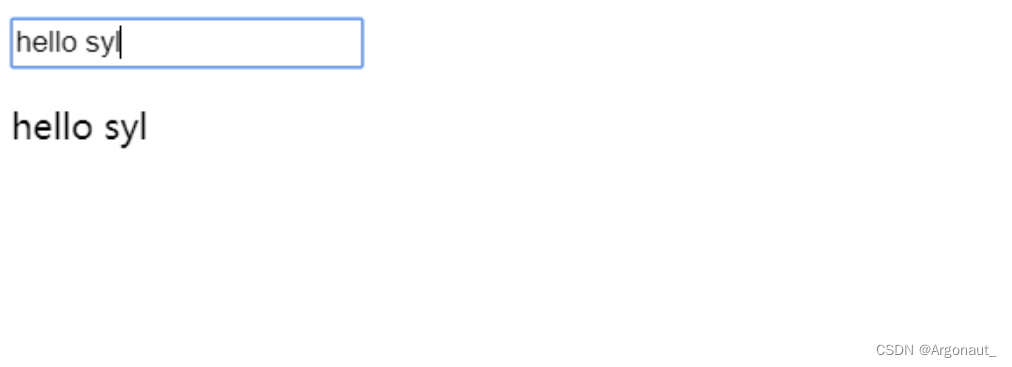
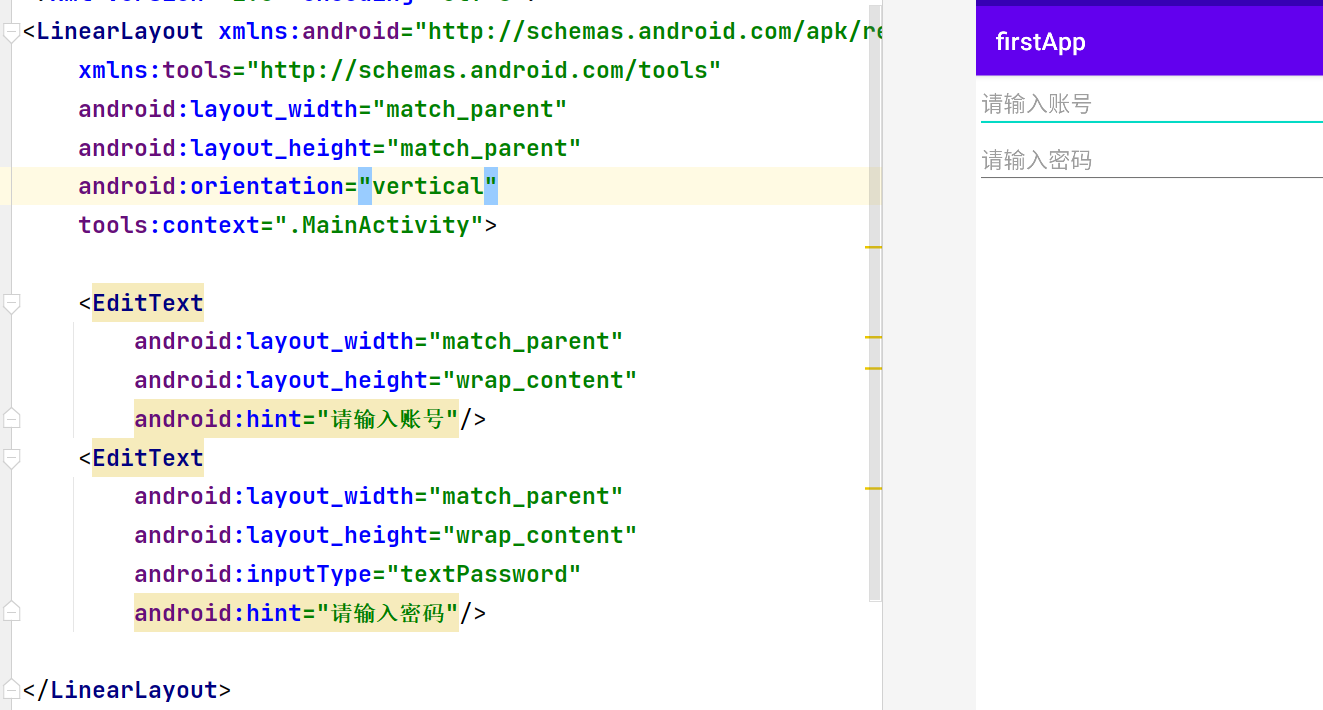
3、EditText(输入框)的使用
EditText控件也称输入框,它允许用户在控件里输入和编辑内容。EditTex常用属性:
1. hint:设置EditText中的提示内容
2. inputType:限制该文本框的输入内容,如textPassword表示输入的文本位密码类型,如number(限制为拨号建盘输入)等
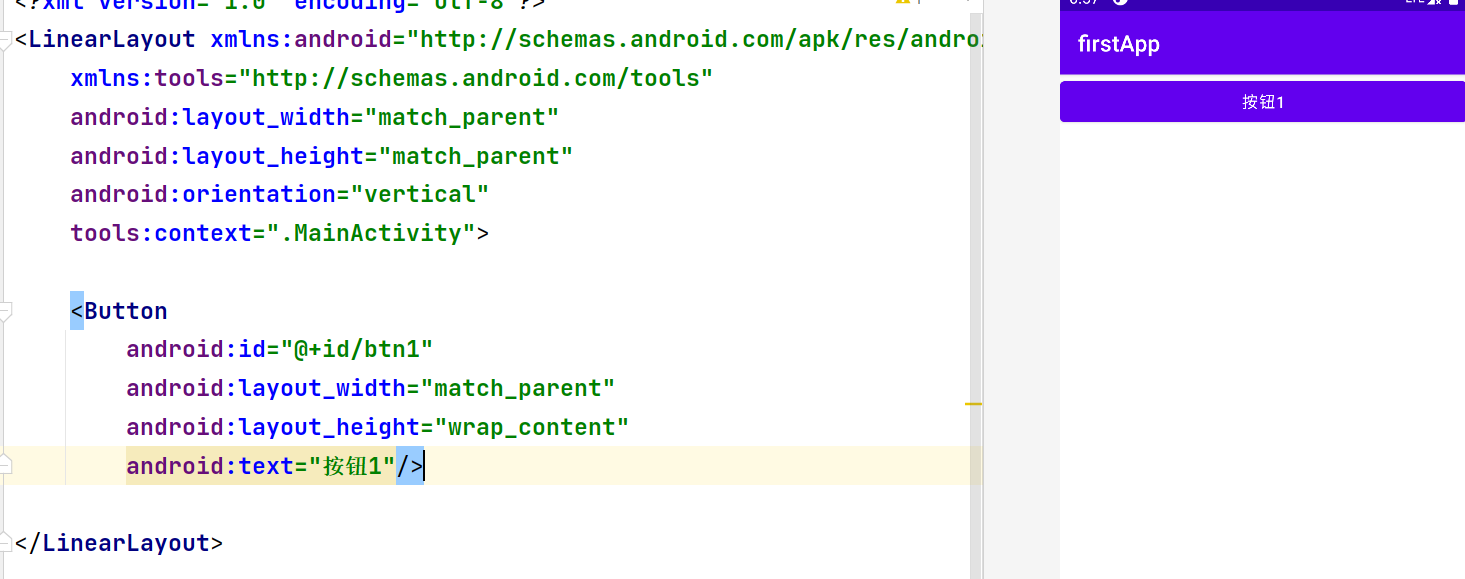
4、Button的使用
Button控件,也就是按钮,是程序与用户交互非常重要的一个控件,起作用是相应用户的一系列点击事件。
常用属性
setClickable(boolean clickable) | 设置按钮是否允许点击。clickable=true:允许点击。clickable=false:禁止点击 |
setBackgroundResource(int resid) | 通过资源文件设置背景色。resid:资源xml 文件 ID。按钮默认背景为:android.R.drawable.btn_default |
使用匿名内部类的方式在Activity中直接实现Button的点击事件
在Activity中实现View.onClickListener接口设置点击事件
xml文件
java文件
package com.example.firstapp;

import androidx.appcompat.app.AppCompatActivity;

import android.os.Bundle;
import android.util.Log;
import android.view.View;
import android.widget.Button;
import android.widget.Toast;

import java.net.DatagramSocketImpl;

public class MainActivity extends AppCompatActivity {
    private Button btn1;
    private static final String TAG = "MainActivity";
    @Override
    protected void onCreate(Bundle savedInstanceState) {
        super.onCreate(savedInstanceState);
        setContentView(R.layout.activity_main);
        btn1 = findViewById(R.id.btn1);
        btn1.setOnClickListener(new View.OnClickListener() {
            @Override
            public void onClick(View view) {
                Toast.makeText(MainActivity.this,"点击了按钮1", Toast.LENGTH_LONG).show();
                Log.d(TAG, "onClick: 点击了");
            }
        });
    }
}
在Activity中实现View.onClickListener接口设置点击事件
<?xml version="1.0" encoding="utf-8"?>
<LinearLayout xmlns:android="http://schemas.android.com/apk/res/android"
    xmlns:tools="http://schemas.android.com/tools"
    android:layout_width="match_parent"
    android:layout_height="match_parent"
    android:orientation="vertical"
    tools:context=".MainActivity">

    <Button
        android:id="@+id/btn1"
        android:layout_width="match_parent"
        android:layout_height="wrap_content"
        android:text="按钮1"/>
    <Button
        android:id="@+id/btn2"
        android:layout_width="match_parent"
        android:layout_height="wrap_content"
        android:text="按钮2"/>
</LinearLayout>
package com.example.firstapp;
import androidx.appcompat.app.AppCompatActivity;
import android.os.Bundle;
import android.util.Log;
import android.view.View;
import android.widget.Button;
import android.widget.Toast;
import java.net.DatagramSocketImpl;
public class MainActivity extends AppCompatActivity implements View.OnClickListener {
private Button btn1,btn2;
private static final String TAG = "MainActivity";
@Override
protected void onCreate(Bundle savedInstanceState) {
super.onCreate(savedInstanceState);
setContentView(R.layout.activity_main);
btn1 = findViewById(R.id.btn1);
btn2 = findViewById(R.id.btn2);
btn1.setOnClickListener(this);
btn2.setOnClickListener(this);
}
@Override
public void onClick(View view) {
switch (view.getId()){
case R.id.btn1:
Toast.makeText(this, "按钮1被点击了", Toast.LENGTH_SHORT).show();
Log.d(TAG, "onClick:1 ");
break;
case R.id.btn2:
Toast.makeText(this, "按钮2被点击了", Toast.LENGTH_SHORT).show();
Log.d(TAG, "onClick: 2");
break;
}
}
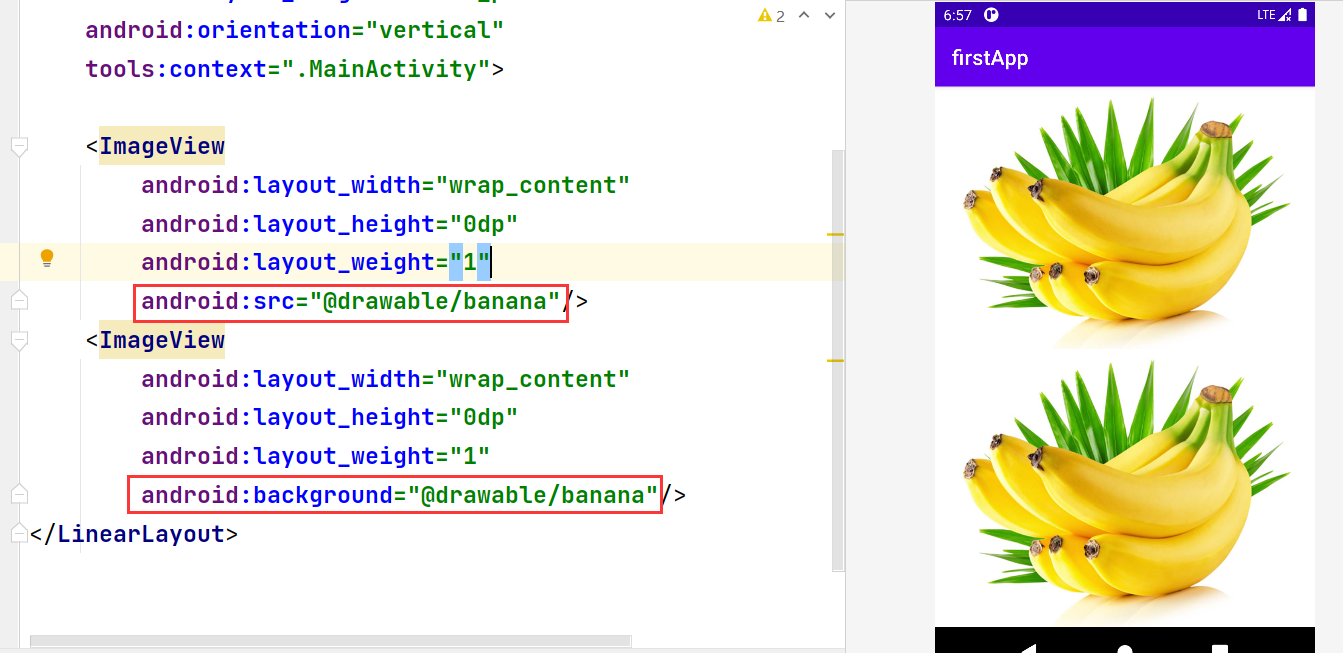
}5、ImageView的使用
ImageView是Android开发中最常用的组件之一,主要用于显示图片,但是它不只是能显示图片,任何Drawable对象都可以使用它来显示。
1、ImageView常用属性
android:maxWidth:ImageView的最大宽度。
android:maxHeight:ImageView的最大高度。
android:adjustViewBounds:用于调整ImageView的边界,使得ImageView和图片有一样的长 宽比例,通常配合maxWidth、maxHeight一起使用。
app:srcCompat:设置要显示的Drawable对象的引用。
android:scaleType:设置图片的缩放类型
在学习这个控件之前,需要准备一些图片资源放置res/drawable目录下。
ImageView控件可以使用android:src属性把图片当作内容显示,也可以用android:background把图片当作背景显示。
通过例子看效果
6、RadioButton的使用
RadioButton(单选按钮)需要与RadioGroup(单选组合框)配合使用,才能实现多个单选按钮间的互斥效果。具体代码如下:
<?xml version="1.0" encoding="utf-8"?>
<LinearLayout xmlns:android="http://schemas.android.com/apk/res/android"
    xmlns:tools="http://schemas.android.com/tools"
    android:layout_width="match_parent"
    android:layout_height="match_parent"
    android:orientation="vertical"
    tools:context=".MainActivity">

    <TextView
        android:layout_width="wrap_content"
        android:layout_height="wrap_content"
        android:text="请选择性别"/>
    <RadioGroup
        android:layout_width="match_parent"
        android:layout_height="wrap_content"
        android:orientation="horizontal">
        <RadioButton
            android:id="@+id/male"
            android:layout_width="wrap_content"
            android:layout_height="wrap_content"
            android:checked="true"
            android:text="男"/>
        <RadioButton
            android:id="@+id/female"
            android:layout_width="wrap_content"
            android:layout_height="wrap_content"
            android:text="女"/>
    </RadioGroup>
</LinearLayout>
7、CheckBox的使用
CheckBox(复选框),它允许用户一次选择多个选项。具体代码如下
<?xml version="1.0" encoding="utf-8"?>
<LinearLayout xmlns:android="http://schemas.android.com/apk/res/android"
xmlns:tools="http://schemas.android.com/tools"
android:layout_width="match_parent"
android:layout_height="match_parent"
android:orientation="vertical"
tools:context=".MainActivity">
<TextView
android:layout_width="wrap_content"
android:layout_height="wrap_content"
android:text="请选择爱好:"/>
<CheckBox
android:id="@+id/cb_basketball"
android:layout_width="wrap_content"
android:layout_height="wrap_content"
android:text="篮球"/>
<CheckBox
android:id="@+id/cb_sing"
android:layout_width="wrap_content"
android:layout_height="wrap_content"
android:text="唱歌"/>
<CheckBox
android:id="@+id/cb_game"
android:layout_width="wrap_content"
android:layout_height="wrap_content"
android:checked="true"
android:text="游戏"/>
<CheckBox
android:id="@+id/cb_tour"
android:layout_width="wrap_content"
android:layout_height="wrap_content"
android:text="旅游"/>
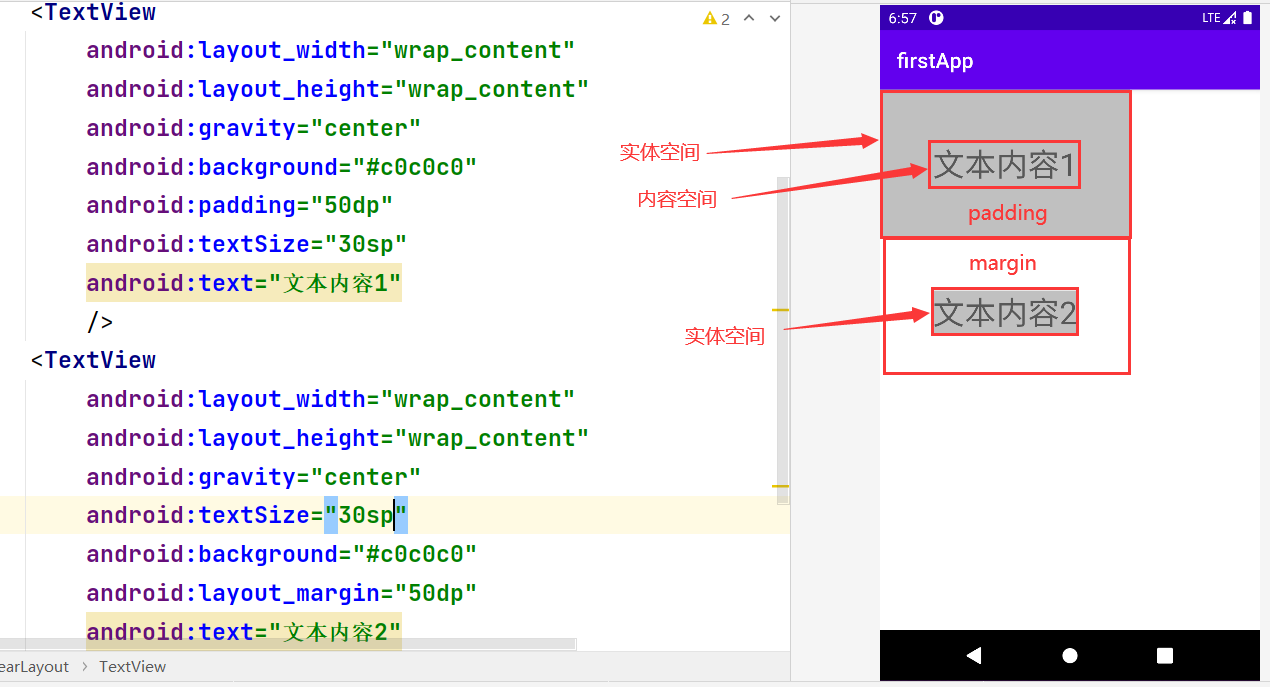
</LinearLayout>8、边距的使用
在android的布局中,经常需要给控件和容器设置一些边距,如控件和控件之间的边距称为外边距,控件与其内容的边距称为内边距。
1.设置各个组件的外边距:
android:layout_marginTop
android:layout_marginBottom
android:layout_marginLeft
android:layout_marginRight
2.设置内边距
android:paddingBottom
android:paddingTop
android:paddingLeft
android:paddingRight
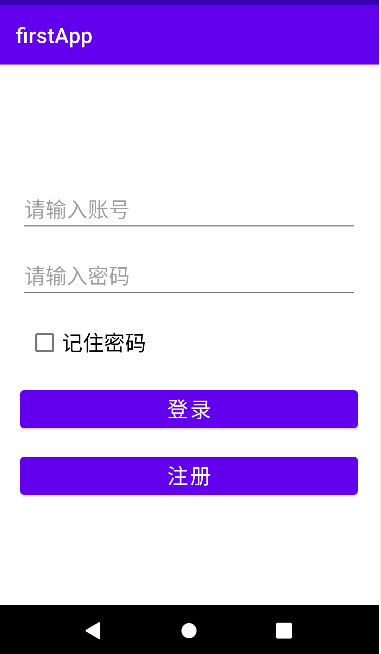
9、登录界面任务实施
<?xml version="1.0" encoding="utf-8"?>
<LinearLayout xmlns:android="http://schemas.android.com/apk/res/android"
    xmlns:tools="http://schemas.android.com/tools"
    android:layout_width="match_parent"
    android:layout_height="match_parent"
    android:orientation="vertical"
    android:gravity="center"
    android:padding="20dp"
    android:id="@+id/ll_main"
    tools:context=".MainActivity">
    <EditText
        android:layout_width="match_parent"
        android:layout_height="wrap_content"
        android:layout_marginTop="15dp"
        android:textSize="20sp"
        android:hint="请输入账号"
        />
    <EditText
        android:layout_width="match_parent"
        android:layout_height="wrap_content"
        android:layout_marginTop="15dp"
        android:textSize="20sp"
        android:inputType="textPassword"
        android:hint="请输入密码"
        />
    <CheckBox
        android:layout_width="match_parent"
        android:layout_height="wrap_content"
        android:layout_marginTop="15dp"
        android:text="记住密码"
        android:textSize="20sp"
        android:layout_marginLeft="5dp"
        />
    <Button
        android:layout_width="match_parent"
        android:layout_height="wrap_content"
        android:layout_marginTop="15dp"
        android:textSize="20sp"
        android:text="登录"/>
    <Button
        android:layout_width="match_parent"
        android:layout_height="wrap_content"
        android:layout_marginTop="15dp"
        android:textSize="20sp"
        android:text="注册"/>
</LinearLayout>