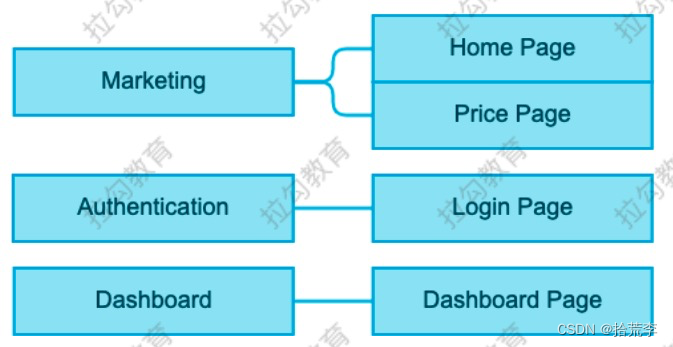
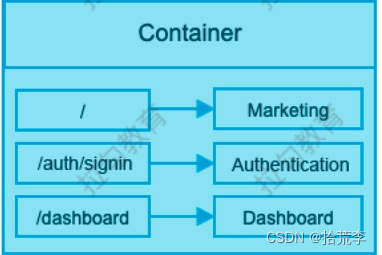
一、 微前端应用案例概述
当前案例中包含三个微应用,分别为 Marketing、Authentication 和 Dashboard
-
Marketing:营销微应用,包含首页组件和价格组件
-
Authentication:身份验证微应用,包含登录组件
-
Dashboard:仪表盘微应用,包含仪表盘组件
容器应用、营销应用、身份验证应用使用 React 框架,仪表盘应用使用 Vue 框架。

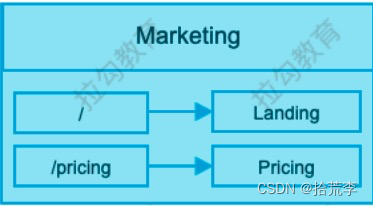
二、 Marketing - 应用初始化
- 创建应用结构
├── public
│ └── index.html
├── src
│ ├── bootstrap.js
│ └── index.js
├── package-lock.json
├── package.json
└── webpack.config.js
<!-- index.html -->
<title>Marketing</title>
<div id="dev-marketing"></div>
// index.js
import("./bootstrap")
// bootstrap.js
console.log('Hello')
- 配置 webpack
const HtmlWebpackPlugin = require("html-webpack-plugin")

module.exports = {
mode: "development",
devServer: {
port: 8081 ,
// 当使用 HTML5 History API 时, 所有的 404 请求都会响应 index.html 文件
historyApiFallback: true
},
module: {
rules: [
{
test: /\.js$/,
exclude: /node_modules/,
use: {
loader: "babel-loader",
options: {
presets: ["@babel/preset-react", "@babel/preset-env"],
// 1. 避免 babel 转义语法后 helper 函数重复
// 2. 避免 babel polyfill 将 API 添加到全局
plugins: ["@babel/plugin-transform-runtime"]
}
}
}
]
},
plugins: [
new HtmlWebpackPlugin({
template: "./public/index.html"
})
]
}
- 添加启动命令
"scripts": {
"start": "webpack serve"
}
三、Marketing - 创建挂载方法
// bootstrap.js
import React from "react"
import ReactDOM from "react-dom"

function mount(el) {
ReactDOM.render(<div>Marketing works</div>, el)
}

if (process.env.NODE_ENV === "development") {
const el = document.querySelector("#dev-marketing")
if (el) mount(el)
}

export { mount }
四、Marketing - 创建路由
-
在 src 文件夹中创建 components 文件夹用于放置页面组件
-
在 src 文件夹中创建 App 组件,用于编写路由
// App.js
import React from "react"
import { BrowserRouter, Route, Switch } from "react-router-dom"
import Landing from "./components/Landing"
import Pricing from "./components/Pricing"

export default function App() {
return (
<BrowserRouter>
<Switch>
<Route path="/pricing" component={Pricing} />
<Route path="/" component={Landing} />
</Switch>
</BrowserRouter>
)
}
// bootstrap.js
import App from "./App"
function mount(el) {
ReactDOM.render(<App />, el)
}
五、Container - 应用初始化
- 创建应用结构 (基于 Marketing 应用进行拷贝修改)
├── public
│ └── index.html
├── src
│ ├── bootstrap.js
│ └── index.js
├── package-lock.json
├── package.json
└── webpack.config.js
- 修改 index.html
<title>Container</title>
<div id="root"></div>
- 修改 App.js
import React from "react"

export default function App() {
return <div>Container works</div>
}
- 修改 bootstrap.js
if (process.env.NODE_ENV === "development") {
const el = document.querySelector("#root")
if (el) mount(el)
}
- 修改 webpack.config.js
module.exports = {
devServer: {
port: 8080
}
}
六、Container 应用加载 Marketing
- Marketing 应用配置 ModuleFederation
const ModuleFederationPlugin =
require("webpack/lib/container/ModuleFederationPlugin")

new ModuleFederationPlugin({
name: "marketing",
filename: "remoteEntry.js",
exposes: {
"./MarketingApp": "./src/bootstrap"
}
})
- Container 应用配置 ModuleFederation
const ModuleFederationPlugin =
require("webpack/lib/container/ModuleFederationPlugin")
new ModuleFederationPlugin({
name: "container",
remotes: {
marketing: "marketing@http://localhost:8081/remoteEntry.js"
}
})
- 在 Container 应用中新建 MarketingApp 组件,用于挂载 Marketing 应用
// Container/components/MarketingApp.js
import React, { useRef, useEffect } from "react"
import { mount } from "marketing/MarketingApp"

export default function MarketingApp() {
const ref = useRef()
useEffect(() => {
mount(ref.current)
}, [])
return <div ref={ref}></div>
}
- 在 Container 应用中的 App 组件中渲染 Marketing 应用的
// Container/App.js
import React from "react"
import MarketingApp from "./components/MarketingApp"

export default function App() {
return <MarketingApp />
}
七、共享库设置
在 Container 应用和 Marketing 应用中都使用了大量的相同的代码库,如果不做共享处理,则应用中相 同的共享库会被加载两次。
"dependencies": {
"@material-ui/core": "^4.11.0",
"@material-ui/icons": "^4.9.1",
"react": "^17.0.1",
"react-dom": "^17.0.1",
"react-router-dom": "^5.2.0"
}

在 Container 应用和 Marketing 应用的 webpack 配置文件中加入以下代码
const packageJson = require("./package.json")

new ModuleFederationPlugin({
shared: packageJson.dependencies
})
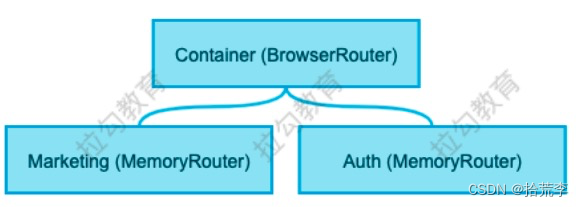
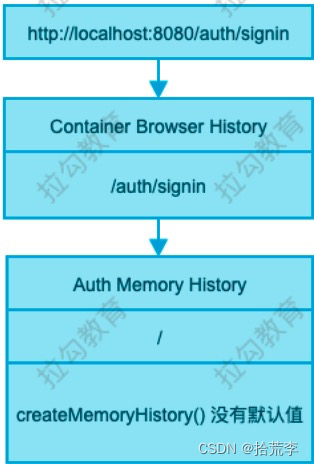
八、路由配置
容器应用路由用于匹配微应用,微应用路由用于匹配组件。


容器应用使用 BrowserHistory 路由,微应用使用 MemoryHistory 路由。
-
为防止容器应用和微应用同时操作 url 而产生冲突,在微前端架构中,只允许容器应用更新 url,应用不允许更新 url,MemoryHistory 是基于内存的路由,不会改变浏览器地址栏中的 url。
-
如果不同的应用程序需要传达有关路由的相关信息,应该尽可能的使用通过的方式,memoryHistory 在 React 和 Vue 中都有提供。
更新现有路由配置
- 容器应用的路由配置
// Container/App.js
import { Router, Route, Switch } from "react-router-dom"
import { createBrowserHistory } from "history"

const history = createBrowserHistory()

export default function App() {
return (
<Router history={history}>
<Switch>
<Route path="/">
<MarketingApp />
</Route>
</Switch>
</Router>
)
}
- Marketing 应用的路由配置
// Marketing/bootstrap.js
import { createMemoryHistory } from "history"

function mount(el) {
const history = createMemoryHistory()
ReactDOM.render(<App history={history} />, el)
}
// Marketing/app.js
import { Router, Route, Switch } from "react-router-dom"

export default function App({ history }) {
return (
<Router history={history}>
<Switch>
<Route path="/pricing" component={Pricing} />
<Route path="/" component={Landing} />
</Switch>
</Router>
)
}
- 添加头部组件
import Header from "./components/Header"

export default function App() {
return <Header />
}
九、微应用和容器应用路由沟通
- 微应用路由变化时 url 地址没有被同步到浏览器的地址栏中,路由变化也没有被同步到浏览器的历史记录中。当微应用路由发生变化时通知容器应用更新路由信息 (容器应用向微应用传递方法)。
// Container/components/MarketingApp.js
import { useHistory } from "react-router-dom"

const history = useHistory()

mount(ref.current, {
onNavigate({ pathname: nextPathname }) {
const { pathname } = history.location
if (pathname !== nextPathname) {
history.push(nextPathname)
}
}
})
// Marketing/bootstrap.js
function mount(el, { onNavigate }) {
if (onNavigate) history.listen(onNavigate)
}
- 容器应用路由发生变化时只能匹配到微应用,微应用路由并不会响应容器应用路由的变化。当容器应用路由发生变化时需要通知微应用路由进行响应 (微应用向容器应用传递方法)
// Marketing/bootstrap.js
function mount(el, { onNavigate }) {
return {
onParentNavigate({ pathname: nextPathname }) {
const { pathname } = history.location
if (pathname !== nextPathname) {
history.push(nextPathname)
}
}
}
}
// Container/components/MarketingApp.js
const { onParentNavigate } = mount()
if (onParentNavigate) {
history.listen(onParentNavigate)
}
十、Marketing 应用本地路由设置
目前 Marketing 应用本地开发环境是报错的,原因是本地开发环境在调用 mount 方法时没有传递第二个参数,默认值就是 undefined, mount 方法内部试图从 undefined 中解构 onNavigate,所以就报错了。
解决办法是在本地开发环境调用mount 方法时传递一个空对象。
if (process.env.NODE_ENV === "development") {
if (el) mount(el, {})
}
如果当前为本地开发环境,路由依然使用 BrowserHistory,所以在调用 mount 方法时传递defaultHistory 以做区分。
// Marketing/bootstrap.js
if (process.env.NODE_ENV === "development") {
if (el) mount(el, { defaultHistory: createBrowserHistory() })
}
在 mount 方法内部判断 defaultHistory 是否存在,如果存在就用 defaultHistory,否则就用MemoryHistory。
// Marketing/bootstrap.js
function mount(el, { onNavigate, defaultHistory }) {
const history = defaultHistory || createMemoryHistory()
}
十一、Authentication 应用初始化
-
下载应用依赖
cd auth && npm install -
拷贝 src 文件夹并做如下修改
// bootstrap.js
if (process.env.NODE_ENV === "development") {
const el = document.querySelector("#dev-auth")
}
// App.js
import React from "react"
import { Router, Route, Switch } from "react-router-dom"

export default function App({ history }) {
return (
<Router history={history}>
<Switch>
<Route path="/auth/signin" component={Signin}></Route>
</Switch>
</Router>
)
}
- 拷贝 public 文件夹,并修改 index.html
<div id="dev-auth"></div>
- 拷贝 webpack.config.js 文件并进行修改
module.exports = {
devServer: {
port: 8082
},

plugins: [
new ModuleFederationPlugin({
name: "auth",
exposes: {
"./AuthApp": "./src/bootstrap"
}
})
]
}
- 添加应用启动命令
// package.json
"scripts": {
"start": "webpack serve"
}
- 修改 publicPath 更正文件的访问路径
// webpack.config.js
module.exports = {
output: {
publicPath: "http://localhost:8082/"
}
}
- 更正其他微应用的 publicPath
// Container/webpack.config.js
output: {
publicPath: "http://localhost:8080/"
}
// Marketing/webpack.config.js
output: {
publicPath: "http://localhost:8081/"
}
十二、Container 应用加载 AuthApp
- 在 Container 应用的 webpack 中配置添加 AuthApp 的远端地址
// Container/webpack.config.js
remotes: {
auth: "auth@http://localhost:8082/remoteEntry.js"
}
- 在 Container 应用的 components 文件夹中新建 AuthApp.js,并拷贝 MarketingApp.js 中的内容进行修改
import { mount } from "auth/AuthApp"
export default function AuthApp() {}
- 在 Container 应用的 App.js 文件中配置路由
<BrowserRouter>
<Switch>
<Route path="/auth/signin">
<AuthApp />
</Route>
<Route path="/">
<MarketingApp />
</Route>
</Switch>
</BrowserRouter>
- 解决登录页面点击两次才显示的 Bug当点击登录按钮时,容器应用的路由地址是 /auth/signin,加载 AuthApp,但是 AuthApp 在首次加载时默认访问的是 /,因为在使用 createMemoryHistory 创建路由时没有传递初始参数,当再次点击登录按钮时,容器应用通知微应用路由发生了变化,微应用同步路由变化,所以最终看到了登录页面。
解决问题的核心点在于微应用在初始创建路由对象时应该接收一个默认参数,默认参数就来自于容器应用。
// auth/bootstrap.js
function mount(el, { onNavigate, defaultHistory, initialPath }) {
createMemoryHistory({
initialEntries: [initialPath]
})
}
// container/src/components/AuthApp.js
mount(ref.current, {
initialPath: history.location.pathname
})
十三、按照上述方法修正 MarketingApp
懒加载微应用
目前所有的微应用都会在用户初始访问时被加载,这样会导致加载时间过长,解决办法就是懒加载微应用。
// Container/app.js
import React, { lazy, Suspense } from "react"
import Progress from "./components/Progress"
const MarketingApp = lazy(() => import("./components/MarketingApp"))
const AuthApp = lazy(() => import("./components/AuthApp"))

function App () {
return (
<Suspense fallback={<Progress />}>
<Switch>
<Route path="/auth/signin">
<AuthApp />
</Route>
<Route path="/">
<MarketingApp />
</Route>
</Switch>
</Suspense>
)
}
import React from "react"
import { makeStyles } from "@material-ui/core/styles"
import LinearProgress from "@material-ui/core/LinearProgress"
const useStyles = makeStyles(theme => ({
root: {
width: "100%",
"& > * + *": {
marginTop: theme.spacing( 2 )
}
}
}))

export default function Progress() {
const classes = useStyles()
return (
<div className={classes.root}>
<LinearProgress />
</div>
)
}
设置登录状态
由于每个微应用都有可能用到登录状态以及设置登录状态的方法,所以登录状态和设置登录状态的方法需要放置在容器应用中。
// Container/App.js
export default function App() {
// 存储登录状态
const [status, setStatus] = useState(false)
return <AuthApp setStatus={setStatus} />
}
// Container/AuthApp.js
export default function AuthApp({ setStatus }) {
useEffect(() => {
mount(ref.current, { setStatus })
}, [])
}
// Auth/bootstrap.js
function mount(el, { setStatus }) {
ReactDOM.render(<App setStatus={setStatus} />, el)
}
// Auth/App.js
export default function App({ setStatus }) {
return <Signin setStatus={setStatus} />
}
// Auth/Signin.js
export default function SignIn({ setStatus }) {
return <Button onClick={() => setStatus(true)}>登录</Button>
}
十四、登录状态应用
根据登录状态更改头部组件右侧的按钮文字,如果是 未登录状态 , 显示登录 ,如果是 登录状态 , 显示退出 。
点击退出按钮取消登录状态。
如果登录状态为真,跳转到 Dashboard 应用。
// Container/App.js
export default function App() {
const [status, setStatus] = useState(false)
// 如果登录状态为真,跳转到 Dashboard 应用
useEffect(() => {
if (status) history.push("/dashboard")
}, [status])
return (
<Router history={history}>
{/* 将登录状态和设置登录状态的方法传递到头部组件 */}
<Header status={status} setStatus={setStatus} />
</Router>
)
}
// Container/Header.js
export default function Header({ status, setStatus }) {
// 当点击按钮时取消登录状态
const onClick = () => {
if (status && setStatus) setStatus(false)
}
return <Button to={status? "/" : "/auth/signin"} onClick={onClick}> {status?
"退出" : "登录"}</Button>
}
十五、Dashboard 初始化
-
下载依赖
npm install -
新建 public 文件夹并拷贝 index.html 文件
<div id="dev-dashboard"></div>
- 新建 src 文件夹并拷贝 index.js 和 bootstrap.js
// bootstrap.js
import { createApp } from "vue"
import Dashboard from "./components/Dashboard.vue"

function mount(el) {
const app = createApp(Dashboard)
app.mount(el)
}

if (process.env.NODE_ENV === "development") {
const el = document.querySelector("#dev-dashboard")
if (el) mount(el)
}

export { mount }
- 拷贝 webpack.config.js 文件并做如下修改
const HtmlWebpackPlugin = require("html-webpack-plugin")
const { VueLoaderPlugin } = require("vue-loader")
const ModuleFederationPlugin =
require("webpack/lib/container/ModuleFederationPlugin")
const packageJson = require("./package.json")

module.exports = {
mode: "development",
entry: "./src/index.js",
output: {
publicPath: "http://localhost:8083/",
filename: "[name].[contentHash].js"
},
resolve: {
extensions: [".js", ".vue"]
},
devServer: {
port: 8083 ,
historyApiFallback: true,
headers: {
"Access-Control-Allow-Origin": "*"
}
},
module: {
rules: [
{
test: /\.(png|jpe?g|gif|woff|svg|eot|ttf)$/i,
use: [
{
loader: "file-loader"
}
]
},
{
test: /\.vue$/,
use: "vue-loader"
},
{
test: /\.scss|\.css$/,
use: ["vue-style-loader", "style-loader", "css-loader", "sass-
loader"]
},
{
test: /\.js$/,
exclude: /node_modules/,
use: {
loader: "babel-loader",
options: {
presets: ["@babel/preset-env"],
plugins: ["@babel/plugin-transform-runtime"]
}
}
}
]
},
plugins: [
new ModuleFederationPlugin({
name: "dashboard",
filename: "remoteEntry.js",
exposes: {
"./DashboardApp": "./src/bootstrap"
},
shared: packageJson.dependencies
}),
new HtmlWebpackPlugin({
template: "./public/index.html"
}),
new VueLoaderPlugin()
]
}
- 修改启动命令
"scripts": {
"start": "webpack serve"
}
十六、Container 应用加载 Dashboard
- Container 配置 ModuleFedaration
// container/webpack.config.js
remotes: {
dashboard: "dashboard@http://localhost:8083/remoteEntry.js"
}
- 新建 DashboardApp 组件
import React, { useRef, useEffect } from "react"
import { mount } from "dashboard/DashboardApp"

export default function DashboardApp() {
const ref = useRef()
useEffect(() => {
mount(ref.current)
}, [])
return <div ref={ref}></div>
}
- Container 应用添加路由
const DashboardApp = lazy(() => import("./components/DashboardApp"))

function App () {
return (
<Route path="/dashboard">
<DashboardApp />
</Route>
)
}
- 重启 Container 应用查看效果
十七、Dashboard 路由保护
function App () {
const [status, setStatus] = useState(false)
useEffect(() => {
if (status) history.push("/dashboard")
}, [status])
return (
<Router history={history}>
<Route path="/dashboard">
{!status && <Redirect to="/" />}
<DashboardApp />
</Route>
</Router>
)
}


// Marketing/Landing.js
<Link to="/dashboard">
<Button variant="contained" color="primary">
Dashboard
</Button>
</Link>