关于yolo应用时能用到的脚本集合,推荐收藏:
https://chenlinwei.blog.csdn.net/article/details/127299428
1. 工程化快速yolo训练流程指定版(无讲解)
1.1 抽样数据集+xml转txt+输出量化分析
python make_dataset.py
make_dataset.py 代码见后面介绍
1.2 在训练的机器上部署yolov5项目
yolov5最新的github地址:
https://github.com/ultralytics/yolov5
没有部署的,安装后解压。
1.3 划分训练集,输出yaml文件
注意:该脚本需要在训练所在的机器下执行,否则会有路径问题。
python split_train_val.py
split_train_val.py 代码见后面介绍
输出的yaml在示例中表示为mydata.yaml
1.4 修改models内的yaml文件
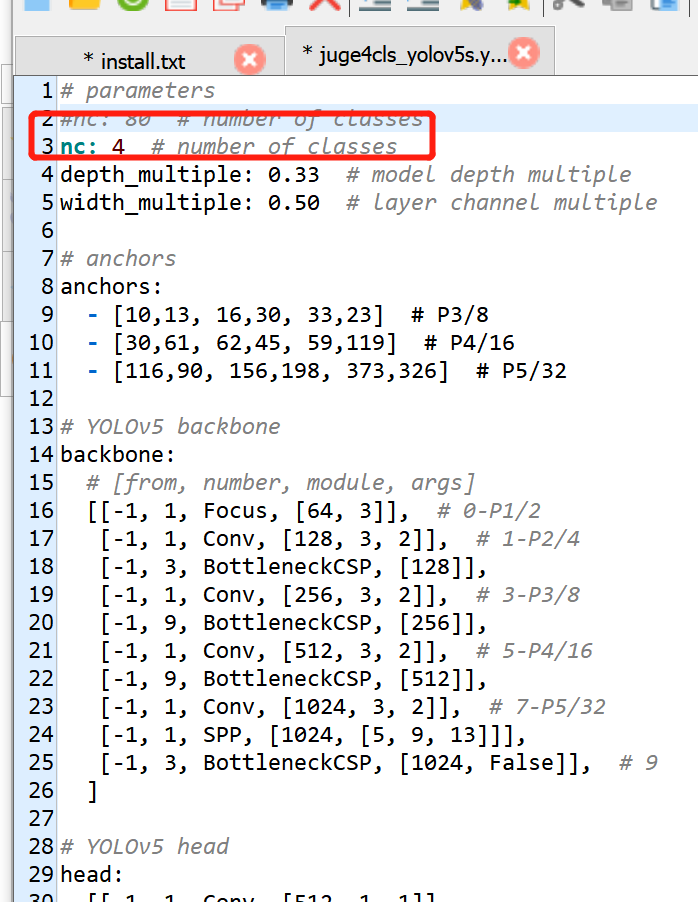
可以根据自己需求复制相应的yaml然后对其进行修改,将nc修改为自己数据集的类。
例如:复制一份models/yolov5s.yaml,然后修改里面的nc参数后,命名为my_yolov5s.yaml。
1.5 训练yolov5模型
输入训练的指令,根据实际情况进行修改
python train.py --cfg models/my_yolov5s.yaml --data mypath/mydata.yaml --weights yolov5s.pt --img 640 --batch-szie 32 --epochs 200
训练后,自动保存在runs/train/expxx(最后一个)
1.6 验证yolov5模型
通过测试集验证yolov5模型的得分,根据实际情况进行修改
python val.py --data mypath/mydata.yaml --weights mypath/best.pt --batch-size 32 --img 640
1.7 yolov5模型进行推理
用训练好的yolov5的模型对图片或视频进行推理检测,根据实际情况进行修改
python detect.py --data mypath/mydata.yaml --weights mypath/best.pt --source mysource
2. yolov5训练自己数据集详细版
2.1 标注数据集
采用labelImg进行标注:
https://github.com/heartexlabs/labelImg
下载并安装,安装过程详见README.rst
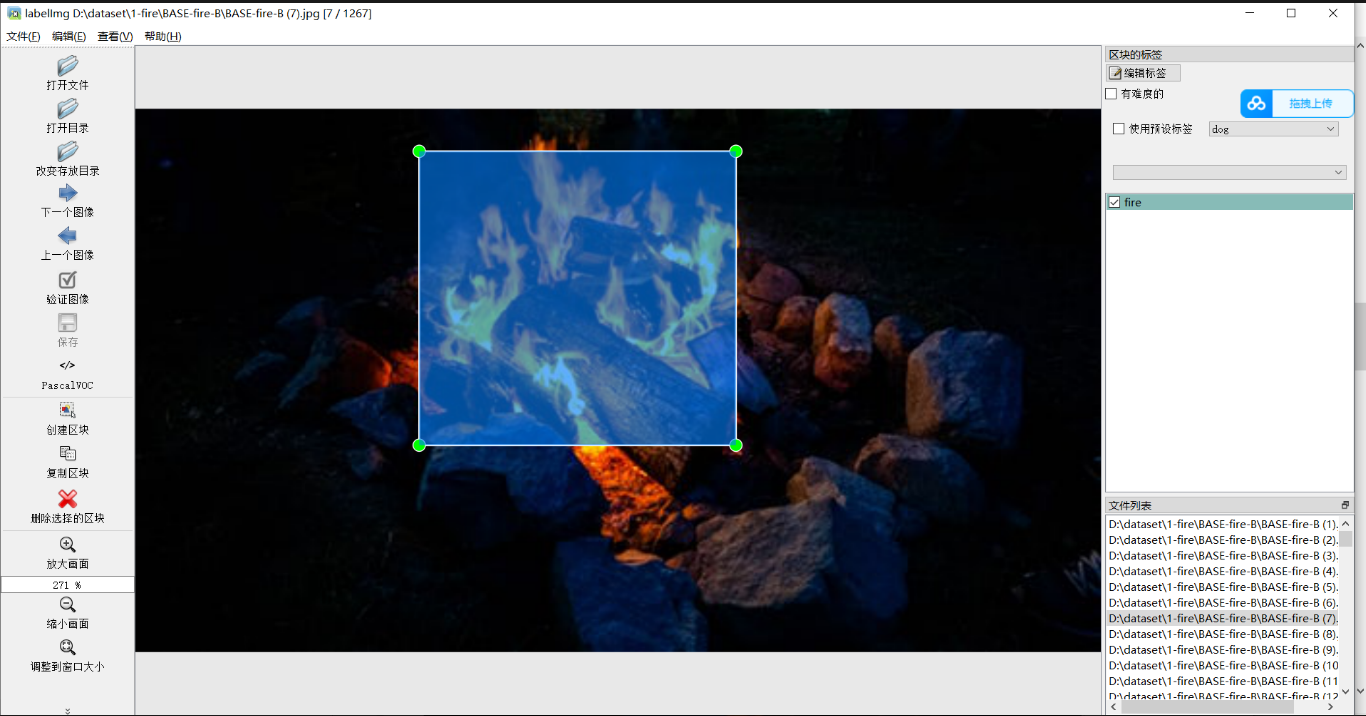
标注后默认会在图像目录下生成同名xml标签文件
2.2 xml转txt的介绍
labelImg自动生成的xml文件,需要转换成yolo格式的txt标签:
labelImg自动生成的xml内容介绍:
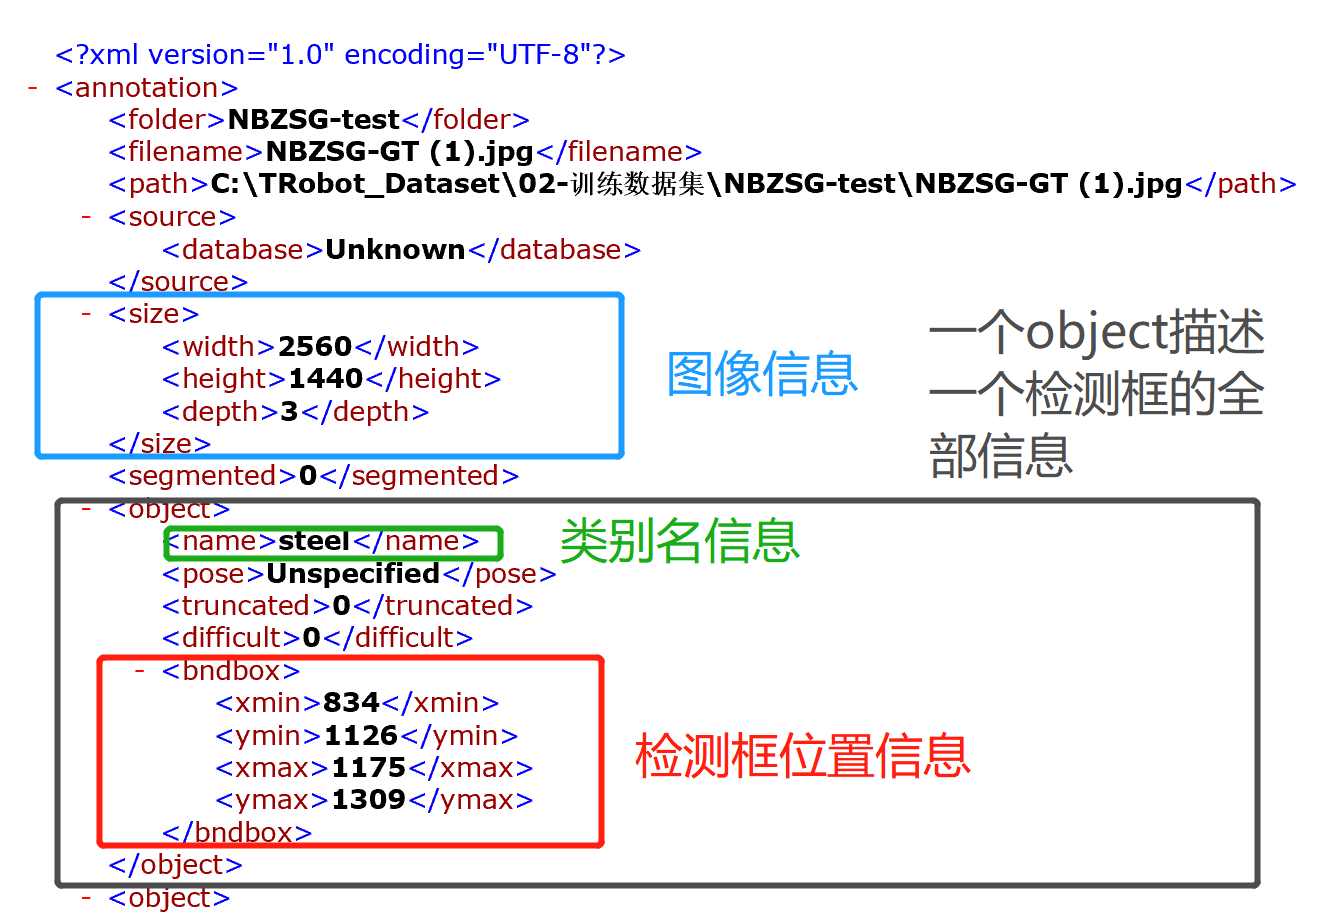
然后yolo的标签txt的格式:

每一行描述一个检测框信息,总共5个数,由空格隔开。
第一个数字代表检测目标的类别id
第二个数字至第五个数字分别表示检测框的 x_center, y_center, width, height
xml转txt的脚本:
def convert_annotation(xml_path, classes, summary_obj):
    flag_cls = []
    for _ in classes:
        flag_cls.append(0)

    # 读取xml文件,写入txt文件
    # print(xml_path)
    # 判断xml是否为空
    if not os.path.getsize(xml_path):
        print("内容为空的xml:",xml_path)
        txt_path = xml_path[:-3] + 'txt'  # xml文件路径
        with open(txt_path, 'w') as out_txt:
            return summary_obj, txt_path


    with open(xml_path,encoding='UTF-8') as f:
        xml_text = f.read()

        # tree = ET.parse(f)
        # root = tree.getroot()
        root = ET.fromstring(xml_text)
        f.close()

    # 获取xml参数信息
    outlines = []
    size = root.find('size')
    w = int(size.find('width').text)
    h = int(size.find('height').text)
    for obj in root.iter('object'):
        cls = obj.find('name').text
        if cls not in classes:
            print('invalid_cls:',cls)
            continue
        summary_obj += 1
        cls_id = classes.index(cls)
        xmlbox = obj.find('bndbox')
        b = (float(xmlbox.find('xmin').text), float(xmlbox.find('xmax').text), float(xmlbox.find('ymin').text),
             float(xmlbox.find('ymax').text))
        bb = convert((w,h), b)
        summary_cls_to_obj[cls_id] += 1
        flag_cls[cls_id] = 1
        outlines.append(str(cls_id) + " " + " ".join([str(a) for a in bb]) + '\n')

    # summary
    for idx in range(len(classes)):
        if flag_cls[idx] == 1:
            summary_cls_to_img[idx] += 1

    # 写入txt文件
    txt_path = xml_path[:-3] + 'txt'  # xml文件路径
    with open(txt_path, 'w') as out_txt:
        out_txt.writelines(outlines)
    return summary_obj, txt_path
2.3 制作训练数据集
2.3.1 步骤介绍
这一个操作分为3个步骤:
步骤1:抽取数据集
主要目的就是可以从大量分类好的数据集目录中按比例抽取自己所需要的数据集,例如要训练水果数据集,因此要从苹果目录,橘子目录,等多个目录提取相应数量的图像和标签,合并到一个数据集中。在抽取时,采用脚本可以设置提取的比例,数量,以及保证随机性。
对比手动操作,进入一个个目录复制粘贴相比,更加快捷。当然,如果只是对一个目录进行训练,则不需要进行数据集的抽取了。
步骤2:xml转txt(无xml生成空白txt)
步骤3:图片保存到输出文件中的image目录内,标签保存到输出目录的labels目录内,生成统计量化文件summarg.txt,可以分析。

2.3.2 make_dataset.py代码
import os
import numpy as np
import shutil
import xml.etree.ElementTree as ET
import ntpath

'''
算法思想:
1. 将数据从源目录中按比例/数量,随机抽出,最后存放到2个总文件夹中(分别存放xml和jpg).
前提,源目录中必须同时存在jpg文件和xml文件
(若源目录中存在子目录,那么子目录中的文件一样会被提取出来)
2. 在传出过程中将xml文件转为txt文件

更新:
1. labelImg 不需要标注的图像就不会产生xml,因此,对没有匹配到xml的jpg,会自动生成一个空的xml文件,表示无标注
2. 支持判断xml和txt两种标签, xml标签会转txt标签,txt标签会直接复制到指定目录

注意:
凡是图像没有对应的标签,会自动创建空标签!
'''

'''
####################    输入参数设置(开始)    ####################
'''
# org_dirs 设置说明:数组内每一个元素表示一条数据集抽离指令, 每一条抽离指令包含4个元素,分别是:
# 目录源路径,计数方式(百分比'ratio'/数值'num'),具体的值('rate':[0,1]||'num'>=0), 图像格式
#    [r'D:\dataset\02-标注数据集\102-基础数据\SITE\3-大连奥通\[HK]DLAT-hat-fire-112', 'ratio', '1', 'jpg'],

org_dirs = [
	   #dataset
     [r'D:\dataset\LabeledDataset\PublicDatasets\0.fire(hat,person,hat)\BASE-flames-297',
      'ratio', '1', 'jpg'],
    [r'D:\dataset\LabeledDataset\FieldDatasets\MG(fire)\MG-fire-1233',
         'ratio', '1', 'jpg'],
]

# 是否需要统一输出的图像格式
is_union = False
# 若需要统一,  设置统一的图像格式
union_imgtype = 'jpg'
# 输出的目标目录,程序会在该目录下创建images和labels分别存放图像文件和txt文件
output_dir = r'D:\dataset\DLAT-11111'

# 集控数据集类别
classes =['fire','Roller','hat','person','rock']

# 输出量化分析summary.txt(位置在output_dir目录下)
write_summary = True

'''
####################    输入参数设置(结束)    ####################
'''

# txt数据统计设置
summary_dataset=[]
summary_cls_to_img = []
summary_cls_to_obj = []
summary_img = 0
summary_obj = 0
for _ in classes:
    summary_cls_to_img.append(0)
    summary_cls_to_obj.append(0)


# 按照yolo格式归一化
def convert(size, box):
    dw = 1.0 / size[0]
    dh = 1.0 / size[1]
    x = (box[0] + box[1]) / 2.0
    y = (box[2] + box[3]) / 2.0
    w = box[1] - box[0]
    h = box[3] - box[2]
    x = x * dw
    w = w * dw
    y = y * dh
    h = h * dh
    return (x, y, w, h)

def count_txt(txt_path):
    flag_cls = []
    for _ in classes:
        flag_cls.append(0)
    with open(txt_path, 'r',encoding='UTF-8') as f:
        while True:
            line = f.readline()
            if line:
                # 以空格为间隔,读取所有该行的数据存入数组
                msg = line.split(" ")
                if len(msg) == 5:
                    cls_idx = line.split(' ')[0]
                    # print("cls_idx=", cls_idx)
                    summary_cls_to_obj[int(cls_idx)] += 1
                    flag_cls[int(cls_idx)] = 1
            else:
                break
    for idx in range(len(classes)):
        if flag_cls[idx] == 1:
            summary_cls_to_img[idx] += 1

# xml转txt(yolo)
def convert_annotation(xml_path, classes, summary_obj):
    flag_cls = []
    for _ in classes:
        flag_cls.append(0)

    # 读取xml文件,写入txt文件
    # print(xml_path)
    # 判断xml是否为空
    if not os.path.getsize(xml_path):
        print("内容为空的xml:",xml_path)
        txt_path = xml_path[:-3] + 'txt'  # xml文件路径
        with open(txt_path, 'w') as out_txt:
            return summary_obj, txt_path


    with open(xml_path,encoding='UTF-8') as f:
        xml_text = f.read()

        # tree = ET.parse(f)
        # root = tree.getroot()
        root = ET.fromstring(xml_text)
        f.close()

    # 获取xml参数信息
    outlines = []
    size = root.find('size')
    w = int(size.find('width').text)
    h = int(size.find('height').text)
    for obj in root.iter('object'):
        cls = obj.find('name').text
        if cls not in classes:
            print('invalid_cls:',cls)
            continue
        summary_obj += 1
        # clw change
        cls_id = classes.index(cls)
        xmlbox = obj.find('bndbox')
        b = (float(xmlbox.find('xmin').text), float(xmlbox.find('xmax').text), float(xmlbox.find('ymin').text),
             float(xmlbox.find('ymax').text))
        bb = convert((w,h), b)
        summary_cls_to_obj[cls_id] += 1
        flag_cls[cls_id] = 1
        outlines.append(str(cls_id) + " " + " ".join([str(a) for a in bb]) + '\n')

    # summary
    for idx in range(len(classes)):
        if flag_cls[idx] == 1:
            summary_cls_to_img[idx] += 1

    # 写入txt文件
    txt_path = xml_path[:-3] + 'txt'  # xml文件路径
    with open(txt_path, 'w') as out_txt:
        out_txt.writelines(outlines)
    return summary_obj, txt_path


if __name__ == "__main__":
    # copy file and convert xml to yolo
    # 创建目录
    if not os.path.exists(output_dir):
        os.mkdir(output_dir)
    output_images = os.path.join(output_dir, 'images')
    if not os.path.exists(output_images):
        os.mkdir(output_images)
    output_labels = os.path.join(output_dir, 'labels')
    if not os.path.exists(output_labels):
        os.mkdir(output_labels)
    # 遍历目录
    for dir in org_dirs:
        # create dir
        path, mode, val, images_type = dir
        old_path = []
        for root, dir, files in os.walk(path):
            count = 1
            for file in files:
                # print("(",count,"/",len(files),")")
                count+=1
                if file[-3:] == images_type:
                    # print(file)
                    xml_name = file[:-3] + 'xml'
                    txt_name =  file[:-3] + 'txt'
                    if not (os.path.exists(os.path.join(root, xml_name)) or os.path.exists(os.path.join(root, txt_name))):
                        # 生成空的txt文件
                        f = open(os.path.join(root, txt_name), 'w', encoding='utf-8')
                        f.close()
                    old_path.append(os.path.join(root, file))

        if len(old_path) <= 0:
            print('目录:', path, '为空,跳过!\n')
            continue

        # 复制到 output_dir
        if mode == 'ratio':     # 按比例抽取
            if float(val) >=0 and float(val) <= 1:
                num = int(len(old_path) * float(val))
            else:
                print('提示:目录:', path, 'val=', val,',无效,跳过!\n')
                continue
        elif mode == 'num':     # 按数值抽取
            if int(val) > len(old_path):
                print('提示:目录:', path, 'val=', val,',超过目录内目标上线,默认提取目录内全部有效数据 num=',len(old_path),'\n')
                num = len(old_path)
            elif int(val) <= len(old_path) and int(val) > 0:
                num = int(val)
            else:
                print('提示:目录:', path, 'val=', val, ',无效,跳过!\n')
                continue
        # 打乱序列
        np.random.shuffle(old_path)
        count=0
        for p in old_path[:num]:
            count+= 1
            summary_img += 1
            # 图像复制
            imgname = ntpath.basename(p)
            shutil.copyfile(p, os.path.join(output_images,imgname))

            xmlpath = p[:-3] + 'xml'

            if os.path.exists(xmlpath):
                print(xmlpath)
                summary_obj, txt_path =convert_annotation(xmlpath, classes, summary_obj)
                # txt移动
                txt_name = imgname[:-3] + 'txt'
                shutil.move(txt_path, os.path.join(output_labels, txt_name))
                # print('目录',path,'转换复制进度:',count,'/',str(num))
            elif os.path.exists(xmlpath[:-3]+"txt"):
                txt_path = xmlpath[:-3] + 'txt'
                txt_name = imgname[:-3] + 'txt'
                shutil.copyfile(txt_path, os.path.join(output_labels, txt_name))
                count_txt(txt_path)
        dataset_status = '数据集名称:' + path + ',随机抽样(' + str(num) + '/' + str(len(old_path)) + ')\n'
        summary_dataset.append(dataset_status)
        print('目录',path,'完成数据提取!' )

    # 量化分析
    if write_summary:
        txt_path = os.path.join(output_dir,'summary.txt')
        with open(txt_path, 'w') as summary_txt:
            summary_txt.write('数据集抽样统计:\n')
            for line in summary_dataset:
                summary_txt.write(line)
            # 编写类别编号
            classes_line = 'classes=['
            for idx in range(len(classes)):
                cls_msg = '\''+classes[idx] + '\''
                classes_line += cls_msg
                if idx < len(classes)-1:
                    classes_line += ','
            classes_line += ']\n'
            summary_txt.write(classes_line)

            summary_txt.write('\n量化分析:\n')
            summary_txt.write('类在图像中出现的频率统计:\n')
            for idx in range(len(classes)):
                ratio = float(summary_cls_to_img[idx] / summary_img)
                mes = classes[idx] + ':出现次数=' + str(summary_cls_to_img[idx]) + ',比例=' + str(round(ratio, 4)) + '\n'
                summary_txt.write(mes)

            summary_txt.write('\n类在检测框中出现的频率统计:\n')
            for idx in range(len(classes)):
                ratio = float(summary_cls_to_obj[idx] / summary_obj)
                mes = classes[idx] + ':出现次数=' + str(summary_cls_to_obj[idx]) + ',比例=' + str(round(ratio, 4)) + '\n'
                summary_txt.write(mes)
        print( '完成量化分析!')
2.4 划分数据集(训练集,测试集)
2.4.1 首先,把之前2.3生成的数据集压缩后,移动到训练模型所在的服务器内。
2.4.2 split_train_val.py脚本划分数据集
功能: 可以生成train.txt,val.txt,和test.txt,txt的文件内存放图像数据的路径。此外,脚本还可以自动生成data.yaml文件
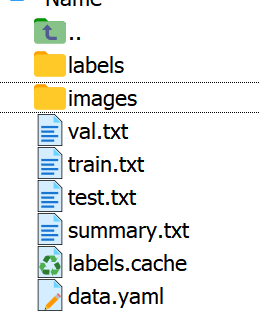
train.txt内的内容

data.yaml的内容样式:

import os
import numpy as np
import shutil

'''
功能说明:
1. 开启数据集文件物理划分方式(FUNC=SPLIT_DATASET)
将原图目录和标签目录按照指定的划分比例(复制/移动)到指定的输出目录,并且在指定的输出目录自动创建如下的文件结构:
例如,指定输出目录为(output_dir)
--output_dir
    --images
        --train
        --val
        --test
    --labels
        --train
        --val
        --test
注:若是需要的文件名和程序默认的不一致,可以到split_data()函数内修改默认的文件名

2. 开启输出train.txt, val.txt, test.txt三个txt文件(FUNC=WRITE_TXT)
不移动源图像和标签的目录内的文件,按照指定的比例将划分后的训练集,测试集和验证集的文件路径分别输出到train.txt, val.txt, test.txt。
例如,指定输出目录为(output_dir)
--output_dir
    --train.txt
    --val.txt
    --test.txt

3. 注意事项
3.1 标签名和图像名务必一一对应,要求所有图像统一格式,所有标签统一格式。
3.2 为提高效率,本程序不支持遍历源目录中子目录下的文件,请将所有源文件都放到一级目录,否则会出问题
'''
'''
####################    输入参数设置(开始)    ####################
'''
# 路径
# 源图像存储的目录:
root_dir = r'/home/tc/dataset/DLAT-juge5cls-230210/'
org_images_dir = os.path.join(root_dir, 'images')
# 源标签存储的目录(图像和标签的名称必须一一对应):
org_labels_dir = os.path.join(root_dir, 'labels')
# 输出的目标路径:
output_dir = root_dir

# 功能:
#FUNC = 'SPLIT_DATASET'     # 划分后移动文件
# mode = 'copy' # 当FUNC = 'SPLIT_DATASET'时才生效,选择从源目录复制到新目录
mode = 'move'   # 当FUNC = 'SPLIT_DATASET'时才生效,选择从源目录移动到新目录

FUNC = 'WRITE_TXT'          # 直接输出包含路径的3个txt文件

# 划分比例,依次是训练集比例,(三者之和必须等于一)
scale = [0.8, 0.19, 0.01]

# 文件格式设置(默认按照yolo格式)
# 图像类型
image_type = 'jpg'
# 标签类型
label_type = 'txt'
# output --data yaml
# (yolo专属) 直接输出yolo的data参数的yaml文件(要求输出路径必须是绝对路径,否则后面训练很容易找不到路径),输出到output_dir
is_output_yaml = True
# 若输出yaml文件,必须提供类的信息
# classes=["fire","coal","hat","person","Roller"]  # class names

classes=['fire','hat','person','roller']
'''
####################    输入参数设置(结束)    ####################
'''


def shuffle_file(org_images_dir):
    filenames= []
    # 遍历源图像目录
    for root, dir, files in os.walk(org_images_dir):
        for file in files:
            if file[-len(image_type):] == image_type: # 判断图像格式
                label_name = file[:-len(image_type)] + label_type
                # 判断是否存在对应标签
                if os.path.exists(os.path.join(org_labels_dir, label_name)):
                    filenames.append(file)  # 保存文件名称

    # 打乱文件名列表
    np.random.shuffle(filenames)

    # 划分训练集、验证集,测试集
    if len(scale) != 3:
        print('划分比例设置有误,划分数组的元素量不为3,请检查')
        return False
    elif float(scale[0])<0 or  float(scale[1])<0 or float(scale[1])<0:
        print('划分比例设置有误,存在划分参数<0,请检查')
        return False
    elif float(scale[0]) + float(scale[1]) + float(scale[2]) != 1:
        print('划分比例设置有误,划分比例总和不为1,请检查')
        return False

    return True, filenames


def split_data(train_val_test_set,mode,org_images_dir,org_labels_dir,output_dir):
    # 子目录文件名的设置默认按照yolo的要求,如果有差异可以修改
    img_label = ['images', 'labels']    # 图像目录名称和标签目录名称
    train_val_test = ['train','val','test']     # 子目录训练集,验证集,测试集的名称
    if not os.path.exists(output_dir):
        os.mkdir(output_dir)
    # 创建新目录
    for i in img_label:
        type_dir = os.path.join(output_dir, i)
        if not os.path.exists(type_dir):
            os.mkdir(type_dir)
        for j in train_val_test:
            split_dir = os.path.join(type_dir, j)
            if not os.path.exists(split_dir):
                os.mkdir(split_dir)

    # 移动/复制文件到新目录
    for i in range(len(img_label)):
        for j in range(len(train_val_test_set)):
            for k in range(len(train_val_test_set[j])):
                if i == 0: # image
                    file_name = train_val_test_set[j][k]
                    old_path = os.path.join(org_images_dir, file_name)
                else:   # label
                    file_name = train_val_test_set[j][k][:-len(image_type)] + label_type
                    # print("train_val_test_set[j][k]=", train_val_test_set[j][k])
                    # print("file_name=", file_name)

                    old_path = os.path.join(org_labels_dir, file_name)
                new_path = os.path.join(
                    os.path.join(os.path.join(output_dir, img_label[i]), train_val_test[j]), file_name)
                if mode == 'copy':
                    shutil.copyfile(old_path, new_path)
                elif mode == 'move':
                    # print("old_path=",old_path)
                    # print("new_path=",new_path)
                    shutil.move(old_path, new_path)
                else:
                    print('mode设置错误, 划分数据集取消')
                    return
    if is_output_yaml:
        train_line = 'train:  ' + os.path.join(os.path.join(output_dir, img_label[i]), train_val_test[0]) + '\n'
        val_line = 'val:  ' + os.path.join(os.path.join(output_dir, img_label[i]), train_val_test[0]) + '\n\n'
        nc_line = 'nc: ' + str(len(classes)) + '\n'
        classes_line = 'names: ['
        for cls in range(len(classes)):
            class_msg = '\'' + classes[cls] + '\''
            classes_line += class_msg
            if cls < len(classes)-1:
                classes_line += ','
        classes_line += ']'
        with open(os.path.join(output_dir, 'data.yaml'), 'w') as f:
            f.write(train_line)
            f.write(val_line)
            f.write(nc_line)
            f.write(classes_line)


def write_txt(train_val_test_set,org_images_dir, output_dir):
    with open(os.path.join(output_dir, 'train.txt'), 'w') as f1,\
            open(os.path.join(output_dir, 'val.txt'),'w') as f2, \
            open(os.path.join(output_dir, 'test.txt'),'w') as f3:

        path_set=[]
        print("len(train_val_test_set)=", len(train_val_test_set))
        for i in range(len(train_val_test_set)):
            new_lines = []
            for j in range(len(train_val_test_set[i])):
                path = os.path.join(org_images_dir, train_val_test_set[i][j])+'\n'
                new_lines.append(path)
            if i==0:
                f1.writelines(new_lines)
            elif i==1:
                f2.writelines(new_lines)
            elif i==2:
                f3.writelines(new_lines)
    if is_output_yaml:
        train_line = 'train: ' + os.path.join(output_dir, 'train.txt') + '\n'
        val_line = 'val: ' + os.path.join(output_dir, 'val.txt') + '\n\n'
        nc_line = 'nc: ' + str(len(classes)) + '\n'
        classes_line = 'names: ['
        for cls in range(len(classes)):
            class_msg = '\'' + classes[cls] + '\''
            classes_line += class_msg
            if cls < len(classes)-1:
                classes_line += ','
        classes_line += ']'
        with open(os.path.join(output_dir, 'data.yaml'), 'w') as f:
            f.write(train_line)
            f.write(val_line)
            f.write(nc_line)
            f.write(classes_line)


if __name__ == "__main__":
    ret,filenames = shuffle_file(org_images_dir)
    if ret:
        train = filenames[:int(len(filenames)*scale[0])]
        val = filenames[int(len(filenames)*scale[0]):int(len(filenames)*scale[0]+len(filenames)*scale[1])]
        test = filenames[int(len(filenames)*scale[0]+len(filenames)*scale[1]):]
        train_val_test_set = [train, val, test]
        if FUNC == 'SPLIT_DATASET':
            split_data(train_val_test_set, mode, org_images_dir, org_labels_dir, output_dir)
        elif FUNC == 'WRITE_TXT':
            write_txt(train_val_test_set, org_images_dir, output_dir)
2.5 修改训练配置文件:
打开yolov5项目内的models目录:
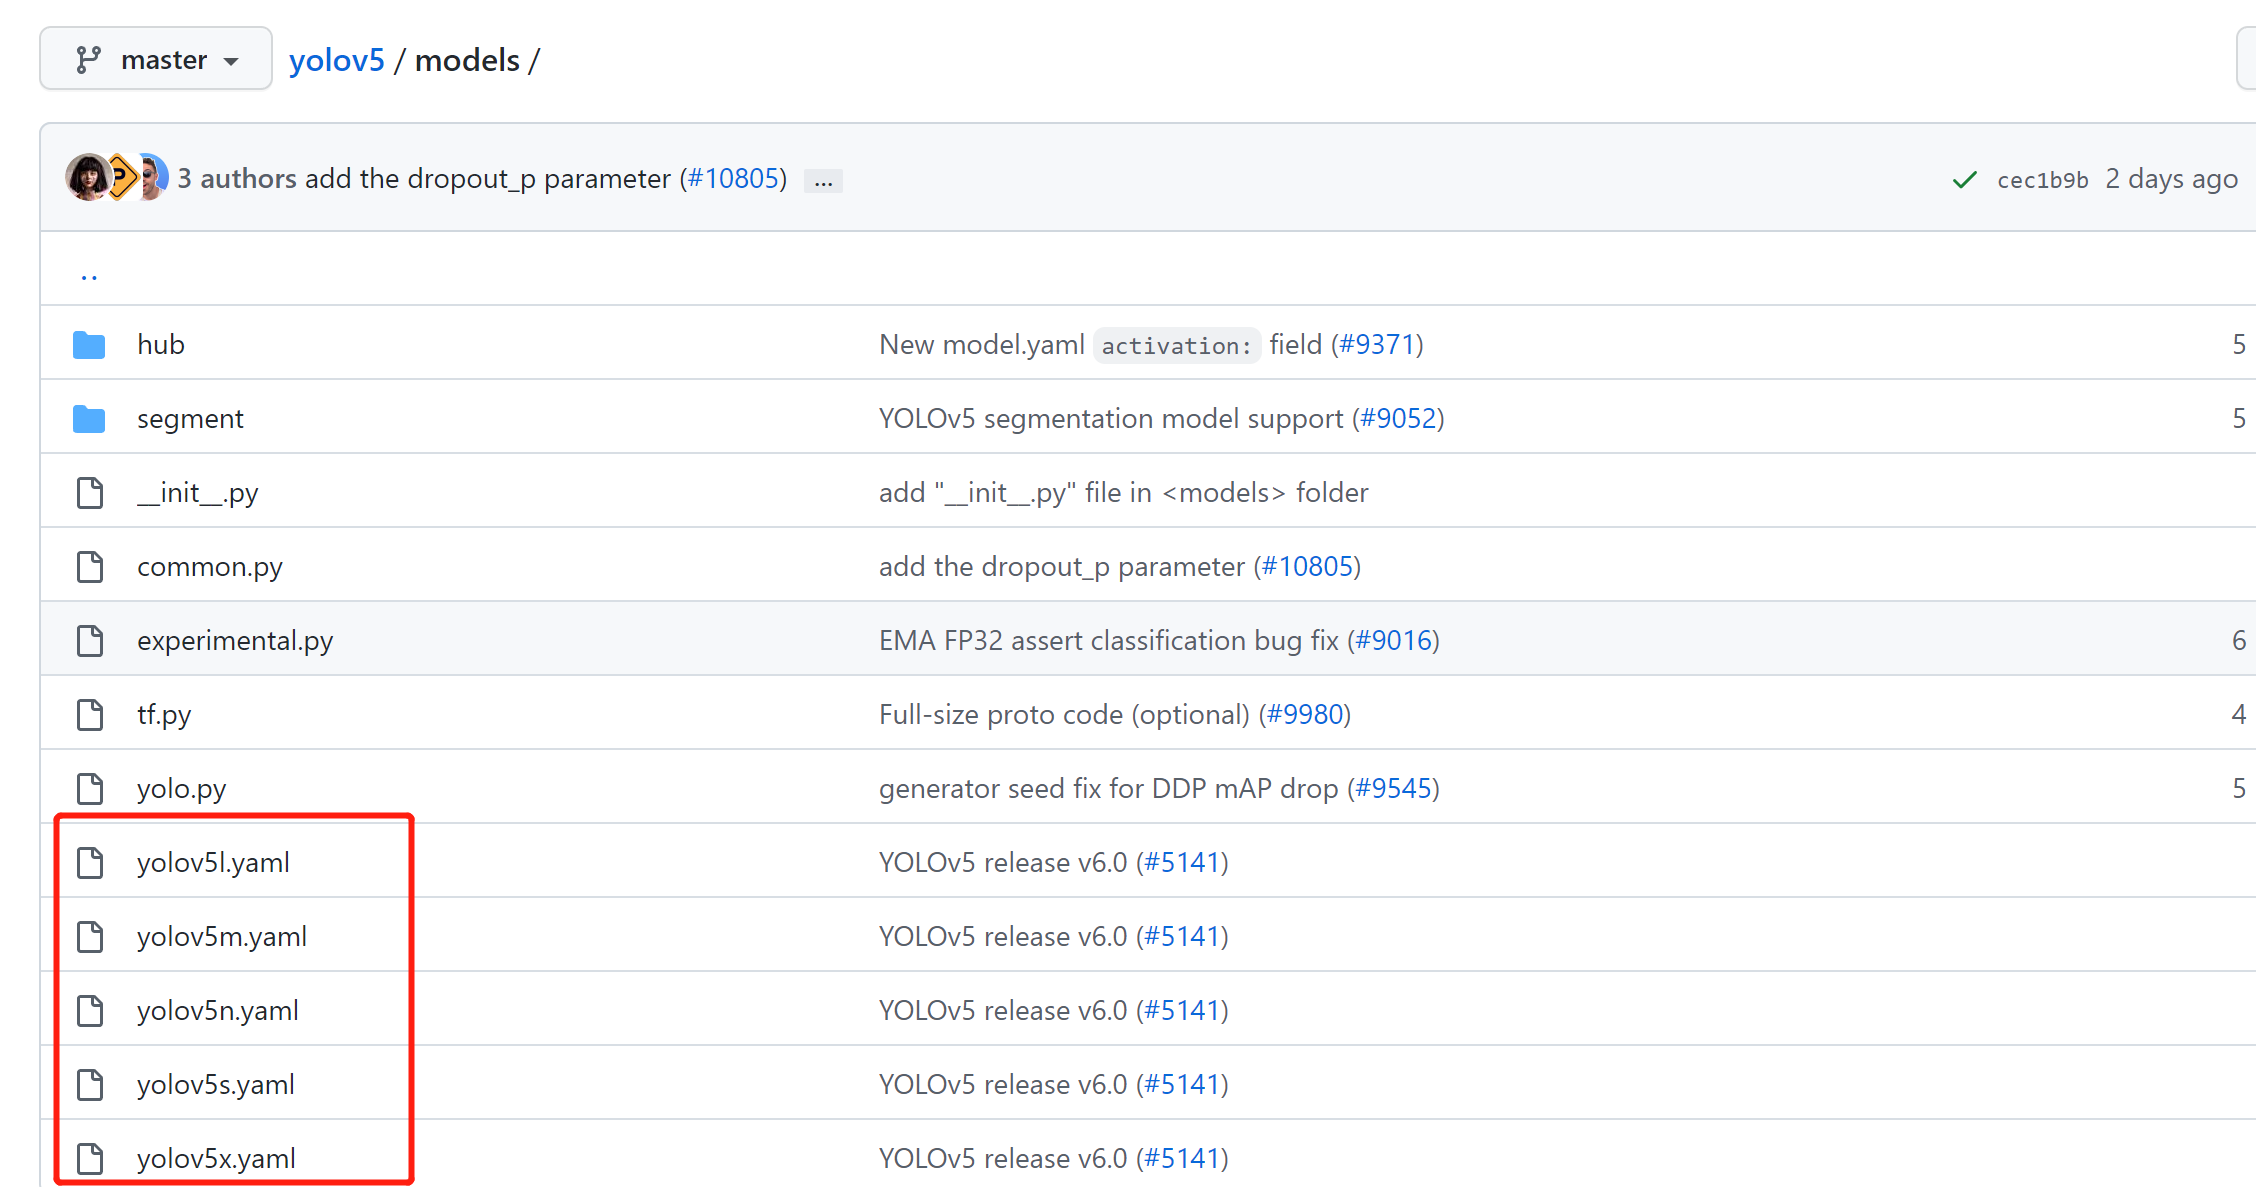
例如,训练yolov5s模型,就修改models/yolov5s.yaml的配置文件。
可以根据自己需求复制相应的yaml然后对其进行修改,将nc修改为自己数据集的类,修改后的文件重新命名
2.6 开始训练:
在yolov5的目录内,输入:
python train.py --data mydatset.yaml --weights yolov5s.pt --cfg models/myyolov5s.yaml --batch-size 16 --epochs 200
训练指令的参数可以在train.py内看到:
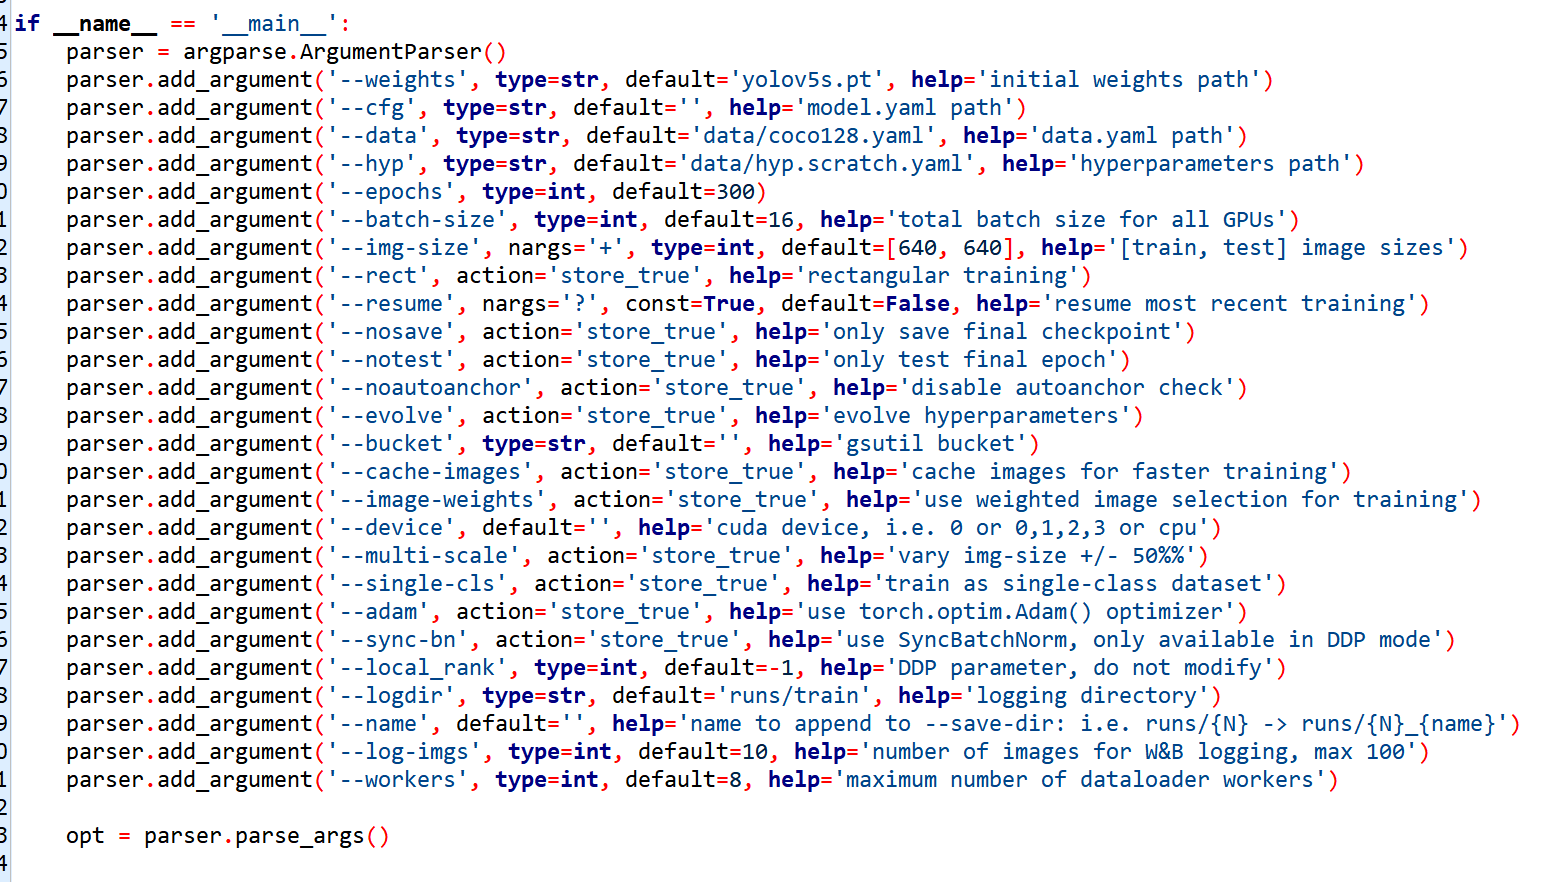
其中:
--weights 输入训练所用的预训练模型
--cfg 模型配置文件yaml,原型在models内的yolov5().yaml,根据自己的数据集修改
--data 数据集相关的配置文件yaml,原型在data目录内,修改yaml内部的路径为自己数据集的路径
--epochs 训练迭代次数
--device 训练模型指定的显卡ID
--batch-size 每次迭代训练的batch数量,具体数据与所用显卡的显存相关
--img 模型中输入的尺寸


