最可落地执行、最有效的保证重构不出错的手段应该就是单元测试(Unit Testing)。
什么是单元测试?
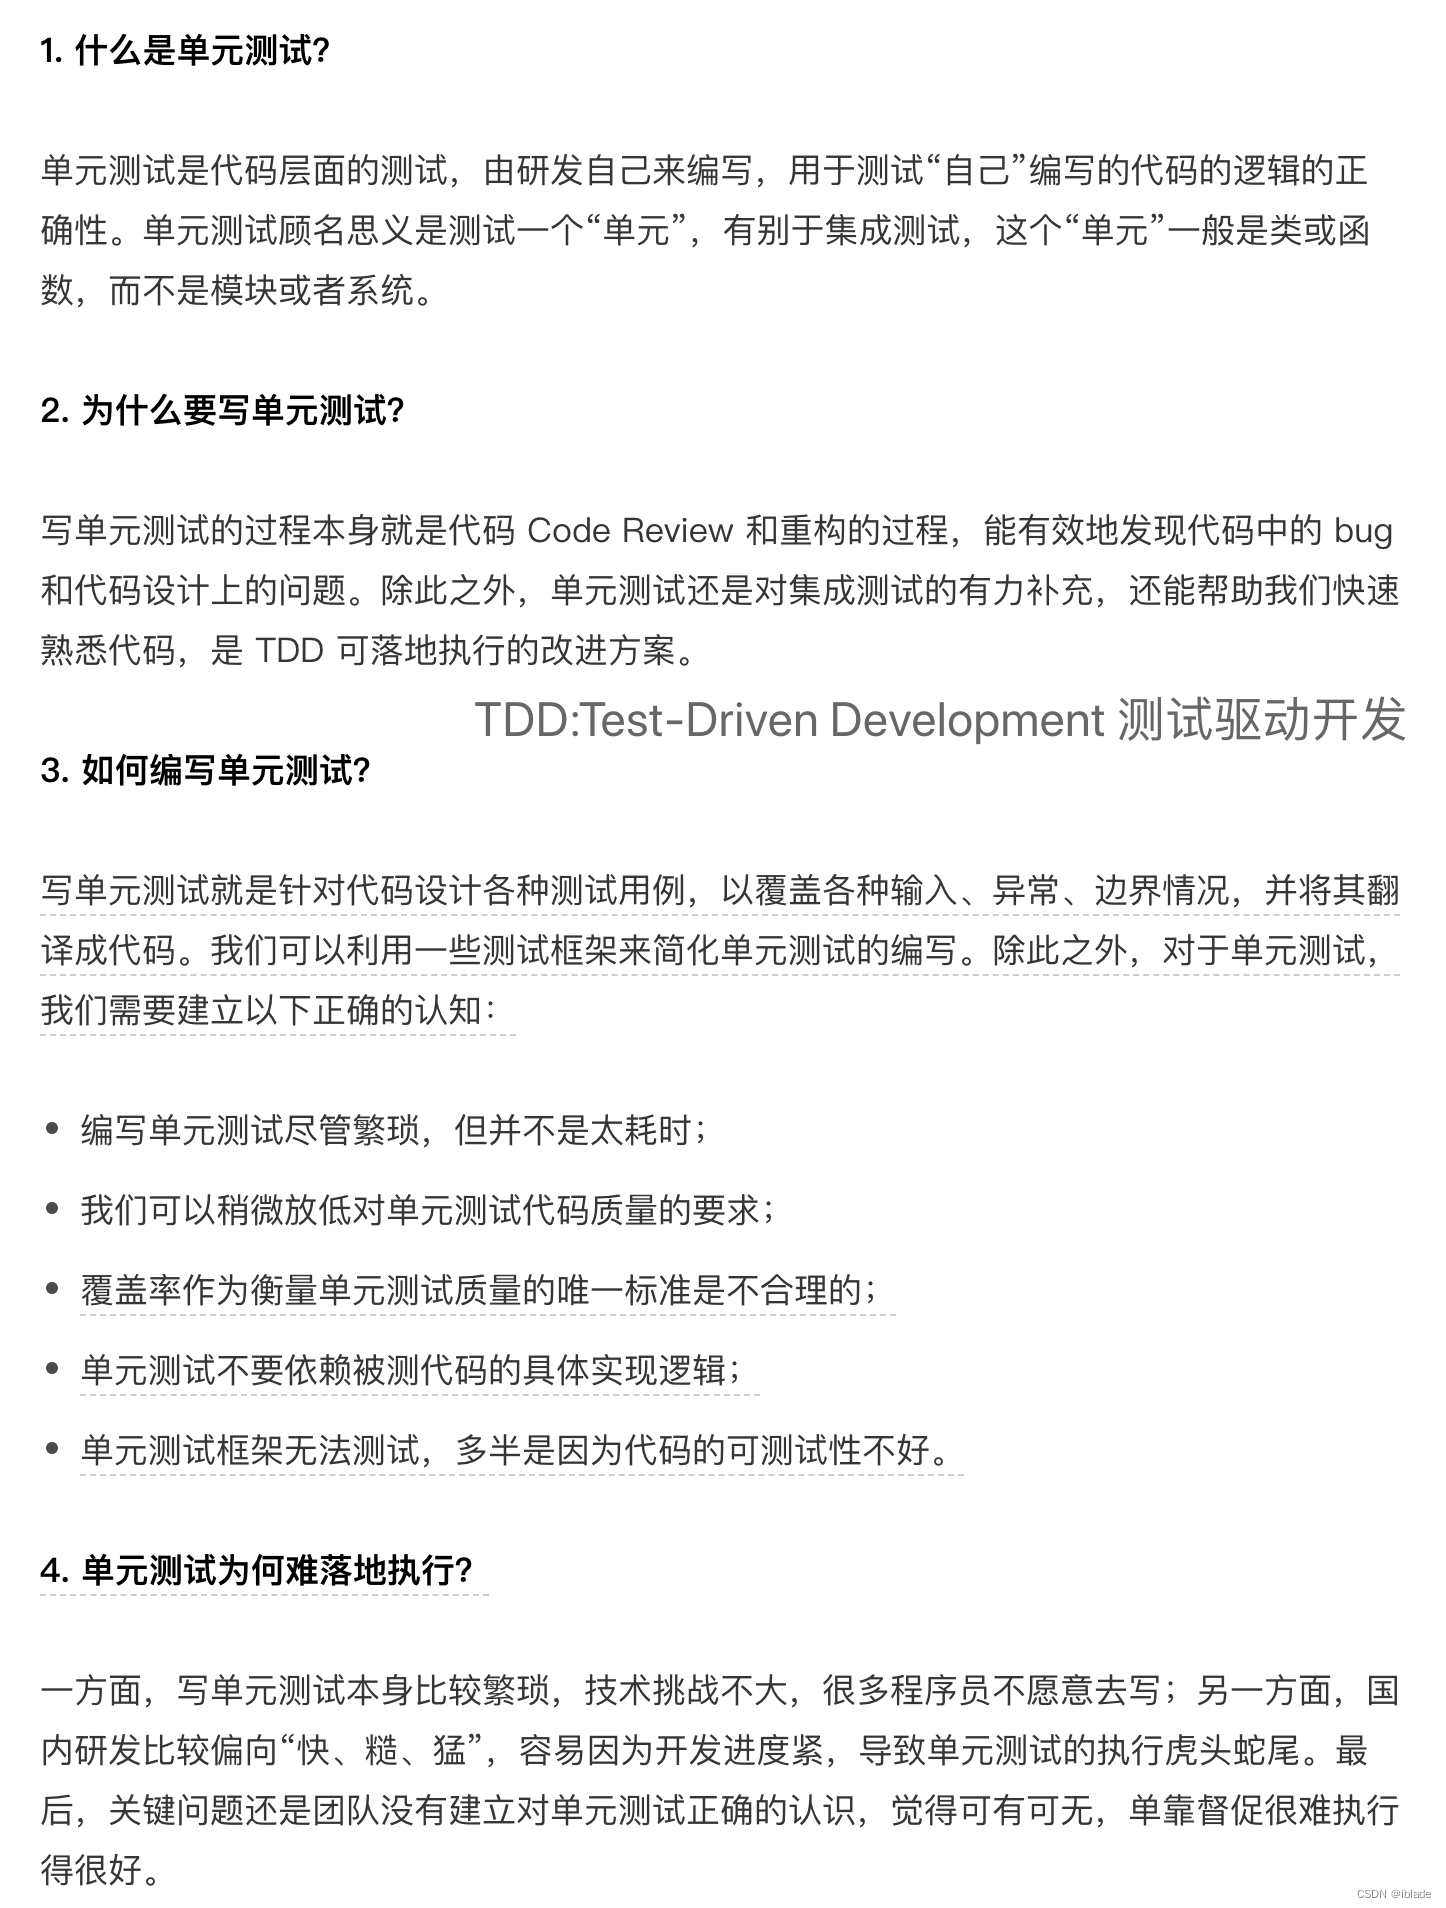
单元测试由研发工程师自己来编写,用来测试自己写的代码的正确性。我们常常将它跟集成测试放到一块来对比。单元测试相对于集成测试(Integration Testing)来说,测试的粒度更小一些。集成测试的测试对象是整个系统或者某个功能模块,比如测试用户注册、登录功能是否正常,是一种端到端(end to end)的测试。而单元测试的测试对象是类或者函数,用来测试一个类和函数是否都按照预期的逻辑执行。这是代码层级的测试。
单元测试除了能有效地为重构保驾护航之外,也是保证代码质量最有效的两个手段之一(另一个是 Code Review)。
写单元测试就是针对代码设计覆盖各种输入、异常、边界条件的测试用例,并将这些测试用例翻译成代码的过程。
在把测试用例翻译成代码的时候,我们可以利用单元测试框架,来简化测试代码的编写。比如,Java 中比较出名的单元测试框架有 Junit、TestNG、Spring Test 等。这些框架提供了通用的执行流程(比如执行测试用例的 TestCaseRunner)和工具类库(比如各种 Assert 判断函数)等。借助它们,我们在编写测试代码的时候,只需要关注测试用例本身的编写即可。
编写可测试代码案例实战
其中,Transaction 是经过我抽象简化之后的一个电商系统的交易类,用来记录每笔订单交易的情况。Transaction 类中的 execute() 函数负责执行转账操作,将钱从买家的钱包转到卖家的钱包中。真正的转账操作是通过调用 WalletRpcService RPC 服务来完成的。除此之外,代码中还涉及一个分布式锁 DistributedLock 单例类,用来避免 Transaction 并发执行,导致用户的钱被重复转出。
public class Transaction {
  private String id;
  private Long buyerId;
  private Long sellerId;
  private Long productId;
  private String orderId;
  private Long createTimestamp;
  private Double amount;
  private STATUS status;
  private String walletTransactionId;

  // ...get() methods...

  public Transaction(String preAssignedId, Long buyerId, Long sellerId, Long productId, String orderId) {
    if (preAssignedId != null && !preAssignedId.isEmpty()) {
      this.id = preAssignedId;
    } else {
      this.id = IdGenerator.generateTransactionId();
    }
    if (!this.id.startWith("t_")) {
      this.id = "t_" + preAssignedId;
    }
    this.buyerId = buyerId;
    this.sellerId = sellerId;
    this.productId = productId;
    this.orderId = orderId;
    this.status = STATUS.TO_BE_EXECUTD;
    this.createTimestamp = System.currentTimestamp();
  }

  public boolean execute() throws InvalidTransactionException {
    if ((buyerId == null || (sellerId == null || amount < 0.0) {
      throw new InvalidTransactionException(...);
    }
    if (status == STATUS.EXECUTED) return true;
    boolean isLocked = false;
    try {
      isLocked = RedisDistributedLock.getSingletonIntance().lockTransction(id);
      if (!isLocked) {
        return false; // 锁定未成功,返回false,job兜底执行
      }
      if (status == STATUS.EXECUTED) return true; // double check
      long executionInvokedTimestamp = System.currentTimestamp();
      if (executionInvokedTimestamp - createdTimestap > 14days) {
        this.status = STATUS.EXPIRED;
        return false;
      }
      WalletRpcService walletRpcService = new WalletRpcService();
      String walletTransactionId = walletRpcService.moveMoney(id, buyerId, sellerId, amount);
      if (walletTransactionId != null) {
        this.walletTransactionId = walletTransactionId;
        this.status = STATUS.EXECUTED;
        return true;
      } else {
        this.status = STATUS.FAILED;
        return false;
      }
    } finally {
      if (isLocked) {
       RedisDistributedLock.getSingletonIntance().unlockTransction(id);
      }
    }
  }
}
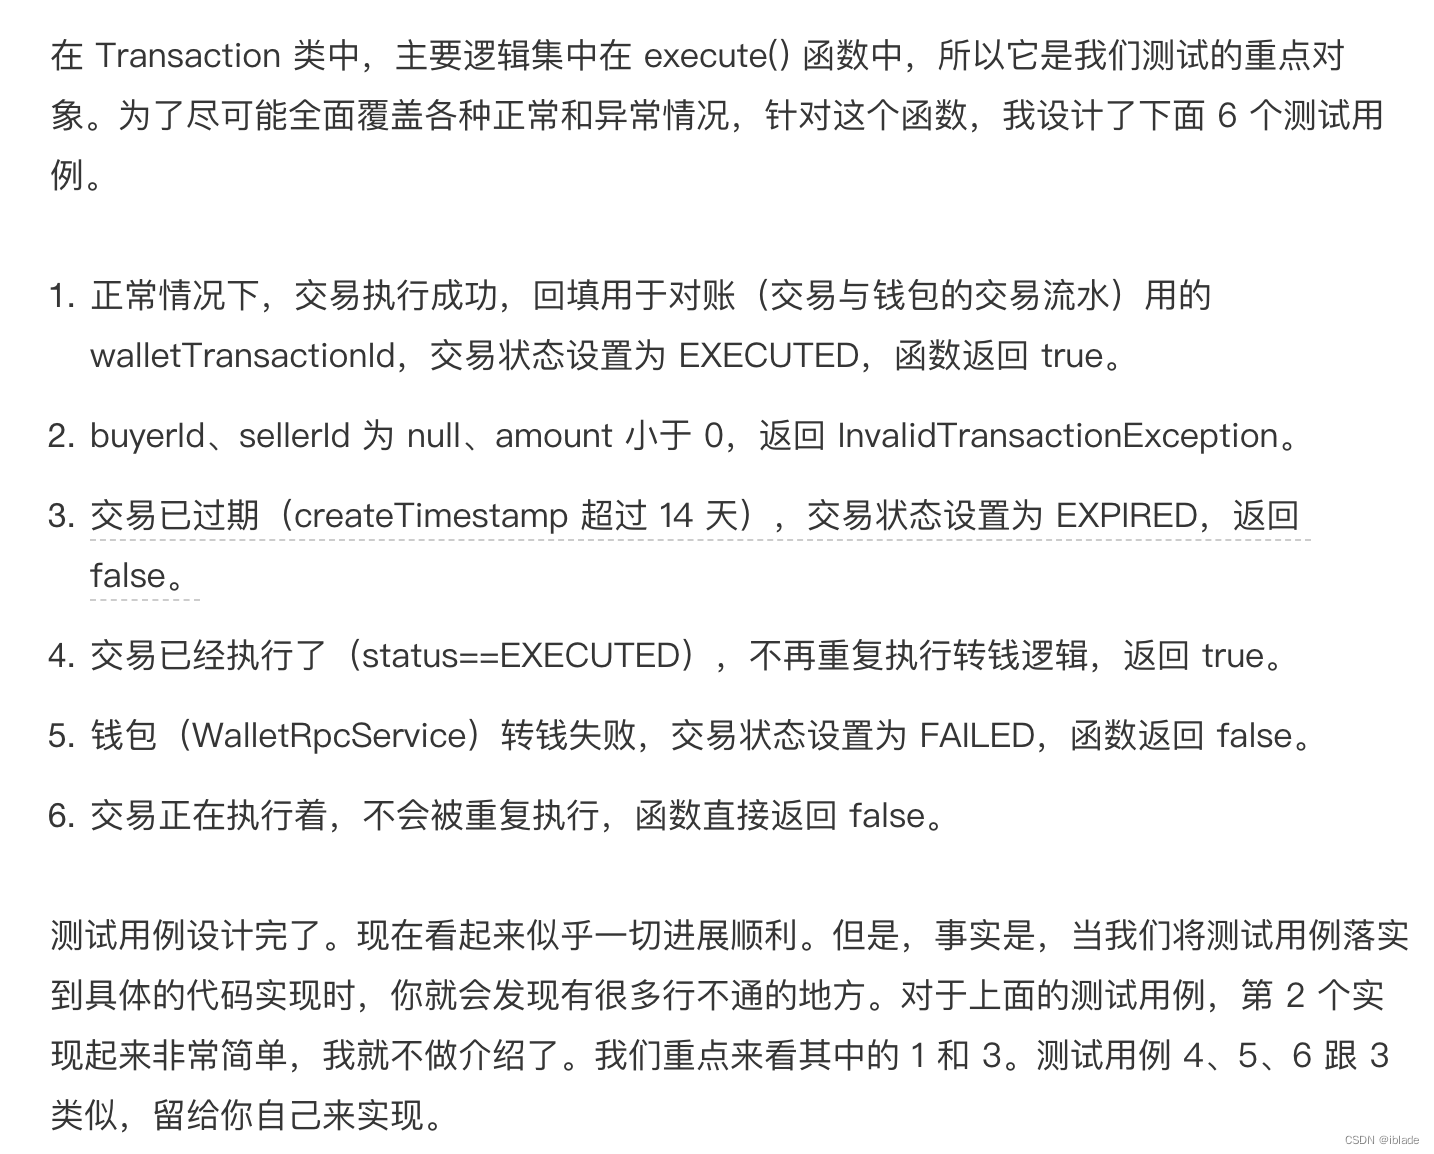
测试用例 1 的代码实现:
public void testExecute() {
  Long buyerId = 123L;
  Long sellerId = 234L;
  Long productId = 345L;
  Long orderId = 456L;
  Transction transaction = new Transaction(null, buyerId, sellerId, productId, orderId);
  boolean executedResult = transaction.execute();
  assertTrue(executedResult);
}
我们通过继承 WalletRpcService 类,并且重写其中的 moveMoney() 函数的方式来实现 mock。具体的代码实现如下所示。通过 mock 的方式,我们可以让 moveMoney() 返回任意我们想要的数据,完全在我们的控制范围内,并且不需要真正进行网络通信。
public class MockWalletRpcServiceOne extends WalletRpcService {
  public String moveMoney(Long id, Long fromUserId, Long toUserId, Double amount) {
    return "123bac";
  }
}

public class MockWalletRpcServiceTwo extends WalletRpcService {
  public String moveMoney(Long id, Long fromUserId, Long toUserId, Double amount) {
    return null;
  }
}
现在我们再来看,如何用 MockWalletRpcServiceOne、MockWalletRpcServiceTwo 来替换代码中的真正的 WalletRpcService 呢?因为 WalletRpcService 是在 execute() 函数中通过 new 的方式创建的,我们无法动态地对其进行替换。也就是说,Transaction 类中的 execute() 方法的可测试性很差,需要通过重构来让其变得更容易测试。
该如何重构这段代码呢?在依赖反转中,我们讲到,依赖注入是实现代码可测试性的最有效的手段。我们可以应用依赖注入,将 WalletRpcService 对象的创建反转给上层逻辑,在外部创建好之后,再注入到 Transaction 类中。
依赖注入是实现代码可测试性的最有效的手段:通过DI实现反转,将对象的创建交给业务调用方,这样就可以随意控制输出的结果,从而达到"mock"数据的目的,这样的思路太赞了。。。(补充下:不存在外部依赖的类对象可以直接通过new来创建)
重构之后的 Transaction 类的代码如下所示:
public class Transaction {
  //...
  // 添加一个成员变量及其set方法
  private WalletRpcService walletRpcService;

  public void setWalletRpcService(WalletRpcService walletRpcService) {
    this.walletRpcService = walletRpcService;
  }
  // ...
  public boolean execute() {
    // ...
    // 删除下面这一行代码
    // WalletRpcService walletRpcService = new WalletRpcService();
    // ...
  }
}
现在,我们就可以在单元测试中,非常容易地将 WalletRpcService 替换成 MockWalletRpcServiceOne 或 WalletRpcServiceTwo 了。重构之后的代码对应的单元测试如下所示:
public void testExecute() {
  Long buyerId = 123L;
  Long sellerId = 234L;
  Long productId = 345L;
  Long orderId = 456L;
  Transction transaction = new Transaction(null, buyerId, sellerId, productId, orderId);
  // 使用mock对象来替代真正的RPC服务
  transaction.setWalletRpcService(new MockWalletRpcServiceOne()):
  boolean executedResult = transaction.execute();
  assertTrue(executedResult);
  assertEquals(STATUS.EXECUTED, transaction.getStatus());
}
WalletRpcService 的 mock 和替换问题解决了,我们再来看 RedisDistributedLock。它的 mock 和替换要复杂一些,主要是因为 RedisDistributedLock 是一个单例类。单例相当于一个全局变量,我们无法 mock(无法继承和重写方法),也无法通过依赖注入的方式来替换。
如果 RedisDistributedLock 是我们自己维护的,可以自由修改、重构,那我们可以将其改为非单例的模式,或者定义一个接口,比如 IDistributedLock,让 RedisDistributedLock 实现这个接口。这样我们就可以像前面 WalletRpcService 的替换方式那样,替换 RedisDistributedLock 为 MockRedisDistributedLock 了。但如果 RedisDistributedLock 不是我们维护的,我们无权去修改这部分代码,这个时候该怎么办呢?
我们可以对 transaction 上锁这部分逻辑重新封装一下。具体代码实现如下所示:
public class TransactionLock {
  public boolean lock(String id) {
    return RedisDistributedLock.getSingletonIntance().lockTransction(id);
  }

  public void unlock() {
    RedisDistributedLock.getSingletonIntance().unlockTransction(id);
  }
}

public class Transaction {
  //...
  private TransactionLock lock;

  public void setTransactionLock(TransactionLock lock) {
    this.lock = lock;
  }

  public boolean execute() {
    //...
    try {
      isLocked = lock.lock();
      //...
    } finally {
      if (isLocked) {
        lock.unlock();
      }
    }
    //...
  }
}
这样,我们就能在单元测试代码中隔离真正的 RedisDistributedLock 分布式锁这部分逻辑了。
public void testExecute() {
  Long buyerId = 123L;
  Long sellerId = 234L;
  Long productId = 345L;
  Long orderId = 456L;

  TransactionLock mockLock = new TransactionLock() {
    public boolean lock(String id) {
      return true;
    }

    public void unlock() {}
  };

  Transction transaction = new Transaction(null, buyerId, sellerId, productId, orderId);
  transaction.setWalletRpcService(new MockWalletRpcServiceOne());
  transaction.setTransactionLock(mockLock);
  boolean executedResult = transaction.execute();
  assertTrue(executedResult);
  assertEquals(STATUS.EXECUTED, transaction.getStatus());
}
现在,我们再来看测试用例 3:交易已过期(createTimestamp 超过 14 天),交易状态设置为 EXPIRED,返回 false。
public void testExecute_with_TransactionIsExpired() {
  Long buyerId = 123L;
  Long sellerId = 234L;
  Long productId = 345L;
  Long orderId = 456L;
  Transction transaction = new Transaction(null, buyerId, sellerId, productId, orderId);
  transaction.setCreatedTimestamp(System.currentTimestamp() - 14days);
  boolean actualResult = transaction.execute();
  assertFalse(actualResult);
  assertEquals(STATUS.EXPIRED, transaction.getStatus());
}
上面的代码看似没有任何问题。我们将 transaction 的创建时间 createdTimestamp 设置为 14 天前,也就是说,当单元测试代码运行的时候,transaction 一定是处于过期状态。但是,如果在 Transaction 类中,并没有暴露修改 createdTimestamp 成员变量的 set 方法(也就是没有定义 setCreatedTimestamp() 函数)呢?
你可能会说,如果没有 createTimestamp 的 set 方法,我就重新添加一个呗!实际上,这违反了类的封装特性。在 Transaction 类的设计中,createTimestamp 是在交易生成时(也就是构造函数中)自动获取的系统时间,本来就不应该人为地轻易修改,所以,暴露 createTimestamp 的 set 方法,虽然带来了灵活性,但也带来了不可控性。因为,我们无法控制使用者是否会调用 set 方法重设createTimestamp,而重设 createTimestamp 并非我们的预期行为。
那如果没有针对 createTimestamp 的 set 方法,那测试用例 3 又该如何实现呢?实际上,这是一类比较常见的问题,就是代码中包含跟“时间”有关的“未决行为”逻辑。我们一般的处理方式是将这种未决行为逻辑重新封装。针对 Transaction 类,我们只需要将交易是否过期的逻辑,封装到 isExpired() 函数中即可,具体的代码实现如下所示:
public class Transaction {

  protected boolean isExpired() {
    long executionInvokedTimestamp = System.currentTimestamp();
    return executionInvokedTimestamp - createdTimestamp > 14days;
  }

  public boolean execute() throws InvalidTransactionException {
    //...
      if (isExpired()) {
        this.status = STATUS.EXPIRED;
        return false;
      }
    //...
  }
}
针对重构之后的代码,测试用例 3 的代码实现如下所示:
public void testExecute_with_TransactionIsExpired() {
  Long buyerId = 123L;
  Long sellerId = 234L;
  Long productId = 345L;
  Long orderId = 456L;
  Transction transaction = new Transaction(null, buyerId, sellerId, productId, orderId) {
    protected boolean isExpired() {
      return true;
    }
  };
  boolean actualResult = transaction.execute();
  assertFalse(actualResult);
  assertEquals(STATUS.EXPIRED, transaction.getStatus());
}
通过重构,Transaction 代码的可测试性提高了。之前罗列的所有测试用例,现在我们都顺利实现了。不过,Transaction 类的构造函数的设计还有点不妥。
  public Transaction(String preAssignedId, Long buyerId, Long sellerId, Long productId, String orderId) {
    if (preAssignedId != null && !preAssignedId.isEmpty()) {
      this.id = preAssignedId;
    } else {
      this.id = IdGenerator.generateTransactionId();
    }
    if (!this.id.startWith("t_")) {
      this.id = "t_" + preAssignedId;
    }
    this.buyerId = buyerId;
    this.sellerId = sellerId;
    this.productId = productId;
    this.orderId = orderId;
    this.status = STATUS.TO_BE_EXECUTD;
    this.createTimestamp = System.currentTimestamp();
  }
我们发现,构造函数中并非只包含简单赋值操作。交易 id 的赋值逻辑稍微复杂。我们最好也要测试一下,以保证这部分逻辑的正确性。为了方便测试,我们可以把 id 赋值这部分逻辑单独抽象到一个函数中,具体的代码实现如下所示:
  public Transaction(String preAssignedId, Long buyerId, Long sellerId, Long productId, String orderId) {
    //...
    fillTransactionId(preAssignId);
    //...
  }

  protected void fillTransactionId(String preAssignedId) {
    if (preAssignedId != null && !preAssignedId.isEmpty()) {
      this.id = preAssignedId;
    } else {
      this.id = IdGenerator.generateTransactionId();
    }
    if (!this.id.startWith("t_")) {
      this.id = "t_" + preAssignedId;
    }
  }
Transaction 类中 isExpired() 函数就不用测试了吗?对于 isExpired() 函数,逻辑非常简单,肉眼就能判定是否有 bug,是可以不用写单元测试的。
其他常见的 Anti-Patterns
上面通过一个实战案例,讲解了如何利用依赖注入来提高代码的可测试性,以及编写单元测试中最复杂的一部分内容:如何通过 mock、二次封装等方式解依赖外部服务。现在,我们再来总结一下,有哪些典型的、常见的测试性不好的代码,也就是我们常说的 Anti-Patterns。
1. 未决行为
代码的输出是随机或者说不确定的,比如,跟时间、随机数有关的代码。
2. 全局变量
全局变量是一种面向过程的编程风格,有种种弊端。实际上,滥用全局变量也让编写单元测试变得困难。
RangeLimiter 表示一个[-5, 5]的区间,position 初始在 0 位置,move() 函数负责移动 position。其中,position 是一个静态全局变量。RangeLimiterTest 类是为其设计的单元测试。
public class RangeLimiter {
  private static AtomicInteger position = new AtomicInteger(0);
  public static final int MAX_LIMIT = 5;
  public static final int MIN_LIMIT = -5;

  public boolean move(int delta) {
    int currentPos = position.addAndGet(delta);
    boolean betweenRange = (currentPos <= MAX_LIMIT) && (currentPos >= MIN_LIMIT);
    return betweenRange;
  }
}

public class RangeLimiterTest {
  public void testMove_betweenRange() {
    RangeLimiter rangeLimiter = new RangeLimiter();
    assertTrue(rangeLimiter.move(1));
    assertTrue(rangeLimiter.move(3));
    assertTrue(rangeLimiter.move(-5));
  }

  public void testMove_exceedRange() {
    RangeLimiter rangeLimiter = new RangeLimiter();
    assertFalse(rangeLimiter.move(6));
  }
}
上面的单元测试有可能会运行失败。假设单元测试框架顺序依次执行 testMove_betweenRange() 和 testMove_exceedRange() 两个测试用例。在第一个测试用例执行完成之后,position 的值变成了 -1;再执行第二个测试用例的时候,position 变成了 5,move() 函数返回 true,assertFalse 语句判定失败。所以,第二个测试用例运行失败。
当然,如果 RangeLimiter 类有暴露重设(reset)position 值的函数,我们可以在每次执行单元测试用例之前,把 position 重设为 0,这样就能解决刚刚的问题。
不过,每个单元测试框架执行单元测试用例的方式可能是不同的。有的是顺序执行,有的是并发执行。对于并发执行的情况,即便我们每次都把 position 重设为 0,也并不奏效。如果两个测试用例并发执行,第 16、17、18、23 这四行代码可能会交叉执行,影响到 move() 函数的执行结果。


![[附源码]计算机毕业设计JAVA民宿网站管理系统](https://img-blog.csdnimg.cn/c49e79c23fb14d05a42c2c17488e45d1.png)