说在前面
🎈相信很多80、90后的朋友,对QQ宠物印象非常深刻,每次开机宠物就会自动跑出来。曾经很多人想饿死他,但失败了;也有很多人一上线就退出,但就是不愿因取消“开机自动开启”的勾选。2018年09月15日,QQ宠物正式停止游戏运营,关闭游戏服务器,很多人表示惋惜,不得不对陪伴了自己这么多年的宠物说了再见。那么现在自己有了一点的能力,为什么不能亲自动手来“复活”一下它呢。
效果展示
组件实现效果如下图:

预览地址
http://jyeontu.xyz/jvuewheel/#/JWebPetView
实现思路
一、获取合适图片包
图片包我们可以通过以下几种方式来获取:
- 1、自己画图
会作图的同学可以自己画一套专属的图片包。
- 2、动图或视频中截取
我们从动图或视频中截取关键帧,并将获取到的关键帧背景扣除,这样我们也可以得到一套自己喜欢的图片包。
- 3、网上寻找资源
其实网上也有很多的桌宠图片包资源,所以我们可以直接到网上搜索。
由于本人美术不行且想偷懒,所以果断地选择了第3种方式来获取到了可以使用的图片资源。
二、图片包行为分类并排序
获取到一套图片包之后,一套图片包中可能包含多个动作行为,所以我们还需要对其进行分类,将不同行为的图片分类出来,为了方便我们后续代码的编写,我们可以先将图片根据动作的顺序进行编号命名。
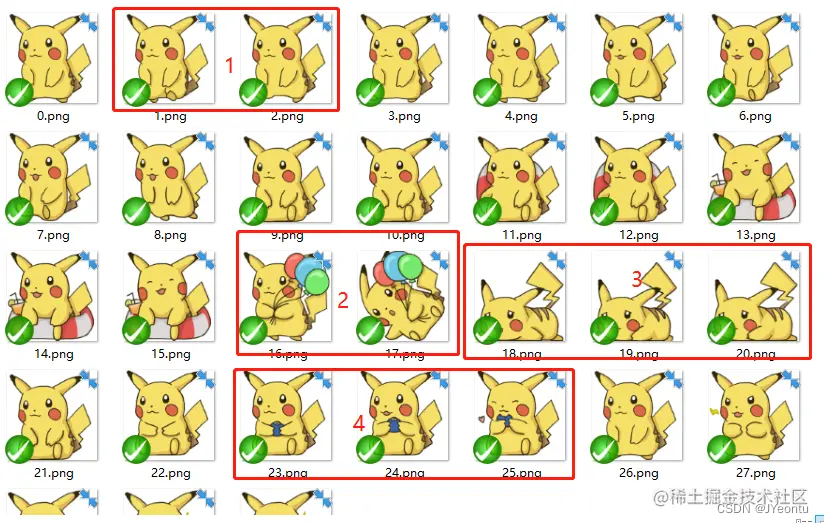
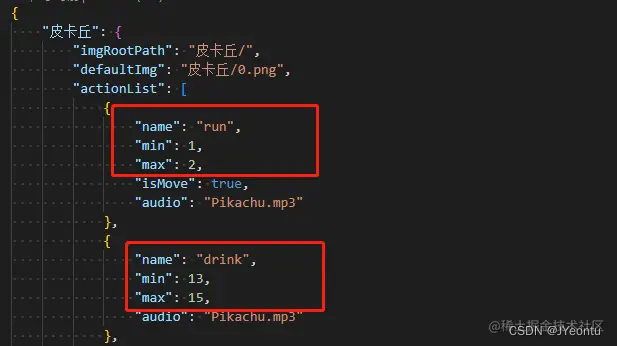
如上图划分的4中行为动作,我们都按顺序对图片进行编号命名,那么我们后续引用的时候就可以根据序号来定义一个行为动作,如下图:
三、代码编写
图片准备好并且处理好之后,我们便可以开始编写代码了。
1、配置表
我们需要完成一个配置表来将图片和行为关联起来,如下图:
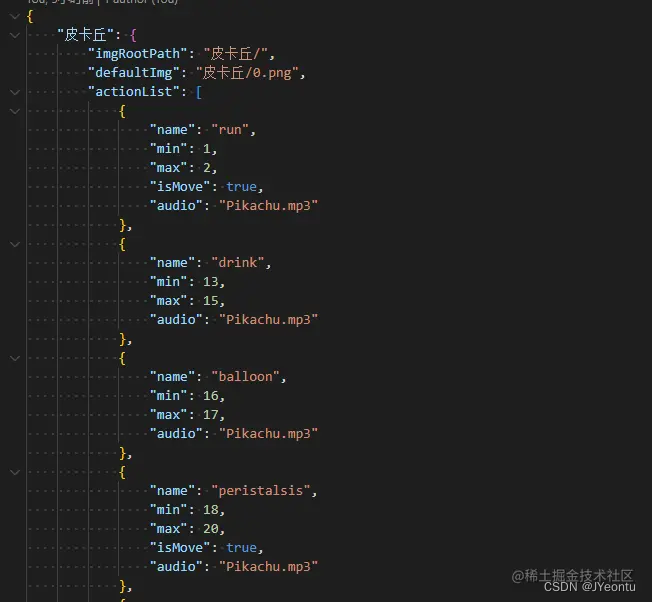
我们需要对每个图包的每个动作进行一个简单的配置:
- imgRootPath
图片包的路径。
- defaultImg
没有进行任何行为的时候的默认展示图片。
- actionList
行为集合,每个集合的配置如下:
name:该行为的名称,后面会在行为菜单展示;
min:行为开始图片编号;
max:行为结束图片编号;
isMove:该行为是否要发生位移;
audio:触发该行为时的音频。
具体如下:
{
    "name": "run",
    "min": 1,
    "max": 2,
    "isMove": true,
    "audio": "Pikachu.mp3"
},
2、组件参数配置
- name
选择展示的图片包,目前已有图片包:皮卡丘,奇犽,白一护,橘一护,喵老师,蓝染,迪达拉,日向雏田。
- step
触发可移动行为时每一次移动的距离,默认为20px。
- petSize
桌宠的尺寸大小,默认为50px。
- defaultAction
初始化时默认触发的行为,可从行为菜单中选择。
具体如下:
props: {
    name: {
        type: String,
        default: "皮卡丘",
    },
    step: {
        type: Number,
        default: 20,
    },
    petSize: {
        type: String,
        default: "50px",
    },
    defaultAction: {
        type: String,
        default: "",
    },
},
3、配置数据初始化
我们需要根据传入的name来选择相对应的配置,图片我们要通过require的方式来引入,不能直接使用相对路径字符串。
import config from "./config.json";
initData() {
    this.webPetConfig = config[this.name];
    this.actionList = this.webPetConfig.actionList;
    this.imgRootPath = this.webPetConfig.imgRootPath;
    this.imgSrc = require("@/assets/img/" +
        this.webPetConfig.defaultImg);
    this.uid = "j-web-pet-" + getUId();
    const list =
        this.actionList.map((item) => {
            return item.name;
        }) || [];
    this.menuList = list;
    clearTimeout(this.isRunToTarget);
    this.isRunToTarget = null;
    this.menuShow = false;
}
4、页面初始化
根据传入参数及对应的配置来进行页面初始化。
init() {
    this.nowAction =
        this.actionList.find((item) => {
            return item.name == this.defaultAction;
        }) || {};
    this.showImg = document.getElementById("showImg");
    this.showImg.style.width = this.petSize;
    this.showImg.style.height = this.petSize;
    this.showImg.style.right = this.petSize;
    this.showImg.style.top = "50%";
    this.showImg.style.transform = "";
    this.mouseEventListen();
    this.autoRunToTarget();
},
5、行为菜单栏
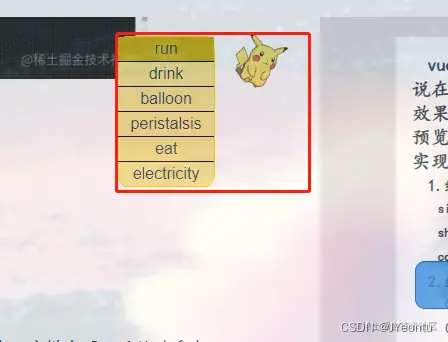
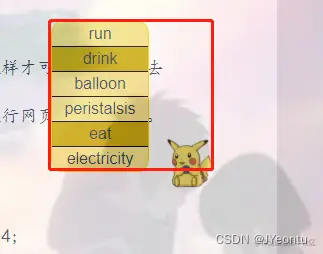
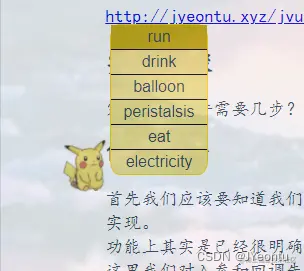
我们需要有个行为菜单栏来对宠物的行为进行切换,所以我们可以制作一个简易菜单展示,为了防止菜单栏溢出视图窗口,我们可以对其弹出位置进行以下限定:
- 桌宠位置位于视图窗口上半部分
菜单顶部与宠物的顶部对齐,如下图:
- 桌宠位置位于视图窗口下半部分
菜单底部与宠物中心对齐,如下图:
- 桌宠位置位于视图窗口左半部分
菜单从宠物右边弹出,如下图:
- 桌宠位置位于视图窗口右半部分
菜单从宠物左边弹出,如下图:
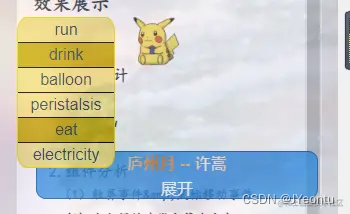
实现代码如下:
showMenu() {
    const w = this.showImg.offsetWidth;
    const h = this.showImg.offsetHeight;
    const left = this.showImg.offsetLeft;
    const top = this.showImg.offsetTop;
    const innerWidth = window.innerWidth;
    const innerHeight = window.innerHeight;
    const inLeft = left < innerWidth / 2;
    const inTop = top < innerHeight / 2;
    const petMenu = document.getElementById("petMenu");
    petMenu.style.top = "";
    petMenu.style.bottom = "";
    petMenu.style.left = "";
    petMenu.style.right = "";
    if (inTop) petMenu.style.top = this.showImg.offsetTop + "px";
    else
        petMenu.style.bottom =
            innerHeight - this.showImg.offsetTop - h + "px";
    if (inLeft) petMenu.style.left = this.showImg.offsetLeft + w + "px";
    else
        petMenu.style.right =
            window.innerWidth - this.showImg.offsetLeft + "px";
    this.menuShow = this.canDrag && !this.menuShow;
},
6、javascript实现图片帧切换
通过配置表我们可以获取到一个动作行为的完整编号应该为[min,max],我们只需要循环切换这组编号的图片即可。
playImg(action, ind) {
    if (!action || JSON.stringify(action) == "{}") return;
    let min = action.min,
        max = action.max;
    if (!ind || ind < min || ind > max) {
        ind = min;
    }
    this.showImg &&
        this.showImg.setAttribute(
            "src",
            require("@/assets/img/" + this.imgRootPath + ind + ".png")
        );
    clearTimeout(this.isRunToTarget);
    this.isRunToTarget = setTimeout(() => {
        this.playImg(action, ind + 1);
    }, 500);
},
7、宠物移动效果实现
移动效果我们只需要在图片切换的同时对图片的定位进行修改,便可以简单实现宠物移动的效果,所以我们需要计算每次移动的时候图片的坐标变化量及角度的偏移量。
这里我们使用的两个端点确定一条线段的方法来计算位移角度及定位切换长度,对此我们可以将其转化成下面这道数学题👇
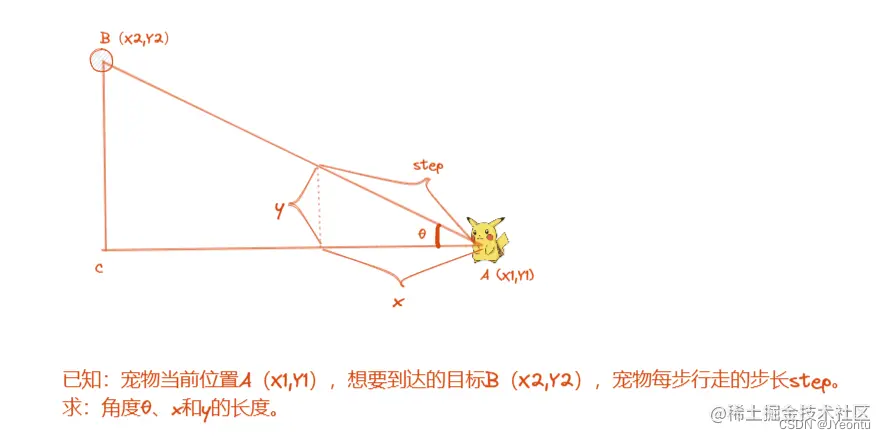
转化成这么一道数学题之后是不是觉得简单多了?我们只需要解开这道简单的三角函数题目即可:
- 计算边AC及BC长度
我们可以通过点A和点B的坐标来求边BC和边AC的长度:
AC = |X2 - X1|
BC = |Y2 - Y1|
知道了这两边的长度之后我们便可以求得角θ的度数了。
- 求角θ的大小
首先我们应该先了解一下反正切arctan,如果tanθ = y,我们可以得出arctan(y) = θ,所以我们可以通过反正切来求得角θ的大小
tanθ' = BC / AC => θ' = arctan(BC/AC) //这里求出的θ'是弧度值,我们需要将其转化为角度
θ = θ' * 180 / π;
- 求x、y的值
知道了角θ的大小和步长step的长度,我们可以利用三角函数来求得x和y的大小:
sinθ = x / step => x = sinθ * step
cosθ = y / step => y = cosθ * step
- 判断是否需要进行翻转
我们知道,正常情况下正切函数的函数图像大概是这样的:
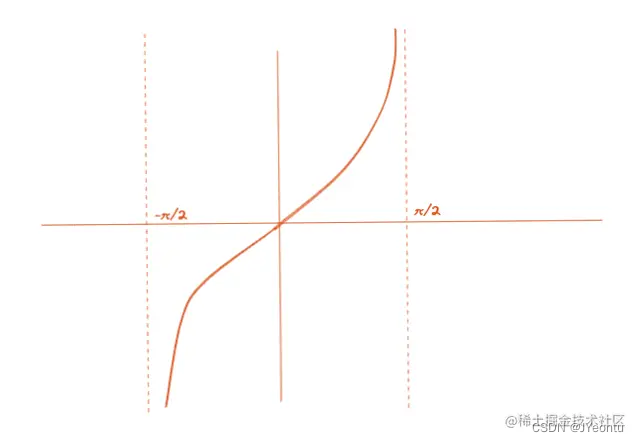
但是我们计算的时候两边的长度永远是正的,所以求得的角度区间应该是[0,π/2],所以在下面这种情况(目标点x坐标大于宠物x坐标)的时候,我们应该对其进行一个y轴镜像翻转。
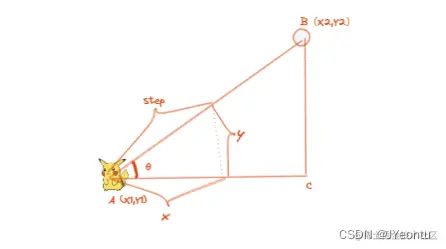
- 使用代码计算
转化成代码如下:
runToTarget(action, ind, x, y, cb = null) {
    const step = this.step;
    if (!action || JSON.stringify(action) == "{}") return;
    if (!action.isMove) return;
    this.nowAction = action;
    let min = action.min,
        max = action.max;
    if (!ind || ind < min || ind > max) {
        ind = min;
    }
    const w = this.showImg.offsetWidth / 2;
    const h = this.showImg.offsetHeight / 2;
    const ny = this.showImg.offsetTop + h;
    const nx = this.showImg.offsetLeft + w;
    const nowY = this.showImg.offsetTop;
    const nowX = this.showImg.offsetLeft;
    let deg = (Math.atan((y - ny) / (x - nx)) * 180) / Math.PI;
    const sin = Math.sin((deg * Math.PI) / 180);
    const cos = Math.cos((deg * Math.PI) / 180);
    let addX = Math.abs(step * cos);
    let addY = Math.abs(step * sin);
    this.showImg &&
        this.showImg.setAttribute(
            "src",
            require("@/assets/img/" + this.imgRootPath + ind + ".png")
        );
    if (x > nx) {
        this.showImg.style.transform = `rotate(${deg}deg) rotateY(180deg)`;
    } else {
        this.showImg.style.transform = `rotate(${deg}deg)`;
    }
    if (x < nowX) addX = -addX;
    if (y < nowY) addY = -addY;
    this.showImg.style.left = nowX + addX + "px";
    this.showImg.style.top = nowY + addY + "px";
    this.showImg.style.right = "";
    this.showImg.style.bottom = "";
    const disX = Math.abs(this.showImg.offsetLeft + w - x);
    const disY = Math.abs(this.showImg.offsetTop + h - y);
    clearTimeout(this.isRunToTarget);
    if (disX > w || disY > h) {
        this.isRunToTarget = setTimeout(() => {
            this.runToTarget(action, ind + 1, x, y, cb);
        }, 500);
    } else {
        this.isRunToTarget = null;
        cb && cb();
    }
},
8、宠物自动随机移动
前面我们已经实现了宠物想指定目标点移动的方法,现在我们只需要随机生成目标点,再让宠物前往目标点即可:
autoRunToTarget(action = this.nowAction, x = "", y = "") {
    if (action.isMove) {
        if (!x) x = getRandomNum(0, window.innerWidth);
        if (!y) y = getRandomNum(0, window.innerHeight);
        this.runToTarget(action, action.min, x, y, () => {
            this.autoRunToTarget(action);
        });
    } else {
        this.playImg(action);
    }
},
9、宠物拖动
有的时候宠物可能会遮挡到页面内容,我们需要将其拖动移开,这里我们可以对鼠标移动事件和点击事件进行监听处理。
- 1、设置可拖动状态
我们需要先点击宠物后使其进入可拖动状态才能开始拖动宠物。
clickPet(e) {
    this.canDrag = true;//设置可拖动状态
    clearTimeout(this.isRunToTarget);
    this.startClickX = e.pageX - window.scrollX;
    this.startClickY = e.pageY - window.scrollY;
    window.addEventListener("mouseover", this.mouseoverHandler, false);
    window.addEventListener("mouseup", this.mouseupHandler, false);
},
- 2、根据鼠标坐标更新宠物坐标
判断当前是否进入可拖动状态,可拖动时根据鼠标坐标更新宠物坐标。
mouseoverHandler(e) {
    if (!this.canDrag) return;
    const w = this.showImg.offsetWidth / 2;
    const h = this.showImg.offsetHeight / 2;
    this.showImg.style.left = e.pageX - window.scrollX - w + "px";
    this.showImg.style.top = e.pageY - window.scrollY - h + "px";
    this.showImg.style.right = "";
    this.showImg.style.bottom = "";
},
- 3、区分点击事件和拖动事件
鼠标抬起时判断是点击事件还是拖动事件,这里我使用拖拽开始位置和拖拽结束位置来做一个简单的判断,拖拽结束后注意清除鼠标的监听事件。
mouseupHandler(e) {
    const endClickX = e.pageX - window.scrollX;
    const endClickY = e.pageY - window.scrollY;
    const { target } = e;
    if (
        target == this.showImg &&
        (Math.abs(this.startClickX - endClickX) < 10 ||
            Math.abs(this.startClickY - endClickY) < 10)
    ) {
        this.showMenu();
    } else {
        this.menuShow = false;
        this.autoRunToTarget();
    }
    this.canDrag = false;
    window.removeEventListener(
        "mouseover",
        this.mouseoverHandler,
        false
    );
    window.removeEventListener("mouseup", this.mouseupHandler, false);
},
10、播放音频
根据配置表获取当前行为的音频,有配对的音频则随机播放音频。
webPetAudioPlay(playNow = false) {
    const webPetAudio = document.getElementById("webPetAudio");
    if (
        !playNow &&
        (!webPetAudio.paused ||
            Math.floor(Math.random() * 100) % 10 != 0)
    )
        return;
    if (!this.nowAction.audio) return;
    webPetAudio.setAttribute(
        "src",
        require("@/assets/audio/" + this.nowAction.audio)
    );
    try {
        webPetAudio.play();
    } catch (e) {}
},
资源来源
图片包资源取自手机桌宠吧 -> 吧主蓠蓠原上草啊分享的资源。有需要的同学也可以去看看。
如有侵权,可以联系删除。
后续计划
目前实现的只是一个简单组件版,后面会继续完善,增加更多的交互功能或交互小游戏,提高组件可配置性,后续还有两个改动方向:
- 1、将其封装成一个浏览器插件
- 2、使用electron封装成一个桌面应用。
有图片包资源的同学可以赞助下😂
有什么其他好的建议也都可以提出来🤞
源码地址
组件库已开源,想要查看完整源码的可以到 gitee 查看,自己也整理了相关的文档对其进行了简单介绍,具体如下:
组件文档
当前组件已发布到npm,可以查看组件文档进行引入并配置。
jvuewheel: http://jyeontu.xyz/jvuewheel/#/JWebPetView
Gitee源码
Gitee源码:gitee.com/zheng_yongt…
觉得有帮助的同学可以帮忙给我点个star,感激不尽~~~
有什么想法或者改良可以给我提个pr,十分欢迎~~~
有什么问题都可以在评论告诉我~~~
往期精彩
面试官:不使用canvas怎么实现一个刮刮卡效果?
vue封装一个3D轮播图组件
vue实现一个鼠标滑动预览视频封面组件(精灵图版本)
node封装一个图片拼接插件
基于inquirer封装一个控制台文件选择器
node封装一个控制台进度条插件
密码太多不知道怎么记录?不如自己写个密码箱小程序
微信小程序实现一个手势图案锁组件
vue封装一个弹幕组件
为了学(mo)习(yu),我竟开发了这样一个插件
程序员的浪漫之——情侣日常小程序
vue简单实现词云图组件
说在后面
🎉这里是JYeontu,现在是一名前端工程师,有空会刷刷算法题,平时喜欢打羽毛球🏸 ,平时也喜欢写些东西,既为自己记录📋,也希望可以对大家有那么一丢丢的帮助,写的不好望多多谅解🙇,写错的地方望指出,定会认真改进😊,在此谢谢大家的支持,我们下文再见🙌。
