简单的 ALSA Driver 实现
- 一、概述
- 二、Linux ALSA 音频设备驱动实例
- 1、注册 Platform Device & Platform Driver
- 2、创建 card
- 3、PCM 设备相关设定
- 3.1 创建 PCM Device
- 3.2 设置 PCM 操作
- 3.2 PCM HW 初始化
- 4、Control 设备相关设定
- 4.1 定义 snd_kcontrol_new
- 4.2 构造 control
- 5、填充 card 重要参数 & 注册 card
- 三、示例来源
一、概述
本节主要根据例子来描述撰写简单的 Alsa Driver 实现步骤,其中涉及的 Alsa Api 具体功能基本已经在Linux ALSA 之二:ALSA 声卡与设备中已经描述。
二、Linux ALSA 音频设备驱动实例
1、注册 Platform Device & Platform Driver
在 dummy.c 中直接 module_init() 入口函数中注册 Platform Device & Platform Driver,匹配后进入 platform_driver 的 probe() 函数。
#define SND_DUMMY_DRIVER	"snd_dummy"
static struct platform_driver snd_dummy_driver = {
	.probe		= snd_dummy_probe,
	.remove		= snd_dummy_remove,
	.driver		= {
		.name	= SND_DUMMY_DRIVER,
		.pm	= SND_DUMMY_PM_OPS,
	},
};

static int __init alsa_card_dummy_init(void)
{
	...
	//1.1 注册 Platform Driver
	err = platform_driver_register(&snd_dummy_driver);
	if (err < 0)
		return err;

	// 用来模拟 DMA Memory 是否已经有被分配(后面会详解)
	err = alloc_fake_buffer();
	if (err < 0) {
		platform_driver_unregister(&snd_dummy_driver);
		return err;
	}

	cards = 0;
	for (i = 0; i < SNDRV_CARDS; i++) {
		struct platform_device *device;
		if (! enable[i])
			continue;
		//1.2 注册 Platform Device
		device = platform_device_register_simple(SND_DUMMY_DRIVER,
							 i, NULL, 0);
		if (IS_ERR(device))
			continue;
		if (!platform_get_drvdata(device)) {
			platform_device_unregister(device);
			continue;
		}
		devices[i] = device;
		cards++;
	}
	...
	return 0;
}
2、创建 card
在前面 driver & device 匹配后则会调用 probe() 函数。对于每个声卡而言,必须创建一个 card 实例,用于管理这个声卡上的所有设备(组件),如 pcm、control、MIDI、synthesizer 等。
static int snd_dummy_probe(struct platform_device *devptr)
{
	struct snd_card *card;
	struct snd_dummy *dummy;
	struct dummy_model *m = NULL, **mdl;
	int idx, err;
	int dev = devptr->id;

	//2.1 创建 card,其中 index 为 card 索引号,xid 为标识字符串,extra_size 为要分配的 private_data size
	err = snd_card_new(&devptr->dev, index[dev], id[dev], THIS_MODULE,
			   sizeof(struct snd_dummy), &card);
	if (err < 0)
		return err;
	dummy = card->private_data;
	dummy->card = card;
	...
	return err;
}
3、PCM 设备相关设定
每个声卡下都可以有多个 PCM 实例,一个 PCM 实例对应一个设备文件。PCM 实例由 PCM Playback & Capture Streams 组成,而每个 PCM Streams 又由一个或多个 PCM Substreams 组成(一般只有一个 Substream)。
3.1 创建 PCM Device
#define MAX_PCM_DEVICES		4
#define MAX_PCM_SUBSTREAMS	128
static int pcm_devs[SNDRV_CARDS] = {[0 ... (SNDRV_CARDS - 1)] = 1};
static int pcm_substreams[SNDRV_CARDS] = {[0 ... (SNDRV_CARDS - 1)] = 8};

static int snd_card_dummy_pcm(struct snd_dummy *dummy, int device,
			      int substreams)
{
	struct snd_pcm *pcm;
	struct snd_pcm_ops *ops;
	int err;
	//3.1 创建 PCM Device,
	//Param1: card 指针; Param2: 标识字符串; Param3: PCM 设备索引(0 标识第一个 PCM 设备); Param4&5: Playback&Capture Substreams 数
	err = snd_pcm_new(dummy->card, "Dummy PCM", device,
			       substreams, substreams, &pcm);
	if (err < 0)
		return err;
	dummy->pcm = pcm;
	...
	return 0;
}

static int snd_dummy_probe(struct platform_device *devptr)
{
	...
	//创建所有 PCM Devices
	for (idx = 0; idx < MAX_PCM_DEVICES && idx < pcm_devs[dev]; idx++) {
		if (pcm_substreams[dev] < 1)
			pcm_substreams[dev] = 1;
		if (pcm_substreams[dev] > MAX_PCM_SUBSTREAMS)
			pcm_substreams[dev] = MAX_PCM_SUBSTREAMS;
		err = snd_card_dummy_pcm(dummy, idx, pcm_substreams[dev]);
		if (err < 0)
			goto __nodev;
	}
	...
	return err;
}
3.2 设置 PCM 操作
static struct snd_pcm_ops dummy_pcm_ops = {
	.open =		dummy_pcm_open,
	.close =	dummy_pcm_close,
	.ioctl =	snd_pcm_lib_ioctl,
	.hw_params =	dummy_pcm_hw_params,
	.hw_free =	dummy_pcm_hw_free,
	.prepare =	dummy_pcm_prepare,
	.trigger =	dummy_pcm_trigger,
	.pointer =	dummy_pcm_pointer,
};

static struct snd_pcm_ops dummy_pcm_ops_no_buf = {
	.open =		dummy_pcm_open,
	.close =	dummy_pcm_close,
	.ioctl =	snd_pcm_lib_ioctl,
	.hw_params =	dummy_pcm_hw_params,
	.hw_free =	dummy_pcm_hw_free,
	.prepare =	dummy_pcm_prepare,
	.trigger =	dummy_pcm_trigger,
	.pointer =	dummy_pcm_pointer,
	.copy_user =	dummy_pcm_copy,
	.copy_kernel =	dummy_pcm_copy_kernel,
	.fill_silence =	dummy_pcm_silence,
	.page =		dummy_pcm_page,
};

static int snd_card_dummy_pcm(struct snd_dummy *dummy, int device,
			      int substreams)
{
	struct snd_pcm *pcm;
	struct snd_pcm_ops *ops;
	int err;
	...

	// 3.2.1 根据 DMA Memory 是否已经存在选择不同的 ops
	if (fake_buffer)
		ops = &dummy_pcm_ops_no_buf;
	else
		ops = &dummy_pcm_ops;

	// 3.2.2 设置 pcm ops 操作
	snd_pcm_set_ops(pcm, SNDRV_PCM_STREAM_PLAYBACK, ops);
	snd_pcm_set_ops(pcm, SNDRV_PCM_STREAM_CAPTURE, ops);
	pcm->private_data = dummy;
	pcm->info_flags = 0;
	strcpy(pcm->name, "Dummy PCM");
	if (!fake_buffer) {
		snd_pcm_lib_preallocate_pages_for_all(pcm,
			SNDRV_DMA_TYPE_CONTINUOUS,
			snd_dma_continuous_data(GFP_KERNEL),
			0, 64*1024);
	}
	return 0;
}
如上代码,设置 PCM 操作使用 snd_pcm_set_ops(),定义如下
/**
 * snd_pcm_set_ops - set the PCM operators
 * @pcm: the pcm instance
 * @direction: stream direction, SNDRV_PCM_STREAM_XXX
 * @ops: the operator table
 *
 * Sets the given PCM operators to the pcm instance.
 */
void snd_pcm_set_ops(struct snd_pcm *pcm, int direction,
		     const struct snd_pcm_ops *ops)
其中 PCM 操作结构体 snd_pcm_ops 定义如下:(详细描述已在注释中)
struct snd_pcm_ops {
	/* This is called when a pcm substream is opened */
	int (*open)(struct snd_pcm_substream *substream);
	/* This is called when a pcm substream is closed */
	int (*close)(struct snd_pcm_substream *substream);
	/* This is used for any special call to pcm ioctls. But usually could pass a generic ioctl callback snd_pcm_lib_ioctl. */
	int (*ioctl)(struct snd_pcm_substream * substream,
		     unsigned int cmd, void *arg);
	/* This is called when the hardware parameter (hw_params) is set up by the application,
	that is, once when the buffer size, the period size, the format, etc.
	Many hardware setups should be done in this callback, including the allocation of buffer. */
	int (*hw_params)(struct snd_pcm_substream *substream,
			 struct snd_pcm_hw_params *params);
	/* This is called to release the resources allocated via hw_params */
	int (*hw_free)(struct snd_pcm_substream *substream);
	/* This is callback is called when the pcm is 'prepared'. You can set the format type,
	sample rate, etc. The difference from hw_params is that the prepare callback will be
	called each time snd_pcm_prepare() is called, i.e. when recovering after underruns, etc.
	Be careful that this callback will be called many times at each setup, too. */
	int (*prepare)(struct snd_pcm_substream *substream);
	/* This is called when the pcm is started, stopped or paused. Which action is specified
	in the second argument, SNDRV_PCM_TRIGGER_XXX in <sound/pcm.h>.  At Least,
	the START and STOP commands must be defined in this callback. */
	int (*trigger)(struct snd_pcm_substream *substream, int cmd);
	/* This callback is called when the PCM middle layer inquires the current hardware position
	on the buffer. The position must be returned in frames, ranging from 0 to buffer_size-1.
	This is called usually from the buffer-update routine in the pcm middle layer, which
	is invoked when snd_pcm_period_elapsed() is called in the interrupt routine. Then
	the pcm middle layer updates the position and calculates the available space, and wakes
	up the sleeping poll threads, etc. This callback is alse atmoic. */
	snd_pcm_uframes_t (*pointer)(struct snd_pcm_substream *substream);
	int (*get_time_info)(struct snd_pcm_substream *substream,
			struct timespec *system_ts, struct timespec *audio_ts,
			struct snd_pcm_audio_tstamp_config *audio_tstamp_config,
			struct snd_pcm_audio_tstamp_report *audio_tstamp_report);
	/* For copy and silence callbacks: These callbacks are not mandatory, and can be omitted in most case.
	These callbacks are used when the hardware buffer cannot be in the normal memory space.
	Some chips have their own buffer on the hardware which is not mappable. In such a case,
	you have to transfer the data manually from the memory buffer to the hardware buffer.
	Or, if the buffer is non-contiguous on both physical and virtual memory spaces, these callbacks must be defined, too.*/
	int (*fill_silence)(struct snd_pcm_substream *substream, int channel,
			    unsigned long pos, unsigned long bytes);
	int (*copy_user)(struct snd_pcm_substream *substream, int channel,
			 unsigned long pos, void __user *buf,
			 unsigned long bytes);
	int (*copy_kernel)(struct snd_pcm_substream *substream, int channel,
			   unsigned long pos, void *buf, unsigned long bytes);
	struct page *(*page)(struct snd_pcm_substream *substream,
			     unsigned long offset);
	int (*mmap)(struct snd_pcm_substream *substream, struct vm_area_struct *vma);
	/* This callbacks is also not mandatory. This callback is called when the appl_ptr
	is updated in read or write operations. Some drivers like emu10k1-fx and cs46xx need
	to track the current appl_ptr for the internal buffer, and this callback is useful
	only for such a purpose. */
	int (*ack)(struct snd_pcm_substream *substream);
};
在上述代码中可以看到针对 fake_buffer 的不同对应的 ops 也不同,其中 fake_buffer 用于描述 DMA 是否已经有自己的缓冲区 Buffer,具体描述如下:
1) fake_buffer = 1
   => 在 module_init 中有申请 fake buffer(当成是 DMA 已经有相应的缓冲区)
      => 由于该 DMA 已经有相应可用的 Buffer, 故无需 allocate_pages for DMA
         => 对应的 snd_pcm_ops = dummy_pcm_ops_no_buf
         	=> 在 ops->hw_params 中不会再 allocate DMA 缓冲区
         	   => 该 snd_pcm_ops 则需要填充 copy_user 等 callbacks, 在 pcm_write() 时最终会将数据给到 copy_user(), 需要 driver 在 copy_user() 中将 Audio Data Copy to DMA Buffer.

2) fake_buffer = 0
   => 在 module_init 中没有申请 fake buffer(当成是 DMA 没有相应的缓冲区)
      => 由于该 DMA 没有相应可用的 Buffer, 故需要 allocate_pages for DMA
        【在 snd_pcm_new 之后先 call snd_pcm_lib_preallocate_pages_for_all() 预分配 DMA Buffer(预分配=> 未分配), 即设置相应参数,如 size & max_size】
         => 对应的 snd_pcm_ops = dummy_pcm_ops
         	=> 在 ops->hw_params 中会 call snd_pcm_lib_malloc_pages() 分配 DMA 缓冲区, 并将 dma buffer info 保存在 substream->dma_buffer && substream-> runtime->dma_buffer_p & dma_area & dma_addr & dma_bytes
         	   => 该 snd_pcm_ops 则不会填充 copy_user 等 callbacks, 在 pcm_write() 时会将 Audio Data 直接送到前面分配的 DMA Buffer 中, 即 runtime->dma_area + hwOffset.
举例:
1)mtk-dtv 对于 audio 都会有被分配好一块 DDR,此时使用到的 DMA 都有对应物理地址连续的一片 DDR 作为 DMA 缓冲区,此时则属于上述 fake_buffer=1 Case;
2)mtk-mt2701 等移动设备对于 PCM DMA 的话则没有分配好 DMA 缓冲区,即需要在 driver 中去分配,此时则属于上述 fake_buffer=0 Case.
Note:上述例子由于涉及 ASOC,故后面的章节中会讲解到。
- 当一个 PCM 子流被打开时,会为该 substeam 分配一个 runtime 实例(即 substream->runtime),runtime 包含各种各样的信息:hw_params & sw_params 配置的拷贝、缓冲区指针、mmap 记录、自旋锁等,几乎 PCM 的所有控制信息均能从中取得,定义如下:
struct snd_pcm_runtime {
	/* -- Status -- */
	struct snd_pcm_substream *trigger_master;
	struct timespec trigger_tstamp;	/* trigger timestamp */
	bool trigger_tstamp_latched;     /* trigger timestamp latched in low-level driver/hardware */
	int overrange;
	snd_pcm_uframes_t avail_max;
	snd_pcm_uframes_t hw_ptr_base;	/* Position at buffer restart */
	snd_pcm_uframes_t hw_ptr_interrupt; /* Position at interrupt time */
	unsigned long hw_ptr_jiffies;	/* Time when hw_ptr is updated */
	unsigned long hw_ptr_buffer_jiffies; /* buffer time in jiffies */
	snd_pcm_sframes_t delay;	/* extra delay; typically FIFO size */
	u64 hw_ptr_wrap;                /* offset for hw_ptr due to boundary wrap-around */

	/* -- HW params -- */
	snd_pcm_access_t access;	/* access mode */
	snd_pcm_format_t format;	/* SNDRV_PCM_FORMAT_* */
	snd_pcm_subformat_t subformat;	/* subformat */
	unsigned int rate;		/* rate in Hz */
	unsigned int channels;		/* channels */
	snd_pcm_uframes_t period_size;	/* period size */
	unsigned int periods;		/* periods */
	snd_pcm_uframes_t buffer_size;	/* buffer size */
	snd_pcm_uframes_t min_align;	/* Min alignment for the format */
	size_t byte_align;
	unsigned int frame_bits;
	unsigned int sample_bits;
	unsigned int info;
	unsigned int rate_num;
	unsigned int rate_den;
	unsigned int no_period_wakeup: 1;

	/* -- SW params -- */
	int tstamp_mode;		/* mmap timestamp is updated */
  	unsigned int period_step;
	snd_pcm_uframes_t start_threshold;
	snd_pcm_uframes_t stop_threshold;
	snd_pcm_uframes_t silence_threshold; /* Silence filling happens when
						noise is nearest than this */
	snd_pcm_uframes_t silence_size;	/* Silence filling size */
	snd_pcm_uframes_t boundary;	/* pointers wrap point */

	snd_pcm_uframes_t silence_start; /* starting pointer to silence area */
	snd_pcm_uframes_t silence_filled; /* size filled with silence */

	union snd_pcm_sync_id sync;	/* hardware synchronization ID */

	/* -- mmap -- */
	struct snd_pcm_mmap_status *status;
	struct snd_pcm_mmap_control *control;

	/* -- locking / scheduling -- */
	snd_pcm_uframes_t twake; 	/* do transfer (!poll) wakeup if non-zero */
	wait_queue_head_t sleep;	/* poll sleep */
	wait_queue_head_t tsleep;	/* transfer sleep */
	struct fasync_struct *fasync;

	/* -- private section -- */
	void *private_data;
	void (*private_free)(struct snd_pcm_runtime *runtime);

	/* -- hardware description -- */
	struct snd_pcm_hardware hw;
	struct snd_pcm_hw_constraints hw_constraints;

	/* -- timer -- */
	unsigned int timer_resolution;	/* timer resolution */
	int tstamp_type;		/* timestamp type */

	/* -- DMA -- */
	unsigned char *dma_area;	/* DMA area */
	dma_addr_t dma_addr;		/* physical bus address (not accessible from main CPU) */
	size_t dma_bytes;		/* size of DMA area */

	struct snd_dma_buffer *dma_buffer_p;	/* allocated buffer */

	/* -- audio timestamp config -- */
	struct snd_pcm_audio_tstamp_config audio_tstamp_config;
	struct snd_pcm_audio_tstamp_report audio_tstamp_report;
	struct timespec driver_tstamp;

#if IS_ENABLED(CONFIG_SND_PCM_OSS)
	/* -- OSS things -- */
	struct snd_pcm_oss_runtime oss;
#endif
};
snd_pcm_runtime 中的大多数记录对被声卡驱动操作集中的函数是只读的,仅仅 PCM 中间层可更新或修改这些信息,但是硬件描述、中断回调函数、DMA 缓冲区信息和私有数据是例外的。
下面解释 snd_pcm_runtime 结构体中的几个重要成员:
(1)Hw Params
包含了基本硬件配置的定义,需要在 ops->open() 函数中赋值。runtime 实例保存的是硬件描述的拷贝而非指针,这意味着在 open()函数中可以修改被拷贝的硬件描述(runtime->hw)。
struct snd_pcm_hardware {
	unsigned int info;		/* SNDRV_PCM_INFO_* */
	u64 formats;			/* SNDRV_PCM_FMTBIT_* */
	unsigned int rates;		/* SNDRV_PCM_RATE_* */
	unsigned int rate_min;		/* min rate */
	unsigned int rate_max;		/* max rate */
	unsigned int channels_min;	/* min channels */
	unsigned int channels_max;	/* max channels */
	size_t buffer_bytes_max;	/* max buffer size */
	size_t period_bytes_min;	/* min period size */
	size_t period_bytes_max;	/* max period size */
	unsigned int periods_min;	/* min # of periods */
	unsigned int periods_max;	/* max # of periods */
	size_t fifo_size;		/* fifo size in bytes */
};
buffer_bytes_max 定义最大的缓冲区大小,注意:没有 buffer_bytes_min 字段,这是因为它可以通过最小的周期大小和最小的周期数量计算出来;
period 信息定义了 PCM 中断产生的周期。更小的周期大小意味着
更多的中断,在录音时,周期大小定义了输入延迟,在播放时,整个缓冲区大小对应着输出延迟。
Note:对缓冲区和周期大小的配置以帧(frame)形式存储,而 frames_to_bytes()和 bytes_to_frames()可完成帧和字节的转换。
For pcm:
1 frame => format2bytes*channels;
1 sample => format2bytes.
dummy.c 定义如下:
static const struct snd_pcm_hardware dummy_pcm_hardware = {
	.info =			(SNDRV_PCM_INFO_MMAP |
				 SNDRV_PCM_INFO_INTERLEAVED |
				 SNDRV_PCM_INFO_RESUME |
				 SNDRV_PCM_INFO_MMAP_VALID),
	.formats =		USE_FORMATS,
	.rates =		USE_RATE,
	.rate_min =		USE_RATE_MIN,
	.rate_max =		USE_RATE_MAX,
	.channels_min =		USE_CHANNELS_MIN,
	.channels_max =		USE_CHANNELS_MAX,
	.buffer_bytes_max =	MAX_BUFFER_SIZE,
	.period_bytes_min =	MIN_PERIOD_SIZE,
	.period_bytes_max =	MAX_PERIOD_SIZE,
	.periods_min =		USE_PERIODS_MIN,
	.periods_max =		USE_PERIODS_MAX,
	.fifo_size =		0,
};
snd_pcm_ops 中的 open() 函数将被调用,在这个函数中,至少需要初始化 runtime->hw 字段,dummy 代码范例如下:
static int dummy_pcm_open(struct snd_pcm_substream *substream)
{
	// 通过 snd_pcm_substream_chip() 先获得 snd_card 私有函数
	struct snd_dummy *dummy = snd_pcm_substream_chip(substream);
	struct dummy_model *model = dummy->model;

	//获得 pcm runtime 指针
	struct snd_pcm_runtime *runtime = substream->runtime;
	...
	//初始化 runtime->hw
	runtime->hw = dummy->pcm_hw;
	...
	return 0;
}
上述代码中的 dummy->pcm_hw 是预先定义的硬件描述。
(2)DMA Buffer Info
包含 dma_area(逻辑地址)、 dma_addr(物理地址)、 dma_bytes(缓冲区大小)和 dma_private
(被 ALSA DMA 分配器使用)。可以由 snd_pcm_lib_malloc_pages() 实现, ALSA 中间层会设置 DMA
缓冲区信息的相关字段,这种情况下,驱动中不能再写这些信息,只能读取。也就是说,如果使用标准的缓冲区分配函数 snd_pcm_lib_malloc_pages() 分配缓冲区,则我们不需要自己维护 DMA 缓冲区信息。如果缓冲区由自己分配,则需要在 hw_params()函数中管理缓冲区信息,至少需管理 dma_bytes 和 dma_addr,如果支持 mmap,则必须管理 dma_area,对 dma_private 的管理视情况而定。
(3) 运行 Status
通过 runtime->status 可以获得运行状态,它是snd_pcm_mmap_status 结构体的指针,例如,通过 runtime->status->hw_ptr 可以获得目前的 DMA 硬件指针。此外,通过 runtime->control 可以获得 DMA 应用指针,它指向 snd_pcm_mmap_control 结构体指针,但是不建议直接访问该指针。
- 驱动中通常可以给 snd_pcm_ops 的 ioctl()成员函数传递通用的 snd_pcm_lib_ioctl()函数,如下:
/* .ioctl =	snd_pcm_lib_ioctl, */
int snd_pcm_lib_ioctl(struct snd_pcm_substream *substream,
		      unsigned int cmd, void *arg)
{
	switch (cmd) {
	case SNDRV_PCM_IOCTL1_RESET:
		return snd_pcm_lib_ioctl_reset(substream, arg);
	case SNDRV_PCM_IOCTL1_CHANNEL_INFO:
		return snd_pcm_lib_ioctl_channel_info(substream, arg);
	case SNDRV_PCM_IOCTL1_FIFO_SIZE:
		return snd_pcm_lib_ioctl_fifo_size(substream, arg);
	}
	return -ENXIO;
}
- 当一个 PCM 子流被打开时,snd_pcm_ops 的 hw_params() 成员函数将在应用程序设置硬件参数(PCM substream 的周期大小、缓冲区大小和格式等)的时候被调用。仅当 DMA 缓冲区已被预先分配(即被 call snd_pcm_lib_preallocate_pages_for_all())的情况下会去分配缓冲区(详细描述如上),如下:
static int dummy_pcm_hw_params(struct snd_pcm_substream *substream,
			       struct snd_pcm_hw_params *hw_params)
{
	if (fake_buffer) {
		/* runtime->dma_bytes has to be set manually to allow mmap */
		substream->runtime->dma_bytes = params_buffer_bytes(hw_params);
		return 0;
	}
	return snd_pcm_lib_malloc_pages(substream,
					params_buffer_bytes(hw_params));
}
- 当 PCM 子流被关闭时,close() 函数将会被调用。如果 open() 函数中分配了私有函数,则在 close() 函数中应该释放 substream 的私有函数,如下:
static int dummy_pcm_close(struct snd_pcm_substream *substream)
{
	get_dummy_ops(substream)->free(substream);
	return 0;
}
- ioctl() 函数传递通用的 snd_pcm_lib_ioctl() 函数。
- hw_params() 成员函数将在应用程序在设置硬件参数(PCM 子流的周期大小、缓冲区大小和格式等)的时候被调用。在这个函数中将完成大量硬件设置,甚至包括缓冲区分配,这时可调用如下辅助函数:
static int snd_xxx_hw_params(struct snd_pcm_substream *substream,struct snd_pcm_hw_params *hw_params); //仅当 DMA 缓冲区已被预先分配的情况下该函数被调用才可成立
dummy.c 函数实现如下:
static int dummy_pcm_hw_params(struct snd_pcm_substream *substream,
			       struct snd_pcm_hw_params *hw_params)
{
	if (fake_buffer) {
		/* runtime->dma_bytes has to be set manually to allow mmap */
		substream->runtime->dma_bytes = params_buffer_bytes(hw_params);
		return 0;
	}
	return snd_pcm_lib_malloc_pages(substream,
					params_buffer_bytes(hw_params));
}
- hw_free() 成员函数与 hw_params() 相对,它释放由 hw_params() 分配的资源,如下:
static int dummy_pcm_hw_free(struct snd_pcm_substream *substream)
{
	if (fake_buffer)
		return 0;
	return snd_pcm_lib_free_pages(substream);
}
- prepare() 成员函数当 PCM 被 “准备” 时被调用,在其中可设置采样率、格式等。prepare() 函数与 hw_params()函数的不同在于对 prepare()的调用发生在 snd_pcm_prepare()每次被调用的时
候。如下:
#define get_dummy_ops(substream) \
	(*(const struct dummy_timer_ops **)(substream)->runtime->private_data)

static int dummy_pcm_prepare(struct snd_pcm_substream *substream)
{
	return get_dummy_ops(substream)->prepare(substream);
}
- trigger() 成员函数在 PCM 被开始、停止或暂停时调用。在 trigger() 函数中至少要处理 SNDRV_PCM_TRIGGER_START 和 SNDRV_PCM_TRIGGER_STOP 命令,如果 PCM 支持暂停,还应处理 SNDRV_PCM_TRIGGER_PAUSE_PUSH 和 SNDRV_PCM_TRIGGER_PAUSE_RELEASE 命令等。【注意 trigger()函数是原子的,中途不能睡眠。】
static int dummy_pcm_trigger(struct snd_pcm_substream *substream, int cmd)
{
	switch (cmd) {
	case SNDRV_PCM_TRIGGER_START:
	case SNDRV_PCM_TRIGGER_RESUME:
		return get_dummy_ops(substream)->start(substream);
	case SNDRV_PCM_TRIGGER_STOP:
	case SNDRV_PCM_TRIGGER_SUSPEND:
		return get_dummy_ops(substream)->stop(substream);
	}
	return -EINVAL;
}
- pointer() 函数用于 PCM 中间层查询目前缓冲区的硬件位置,该函数以帧的形式返回 0~buffer_size – 1 的位置,此函数也是原子的。如下:
static snd_pcm_uframes_t dummy_pcm_pointer(struct snd_pcm_substream *substream)
{
	return get_dummy_ops(substream)->pointer(substream);
}
- copy() 和 silence() 函数一般可以省略,但是,当硬件缓冲区不处于常规内容中时需要。例如,一些设备有自己的不能被映射的硬件缓冲区,这种情况下,我们不得不将数据从内存缓冲区复制到硬件缓冲区。
3.2 PCM HW 初始化
如前面所述,一般在 snd_pcm_ops 中的 open() 成员函数中都需要初始化 pcm_hw,一般不同的 substream 对应的 pcm hw 都是不一样的,故一般在 open() 才会对 pcm hw init,而 dummy.c 则直接在 probe() 函数中做了,如下:
static int snd_dummy_probe(struct platform_device *devptr)
{
	...
	for (mdl = dummy_models; *mdl && model[dev]; mdl++) {
		if (strcmp(model[dev], (*mdl)->name) == 0) {
			printk(KERN_INFO
				"snd-dummy: Using model '%s' for card %i\n",
				(*mdl)->name, card->number);
			m = dummy->model = *mdl;
			break;
		}
	}
	...
	dummy->pcm_hw = dummy_pcm_hardware;
	if (m) {
		if (m->formats)
			dummy->pcm_hw.formats = m->formats;
		if (m->buffer_bytes_max)
			dummy->pcm_hw.buffer_bytes_max = m->buffer_bytes_max;
		if (m->period_bytes_min)
			dummy->pcm_hw.period_bytes_min = m->period_bytes_min;
		if (m->period_bytes_max)
			dummy->pcm_hw.period_bytes_max = m->period_bytes_max;
		if (m->periods_min)
			dummy->pcm_hw.periods_min = m->periods_min;
		if (m->periods_max)
			dummy->pcm_hw.periods_max = m->periods_max;
		if (m->rates)
			dummy->pcm_hw.rates = m->rates;
		if (m->rate_min)
			dummy->pcm_hw.rate_min = m->rate_min;
		if (m->rate_max)
			dummy->pcm_hw.rate_max = m->rate_max;
		if (m->channels_min)
			dummy->pcm_hw.channels_min = m->channels_min;
		if (m->channels_max)
			dummy->pcm_hw.channels_max = m->channels_max;
	}
    ...
	return err;
}
4、Control 设备相关设定
每个声卡下都有一个 Control 设备,在前面中已经讲解,在创建 snd_card 的时候会自动创建 Control 设备。故此时则按照Linux ALSA 之二:ALSA 声卡与设备中创建 Control 设备的方式创建相应的 Control,如下:
4.1 定义 snd_kcontrol_new
创建一个新的 control 至少需要实现 snd_kcontrol_new 中的 info()、get() 和 put() 这 3个成员函数,dummy.c 实现如下:
/*
 * mixer interface
 */

#define DUMMY_VOLUME(xname, xindex, addr) \
{ .iface = SNDRV_CTL_ELEM_IFACE_MIXER, \
  .access = SNDRV_CTL_ELEM_ACCESS_READWRITE | SNDRV_CTL_ELEM_ACCESS_TLV_READ, \
  .name = xname, .index = xindex, \
  .info = snd_dummy_volume_info, \
  .get = snd_dummy_volume_get, .put = snd_dummy_volume_put, \
  .private_value = addr, \
  .tlv = { .p = db_scale_dummy } }

/* 获取该 control 的详细信息 */
static int snd_dummy_volume_info(struct snd_kcontrol *kcontrol,
				 struct snd_ctl_elem_info *uinfo)
{
	uinfo->type = SNDRV_CTL_ELEM_TYPE_INTEGER;
	uinfo->count = 2;
	uinfo->value.integer.min = -50;
	uinfo->value.integer.max = 100;
	return 0;
}

/* 得到 control 的目前值并返回用户空间 */
static int snd_dummy_volume_get(struct snd_kcontrol *kcontrol,
				struct snd_ctl_elem_value *ucontrol)
{
	struct snd_dummy *dummy = snd_kcontrol_chip(kcontrol);
	int addr = kcontrol->private_value;

	spin_lock_irq(&dummy->mixer_lock);
	ucontrol->value.integer.value[0] = dummy->mixer_volume[addr][0];
	ucontrol->value.integer.value[1] = dummy->mixer_volume[addr][1];
	spin_unlock_irq(&dummy->mixer_lock);
	return 0;
}

/* 从用户空间写入值, 如果值被改变则返回1, 否则返回0 */
static int snd_dummy_volume_put(struct snd_kcontrol *kcontrol,
				struct snd_ctl_elem_value *ucontrol)
{
	struct snd_dummy *dummy = snd_kcontrol_chip(kcontrol);
	int change, addr = kcontrol->private_value;
	int left, right;

	left = ucontrol->value.integer.value[0];
	if (left < -50)
		left = -50;
	if (left > 100)
		left = 100;
	right = ucontrol->value.integer.value[1];
	if (right < -50)
		right = -50;
	if (right > 100)
		right = 100;
	spin_lock_irq(&dummy->mixer_lock);
	change = dummy->mixer_volume[addr][0] != left ||
	         dummy->mixer_volume[addr][1] != right;
	dummy->mixer_volume[addr][0] = left;
	dummy->mixer_volume[addr][1] = right;
	spin_unlock_irq(&dummy->mixer_lock);
	return change;
}

static const DECLARE_TLV_DB_SCALE(db_scale_dummy, -4500, 30, 0);

static struct snd_kcontrol_new snd_dummy_controls[] = {
DUMMY_VOLUME("Master Volume", 0, MIXER_ADDR_MASTER),
...
};
4.2 构造 control
当所有事情准备好后,我们需要创建一个 control,调用 snd_ctl_add() 和 snd_ctl_new() 这两个函数来完成,dummy.c 实现如下:
static int snd_card_dummy_new_mixer(struct snd_dummy *dummy)
{
	struct snd_card *card = dummy->card;
	struct snd_kcontrol *kcontrol;
	unsigned int idx;
	int err;

	spin_lock_init(&dummy->mixer_lock);
	strcpy(card->mixername, "Dummy Mixer");
	dummy->iobox = 1;

	for (idx = 0; idx < ARRAY_SIZE(snd_dummy_controls); idx++) {
		/* 创建 snd_kcontrol 并返回指针 */
		kcontrol = snd_ctl_new1(&snd_dummy_controls[idx], dummy);
		/* 将创建的 snd_kcontrol 添加到对应的 card 中 */
		err = snd_ctl_add(card, kcontrol);
		if (err < 0)
			return err;
		if (!strcmp(kcontrol->id.name, "CD Volume"))
			dummy->cd_volume_ctl = kcontrol;
		else if (!strcmp(kcontrol->id.name, "CD Capture Switch"))
			dummy->cd_switch_ctl = kcontrol;

	}
	return 0;
}

static int snd_dummy_probe(struct platform_device *devptr)
{
	...
	err = snd_card_dummy_new_mixer(dummy);
	...
	return err;
}
5、填充 card 重要参数 & 注册 card
在创建好所有该 card 下的 device 最后需要调用 snd_card_register() 注册声卡,dummy.c 示例代码如下:
static int snd_dummy_probe(struct platform_device *devptr)
{
	...
	/* 填充 card driver, shortname, longname 等重要参数 */
	strcpy(card->driver, "Dummy");
	strcpy(card->shortname, "Dummy");
	sprintf(card->longname, "Dummy %i", dev + 1);

	dummy_proc_init(dummy);

	/* 注册声卡 */
	err = snd_card_register(card);
	if (err == 0) {
		platform_set_drvdata(devptr, card);
		return 0;
	}
      __nodev:
	snd_card_free(card);
	return err;
}
三、示例来源
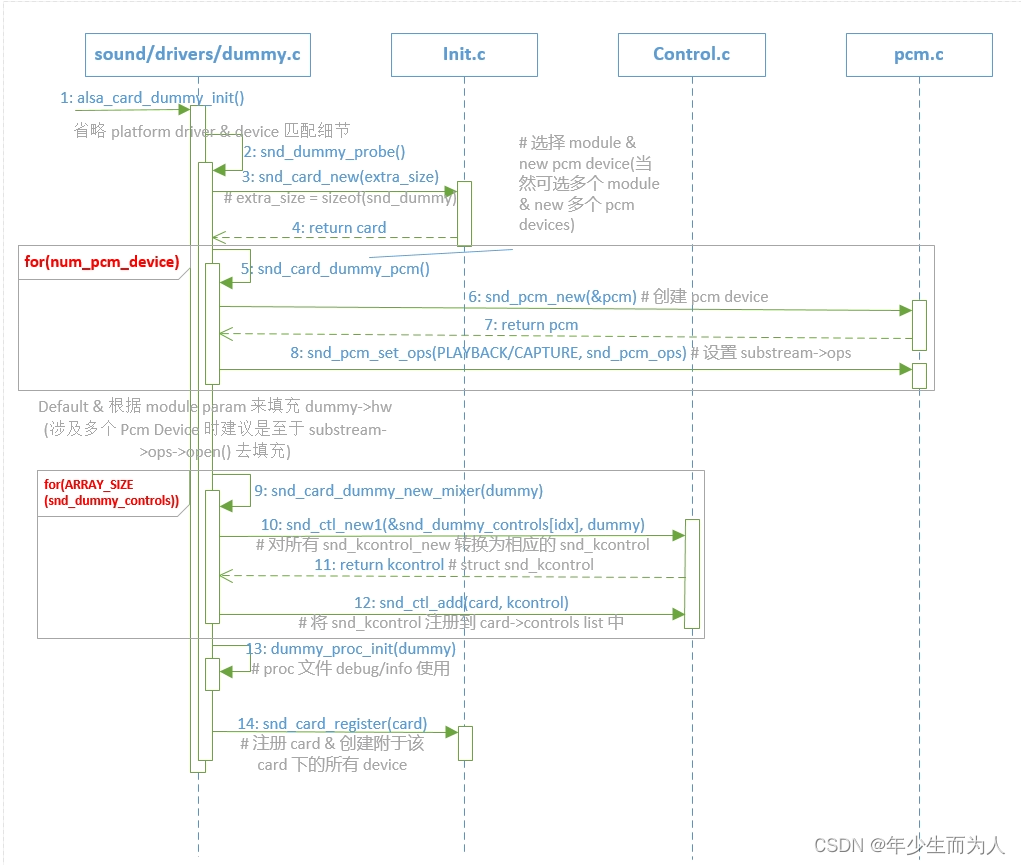
其中上文中描述的例子来源:kernel/sound/drivers/dummy.c
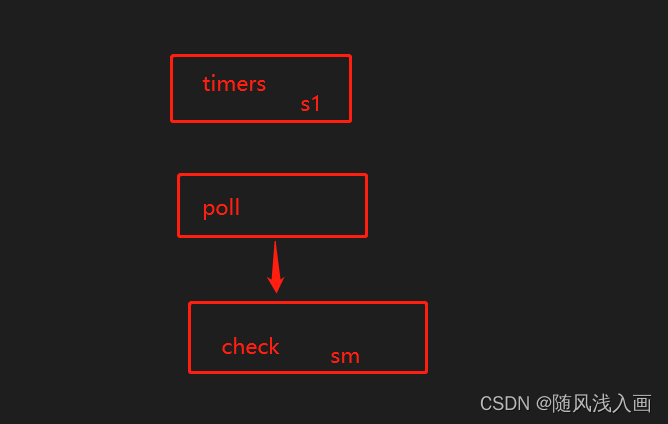
关于 dummy.c 简单的 ALSA Driver 实现,我大致画了一个时序图,如下: